FR EN

Advanced services

Estimated reading: 47 minutes

Introduction

Enhanced services are ranked by priority (indicated by the numbers 01, 02 …). For example, due to the similarity of the “Forward” and “Ring at the same time” services, if both are enabled, the “Forward” service will be executed due to its higher priority.
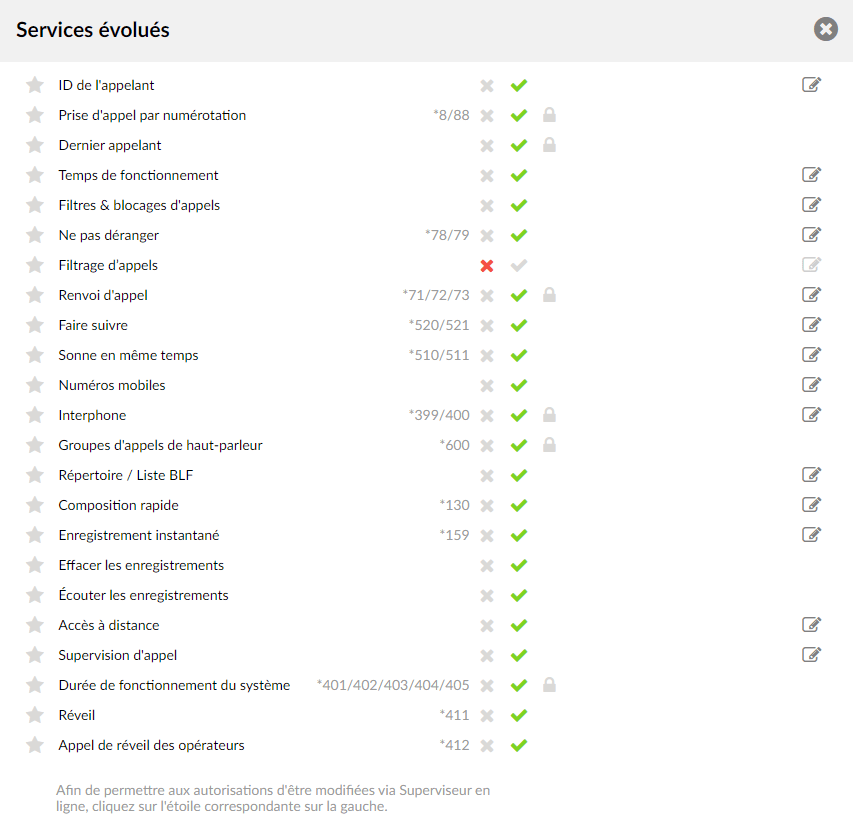
Each enhanced service has two or three positions:

Disabled

Enabled

PIN Required

To enable a specific service, press the selection button next to the icon available for that particular service and click save. If the service requires additional settings, the edit button located next to it will appear after saving.

By adding an enhanced service to the OSC, an “Enhanced services” tab will appear with only the list of enhanced services whose star has been selected by the administrator.

To learn more about the online supervisor, see the End user guide

Caller ID
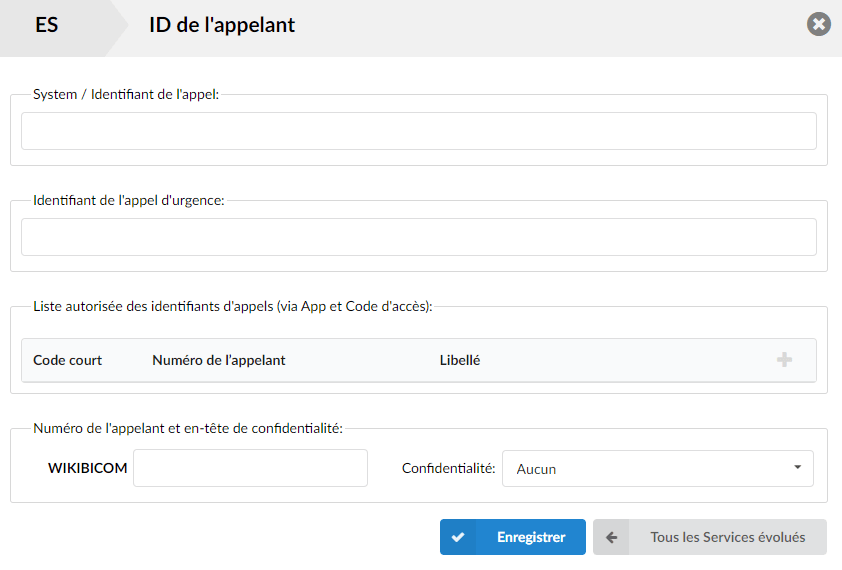
This service allows you to customize the caller ID that will be displayed on the UAD/Phone of the called party. Any information provided here will override the default caller ID (extension number and username).

  • System / Caller ID

The information entered in this field will override the default caller ID information at the system/network level.
(For example, if "Mark 225" is entered in this field and you call extension 108, on the screen of phone 108, 'Mark 225' will be displayed as the caller ID.

  • Emergency call ID

The caller ID entered here will be used only for calls to emergency service numbers as defined on your system.

  • Allowed caller ID list

You can add, with the “+”, a list of caller numbers that you want to allow to be used for outgoing calls. This option can be used from Communicator Desktop by simply selecting the caller number in the Communicator list.

On a desk phone, you can still use this option by entering:
*65*[Caller ID from the list]*[Number you wish to dial].

For example, you have added the CallerID 0610203040 in your list and you want to use it to dial the number 0990807060 :

Then dial *65*0610203040*0990807060

  • Short code

Furthermore, for each Caller ID added, you can specify a short code so that you do not have to write the entire phone number each time you dial, using the “Short code” field.

To dial a number with a short code, the pattern is *65dxxxxxx:
1. *65 is the access code
2. d is the 1-digit short code configured on the extension
3. xxxxxx is the destination to dial

In this case, if your outbound number is 0610203040 and I associate the short code with it 5, in order to call 0990807060 with this number, you will need to dial *6550990807060

  • Caller number and privacy header
For each trunk available on the system, a field will be created in this section, in which you can define a custom caller ID that will be used when making a call on that specific trunk.
  • Privacy

Which anonymity to use when configuring the caller ID on a trunk. If the selected option contains a privacy ID, this field will be added to the SIP header.

  • Anonymous – adds “anonymous <anonymous>” in the trunk's caller ID field, meaning the caller's name and number will be hidden when dialing from this trunk.
  • Anonymous with privacy ID – Same as the previous one, but adds the privacy ID to the SIP header.
  • Anonymous with number – Sets the caller ID to “anonymous” but allows the number to be shown.
  • Anonymous with number and privacy ID – Same as the previous one but adds the privacy ID to the SIP header.

Directed call pickup

This service allows the user to pick up calls ringing in the same call group. Dial ‘*8’ to pick up a call from the same call group, or *88 + %EXTENSION (for example *88100) to pick up calls from different call groups.

Example scenario:

Extension 100:

  • Call group: 1
  • Pickup group: 3 & 4

Extension 200:

  • Call group: 2
  • Pickup group: 1

If 100 rings, 200 can pick up the call by dialing ‘*8’.
If 200 rings, 100 cannot pick up the ringing call because 200’s call group = 2, and A can only pick up call groups 3 and 4).

Last caller 

This service lets you hear the extension number of the last caller and dial that number. Dial '*149' to hear the extension number, then press '1' to call it.

Schedules

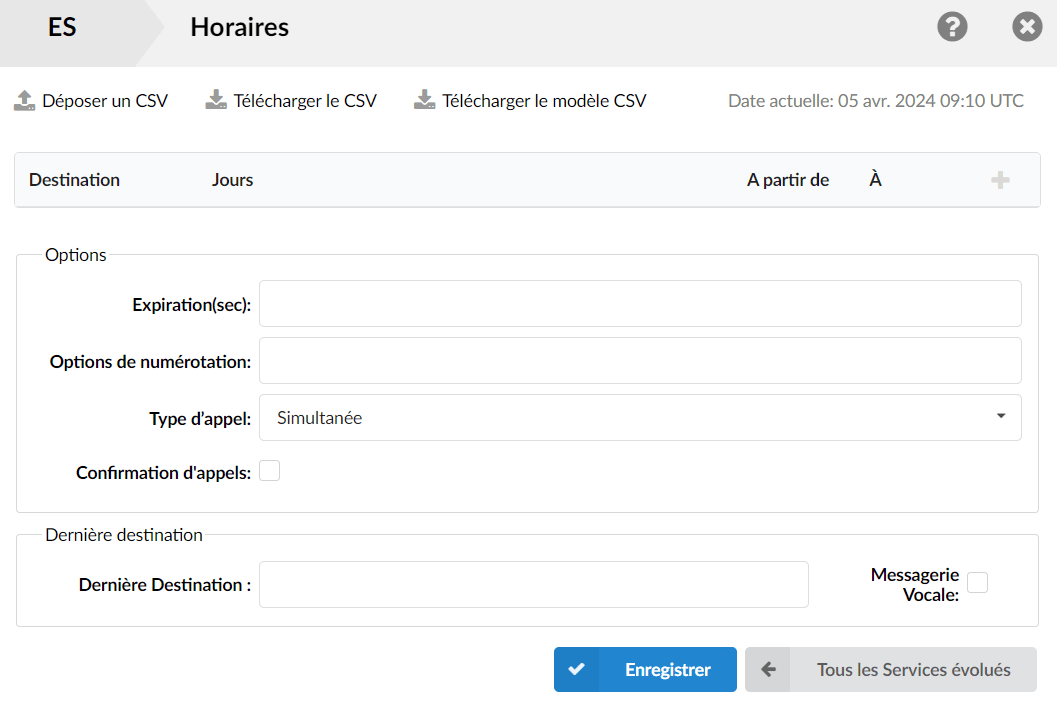
Gives users the ability to set up call redirections under the extension based on operating-time rules. Here, you can set the destination to which the call should be redirected as well as the time and days on which you want to redirect it.

  • Drop CSV

Imports operation time settings from a csv file

  • Download CSV

Downloads the operation times settings in a csv file

  • Download csv template

Downloads the csv file with the template headers for the operation times settings.

  • Destination

Destination to which all calls are redirected for a defined time.

  • Days

Days on which the schedules will be applied.

  • Starting from

Exact time from which the schedules will be applied.

  • Up to
Exact time at which the scheduling rules will stop applying.
  • Expiration (sec)

Number of seconds the extension rings after which the call is considered unanswered.

  • Dialing options

Additional call options:

  • t – Allows the called user to transfer the call by pressing #.
  • T – Allows the calling user to transfer the call by pressing #.
    NOTE: The caller can use '#' to transfer local calls, but only if both extensions, or only the called extension, have 'T' as the 'inbound dialing' option. Please note that calls coming from the trunk do not perform a transfer on '#'.
  • r – Generates a ringing tone for the caller, transmitting no sound from the called channel(s) until answered. Use this option carefully and do not insert it by default in all your dial instructions, because you are removing call progress information for the user. You certainly do not want to use this option. Asterisk automatically generates ringing tones when it is appropriate to do so. With ‘r’, it moves to the next step and additionally generates ringing tones where it is probably not appropriate.
  • R – Indicates a ringing tone to the caller when the called party indicates that it is ringing, but transmits no sound until it answers. This is only available if you use kapejod's bristuff.
  • m – Provide music on hold to the caller until the called channel answers. This is mutually exclusive with the ‘r’ option, obviously. Use m(class) to specify a class for the music on hold.
  • o – Restore the caller identification behavior of Asterisk v1.0 (send the original caller identification) in Asterisk v1.2 (default: send the number of this extension).
  • j – Asterisk 1.2 and later: Jump to priority n+101 if all requested channels are busy (like the behavior in Asterisk 1.0.x)
    M (x) – Runs the macro (x) when connecting the call (i.e., when the called party answers).
  • h – Allows the called party to hang up by dialing *.
  • H – Allows the caller to hang up by dialing *.
  • C – Resets the CDR (Call Detail Record) for this call. This is the same as using the NoCDR command
  • P (x) – Use the privacy manager, using x as the database (x is optional).
  • g – When the called party hangs up, exit to execute other commands in the current context.
  • G(context^exten^pri) – If the call is answered, transfer both parties to the specified priority; however, it appears that the calling party is transferred to priority x, and the called party to priority x+1.
  • A (x) – Play an announcement (x.gsm) to the called party.
  • S (n) – Hangs up the call n seconds AFTER the called party has picked up.
  • d : – This flag takes precedence over the ‘H’ flag and intercepts any dtmf while waiting for the call to be answered and returns that value on the spot. This allows you to dial a 1-digit outbound extension while waiting for the call to be answered – see also RetryDial.
  • D(digits) – After the called party answers, send the digits as a DTMF stream, then connect the call to the original channel.
  • L – Limits the call to ‘x’ ms, with a warning when ‘y’ ms remain, repeated every ‘z’ ms) Only ‘x’ is required, ‘y’ and ‘z’ are optional. The following special variables are optional for limited calls: (pasted from app_dial.c)
    • + LIMIT_PLAYAUDIO_CALLER – yes|no (default yes) – Plays sounds to the caller.
    • + LIMIT_PLAYAUDIO_CALLEE – yes|no – Plays sounds to the called party.
    • + LIMIT_TIMEOUT_FILE – File to play when time has run out.
    • + LIMIT_CONNECT_FILE – File to play when the call begins.
    • + LIMIT_WARNING_FILE – File to play as a warning if ‘y’ is set. If LIMIT_WARNING_FILE is not set, the default behavior is to announce (‘You have [XX minutes] YY seconds’).
  • f – forces the caller ID to be set as the extension of the line that makes/redirects the outbound call. For example, some PSTNs do not allow caller numbers other than those assigned to you.
  • w – Allows the called user to start recording after pressing *1 or what is defined in features.conf, requires Set(DYNAMIC_FEATURES=automon)
  • W – Allows the calling user to start recording after pressing *1 or whatever is defined in features.conf, requires Set(DYNAMIC_FEATURES=automon)
NOTE  The dialing options can link to each other.
(For example: t + r = tr)

  • Call type

Sets whether all destinations will ring at the same time or one by one.

    • Simultaneous – All destinations ring at the same time.
    • Sequential – The destinations ring one by one; after the timeout, the call moves to the next destination.
  • Call confirmation

By enabling this option, you can ensure that the call is answered by a person and not by a voicemail box.

(For example, when the person picks up, they must press the 1 key (or another key) to answer the call. If this key is not pressed, the phone will keep ringing because it will be considered unanswered).

  • Last destination

This is the last destination that is called if all the others in the "Destination" list do not answer. The last destination can also be a voicemail if you check the "Voicemail" option.

For example: if this field is set to 103 and none of the extensions answer, extension 103 will be dialed.

  • Voicemail

By checking this option, the voicemail will be set as the last destination.

Call filters & blocking

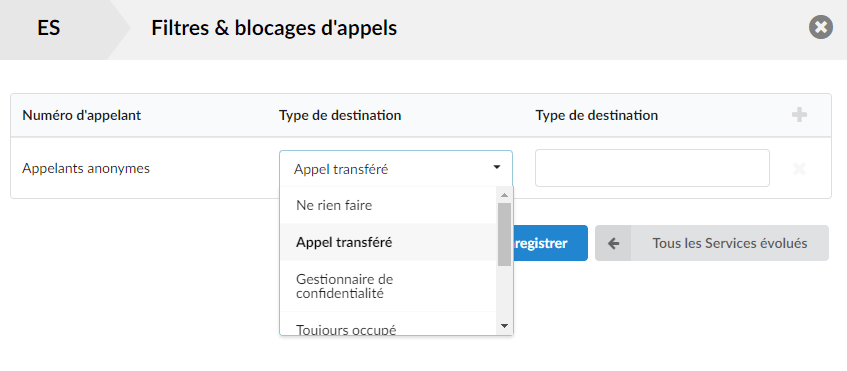
This service filters and blocks all incoming calls based on a set of rules. For example, calls can be filtered according to whether they are anonymous or whether they belong to a specific caller or telemarketer.

  • Caller number

Here you define the number that will be blocked/filtered. You can set this for an anonymous caller or add a number by clicking on ” + “.

  • Destination type

Type of destination to which the call with the caller's number will be directed. If the chosen type is "Always busy", once the extension defined in the caller's number dials the number, the busy signal will be heard.

  • Destination type

This is where you enter the destination to which you want to direct calls if an appropriate type is chosen.

When a call comes in, it is handled in a way defined by the Destination Type selection box, depending on whether it is anonymous callers or specific extensions.

  • Drop-down menu options for anonymous callers:
    • Call forwarding

The incoming call is transferred to a given number in the Destination field.

    • Privacy manager

To reach you, the anonymous caller must configure their CallerID.

    • Always busy

You are always busy for anonymous callers.

    • Voicemail

The anonymous caller is transferred to the voicemail of a given extension.

    • Out of service

The called number is “Out of service”.

    • Ringtone

With this option, it is possible to set a custom ringtone for anonymous (or known) callers.

  • For specific extensions:
    • Call forwarding number

The incoming call is transferred to a given number in the Destination field.

    • No answer

The incoming call is not answered.

    • Busy

You are busy for incoming calls on this extension.

    • Voicemail

The anonymous caller is transferred to the voicemail of a given extension.

    • Out of service

The called number is “Out of service”.

    • Ringtone

With this option, it is possible to set a custom ringtone for this caller.

Do Not Disturb

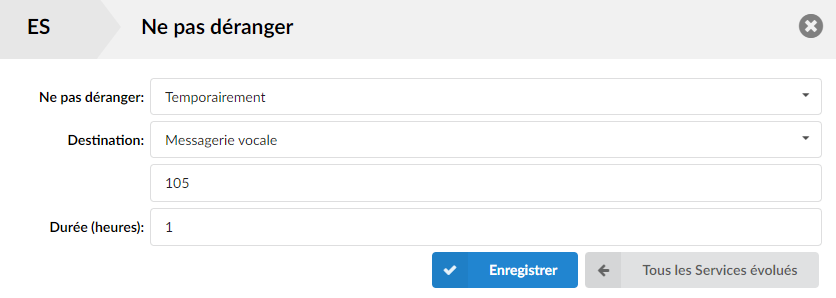
This service temporarily redirects all incoming calls to a destination number or a voicemail box.

  • Do Not Disturb

Enable the DND service.
(Inactive/Temporary/Permanent).

  • Destination

Destination to dial once DND is enabled.
(For example, if the Voicemail option is selected, type in the field below the extension number to which the voicemail call will be sent. If call forwarding is selected, type the extension number that will be dialed).

  • Duration (hours)

If you choose to enable temporary DND, you can set here how many hours the DND service will be active.
(For example, set '1' to activate the service for one hour).

Call filtering

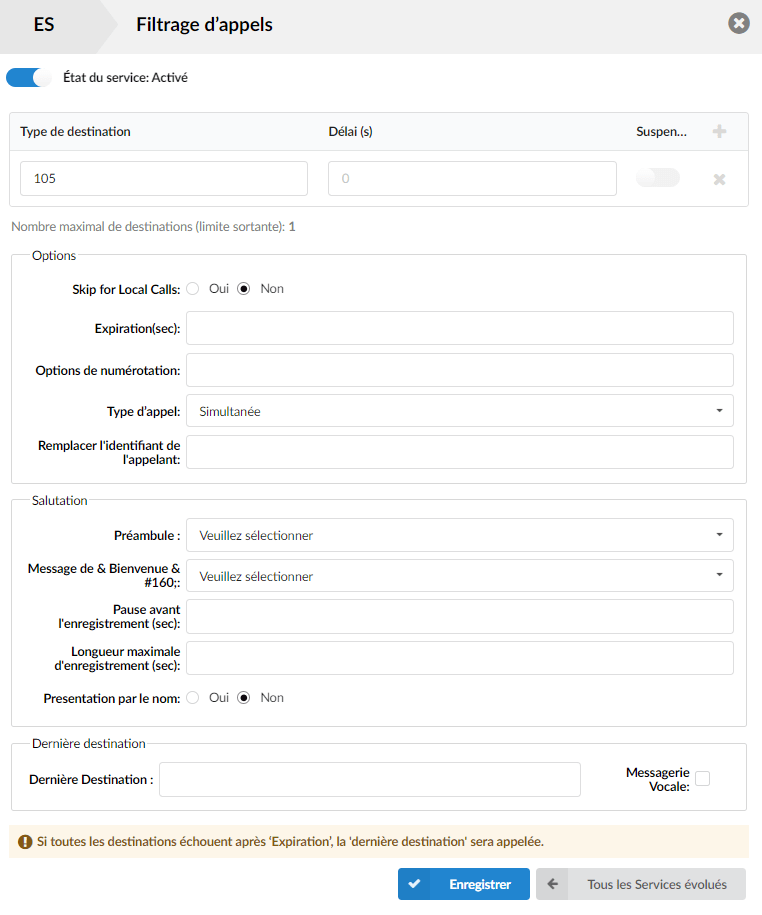
This option provides call filtering for an extension in the following way:

  • Add one or more destinations to the call filtering list.
  • When a person calls this extension, they will be offered a choice:
      1. State your name and wait while the call is placed to one of the destinations on the call screen.
      2. Leave a voicemail at the called extension.
  • If a caller presses 1, they will say their name and the destinations defined in call screening will ring at the same time for the duration set in "Timeout". If no one answers the call, the original caller will receive the voicemail of the called extension.
  • If any destination answers the call, the following options will be presented to it:
      • If you press 1, the caller will be connected to the destination.
      • If you press 2, the caller will be able to leave a message on the voicemail of the called extension.
      • If you press 3, you will be able to send a call to another number.
      • If you press 4, you will record a short message explaining why you are not available (for example), and this message will be played to the caller, who can then leave a voicemail in turn.
  • Destination type
    Number(s) that call screening will call.
    (e.g. 1008)

  • Delay (s)
    Number of seconds before the destination starts ringing.
    (e.g. 5)

  • Suspend
    If you do not want to delete the destination from the call screening list, you can suspend it using this option.

  • Skip for local calls

This option enables or disables local call filtering.

If the option is set to “No”, call screening will be enabled for local calls and the caller will hear the message to connect the call (1) or to leave a message (2).

If the option is set to “Yes”, call screening will be skipped and the caller will be directly connected to the extension.

Options

    • Expiration (sec)

Number of seconds the destination(s) will ring.

    • Dialing options

Additional call options

  • t – Allows the called user to transfer the call by pressing #.
  • T – Allows the calling user to transfer the call by pressing #.
    NOTE: The caller can use '#' to transfer local calls, but only if both extensions, or only the called extension, have 'T' as the 'inbound dialing' option. Please note that calls coming from the trunk do not perform a transfer on '#'.
  • r – Generates a ringing tone for the caller, transmitting no sound from the called channel(s) until answered. Use this option carefully and do not insert it by default in all your dial instructions, because you are removing call progress information for the user. You certainly do not want to use this option. Asterisk automatically generates ringing tones when it is appropriate to do so. With ‘r’, it moves to the next step and additionally generates ringing tones where it is probably not appropriate.
  • R – Indicates a ringing tone to the caller when the called party indicates that it is ringing, but transmits no sound until it answers. This is only available if you use kapejod's bristuff.
  • m – Provide music on hold to the caller until the called channel answers. This is mutually exclusive with the ‘r’ option, obviously. Use m(class) to specify a class for the music on hold.
  • o – Restore the caller identification behavior of Asterisk v1.0 (send the original caller identification) in Asterisk v1.2 (default: send the number of this extension).
  • j – Asterisk 1.2 and later: Jump to priority n+101 if all requested channels are busy (like the behavior in Asterisk 1.0.x)
    M (x) – Runs the macro (x) when connecting the call (i.e., when the called party answers).
  • h – Allows the called party to hang up by dialing *.
  • H – Allows the caller to hang up by dialing *.
  • C – Resets the CDR (Call Detail Record) for this call. This is the same as using the NoCDR command
  • P (x) – Use the privacy manager, using x as the database (x is optional).
  • g – When the called party hangs up, exit to execute other commands in the current context.
  • G(context^exten^pri) – If the call is answered, transfer both parties to the specified priority; however, it appears that the calling party is transferred to priority x, and the called party to priority x+1.
  • A (x) – Play an announcement (x.gsm) to the called party.
  • S (n) – Hangs up the call n seconds AFTER the called party has picked up.
  • d : – This flag takes precedence over the ‘H’ flag and intercepts any dtmf while waiting for the call to be answered and returns that value on the spot. This allows you to dial a 1-digit outbound extension while waiting for the call to be answered – see also RetryDial.
  • D(digits) – After the called party answers, send the digits as a DTMF stream, then connect the call to the original channel.
  • L – Limits the call to ‘x’ ms, with a warning when ‘y’ ms remain, repeated every ‘z’ ms) Only ‘x’ is required, ‘y’ and ‘z’ are optional. The following special variables are optional for limited calls: (pasted from app_dial.c)
    • + LIMIT_PLAYAUDIO_CALLER – yes|no (default yes) – Plays sounds to the caller.
    • + LIMIT_PLAYAUDIO_CALLEE – yes|no – Plays sounds to the called party.
    • + LIMIT_TIMEOUT_FILE – File to play when time has run out.
    • + LIMIT_CONNECT_FILE – File to play when the call begins.
    • + LIMIT_WARNING_FILE – File to play as a warning if ‘y’ is set. If LIMIT_WARNING_FILE is not set, the default behavior is to announce (‘You have [XX minutes] YY seconds’).
  • f – forces the caller ID to be set as the extension of the line that makes/redirects the outbound call. For example, some PSTNs do not allow caller numbers other than those assigned to you.
  • w – Allows the called user to start recording after pressing *1 or what is defined in features.conf, requires Set(DYNAMIC_FEATURES=automon)
  • W – Allows the calling user to start recording after pressing *1 or whatever is defined in features.conf, requires Set(DYNAMIC_FEATURES=automon)
NOTE  The dialing options can link to each other.
(For example: t + r = tr)

    • Call type

Simultaneous – All defined destinations ring at the same time.
Sequential – Each destination will ring one at a time; after the timeout, the call will move to the next destination.

    • Replace caller ID

Enter the caller number that will be used for call filtering.

Greeting

    • Preamble

The preamble plays a prerecorded message before the greeting, if it is selected from the drop-down list. The message file name must begin with “pivr-” in order to be displayed in the list.

    • Welcome message

Here you can select a custom greeting message for your call screening. The message file must begin with “pivr_” and must be uploaded to the sounds folder.

    • Pause before recording (sec)

Number of seconds to pause before playing the recorded caller name.

    • Maximum recording length (sec)

Maximum duration of the recording in seconds.

    • Presentation by name

If this option is set to yes, your name will be read out to the caller if it is recorded in the voicemail.

Last destination

    • Last destination

This is the last destination that is called if none of the others in the “Destination” list answer.

    • Voicemail

Sets whether the last destination is voicemail.

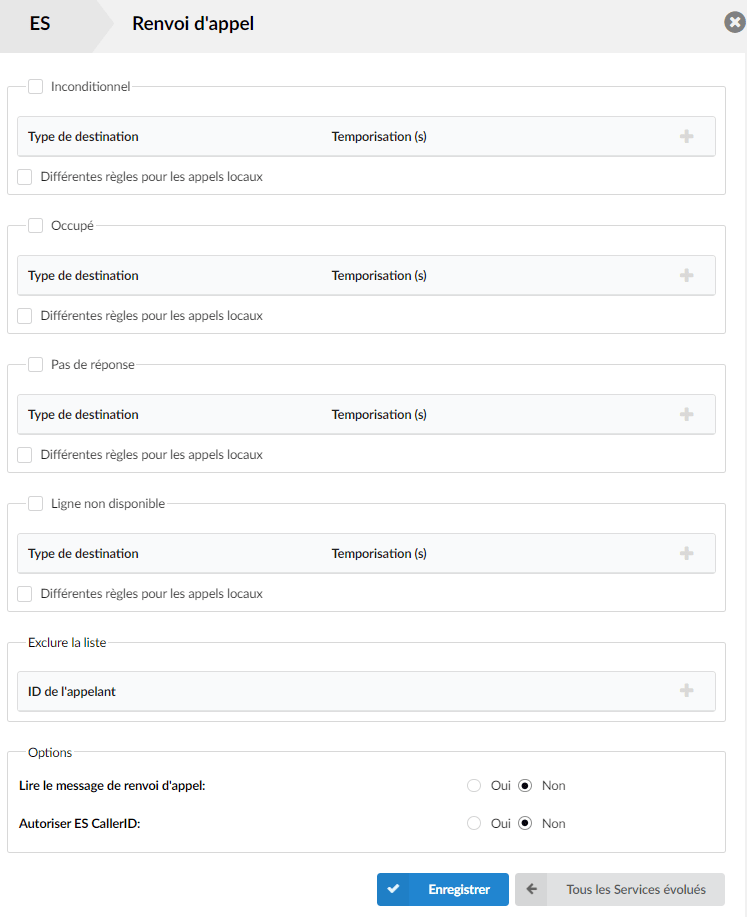
Call forwarding

This service transfers calls to other extensions depending on the extension's answer/status. 

If none of the destinations answer, the call is directed to the extension’s voicemail.

  • Unconditional

Forwards all inbound calls.
Calls can be transferred to other extension numbers (internal or external) and to local voicemail boxes, regardless of the caller. The current extension's voicemail is the default destination type.

  • Busy

Forwards all inbound calls if the extension is busy.
Calls can be transferred to other extension numbers (internal or external) and to local voicemail boxes if the line has reached the maximum incoming call limit. The current extension's voicemail is the default destination type.

  • No answer

Forwards all inbound calls if the extension does not answer the inbound call.
Calls can be transferred to other extension numbers (internal or external) and to local voicemail boxes if no one answers the call. The current extension's voicemail is the default destination type.

  • Line unavailable

Forwards all inbound calls if the line is unavailable.
If your line is cut off or if, for any reason, you cannot connect the UAD/Phone to the system, all calls that were supposed to reach you can be redirected to the extension number/voicemail defined here. The voicemail of the current extension is the default destination type.
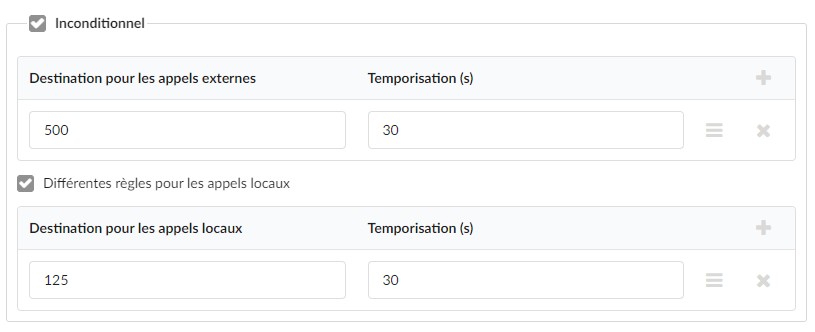
  • Destination for external calls

In this field, you must enter the destinations to which you want to forward external calls based on the status of your extension. You can enter multiple destinations for each status, but they must be separated by timeout seconds, which means that when the first extension in the list has not answered during the timeout period, the next one will ring, and so on

  • Destination for local calls

In this field, you must enter the destinations to which you want to forward internal calls based on the status of your extension. You can enter multiple destinations for each status, but they must be separated by timeout seconds, which means that when the first extension in the list has not answered during the timeout period, the next one will ring, and so on.

  • Timeout (s)
Ring duration in seconds. After this, the current destination will stop ringing.
  • Exclude list
Set up to 10 caller ID numbers that you wish to exclude from call forwarding, meaning these numbers will be able to reach you by bypassing the configured forwarding rules.
  • Play the call forwarding message
Notifies users that a forward is active.
If this option is set to “Yes”, the caller will hear a message “Please wait, your call is being transferred. You will not be charged for the call-forwarding portion“, informing the user that a transfer is in progress.
  • Allow ES CallerID

Allows the recipient of a call to see the call as if the current extension were making it.

If this option is set to “Yes”, the recipient will see the extension from which the call is forwarded, otherwise they will see the original caller.

For example:

I am the extension 105 and I set up a unconditional forwarding (therefore of all incoming calls) to the extension 108

If the 09 08 07 06 05 calls me and I have enabled the option Allow ES CallerID on Yes, my extension number 105 will appear on extension 108 during the call. 

Otherwise, the original caller ID, so 09 08 07 06 05 will appear on the phone of extension 108.

Forward
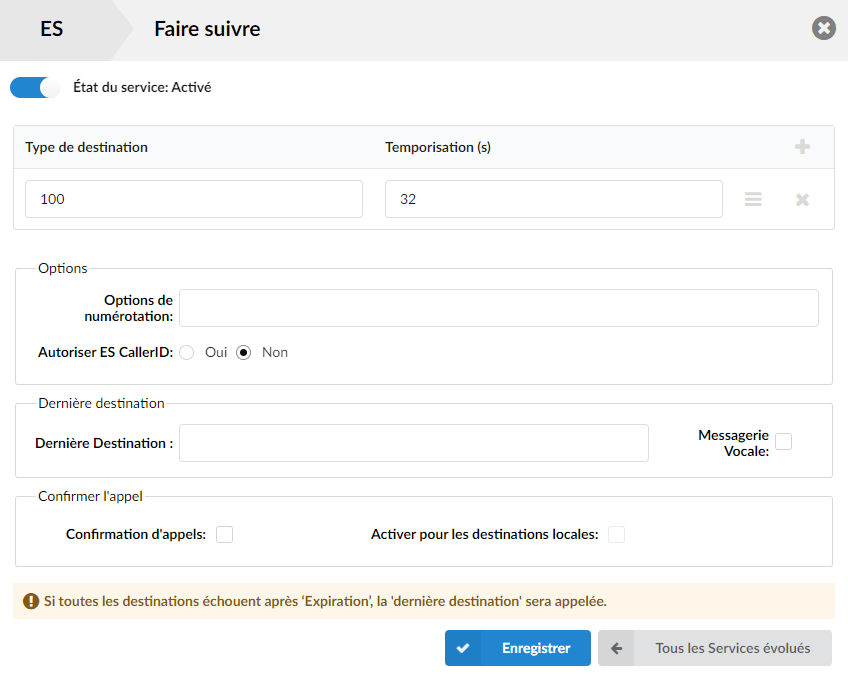
This service rings all the destinations provided in a sequence.
If the call is not answered by any of the provided extensions, it is transferred to the extension configured as Last destination which can be its voicemail if the option Voicemail is selected.

  • Service status: Enabled/Disabled

Enables or disables the service Forward

  • Destination type 

Local/business/mobile numbers to dial.

  • Timeout (s)

Ring duration in seconds. The time in seconds during which the destinations will ring. If the call is not answered during this period, it is forwarded to the next priority number.

  • Dialing options:

Additional call options.
(For example, this service can assign additional call properties, such as allowing the called party to transfer the call, etc.)

  • t – Allows the called user to transfer the call by pressing #.
  • T – Allows the calling user to transfer the call by pressing #.
    NOTE: The caller can use '#' to transfer local calls, but only if both extensions, or only the called extension, have 'T' as the 'inbound dialing' option. Please note that calls coming from the trunk do not perform a transfer on '#'.
  • r – Generates a ringing tone for the caller, transmitting no sound from the called channel(s) until answered. Use this option carefully and do not insert it by default in all your dial instructions, because you are removing call progress information for the user. You certainly do not want to use this option. Asterisk automatically generates ringing tones when it is appropriate to do so. With ‘r’, it moves to the next step and additionally generates ringing tones where it is probably not appropriate.
  • R – Indicates a ringing tone to the caller when the called party indicates that it is ringing, but transmits no sound until it answers. This is only available if you use kapejod's bristuff.
  • m – Provide music on hold to the caller until the called channel answers. This is mutually exclusive with the ‘r’ option, obviously. Use m(class) to specify a class for the music on hold.
  • o – Restore the caller identification behavior of Asterisk v1.0 (send the original caller identification) in Asterisk v1.2 (default: send the number of this extension).
  • j – Asterisk 1.2 and later: Jump to priority n+101 if all requested channels are busy (like the behavior in Asterisk 1.0.x)
    M (x) – Runs the macro (x) when connecting the call (i.e., when the called party answers).
  • h – Allows the called party to hang up by dialing *.
  • H – Allows the caller to hang up by dialing *.
  • C – Resets the CDR (Call Detail Record) for this call. This is the same as using the NoCDR command
  • P (x) – Use the privacy manager, using x as the database (x is optional).
  • g – When the called party hangs up, exit to execute other commands in the current context.
  • G(context^exten^pri) – If the call is answered, transfer both parties to the specified priority; however, it appears that the calling party is transferred to priority x, and the called party to priority x+1.
  • A (x) – Play an announcement (x.gsm) to the called party.
  • S (n) – Hangs up the call n seconds AFTER the called party has picked up.
  • d : – This flag takes precedence over the ‘H’ flag and intercepts any dtmf while waiting for the call to be answered and returns that value on the spot. This allows you to dial a 1-digit outbound extension while waiting for the call to be answered – see also RetryDial.
  • D(digits) – After the called party answers, send the digits as a DTMF stream, then connect the call to the original channel.
  • L – Limits the call to ‘x’ ms, with a warning when ‘y’ ms remain, repeated every ‘z’ ms) Only ‘x’ is required, ‘y’ and ‘z’ are optional. The following special variables are optional for limited calls: (pasted from app_dial.c)
    • + LIMIT_PLAYAUDIO_CALLER – yes|no (default yes) – Plays sounds to the caller.
    • + LIMIT_PLAYAUDIO_CALLEE – yes|no – Plays sounds to the called party.
    • + LIMIT_TIMEOUT_FILE – File to play when time has run out.
    • + LIMIT_CONNECT_FILE – File to play when the call begins.
    • + LIMIT_WARNING_FILE – File to play as a warning if ‘y’ is set. If LIMIT_WARNING_FILE is not set, the default behavior is to announce (‘You have [XX minutes] YY seconds’).
  • f – forces the caller ID to be set as the extension of the line that makes/redirects the outbound call. For example, some PSTNs do not allow caller numbers other than those assigned to you.
  • w – Allows the called user to start recording after pressing *1 or what is defined in features.conf, requires Set(DYNAMIC_FEATURES=automon)
  • W – Allows the calling user to start recording after pressing *1 or whatever is defined in features.conf, requires Set(DYNAMIC_FEATURES=automon)
NOTE  The dialing options can link to each other.
(For example: t + r = tr)
  • Allow ES CallerID

Set this option to "Yes” so that the caller sees the caller ID of the extension from which the call is transferred, or set it to “No” so that the caller sees the original caller ID.

  • Last destination

Destination that will be dialed if none of the “priority” destinations answer the call. If you check the “Voicemail“, the last destination will be voicemail.
(For example, if extension 1005 is defined here, this extension will be called if none of the destinations defined above answer the call).

  • Voicemail

Indicate whether the last destination is a voicemail or not.

  • Call confirmation

By enabling this option, you can ensure that the call is answered by a person, and not by a voicemail box.

For example, if the call is answered by a mobile phone, the person answering the call must press key 1 (or another key on the phone) to answer the phone. If this key is not pressed, all phones will continue to ring because the call is considered no answer.

  • Enable for local destinations

Allows call confirmation for local destinations.

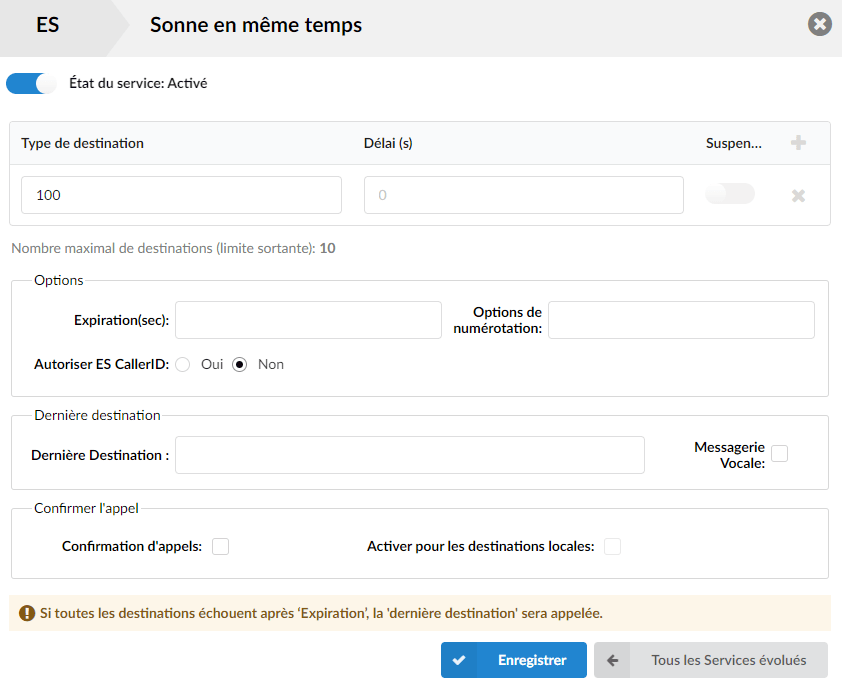
Rings at the same time

This service rings all the configured destinations at the same time. If the call is not answered by one of the specified extensions, it will be transferred to the extension configured as Last destination which can also be a voicemail box if the option Voicemail is selected.

When the called number picks up, the system asks whether the user wants to accept or reject the call. If the user accepts the call that someone else has already answered, the system plays a message informing the user of this situation.
  • Service status: Enabled/Disabled

Enables or disables the service Rings at the same time

  • Destination type

Local/business/mobile numbers to dial.

  • Delay (s)

Number of seconds before the destination starts ringing.

  • Suspend

Suspend the group destination.

  • Expiration (sec)

Ring duration in seconds. The time during which all destinations will ring.

  • Dialing options

Additional call options:

  • t – Allows the called user to transfer the call by pressing #.
  • T – Allows the calling user to transfer the call by pressing #.
    NOTE: The caller can use '#' to transfer local calls, but only if both extensions, or only the called extension, have 'T' as the 'inbound dialing' option. Please note that calls coming from the trunk do not perform a transfer on '#'.
  • r – Generates a ringing tone for the caller, transmitting no sound from the called channel(s) until answered. Use this option carefully and do not insert it by default in all your dial instructions, because you are removing call progress information for the user. You certainly do not want to use this option. Asterisk automatically generates ringing tones when it is appropriate to do so. With ‘r’, it moves to the next step and additionally generates ringing tones where it is probably not appropriate.
  • R – Indicates a ringing tone to the caller when the called party indicates that it is ringing, but transmits no sound until it answers. This is only available if you use kapejod's bristuff.
  • m – Provide music on hold to the caller until the called channel answers. This is mutually exclusive with the ‘r’ option, obviously. Use m(class) to specify a class for the music on hold.
  • o – Restore the caller identification behavior of Asterisk v1.0 (send the original caller identification) in Asterisk v1.2 (default: send the number of this extension).
  • j – Asterisk 1.2 and later: Jump to priority n+101 if all requested channels are busy (like the behavior in Asterisk 1.0.x)
    M (x) – Runs the macro (x) when connecting the call (i.e., when the called party answers).
  • h – Allows the called party to hang up by dialing *.
  • H – Allows the caller to hang up by dialing *.
  • C – Resets the CDR (Call Detail Record) for this call. This is the same as using the NoCDR command
  • P (x) – Use the privacy manager, using x as the database (x is optional).
  • g – When the called party hangs up, exit to execute other commands in the current context.
  • G(context^exten^pri) – If the call is answered, transfer both parties to the specified priority; however, it appears that the calling party is transferred to priority x, and the called party to priority x+1.
  • A (x) – Play an announcement (x.gsm) to the called party.
  • S (n) – Hangs up the call n seconds AFTER the called party has picked up.
  • d : – This flag takes precedence over the ‘H’ flag and intercepts any dtmf while waiting for the call to be answered and returns that value on the spot. This allows you to dial a 1-digit outbound extension while waiting for the call to be answered – see also RetryDial.
  • D(digits) – After the called party answers, send the digits as a DTMF stream, then connect the call to the original channel.
  • L – Limits the call to ‘x’ ms, with a warning when ‘y’ ms remain, repeated every ‘z’ ms) Only ‘x’ is required, ‘y’ and ‘z’ are optional. The following special variables are optional for limited calls: (pasted from app_dial.c)
    • + LIMIT_PLAYAUDIO_CALLER – yes|no (default yes) – Plays sounds to the caller.
    • + LIMIT_PLAYAUDIO_CALLEE – yes|no – Plays sounds to the called party.
    • + LIMIT_TIMEOUT_FILE – File to play when time has run out.
    • + LIMIT_CONNECT_FILE – File to play when the call begins.
    • + LIMIT_WARNING_FILE – File to play as a warning if ‘y’ is set. If LIMIT_WARNING_FILE is not set, the default behavior is to announce (‘You have [XX minutes] YY seconds’).
  • f – forces the caller ID to be set as the extension of the line that makes/redirects the outbound call. For example, some PSTNs do not allow caller numbers other than those assigned to you.
  • w – Allows the called user to start recording after pressing *1 or what is defined in features.conf, requires Set(DYNAMIC_FEATURES=automon)
  • W – Allows the calling user to start recording after pressing *1 or whatever is defined in features.conf, requires Set(DYNAMIC_FEATURES=automon)
NOTE  The dialing options can link to each other.
(For example: t + r = tr)
  • Allow ES CallerID

Set this option to "Yes” so that the caller sees the caller ID of the extension from which the call is transferred, or set it to “No” so that the caller sees the original caller ID.

  • Last destination

The last dialed destination if none of the “priority” numbers answer the call.
(For example, set this field to 103. If none of the priority extensions answer, extension 103 will be dialed).

  • Voicemail

Indicate whether the last destination is a voicemail or not.

  • Call confirmation

By enabling this option, you can ensure that the call is answered by a person, and not by a voicemail box. (For example, if the call is picked up by a mobile phone, the person answering the call must press the 1 key (or another key on the phone) to answer the phone. If this key is not pressed, all the phones will continue to ring because the call is considered unanswered).

  • Enable for local destinations

Allows call confirmation for local destinations.

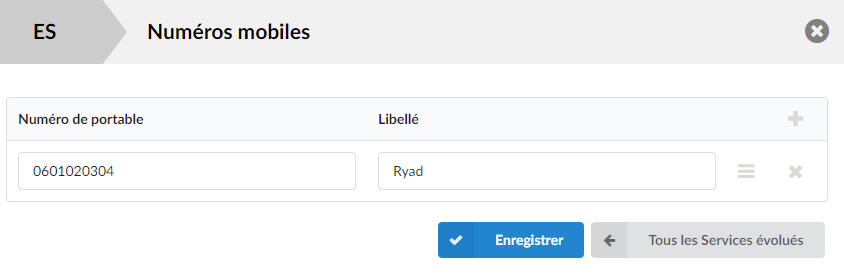
Mobile numbers


With this service, you can assign mobile phone numbers on which you want to receive calls when you are not at the office.

If you enable the service Mobile numbers and add a number to the list of mobile numbers, it will be displayed in Communicator as one of the destinations where you can be reached.

  • Mobile number

Add the desired mobile phone number to this field

  • Label

The name that will be given and displayed for this mobile phone number.

Speaker call
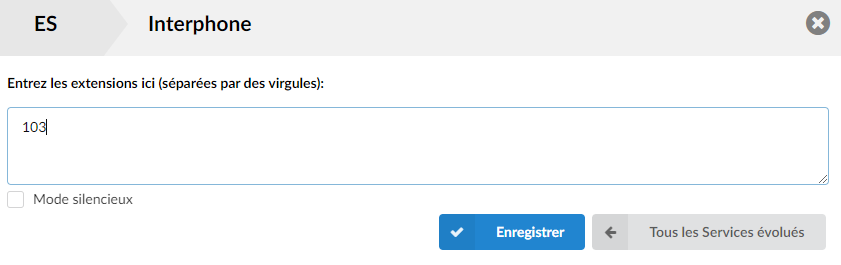

This service allows the message to be sent to several phones by dialing '*399', or to a single phone by dialing *400 ext.

  • Enter the extensions here (separated by commas)

Real-world examples:

Case 1

Set this field to 1000,1001,1002 for example.
Now dial *399. Extensions 1000,1001,1002 will be beeped.

If the UAD/Phone allows it, the call will automatically switch to speaker, otherwise it will simply ring).

Case 2

Set this field to 1000,1001,1002 for example.
Now dial *400 1001. Extension 1001 will be beeped.

If the UAD/Phone allows it, the call will automatically switch to speaker, otherwise it will simply ring).

  • Silent mode

Does not play a beep to the caller. Under normal circumstances, you should not use this option. However, if you have a speaker or another device that emits its own tone, you may want to set it.

Grouped speaker call

The service Speaker call group allows a specific extension to call multiple extensions by dialing *600.

Dial *600 + extension number of the paging group’ to call all extensions assigned to this group.

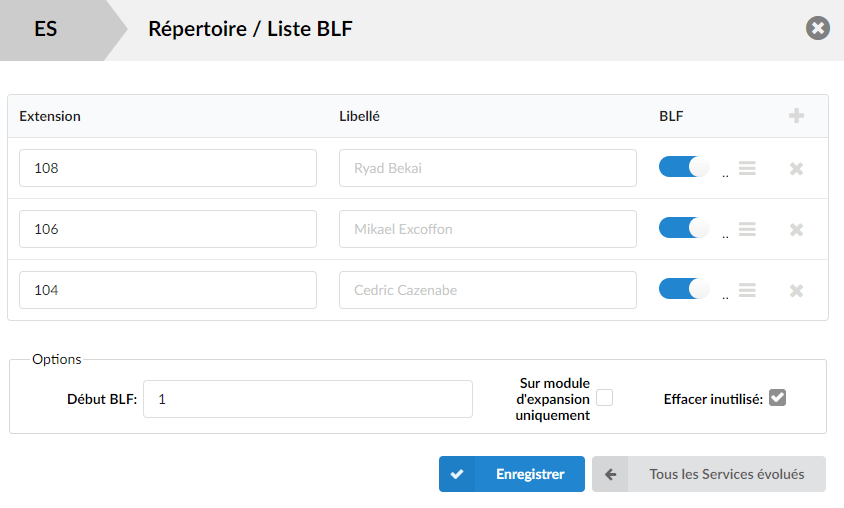
Directory / BLF List

The service Directory/BLF List is used to enter the list of extensions the user wants to have as contacts. When used with a phone that has speed-dial keys, the user can select some of these extensions to be monitored in real time by the phone's BLF buttons.

  • Custom BLFs

The DID, the queues, IVR or Advanced services can also be defined as BLFs.

For example, add *710601020304 and *72 to your BLF list. 
By pressing the BLF, you will be able to enable or disable your call forwarding.
When this BLF button is used and the operating hours are modified, the button also changes color.

The code *73 allows you to enable/disable preconfigured call forwarding.

Available options:

  • Extension

BLF number

  • Label

Name that will be displayed on the phone

  • BLF

This field is used to enable or disable BLF

  • BLF start

BLF start position

  • On expansion module only

This option allows you to provision only the keys that exist on a BLF key expansion module (example: Snom D7Fanvil EXP200…). No key will then be provisioned on the phone's BLFs directly if this option is checked.

  • Clear unused

Clear all unused BLFs
Only the BLFs listed on this page will be visible on the phone.

Speed dial

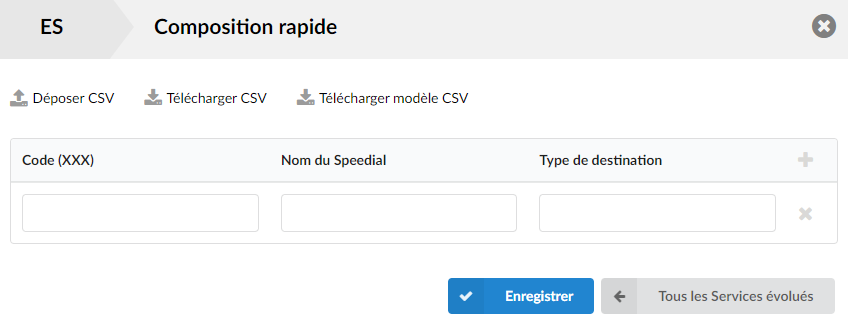
The speed dial service allows you to assign a short code (up to 3 digits) to numbers you dial frequently so you don't have to type the full number each time. To use the speed dial service, you must dial *130 before the short code assigned to you (*130XX).

Drop CSV is used when you have all the codes written in a simple CSV file in the form of a template:
Code,Name,Destination

Download CSV is used when you want to download the already defined dial codes in a CSV file.

Download CSV template is used when you want to download the dial codes template in a CSV file.

  • Code (XXX)

A one- to three-digit code to enter after the speed dial access code, *130 by default.
(For example, if the code is '35', you must dial '*13035').

  • Speed dial name

The brief description of the destination this code points to.

  • Destination type

Destination to which this code points.

Instant recording
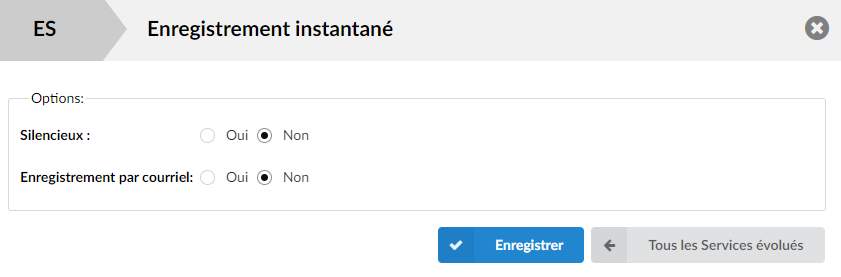
This service allows the instant recording of a call, which can be started at any time during the conversation by dialing *159.
When the instant recording service is enabled, dial *159 at any time during the ongoing call. From the moment you dial this code, the call will be recorded.

  • Silent

Sets whether or not the conversation participants will be informed that they are being recorded.

  • Recording by email

With this option, you can allow the system to send each recorded file that was activated with instant recording *159 to the email of the extension that activated it.

Listen to the recordings

This service allows the user to listen to recorded calls by downloading them to their Supervisor online or by dialing the access code *170 on your phone, then pressing the numbers 1-9 for the last 9 recordings, with 1 being the most recent.

For example, if this option is enabled, the user connects to their Supervisor online, navigate to CDR, select a recorded message and click the “Listen” button. The selected sound file will be downloaded to the computer from where it can be played in your audio player. To listen to the last 9 recordings on an extension, dial *170 from your phone, then enter a number between 1 and 9 to play the recording. Pressing 1 will play the recording of the most recent call and 9 the oldest.

Clear the recordings

This service allows the user to delete recorded calls via the Supervisor online (OSC).
For example, if this option is enabled, the user connects to their Supervisor online, navigate to CDR, select the recorded message and click on Advanced > Delete recordings.

Remote access

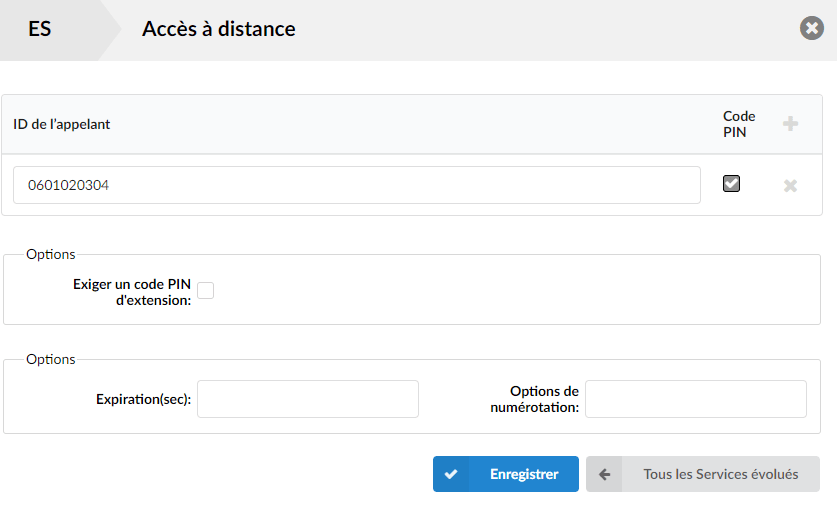
This service allows users to access the system remotely and authenticate on their personal extensions so that they can make calls as if they were using their desk phone.

For example:

Set one of the fields Destination of IVR (Home > IVR) on Remote access.

Set the field Extension associated with it on Destinations (if you want to call remote numbers).

Back up the IVR.

Edit the enhanced services of the extension under which you want to authenticate and enable theRemote access.

Click on Save, then on Edit next to this option.

You can authenticate by the caller ID that you can define in this list, and additionally require the PIN of this extension, or if you want any caller ID, you can leave this field empty and click the field Require an extension PIN code to authenticate using only the extension PIN.

In addition, you can set the timeout and the outbound dialing options that are used when dialing a number.

Call supervision
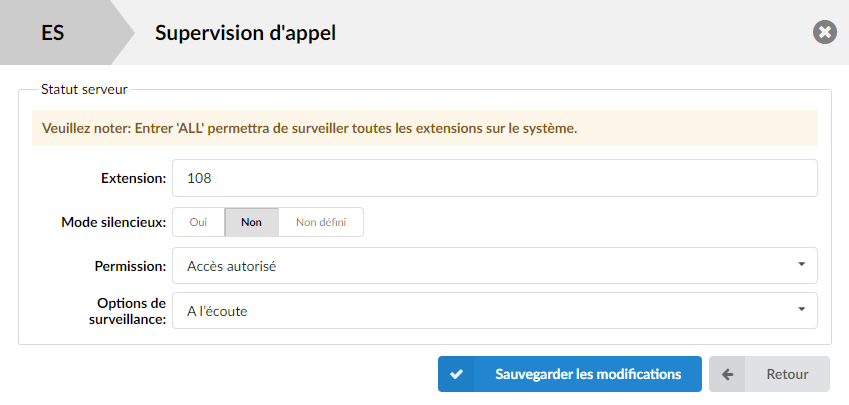
This service monitors active calls in real time.

For example, extensions 1000 and 1001 are in conversation. Extension 1005 dials *1991000.

From that moment on, the active call and all other calls made by extension 1000 will be monitored by extension 1005, until extension 1005 hangs up.

  • Extension

Number of the extension to be monitored. If you want to monitor extension 1000, simply provide the extension number here. If your system contains hundreds of extensions, it will not be practical to enter them all in this field.

  • Silent mode

Select whether you want to play the monitoring message or not

  • Permission

Sets the access mode for the monitored extension

Options:

    • Authorized access – Monitor without providing a PIN code
    • PIN required – Ask for a PIN code before monitoring another extension.
    • No access – Do not monitor this extension, but leave it in the monitoring window.
  • Monitoring options

Sets the monitoring option you want to use.

Options:

  • Listening – the user can only listen to calls.
  • Whisper – the user can listen to the conversation and only talk to the monitored extension.
  • Intervene – the user can listen and talk to both parties of the call.
  • All (dynamic mode) – dynamically choose the monitoring mode you want to use by pressing numbers (default, 4):
    • 4 – Listening
    • 5 – Whisper
    • 6 – Barge in

Callback

Callback is an option that allows you to call the PBXware system, which will identify you by your callerID, hang up the call, and then call you back at the number provided in this list.

  • Caller ID

Caller ID that PBXware detects and then calls back the number provided.

  • Number

Number that will be called back when the Caller ID is detected.

System uptime

Operation times are used to define working hours, holidays, and certain redirections based on the date and time. Operation times can be configured at different levels: tenants, DIDs, queues, IVRs and extensions.

If this option is enabled, the user will be able to use the uptime access codes.

Wake-up call

This option allows you to use an access code to manage your own wake-up calls.

Operators wake-up call

This option allows you to use an access code to manage wake-up calls on any extension.

Share

Advanced services

Or copy the link below

CONTENT