sipPROT

• VOIP service interruption and unavailability
• The possibility of password theft (SIP registration)
Operation
- PBXware – if you are running a standalone PBXware installation.
- SERVERware – If you run PBXware as a VPS in a SERVERware virtual environment, sipPROT must be installed on all SERVERware hosts.
NOTE:
Before deleting an extension on PBXware, it is essential to reset the phone associated with this extension to factory settings. If you forget this step, you may encounter connection errors, such as failed “REGISTER” packets. This could lead to the IP addresses of the affected phones being blocked by sipPROT.
If this happens, you will receive an email notification (at the address defined under the Notification recipients tab), provided your SMTP settings are correctly configured.
Prerequisites
On a Debian/Ubuntu standalone installation, be sure to install the iptables xtables addon used in particular by the sipPROT protection software.
apt install xtables-addons-common In order to correctly load the xt_geoip module, which handles IP blocking by country, also install the Linux kernel headers:
apt install -y linux-headers-$(uname -r) dkms autoinstall -k $(uname -r) depmod -a If these tools are not installed beforehand, geoblocking will not be able to work properly and sipPROT will display an error message:
systemctl status sipprotd * sipprotd.service - sipPROT Loaded: loaded (/etc/systemd/system/sipprotd.service; enabled; preset: enabled) Active: failed (Result: exit-code) since Tue 2026-05-19 14:58:28 CEST; 4min 56s ago Process: 874968 ExecStartPre=/usr/sbin/modprobe ip_tables (code=exited, status=0/SUCCESS) Process: 874969 ExecStartPre=/usr/sbin/modprobe br_netfilter (code=exited, status=0/SUCCESS) Process: 874970 ExecStartPre=/usr/sbin/modprobe -b xt_geoip (code=exited, status=1/FAILURE) CPU: 20ms May 19 14:58:27 bicom systemd[1]: Starting sipprotd.service - sipPROT... May 19 14:58:28 bicom modprobe[874970]: modprobe: FATAL: Module xt_geoip not found in directory /lib/modules/6> May 19 14:58:28 bicom systemd[1]: sipprotd.service: Control process exited, code=exited, status=1/FAILURE May 19 14:58:28 bicom-net-lyon systemd[1]: sipprotd.service: Failed with result 'exit-code'. May 19 14:58:28 bicom systemd[1]: Failed to start sipprotd.service - sipPROT. Install sipPROT
- Checking the PBXware version : Make sure that PBXware is on version 7.x. If you are using an older version, you will need to use sipPROT via the command line.
- Installing PBXware : If not already done, install PBXware.
- Access the configuration wizard : Open your browser and access the setup wizard via port 81.
- Access sipPROT : Once in the interface, the new "sipPROT" item should appear in the left menu. Click this item to begin the configuration.
NOTE:
If the sipPROT menu is not visible, it means that sipPROT has not been enabled for your license. To request activation of the software, please contact our support at support@ags-next.com.
Refresh your license as soon as sipPROT has been activated.
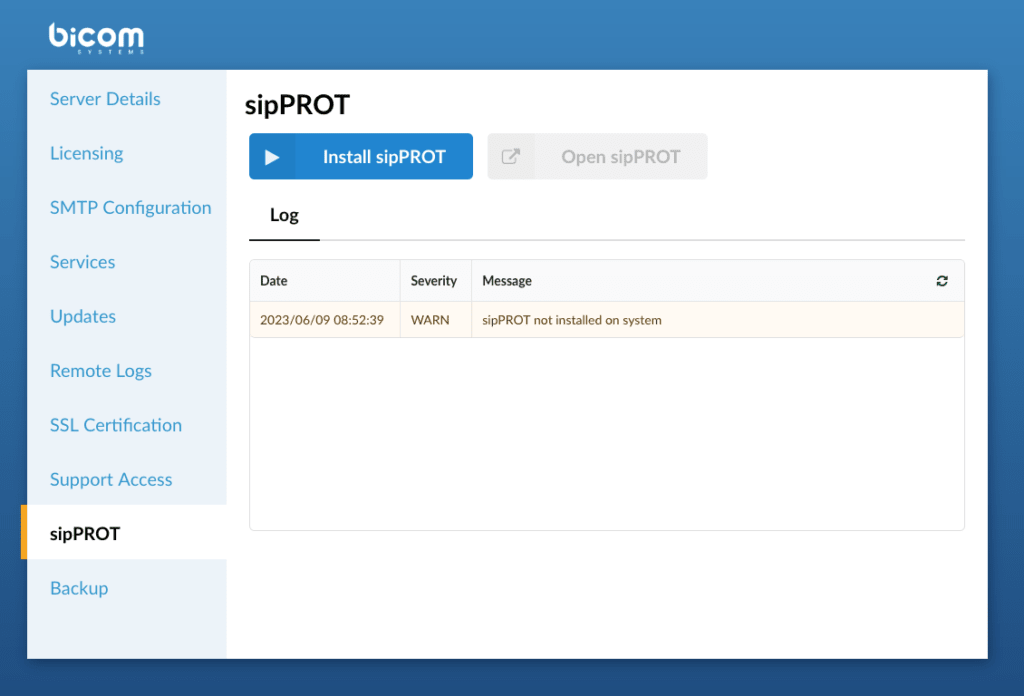
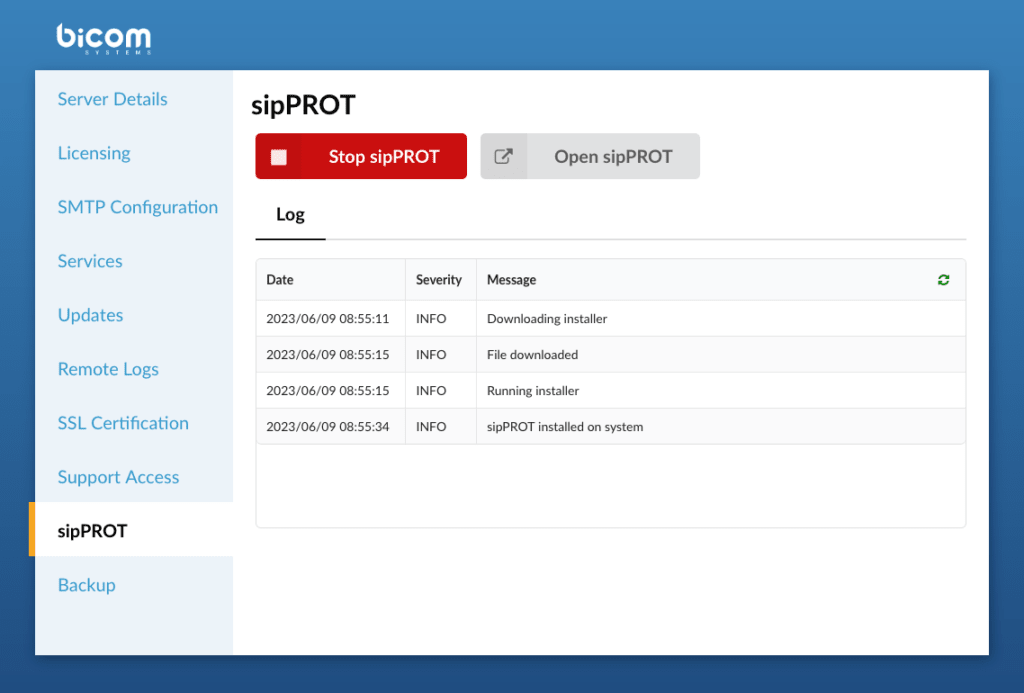
Click install sipPROT and wait until the installation process is complete.
Click the Services tab in the left menu.
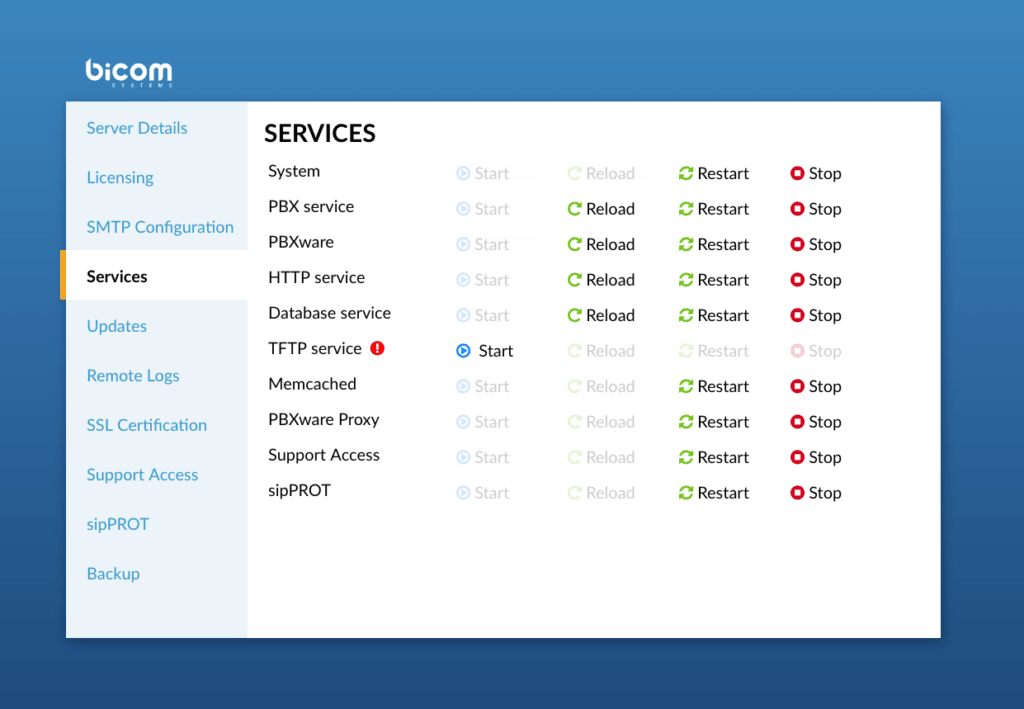
You can start/reload/restart/stop sipPROT from the menu Services.
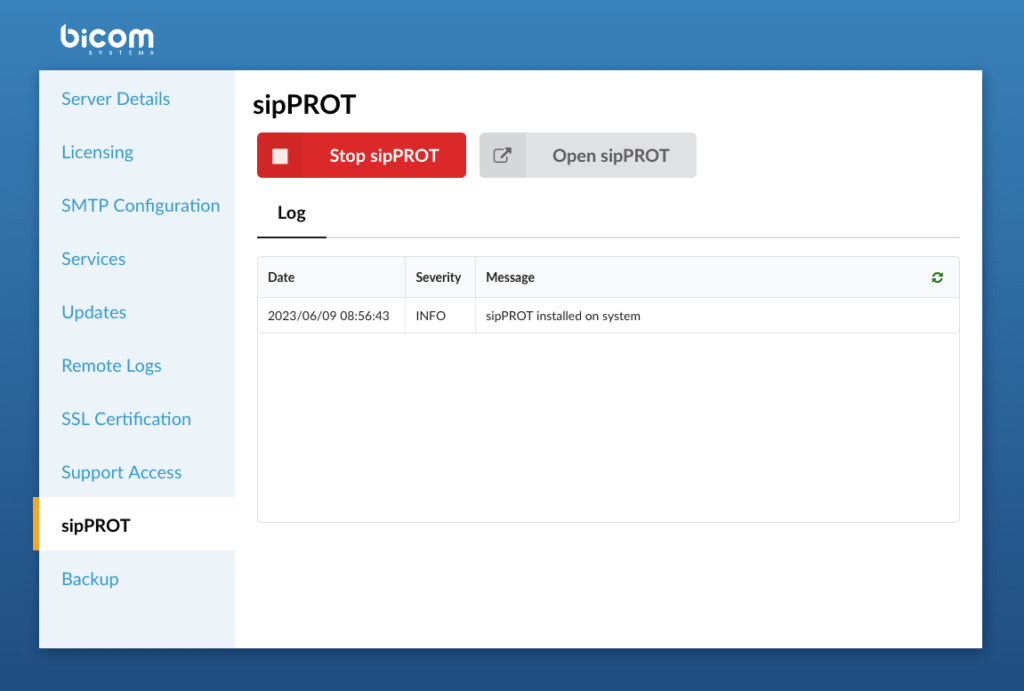
When you click the button Open sipPROT, a new tab will open and you will be redirected to the sipPROT – Web UI page.
INFORMATION:
In order to display the sipPROT configuration page, you must be logged in to PBXware as an administrator, otherwise an access denied message will be shown on the page.
Dashboard
The sipPROT dashboard is designed to provide critical information about the health and status of the protection system. Here is a brief overview of what each dashboard widget represents: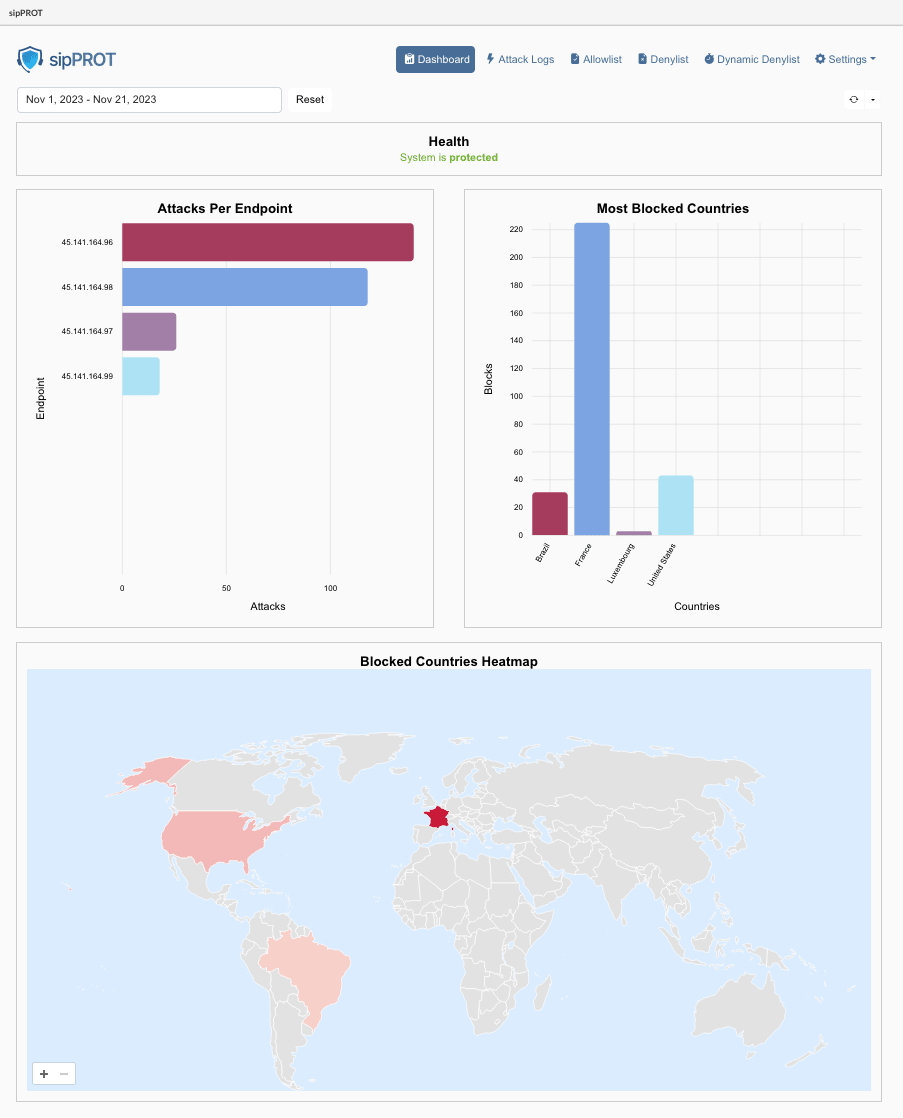
| Widget | Description |
| Health: | This widget displays the operating status of the service sipPROT :
A direct link to the hosts page is provided for quick access. |
| Endpoint attacks | This widget displays a list of attacks for a specified period, allowing you to identify the most targeted IP addresses or virtual private servers (VPS) on your server. For PBXware users, it will usually display attacks related to a specific IP address. |
| Most blocked countries | This widget displays information about the countries of origin of blocked IP addresses. It groups blocked IP addresses according to their country of origin, providing an overview of geographic patterns in the attack data. |
| Mapping of the most blocked countries | The geolocation heat map visually represents the density of attacks according to their geographic location. It uses a color code:
This makes it easy to identify the regions most targeted by attacks. |
All these widgets are affected by the date selector filter and the refresh interval selector on the dashboard. This means you can customize the displayed data according to specific time periods and set how often the information is updated.
| Each widget provides valuable information about different aspects of the security and health of the system managed by sipPROT, thus making it easier for users to monitor and respond to potential threats or issues. |
Configuration page
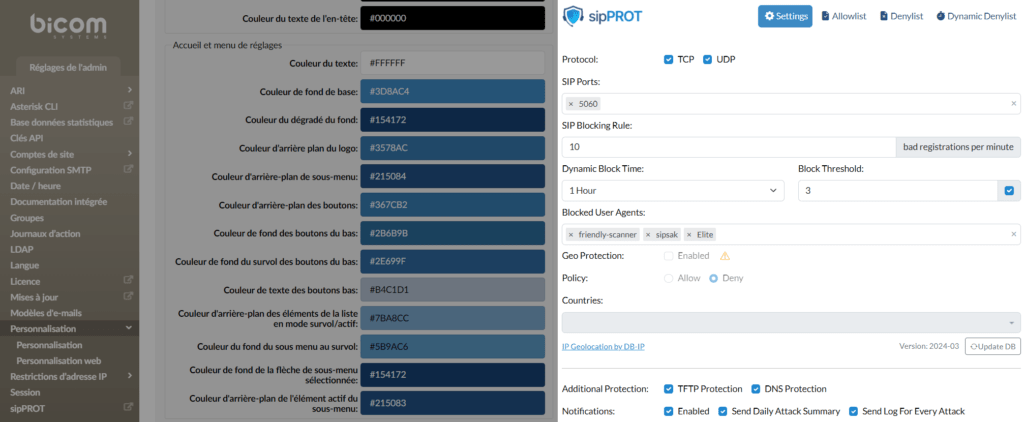
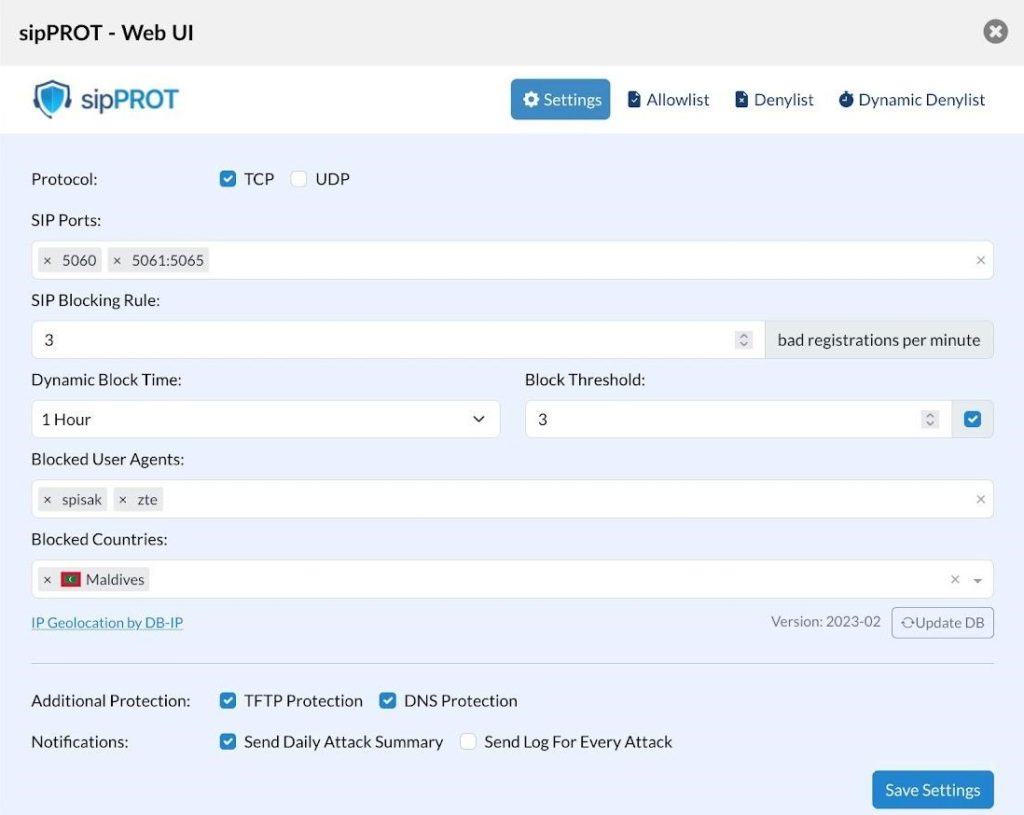
Under PBXware > Admin Settings > sipPROT > Settings, the configuration options for sipPROT are located.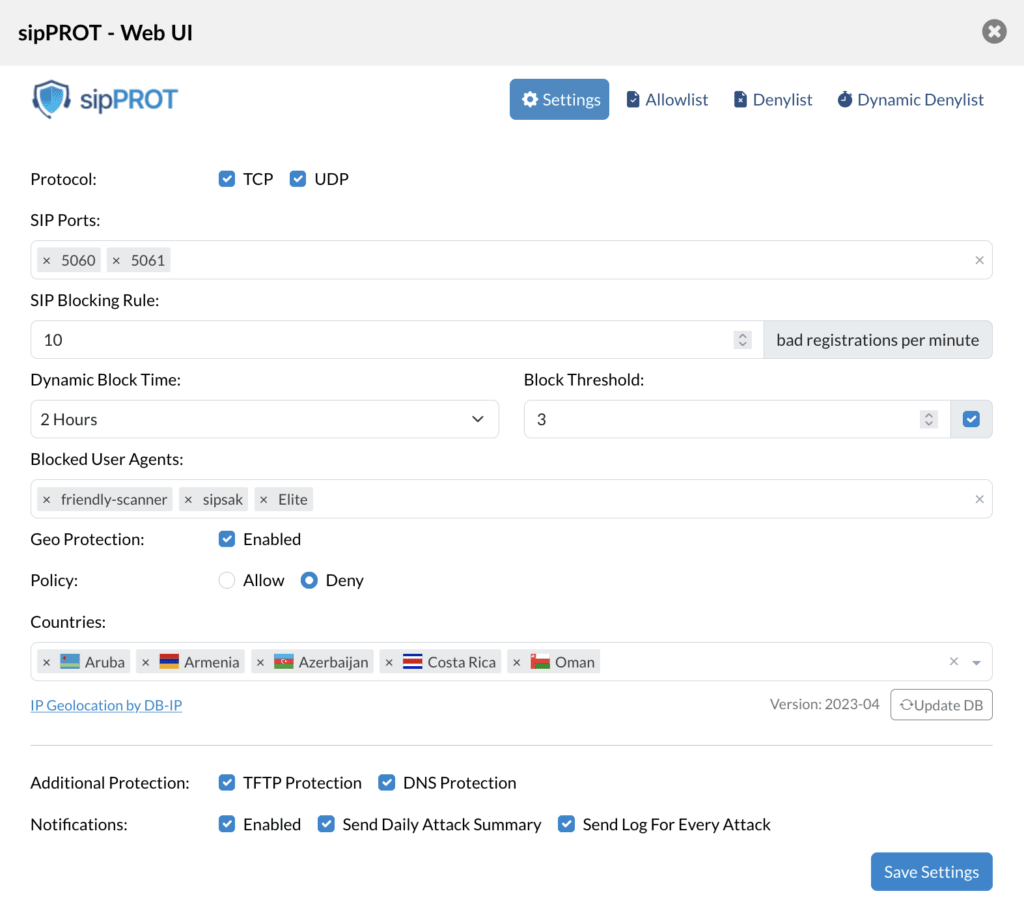
Available options
| Field | Description |
| Protocols: | Choose the protocols to monitor for attacks (TCP, UDP or both). |
| SIP ports: | Specify one or more ports or ranges to monitor, such as "5060" or "5060:5062". |
| SIP blocking rule: | Set the maximum number of unauthorized registration attempts per minute before blocking an attacker's IP address for a specified period. |
| Dynamic blocking time: | Choose how long blocked IP addresses will remain blocked after preventing an attack. |
| Blocking threshold: | Set how many times an IP address will be dynamically blocked before being permanently blocked by being added to the block list. The acceptable range is (1-20). |
| Blocked user agents: | Specify the SIP user agents from which to block incoming traffic. Keep the list as short as possible to avoid affecting system performance. |
| Geo-protection: | Enable or disable GEO blocking and select the Allow or Deny option. |
| Allow: if "Allow" is selected, only traffic originating from the selected countries will be allowed and all other traffic will be denied. Note that resources the server needs to access outside the selected country range, such as external mail or archiving servers, must be explicitly allowed. | |
| Decline: if "Deny" is selected, all traffic originating from the blocked countries will be denied. | |
| Blocked countries: | Select the countries from which to block incoming traffic. sipPROT will block the entire range of IP addresses belonging to the selected countries or allow it if a different method is selected above |
| Additional protections: | |
| TFTP: Protect your server against TFTP brute-force attacks by using a rate limit. The default rate limit is 10 requests per minute, with a maximum burst of 100 requests. | |
| DNS: Protect legacy systems from the glibc stack-based buffer overflow in the getaddrinfo() security vulnerability. This feature is enabled by default and should not be modified without the proper knowledge. | |
| If you do not know what the feature is for, you should under no circumstances modify this option. | |
| Notifications: | |
| Enable: enable or disable sipPROT notifications. | |
| Send a daily summary of attacks: receive an email with a daily report of attacks if this option is checked. | |
| Send the log for each attack Receive a notification for each attack. The default value is once per hour. | |
| Notification recipient: | sipPROT uses the SMTP configuration provided by PBXware and requires functional SMTP settings. The default recipient of notifications is the PBXware administrator. |
1. Managing the allow list
- Add (Manually add an IP record to the list)
- Export (export the entire list to a CSV file)
- Import (import the list from a CSV file)
- Delete (deletes the selected IP record)
2. Search
- Search (Searches the list by IP record or by note)
- Country (Search IP address records by country)
- Reset (Clear the country and reset the search)
3. Display and refresh options

- Show per page (drop-down list allowing you to select the number of records displayed per page)
- Refresh (The "Refresh" option in the permissions list is a drop-down list that allows users to set the list's refresh interval. When a refresh interval is set, the list is automatically refreshed at the specified interval. However, it is important to keep in mind that this action may clear any current selections in the list.)
At the bottom of the list, users can find:

4. Number selected / total entries
5. Page numbers with selector
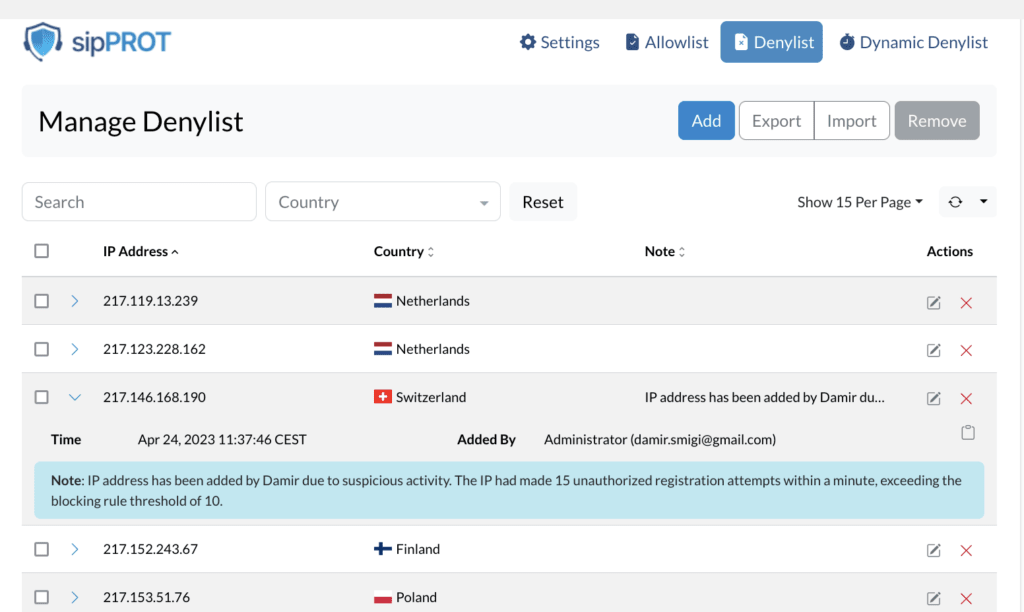
Also, for convenience, additional information regarding the specific IP address can be found with a single click on the arrow at the beginning of the record to expand the additional information for the record content.

- IP: the IP address concerned
- Note: the note for the record if available.
- Time: the date and time of the addition or modification
- Added by : the user who added the record.
- Copy button: copy the recording data to the clipboard in json format.
{ "ip": "217.146.168.190", "note": "IP address has been added by Damir due to suspicious activity. The IP had made 15 unauthorized registration attempts within a minute, exceeding the blocking rule threshold of 10.", "time": 1682329066, "added_by": "Administrator (damir.smigi@gmail.com)", "geo_data": { "country_code": "CH", "country_name": "Switzerland" } } - Edit: edit the recording button
- Delete: delete the record button.
Whitelist
The whitelist contains the IP addresses allowed to access the system without interruption. It can be populated manually via a form or uploaded from a CSV file. It is crucial to keep this list up to date to ensure that legitimate users can access the system without problems.
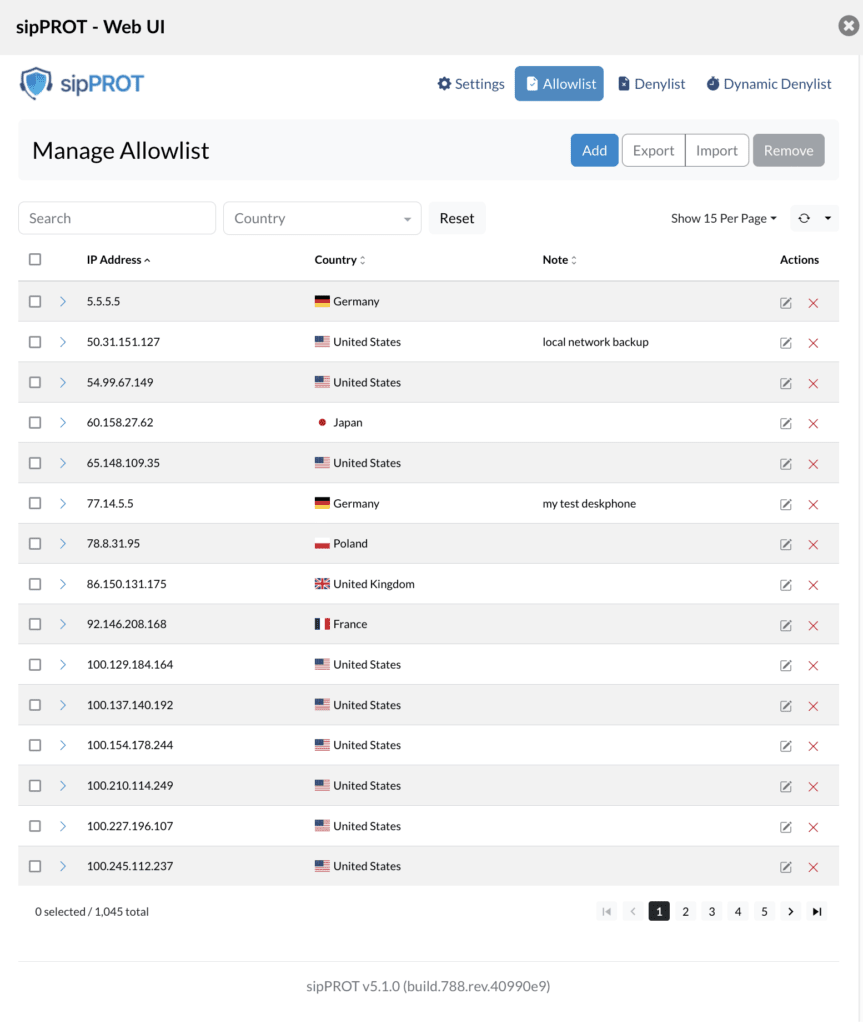
Add IP records to the whitelist
To add an IP address to the whitelist, proceed as follows:
- Open the sipPROT “Allowlist” tab in your system. Click the "ADD" button.
- Enter the network or IP address in the designated field.
- Enter any optional notes to help you remember why this address was added.
- Click the "ADD" button to add the IP address to the whitelist.
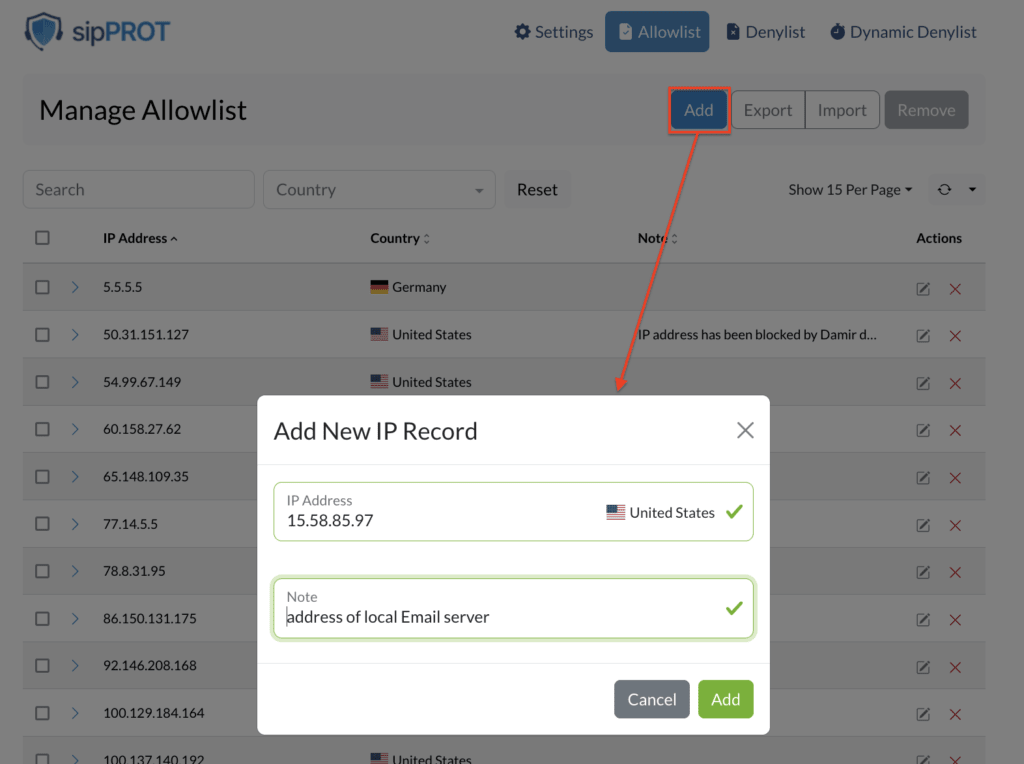
Import/export multiple IP records to the whitelist
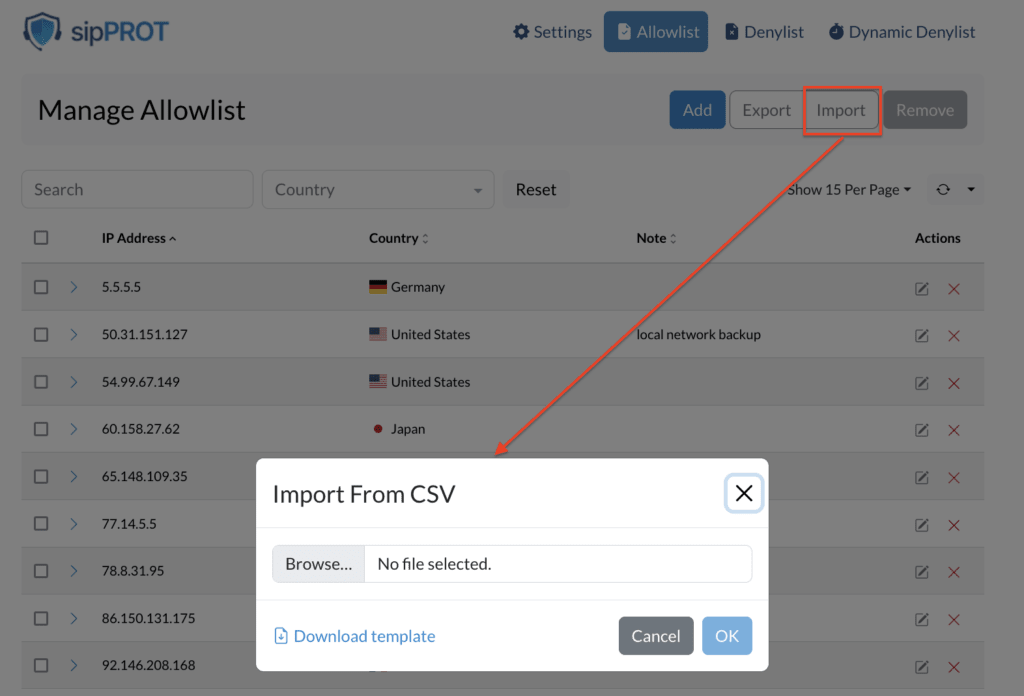
To import multiple IP addresses into the whitelist, use the Import CSV option (top right corner of the IP Addresses tab). You will need a CSV file containing the IPs to add.
Download the provided template file to make it easier to create the CSV. Open it in a spreadsheet (Excel, Google Sheets), then add the IP addresses to allow in the “IP_ADDRESS” column. An optional note can be added in the “NOTE” column.
CSV file example:
IP_ADDRESS,NOTE,TIME,ADDED_BY 192.168.24.1,"réseau privé interne",2023-09-01 15:44:35,"Bicom France (support@ags-next.com)" Save the file in CSV format, making sure it is properly formatted. Then, in the sipPROT Allowlist tab, click IMPORT, select your CSV file and click DOWNLOAD. The system will then add the IP addresses to the whitelist.
To export the list of allowed IPs, use the EXPORT option to download a file containing all currently whitelisted addresses.
Remove an IP address from the list
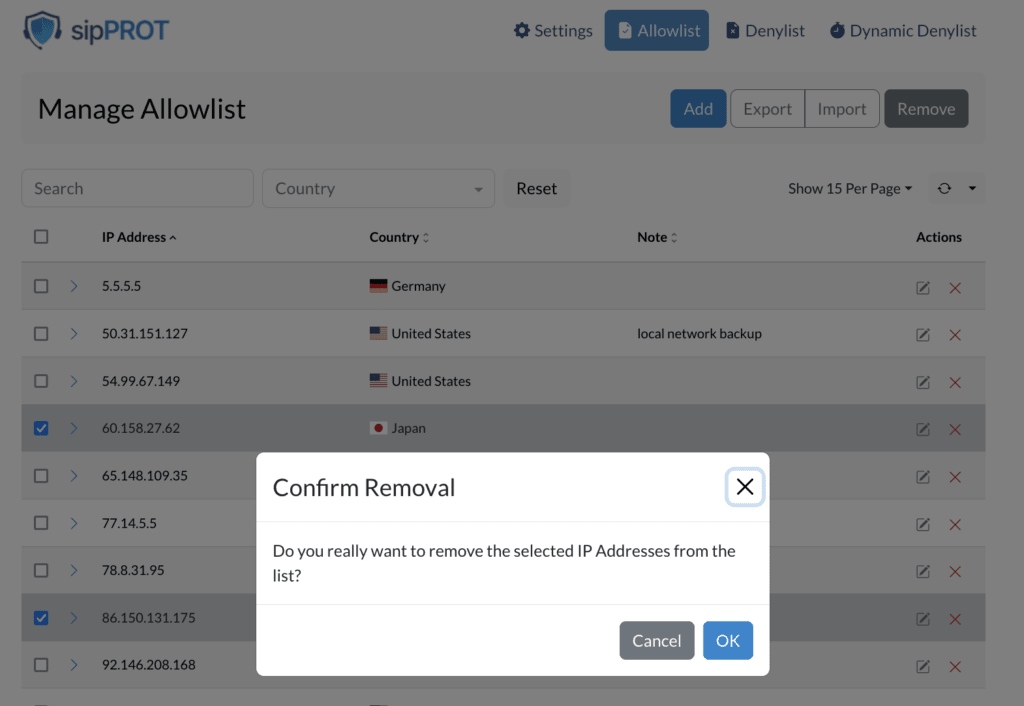
You can delete IP addresses in two ways.
Individual or multiple deletion:
- Check the boxes of the addresses to delete.
- Click REMOVE and confirm by clicking OK.
Deleting all addresses:
- Check Select all.
- Click REMOVE and confirm.
Changes are applied automatically. To remove a large number of addresses, you can also use a CSV file. A template is available to guide you.
INFORMATION:
The whitelist takes priority over all other lists. If an IP address appears in both the whitelist and another list (such as the blacklist), the IP address will still have access to the system, and the restriction from the other list will be ignored.
This is especially useful if you want to block a network or a range of IP addresses (for example, 192.168.50.0/24) while allowing access to a specific IP address within that range (for example, 192.168.50.15). By adding this address to the whitelist, it will be able to access the system, even if the rest of the network is blocked in the blacklist.
Blacklist
The blacklist contains the IP addresses whose access to the system is restricted. It can be populated manually by entering an IP address and an optional “note” via a graphical interface, or by importing a CSV file. In addition, the blacklist can be updated dynamically with IP addresses from the dynamic blacklist, if they are associated with persistent attacks on the system.
NOTE:
The whitelist takes priority over the blacklist. If an IP address is present in both the whitelist and the blacklist, the IP address will be granted access to the system by default.
Add IP records to the blacklist
To add an IP address to the blacklist, proceed as follows:
- Open the sipPROT Denylist tab in your system.
- Click the “ADD” button.
- Enter the network or IP address in the designated field.
- Enter any optional notes to help you remember why this address was added.
- Click the “ADD” button to add the IP address to the deny list.
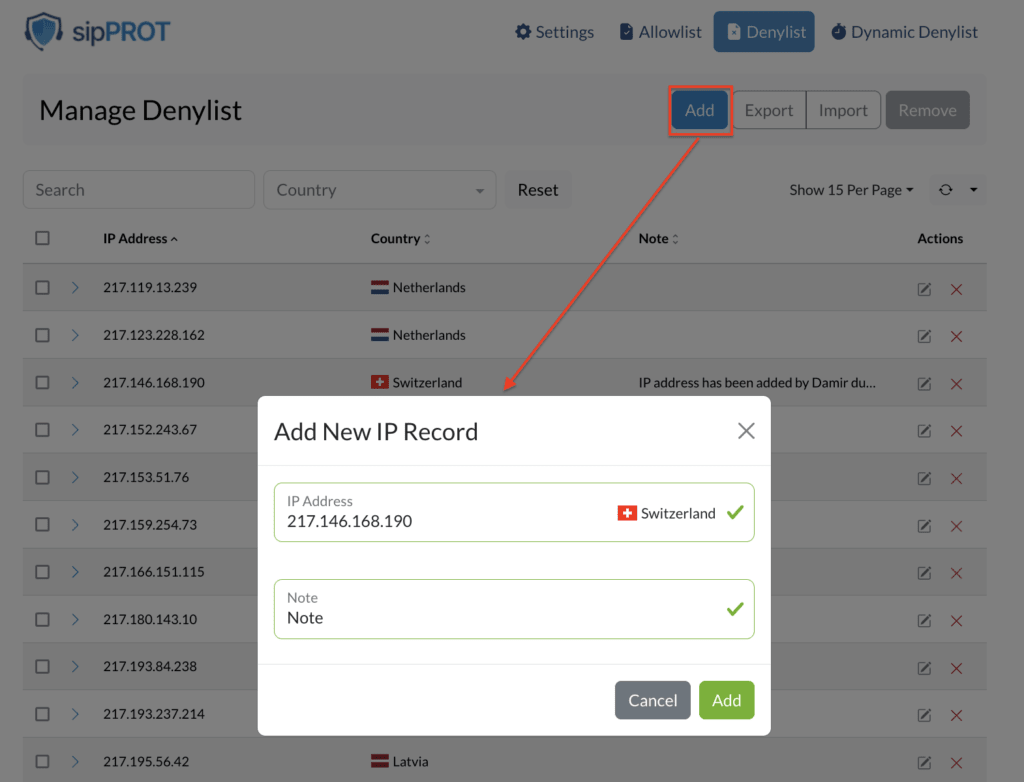
Import/export multiple IP records to the blacklist
To import multiple IP addresses into the deny list, use the Import CSV option located in the top right corner of the Deny List tab. You will need a CSV file containing the IP addresses to add.
To create the CSV file, download the provided template, which contains headers and examples. Then open it in a spreadsheet program (such as Microsoft Excel or Google Sheets). Add the IP addresses to block in the “IP_ADDRESS” column and an optional note in the “REMARQUE” column.
CSV file example:IP_ADDRESS,NOTE 192.168.x.x,"example note1" 77.14.x.x,"example note2" 1. Save the file in CSV format, making sure it is correctly formatted.
2. Return to the sipPROT Denylist tab.
3. Click the Upload button, select the CSV file you created, then click again on Download. The system will import the IP addresses and add them to the deny list.
Export the block list
If you want to export the list of IP addresses currently in the deny list, use the Export CSV option to download a file containing all the IP addresses of the deny list.
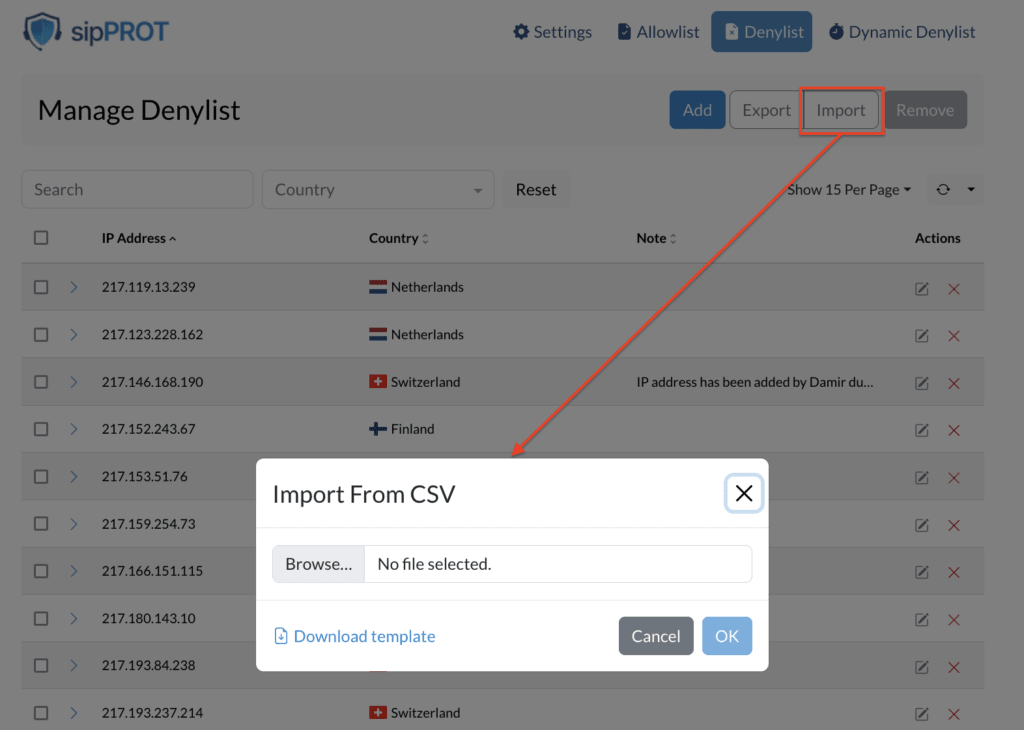
Remove an IP address from the list
You can delete IP addresses in two ways.
Individual or multiple deletion :
- Check the boxes of the addresses to delete.
- Click on Delete, then confirm by clicking on Yes.
Deleting all addresses :
- Check Select all.
- Click on Delete, then confirm.
Changes are applied automatically. For bulk removal, you can use a CSV file. A template is available to help you.
Dynamic block list
The dynamic blocklist automatically displays the IP addresses identified as sources of attacks or malicious traffic. These IPs are blocked without manual intervention and the list is constantly updated to protect the system against new threats.
- Unblocking : An administrator can unblock an IP manually or wait for the block timeout to expire.
- Useful information: The list provides details on the user agent/scanner used and the country of origin of the attack, facilitating the inspection and prevention of future attacks
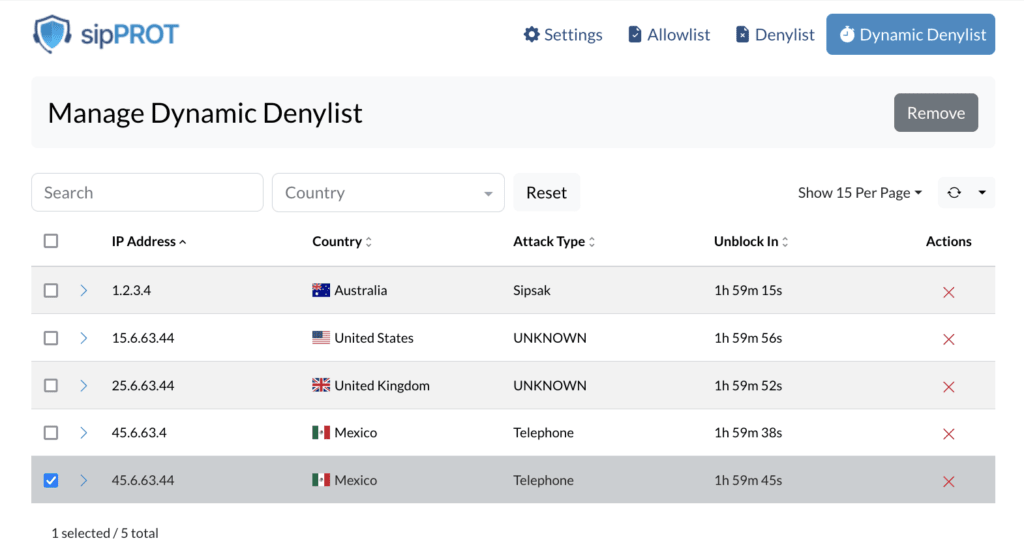
The dynamic blocking of sipPROT automatically blocks IP addresses that attempt to attack your system, according to the rules defined in the settings.
- Block duration (“Dynamic Block Time”) : determines how long an IP stays blocked after a violation.
- Example : If the block is set to 1 hour, an IP breaching the rules will be blocked for 1 hour. If it recurs during this period, the counter is reset.
Difference with the deny list : An IP on the deny list is permanently blocked, even without an attack.
Dynamic blocking provides automated protection against attacks by temporarily blocking suspicious IPs.
INFO:
If sipPROT is installed on PBXware, it will use the branding and language options of PBXware.
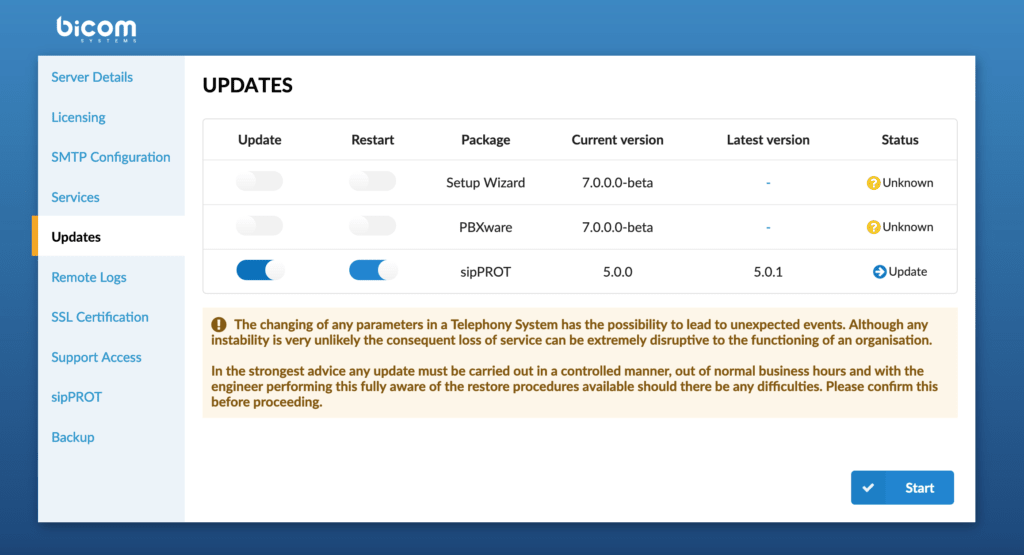
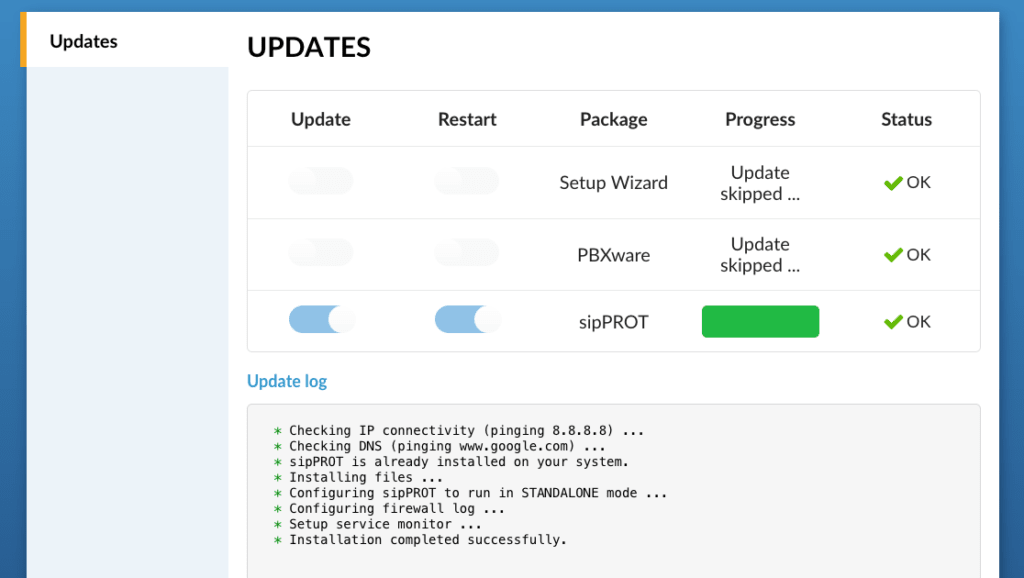
Update sipPROT
sipPROT CLI
sipPROT status
To obtain information about the sipprot status, use the following command:
sipprot status This command will give the following information
+---------------------+------------+ | LIST | NUM OF IPS | +---------------------+------------+ | Allow | 493 | +---------------------+------------+ | Deny | 482 | +---------------------+------------+ | Dynamic (temporary) | 100 | +---------------------+------------+ sipprot --help NAME: sipPROT - CLI USAGE: sipPROT [global options] command [command options] [arguments...] VERSION: 5.1.0+build.777.rev.5ad785a COMMANDS: status, s Prints number of IPs per list report, r Prints out daily attack report setup, Setup redis repositories. If the repositories already exist, this is no-op. version, Print only the version list, l Manages IP lists help, h Shows a list of commands or help for one command GLOBAL OPTIONS: --config FILE load configuration from FILE (default: "/opt/sipprot/conf/sipprot.conf") --log value log URI e.g. stdout://, syslog:// or file:///var/log/sipprotd.log (default: "stdout://") --debug include debug logs (default: false) --help, -h show help --version, -v print the version To list detailed information, use the --all, --allow, --deny, --dynamic flags
Example:
sipprot report Allowlist: +-----------------+----------------+ | IP ADDRESS | COUNTRY | +-----------------+----------------+ | 191.85.106.233 | Argentina | +-----------------+----------------+ | 165.191.222.98 | Australia | +-----------------+----------------+ | 175.35.61.159 | Australia | +-----------------+----------------+ | 83.164.34.163 | Austria | +-----------------+----------------+ | 178.127.91.72 | Belarus | +-----------------+----------------+ | 178.116.223.166 | Belgium | +-----------------+----------------+ | 109.140.180.239 | Belgium | +-----------------+----------------+ SipPROT Report
To display the daily attack report, use:
sipprot report The IP addresses used on this wiki are not real and are used for demonstration purposes only. They do not represent any actual threat.
To display the sipPROT version information, use:
Daily Firewall Report Host: PBXware-Standalone Date: Tue, 28 Feb 2023 +-----------------+-----------------------+-----------------+----------------+--------+
| 45.134.144.31 | Netherlands | SCANNER:21da605 | 45.141.164.106 | 1 |
+-----------------+-----------------------+-----------------+----------------+--------+
| 51.159.91.192 | France | SCANNER:21da605 | 45.141.164.106 | 2 |
+-----------------+-----------------------+-----------------+----------------+--------+
| 207.154.225.217 | Germany | SCANNER:21da605 | 45.141.164.106 | 1 |
+-----------------+-----------------------+-----------------+----------------+--------+
| 212.129.7.65 | France | SCANNER:21da605 | 45.141.164.106 | 1 |
+-----------------+-----------------------+-----------------+----------------+--------+
| 212.129.58.7 | France | SCANNER:21da605 | 45.141.164.106 | 1 |
+-----------------+-----------------------+-----------------+----------------+--------+
| 51.159.199.3 | France | SCANNER:21da605 | 45.141.164.109 | 1 |
+-----------------+-----------------------+-----------------+----------------+--------+
| 104.167.222.98 | United States | SCANNER:21da605 | 45.141.164.109 | 1 |
+-----------------+-----------------------+-----------------+----------------+--------+
| 212.129.7.65 | France | SCANNER:21da605 | 45.141.164.109 | 1 |
+-----------------+-----------------------+-----------------+----------------+--------+
| | | | TOTAL | 9 |
+-----------------+-----------------------+-----------------+----------------+--------+
sipprot version sipPROT : 5.0.0+build.619.rev.1b112e5 sipprot check 83.221.171.193 IP address '83.221.171.193' found in Allowlist IP address '83.221.171.193' found in Denylist Customization
If sipPROT is installed in PBXware (standalone), it will use the PBXware customization options (colors).