FR | EN

Frequently Asked Questions

Wiki Bicom Systems EnglishWiki Bicom Systems English
  • Home
  • Documentation
    • PBXware
      • Installation
      • Getting started
      • Editions
        • PBXware Multi-Tenant
        • PBXware Business
        • PBXware Contact Center
        • PBXware Service Provider
      • Advanced services
      • Supported phones
      • Autoprovisioning
    • Communicator
      • Communicator Desktop
      • Communicator GO
      • Communicator Web
    • SERVERware
      • Standalone
      • Mirror
      • Cluster
    • sipPROT
    • Tutorials
  • Videos
    • Communicator Desktop
  • Operators
  • Downloads
  • FAQ
Support

Frequently asked questions

WaveWave
24

PBXware questions

7

Communicator questions

3

SIPPROT questions

34

Total questions

Quick navigation

  • Communicator
  • General
  • PBXware
  • SIPProt

When only the OPUS codec is set to be used for DTMF, it may not work.

The OPUS codec does not guarantee proper DTMF operation, so make sure that other alternative codecs (G711, G722, etc.) are set as secondary priority, so that DTMF works.

If the chat feature is not working and returns this error: “message history syncing Failed (Failed initial chat server request: Chat server is not connected) Chat server not connected”

You must connect via SSH to your system and run the following:

  • ps fax | grep -i chat –> to check whether the chat server is running; if it is, do not restart the chat server
  • /opt/pbxware/sh/pbxware start chat_server –> to start the chat server

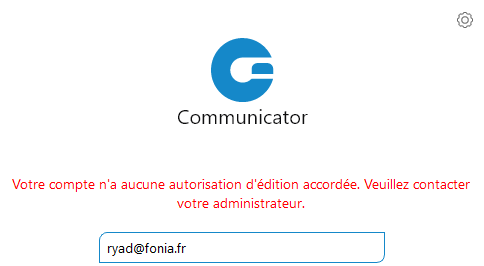
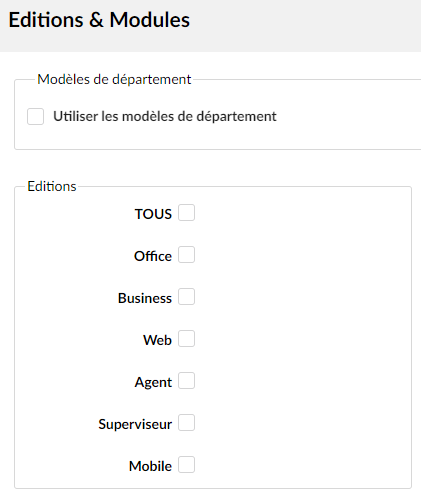
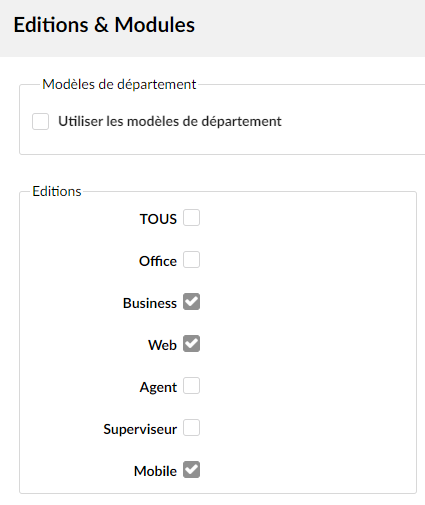
The message “Requested edition is not allowed for your account” or “Your account has no editing permission granted” means that your extension does not have a license assignment for the application in Extension > Edition & Modules.

Simply add the Desktop/Mobile/Web license in the extension settings (Extension > Edition & Modules) and restart your application.


If you have no sound in a meeting on Communicator Web, an additional setting is necessary for the meeting feature on a PBXware when it is behind a NAT:

In Settings > Protocols => RTP => Additional configuration:

[ice_host_candidates] ip_locale => ip_publique

For example:

[ice_host_candidates] 192.168.1.150 => 212.89.138.150


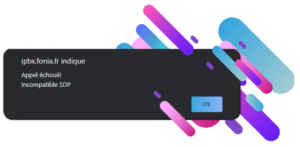
Symptoms:

When you make a call from Communicator Web, an error pop-up will appear displaying the following:

Resolution:

Before making a call with Communicator Web, certain prerequisites must be met:

  • Enable WebRTC on the extension
  • Enable the Opus codec on the extension
  • Enable TLS in the protocols

The extension must have enabled the WebRTC and the codec Opus on their system or on themselves.

To do this, simply navigate to the relevant extension Extension > Show advanced options > Enable WebRTC > Yes

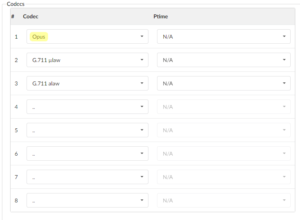
For the Opus codec, it must be enabled in the extension as well(if it does not appear, check that it is present in Settings > Servers > Default codecs > Remote > Opus.

On a Multi-Tenant system, select the Tenant in question in Settings > Tenants > Default codecs > Remote > Opus).

Then in the extension, Extension > Show advanced options > Codecs and place Opus in the list.

Similarly, the settings TLS must be enabled on the system. To do this, simply go to Settings > Protocols > SIP > TLS settings > Enable TLS > Yes > Restart the PBXware service using the button in the top right corner.

An additional parameter is required for the meeting feature and Communicator WEB on a PBXware behind a NAT:

In Settings > Protocols > RTP > Additional configuration:

[ice_host_candidates]
local_address => public_ip

For example:

[ice_host_candidates] 192.168.1.62 => 195.154.138.62

Save the settings.

If all the above settings have been applied, calls on Communicator web will work.

You will be able to download the latest version of Communicator as well as previous versions on this link.

Communicator is compatible with Windows, Linux, and MacOS operating systems.


A few definitions:

Asterisk– Implementation of the PBX on which the BICOM system is built

AGI–[Asterisk Gateway Plan] – Interface through which external programs control the dialplan

API –[Application Programming Interface] – Ea set of rules and protocols that allow different software applications to communicate with each other and share data or functionality

BLF – [Button Line Function] – Buttons on a phone or app to manage dialing shortcuts.

BLF – [Busy Lamp Field] – allows monitoring other extensions via the indicator lights, such as busy=red, available=green and away=yellow.

BRI – [Basic Rate Interface] – RNIS configuration consisting of 2 voice/data channels and one signaling channel

CC –[Contact Center] – Abbreviation for Bicom's Contact Center edition

CDR – [Continuous Data Recording] – Database of all phone call actions

CLI–[Command Line Interface] – Interface for interacting with the system using a command line

CSV – [Comma Separated Value] – File format where columns are separated by a comma ‘,’ ” and rows by a new line.

DAHDI – [Digium Asterisk Hardware Device Interface] – Interface for the telephone devices used by PBXware. The dahdi-* packages provide the kernel with the DAHDI modules and their necessary configuration environment.

DHCP – [Dynamic Hosts Configuration Protocol] – Protocol for assigning a different IP address to a device each time it connects to a network.

DID–[Direct Inward Dial] – DID, an inbound line to directly dial system destinations without going through an operator.

DNS – [Domain Name Service] – Service that translates Internet domain names into IP addresses.

DTMF – [Dual Tone Multi Frequency] – A specific frequency composed of two distinct tones sent by the UAD/Phone each time a key is pressed.

DynDNS – [Dynamic Domain Name Service] – Service used by clients with a dynamic IP address, allowing them to be reached regardless of their current IP address.

E.164 – [International numbering Standard] – International public telecommunications numbering normalization of up to 15 digits. It follows this nomenclature: $COUNTRY_NUMBER + $NATIONAL_CODE + $SUBSCRIBER_NUMBER

EOL – [End of Life] – End of life for hardware or software; it is no longer supported, will not be updated, and may no longer be produced.

EULA – [End-user License Agreement] (EULA) End User License Agreement.

IAX – [Inter-Asterisk eXchange protocol] – Protocol for the server-to-server or server-to-client connection.

IVR – [Interactive Voice Response] – see DID.

LAN – [Local Area Network] – Set of connected terminals together within the same physical location, often through the IP protocol.

LCR – [Least Cost Routing] – Routes calls to the destination via the cheapest provider.

MAC – [Media Access Control] – Physical and unique address of a network device.

MOH – [Music On Hold] – Abbreviation for music on hold.

MOS – [Mean Opinion Score] – Mean Opinion Score is a score given to an audio codec to characterize the quality of the sound reproduction

MT – [Multi Tenant] – Abbreviation for BICOM's Multi-Tenant edition

MWI – [Message Waiting Indicator] – Unread message indicator

NAT – [Network Address Translation] – Matching mechanism ofIP addresses used to make the network accessible Internet to a network Intranet

NDI – [Installation Designation Number] – Head-of-line number or main number of a telephone installation.

OSC – [Online Self Care] – Web page for managing the user's/extensions' enhanced options.

PAI – (Private-Asserted Identity] – RFC 3325, it contains the caller identification information for the call on the SIP INVITE packet.

PBX – [Private Branch Exchange] – Device that connects the (internal) telephone extensions of an establishment with the public (external) telephone network. Also iPBX and PABX

PIN – [Personal Identification Number] – Four-digit security code required to access restricted parts of the system such as voicemail, enhanced services, conferences, etc…

POSTFIX – Mail transfer agent used for routing and sending the system's emails.

PSTN – [Public Switched Telephone Network] – Historical and traditional network used by landline phones

PRI – [Primary Rate Interface] – RNIS configuration consisting of 23/30 voice data channels and one signaling channel

RNIS – [Integrated Services Digital Network] – Network entirely made up of digital connections that allows its users to exchange information of a different nature: sounds, images, data

RPID – [Remote Party Identification] – RFC 4480; rich presence extensions to the presence information data format (PIDF).

PSTN – [Public Switched Telephone Network] – the historical analog technology that made it possible to provide voice communications between two remote users.

RTP – [Real-time transport protocol] – Internet standard for the transport of real-time data (audio and video)

SaaS – [Software as a Service] – is a cloud-based service and you access an application through an internet browser.

DID – [Direct Inward Dialing] – See DID; This refers to a specificity of the ISDN network (analog lines) that allows directly calling an internal extension (of a company, an administration) from an external phone without an intermediary

SIP – [Session Initiation Protocol] – Signaling protocol for Internet telephony

SMTP – [Simple Mail Transfer Protocol] – Protocol used to send and receive email

SSH – [Secure Shell] – is a network protocol that allows administrators to remotely access a computer securely.

SSL – [Secure Socket Layer] – It is a standard technology for securing Internet connections by encrypting the data transmitted between a browser and a website or between two servers.

IVR(FR = IVR)[Interactive Voice Response] – System that handles inbound calls by presenting the available options and capturing the user's response (digit pressed).

TLS – [Transport Layer Security] – Is a protocol that ensures the confidentiality of exchanges between communication applications and users on the Internet.

TTL – [Time to Live] – Time in milliseconds that the system will wait for an answer.

UAD – [User Agent Device] – Phone

UC – [Unified Communications] – these are sets of tools for making audio or video calls and improving internal collaboration and information sharing within an organization.

UCaaS – [Unified Communication as a Service] – Unified communications on demand. See UC

UDP – [User Datagram Protocol] – C'is a communication protocol used on the Internet for transmissions that are particularly time-sensitive, such as voice, video playback or DNS lookups.

VoIP – [Voice over Internet Protocol] – Voice over IP

WAN – [Wide Area Network] – Geographically dispersed telecommunications network

PBXware is a scalable PBX solution that offers a range of traditional telephony technologies and emerging VOIP technologies. The creation of national/global voice networks and a full range of PSTN and VOIP technologies are supported.

PBXware offers least-cost routing, voicemail, queues, auto attendants (IVR), conferences, music on hold, and much more – a genuine cost-reduction solution in a complete PBX package! Some of the advanced features included are self-installation on any Linux distribution, automatic updates, system backup, provider templates, the web interface, call recordings, and real-time call monitoring.

Bicom Systems has also developed a softphone solution, called Communicator, available on PC, Mobile, and Web. This powerful business telephony application takes communication to a whole new level by integrating closely with PBXware. Its main goal is to simplify and improve your daily communication and collaboration experience.

If you experience problems with your BLFs not working, in the majority of cases this is due to global presence being enabled in your extension.

Global presence will enable presence for all tenants on the system.

Note: enabling this option will prevent you from monitoring the presence status of extensions on the same tenant, unless you enter the tenant prefix before the extension number (for example, 2001001 for extension 1001 on tenant 200). However, if you set global presence to Yes, you will not be able to use BLFs to monitor your tenant's parking lots, because their numbers do not have a tenant prefix.

If global presence is enabled, you must make sure to set your BLFs as tenant number + extension or disable global presence if the configuration is set to extension number only.

The Global Presence option can be configured at the UAD level as well as at the extension level.

Go to Settings > UAD > Edit UAD > Global presence

Go to Home > Extensions > Edit extension > Show advanced options > Global presence

You can arrange for music to start playing at the same time as the extensions ring when a call comes directly into an extension or a group of extensions.

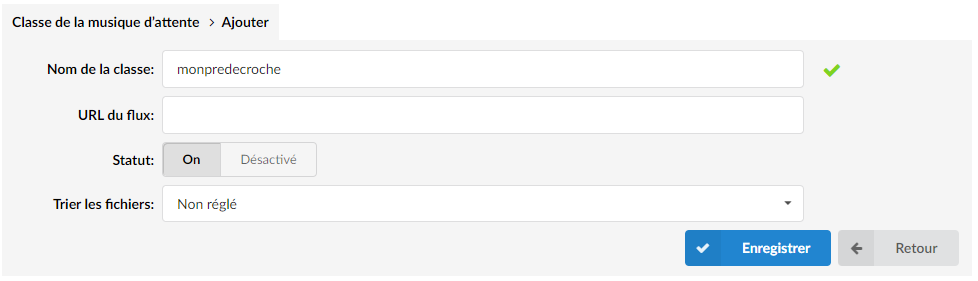
You must have created a music on hold class in System > Music on Hold > Classes

NOTE : the Status must be on “On” so that the class is active.

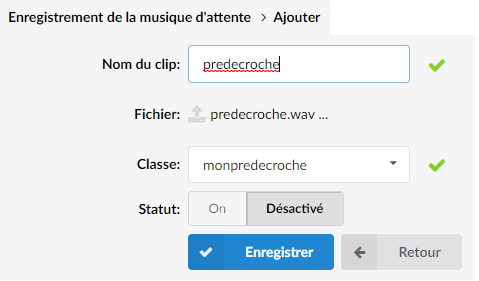
You must then have defined a music on hold in System > Music on Hold > Add a recording> Choose the previously created class.


To apply your music when calls arrive:

  • For an extension:

Add this option to the parameter in Extension > Show advanced options > Incoming Call Options
m(yourclass)
Example :

For a PBXWare Multi-Tenant, you must specify the tenant number in between.
m(m-[N°TENANT]-yourclass)

Example :


  • For an extension group:

Add this option to the parameter Extension group > Show advanced options > Dialing options:
m(music-class)
Example :

For a Multi-tenant PBXware:
m(m-[N°TENANT]-yourclass)
Example :

PBXware also allows you to re-license your PBXware from the terminal.
To do this, use SSH to connect to your PBXware and run these commands:

cd /opt/pbxware
sh /licence_refresh

If you need to reset your server with a new license number, use these commands:

cd /opt/pbxware
sh /license_refresh ABCD1234

HTTP access (auto-provisioning) is found in:

/opt/pbxware/pw/var/log/nginx/localhost.access_log

HTTPS access (PBXware Web interface) is found in:

/opt/pbxware/pw/var/log/nginx/localhost.ssl_access_log


These files can be viewed with the command less or cat, for example:

less /opt/pbxware/pw/var/log/nginx/localhost.access_log

  • Either *8 when a call rings an extension in a call group whose extension wishing to pick it up has call pickup rights:

Example, in the extension settings below, this extension is part of call group 1 and has call pickup rights for the same call group:


  • Either *88+the number of the ringing extension. Most phones are auto-provisioned with the retrieval code on the BLF. So it is enough to press the BLF key of the extension receiving the call to pick it up. Otherwise, you will need to set the pickup code (*88) in the phone.
  • Either with Communicator by right-clicking on the ringing extension => pick up the call.

In any case, the enhanced service “Directed call pickup ” of the extension that intercepts the calls, is enabled.

Connect to your PBXware system via SSH as the root user.
Go to the /opt directory

cd /opt

Stop the following services:
/opt/pbxware/sh/stop
/opt/httpd/sh/stop

Create a tar file:
tar –numeric-owner -czf backup.tgz httpd pbxware

restart the services:
/opt/pbxware/sh/start
/opt/httpd/sh/start


How to restore:

Connect to your PBXware system via SSH as the root user.
Go to the /opt directory

cd /opt

Stop the following services:
/opt/pbxware/sh/stop
/opt/httpd/sh/stop

Unzip the backup archive
tar –numeric-owner -xvf chemin_du_BACKUP
Where BACKUP_path is the full path to your backup file.

Restart the services:
/opt/pbxware/sh/start
/opt/httpd/sh/start

Error 500 Nginx, what to do?

It is possible that when you connect to your web interface on PBXware, you are surprised by a Nginx 500 error: "500 internal server error"

Nginx, like Apache for example, is a web server. It is used by PBXware to respond to users’ HTTP requests.

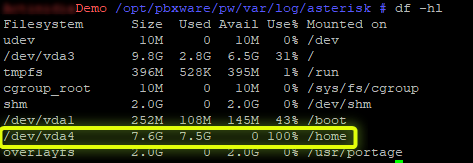
This error occurs when the main partition is full. You can check this by connecting via SSH to your machine and entering the command

df -hl

Here we can see that the partition /dev/vda4 assigned to the folder /home is at 100% disk usage and is therefore saturated.

Generally, it is the call logs or SIP registration logs that risk filling up the disk, which can be found in:

/opt/pbxware/pw/var/log/asterisk

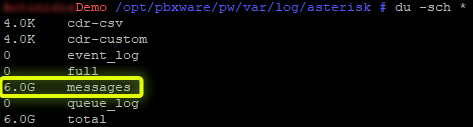
You can check which file takes up the most space with this command:

du -sch

The command of is a Linux/Unix command that allows a user to quickly obtain information about disk usage.

The argument -s (summarize) allows summarizing.

The argument -c (total) allows adding the "total" line at the bottom of the command output to see the full disk space used.

The argument -h (human readable) allows file sizes to be displayed in an understandable format (in gigabytes, for example).

Here we see that the log file "messages” takes up the most space here. Two scenarios then arise:

  • Increase the partition size /dev/vda4 
  • Purge the log file

In order to purge/empty the log file simply enter the following command:

cat /dev/null > messages

Once free disk space becomes available again on the /dev/vda4 partition, the 500 error should disappear.

Yes, it is possible to customize the phone ringtone like this:

Using the Call Filter & Blocked option under Enhanced services when editing extensions
Using the Custom Ringtone option when defining a DID
Set the ring tone of your choice for all phones in Settings > Servers > Edit

Call filter & Blocked

If you want to set a custom ringtone (which can be done per extension), click Enhanced services when editing your extension. Enable the Call Filter & Block feature. You can set a custom ringtone for anonymous callers or for known numbers. Simply click Destination Type and choose Ringtone. In the Destination field, enter the ringtone you want and it depends on the phone you have.

AASTRA phones

For AASTRA phones, enter <Bellcore-drX> in the Destination field, where X corresponds to the number of rings, usually 1-5.

CISCO phones

For CISCO phones, enter <Bellcore-drX> in the Destination field, where X corresponds to the number of rings.

LINKSYS phones

Enter the ringtone name, Simple-5 or Classic-2, for example. Ringtone names can be checked in the LINKSYS phone settings – > Ringtone.

POLYCOM phones

To set a custom ringtone on a POLYCOM phone, you must edit the sip.cfg and ipmid.cfg files. In ipmid.cfg, look for the line with these variables:

<alertInfo voIpProt.SIP.alertinfo.1.value = "Sales" voIpProt.SIP.alertInfo.1.class = "8" />

With ‘class’, you choose the ringing class to use when you set ‘value’ as a SIP header. In this case, sending a SIP header with the value ‘Sales’ will cause the phone to use the ringtone defined in class 8 of the ipmid.cfg file. In ipmid.cfg, the class 8 line looks like this:

<SALES se.rt.8.name = "Sales" se.rt.8.type = "sonne" se.rt.8.ringer = "3" se.rt.8.callWait = "6" se.rt. 8.mod = "0" />

In this case, the phone will use ringtone number 3. Characters such as blank spaces or the " sign can be used in ringtone names if they are used with a backslash (e.g. ").

Most phones do not support custom ringtones.

YEALINK

Yealink phones also require settings on the PBXware and the device. The phone settings can be updated on PBXware, via a UAD auto-configuration template or manually via the phones' web interface.

In the web interface of your phone, you must go to the Account tab, select Advanced, and scroll down to Distinctive Ring to switch it to Enabled.

In the Settings tab, select Ringtone and add a value to the "Internal Ring Text" that you want to use. for example 'Ring4'. Select the "Internal Ring File" from the list that you want to play when PBXware sends this string to your phone, for example "Ring4.wav".

On your DID or your extension group, you will need to modify the Custom Ringtone field: enter a value, for example "Ring4" (without the quotes). The string entered in the device and the string entered in the Custom Ringtone field must match.

UAD Auto Provisioning – User Agent Auto General Provisioning Template:

account.1.alert_info_url_enable = 1 (Active les "Sonneries distinctives" dans la section Compte -> Avancé) distinctive_ring_tones.alert_info.1.text = Ring4 (Définit la valeur du «texte de sonnerie interne» trouvée dans Setting -> Ring) distinctive_ring_tones.alert_info.1.ringer = 4 (Définit la valeur du «fichier de sonnerie interne» trouvée dans Paramètres -> Sonnerie)

HTEK

Htek phones also require settings on the PBXware and the device. The phone settings can be updated on PBXware, via a UAD auto-configuration template or manually via the phones' web interface.
UAD Auto Provisioning – User Agent Auto General Provisioning Template:

#Preference.AlertInternalText P1399=Ring4 #Preference.AlertInternalRinger P1402=4

SNOM
Under PBXware enter this (example for ringtone 4 of the Snom) in the custom ringtone field in extension or DID:
http://127.0.0.1/Ringer4

=> Custom ringtone in the DIDs

It is possible to set custom ringtones for extensions defined as a destination in DIDs if the phone on that extension is AASTRA, CISCO LINKSYS, or YEALINK. To set a custom ringtone for all calls coming from this DID, use the Custom Ringtone field, where you enter the same as above, depending on the phone type.

From now on, every call originating from this DID will have the same custom ring tone, whereas you must set the custom ring tone per extension and anonymous callers using call filters and blocking. In addition, if you use both methods to set custom ring tones, the DID option overrides the Call Filters and Blocking ring tone.

Fanvil or GrandStream

For Fanvil or Grandstream phones, enter <Bellcore-drX> in the Destination field, where X corresponds to the number of rings, usually 1-5.

Setting the custom ringtone for all phones

To set a ringtone for all phones on the system, click Settings-> Servers then Edit. There you will find the Ringtone for local calls option under Features. Here, you have the option to enter the ringtone of your choice for all phones (same information as above).

NOTE: To use this option system across the entire system, all your phones must be from the same manufacturer.

It is entirely possible to change the default music on hold when you create a new tenant on your system.

Connect to your PBXware via SSH and enter the Asterisk sounds folder.

cd /opt/pbxware/pw/var/lib/asterisk/sounds/

Create a folder named tenant-default and change its owner:

mkdir tenant-default chown 555:555 tenant-default

Once the folder is created, you must upload the sound file that you wish to use as the new default music on hold when creating a new tenant.

Please note that the file must be named: defaut and be in the format .gsm

NOTE : you can use the PBXware Sound Wizard Converter in local mode to convert your audio file to .gsm format.

Once the file is converted to .gsm format, upload it to the folder tenant-default created:

/opt/pbxware/pw/var/lib/asterisk/sounds/tenant-default/

Once the file is loaded into the designated folder, you must also change the owner of the file and its permissions:

Enter the folder tenant-default :

cd /opt/pbxware/pw/var/lib/asterisk/sounds/tenant-default/

Change the owner of the loaded default.gsm file:

chown 555:555 default.gsm

Change the mode of the loaded default.gsm file:

chmod 644 default.gsm

Once this operation is completed, your new music on hold file will be used by default by each newly created tenant.

Prerequisites:

  • FTP client (WinSCP, FileZilla, …)
  • Command line terminal
  • Sound pack in the correct format

It is possible to change the language of the voice (the voice when checking voicemail, for example).

We have created an FR voice pack in studio recording for PBXware, which we can offer you.

Click here to download this FR pack.


Procedure to set up our FR voice pack:

1. Log in using WinSCP or any other FTP client to the PBXWARE server (host (IP or domain) + port 2020) with your root credentials.

2. Send the provided FR voice pack: "sound_fr_v2.3.zip” in /opt/pbxware/pw/var/lib/asterisk/sounds/

3. Then connect via SSH to the server and enter the following command:

cd /opt/pbxware/pw/var/lib/asterisk/sounds/ unzip sound_fr_v2.3.zip

4. Next, you need to specify under PBXware in Settings > Protocols > Default language: fr

It is possible that the sending of emails on PBXware, using the SMTP protocol, is failing.

If there is an issue sending emails with the SMTP configuration that looks like this:

ERROR: Failed to authenticate on SMTP server with username "test@test.com"

Check the SMTP sending logs with the following command: the latest error messages displayed like this:

less /opt/pbxware/pw/var/log/ssmtp/msmtp.log

The latest SMTP send logs will be displayed like this; here is an example of a failed SMTP send:

Aug 12 10:40:49 host=smtp.office365.com tls=on auth=off from=test@test.com recipients=test2@test2com smtpstatus=530 smtpmsg='530 5.7.57 Client not authenticated to send mail. [956EZZE51X1.CC4745.OUTLOOK.COM]' errormsg='envelope from address test@test.fr not accepted by the server' exitcode=EX_DATAERR

The SMTP configuration using TLS/STARTTLS probably did not save in the user interface (:81, or Wizard). To fix this, you need to check the configuration file msmtprc SMTP /opt/pbxware/pw/etc/msmtprc

In addition to enabling TLS, you must add the following line at the bottom of the SMTP configuration file:

auth on

The configuration file is named msmtprc and is located in the path /opt/pbxware/pw/etc/msmtprc.

In order to unlock the user limit in a queue configured by PBXware, go to the queue concerned and in the Additional config > Advanced section enter this command line:
number_of_members_to_dial=15
15 being the variable number of users to define.

When closing during an operation time (Tenant, DID, Queue, Ring Group), you can redirect the call to an external destination.

To do this, you simply need to forward the call to an empty extension group, with optionally Last destination the desired external number.

NOTE: The option Voicemail on the Last Destination must be on No.

1. Log in via SSH to the system and enter this command:

/opt/pbxware/sh/mysql -e "INSERT INTO pbxware.config (name,value) VALUES('transfer_dialopt','1');"

2. In Extensions > System > Extension > Show advanced options > Outbound Call Options: add the argument T

Check that the codecs set on the phone match the codecs set on the extension in PBXware.

If you are able to make calls but your voice is not heard, check the following points:

– The following ports must be opened/forwarded to the local IP address of the IPBX on the router/firewall of the IPBX network.

SIP traffic:

  • TCP: 10001, 5060-5069
  • UDP: 4000-4999, 5060-5069, 10000-20000
  • pwproxy (for Communicator): 10005

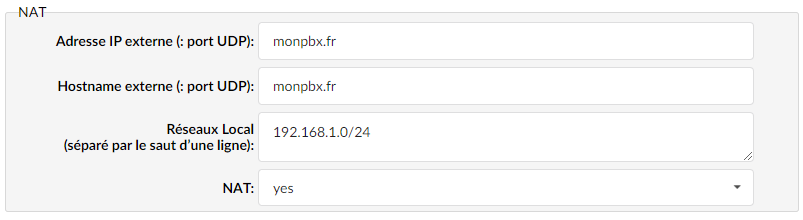
In Settings > Protocols > set the “NAT” option to “Yes”
Enter the external IP address and the local network followed by the subnet mask.

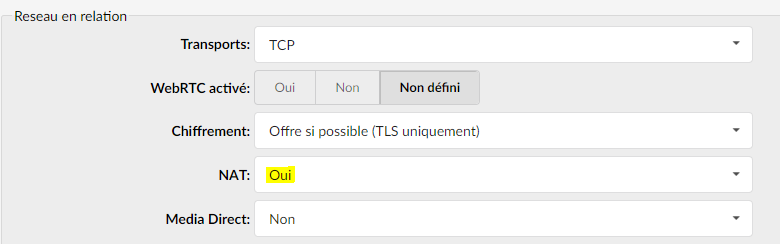
You must also set NAT to Yes in the extensions of the remote phones.

To do this, go to the relevant extension then Show advanced options > Related network > NAT: set to Yes


If the server is running from an IP LAN or behind a router/firewall, all ports listed below must be opened/forwarded by the router/firewall.

Ports for updates (rsync):

  • TCP: 873

Web interface:

  • TCP: 80, 81, 443

SSH access:

PBXware

  • TCP: 2020

SERVERware

  • TCP: 2020, 2222

SIP traffic:

  • TCP: 10001, 5060-5069
  • UDP: 4000-4999, 5060-5069, 10000-20000

IAX traffic:

  • TCP: 5038, 5037
  • UDP: 4569

PWProxy:

  • v5.0 TCP: 10005
  • v6.0 TCP: 10005, 10007, 10009

Jabber traffic (deprecated as of v6.0):

  • TCP: 5222 and 5223

Provisioning TFTP:

  • UDP: 69

Company directory (LDAP):

  • TCP: 11389, 11636

BSSUP (Bicom Systems Support Access):

  • TCP: 2244

The PBXware enterprise directory works and basically auto-provisions Yealink, Polycom, and Cisco brand phones, but the HTEK and FANVIL templates do not, for the moment, provide for these settings.

The configurations should be added in the field UAD auto provisioning template the extensions to which you want to synchronize the directory:

For HTEK phones

 P5430=(cn=%) P5431=(pn=%) P5432=AdresseDuServeurLDAP P5433=11389 P5434=Adresse_MAC_Du_Tel P5435=Adresse_MAC_Du_Tel P5436=LDAP_Password P5437=50 P23136=cn P23137=pn P5440=%cn P5442=0 P5441=1 P5443=1 P5444=>1

For FANVIL phones

Depending on the structure of the template used by PBXWare for this phone, which you can check at the address http://pbxware-exemple.fr/prov/adresseMAC.cfg (connection with your provisioning logins), or go to your phone's configuration and export the configuration in .txt format. 

Then choose one of the provisioning template structures below: 

 phone.ldap.1.Title = Contacts phone.ldap.1.Server = AdresseDuServeurLDAP phone.ldap.1.port = 11389 phone.ldap.1.Base = Adresse_MAC_Du_Tel phone.ldap.1.UseSSL = 0 phone.ldap.1.Version = 3 phone.ldap.1.CallingLine = -1 phone.ldap.1.InCallSearchEnabled = 0 phone.ldap.1.OutCallSearchEnabled = 0 phone.ldap.1.Anonymous = phone.ldap.1.Authenticate = 3 phone.ldap.1.Username = Adresse_MAC_Du_Tel (exemple : 0c383e43dbcb) phone.ldap.1.Password = LDAP_Password phone.ldap.1.TelAttr = pn phone.ldap.1.MobileAttr = mobile phone.ldap.1.OtherAttr = other phone.ldap.1.NameAttr = cn phone.ldap.1.SortAttr = cn phone.ldap.1.Displayname = %cn phone.ldap.1.NumberFilter = (pn=%) phone.ldap.1.NameFilter = (cn=%) phone.ldap.1.MaxHits = 50 phone.LDAPSearch = 1

Or following the Template format:

<PHONE FEATURE MODULE>
--LDAP Config-- :
LDAP1 Title :Contacts
LDAP1 Server :AdresseDuServeurLDAP
LDAP1 port :11389
LDAP1 Base :Adresse_MAC_Du_Tel (exemple : 0c383e43dbcb)
LDAP1 Use SSL :0
LDAP1 Version :3
LDAP1 Calling Line :-1
LDAP1 Bind Line :-1
LDAP1 In Call Search :0
LDAP1 Out Call Search :0
LDAP1 Authenticate :3
LDAP1 Username :Adresse_MAC_Du_Tel (exemple : 0c383e43dbcb)
LDAP1 Password :LDAP_Password
LDAP1 Tel Attr :pn
LDAP1 Mobile Attr :mobile
LDAP1 Other Attr :other
LDAP1 Name Attr :cn sn ou
LDAP1 Sort Attr :cn
LDAP1 Displayname :cn
LDAP1 Number Filter :(|(telephoneNumber=%)(mobile=%)(other=%))
LDAP1 Name Filter :(|(cn=%)(sn=%))
LDAP1 Max Hits :50

Example for a Fanvil X3S:

<PHONE CONFIG MODULE>
--LDAP Config-- :
LDAP1 Title :Contacts
LDAP1 Server :AdresseDuServeurLDAP
LDAP1 port :11389
LDAP1 Authenticate :4
LDAP1 Version :3
LDAP1 Calling Line :0
LDAP1 Enable Search :1
LDAP1 Bind Line :0
LDAP1 Base :Adresse_MAC_Du_Tel (exemple : 0c383e43dbcb)
LDAP1 Username :Adresse_MAC_Du_Tel (exemple : 0c383e43dbcb)
LDAP1 Password :LDAP_Password
LDAP1 Tel Attr :pn
LDAP1 Mobile Attr :mobile
LDAP1 Other Attr :other
LDAP1 Displayname :cn
LDAP1 Filter Name :(|(cn=%)(sn=%))
LDAP1 Filter number :(|(telephoneNumber=%)(mobile=%)(other=%))
IMPORTANT NOTE:

Text indentation must be taken into account. An extra space or a missing space before or after the ":" can cause the configuration to malfunction.

For SNOM phones:

ldap_server$ :adresse.serveur.ldap (votre PBX)
ldap_port$ :11389
ldap_base$ :Adresse_MAC_Du_Tel (exemple:0c383e43dbcb)
ldap_username$ :Adresse_MAC_Du_Tel (exemple:0c383e43dbcb)
ldap_password$ :MDP_LDAP
guess_max_hits$ :50
ldap_sort_mode$ :none
ldap_search_filter$ :(cn=%)
ldap_number_filter$ :(pn=%)
ldap_search_filter_during_call$ :(cn=%)
ldap_number_filter_during_call$ :(pn=%)
ldap_name_attributes$ :cn
ldap_number_attributes$ :pn
ldap_display_name$ :cn

To recover your administrator access to the PBXware web interface, you must always have root access.

It is possible to add an additional administrator account by logging in via SSH to your PBXware machine and entering the MySQL shell:

/opt/pbxware/sh/mysql

Then inject this new entry (change the name, email address, and password):

insert into sitemanager_global.users set name='Bicom France', email='support@ags-next.com', password=md5("VotreMotDePasse"), type=1;

You will then simply need to log in with this administrator account.


Depending on the phone model, there is a setting that allows updating the CallerID.

In the extension settings, on PBXWare, look for the option “Send Remote-Party-ID” and “Use Remote Party ID”.

Also search for the option in the extension "Trust Remote-Party-ID" and toggle this option to Yes.

For a Yealink, go to its phone web administration interface (e.g.: 192.168.1.104), then in Account > Advanced > CallerID Source you must configure the option RPID-PAI-FROM.

Another solution is to inject the following provisioning parameter into the phone:

account.1.cid_source = 3

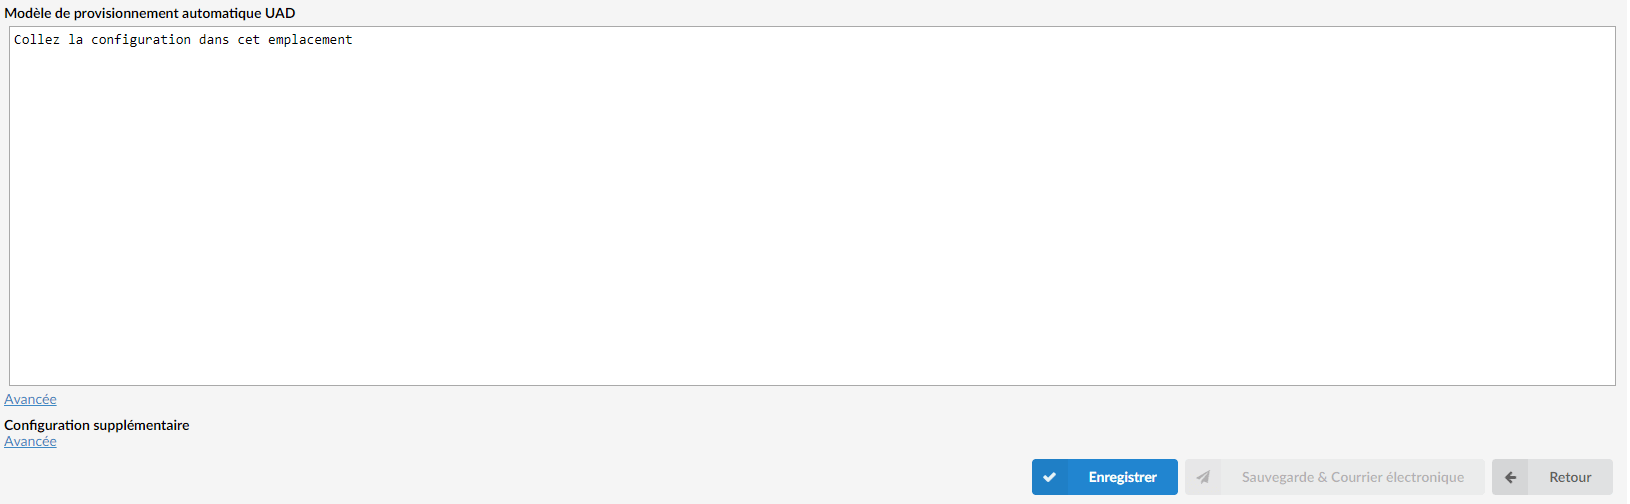
Under PBXware phones can be auto-provisioned by adding custom parameters in the UAD of the Yealinks in the field General user agent auto-provisioning template

For HTEK go to the phone administration interface, then in Profile > Advanced >  Caller Display Source > Configure the field RPID-PAI-FROM.

It may happen that remote SIP phones are registered on PBXware but appear offline.

You will then need to check the following points:

In extensions :

  • UAD Location: Remote
  • NAT: Yes

In the phone settings:

  • Pass the value “Registration Timer” to 120 seconds
  • Enable Keep Alive with a reduced interval.


Snom case:

In the WEB interface of the SNOM > Identity > NAT > Interval for keepalive > Fill in 15 and set the option Offer ICE on OFF


Yealink case:

In the web interface of theYealink Accounts > Advanced and;

  • Keep Alive Type: defaut
  • Keep Alive Interval (Seconds): 15


If the problem persists:

  • Set the SIP transport in the phone to TCP instead of UDP.

For remote phones and phones behind a router/firewall:

  • The lifetime of UDP sessions (Time/Timeout/NAT Session) must be greater than or equal to 180 seconds.
  • The SIP ALG feature must be disabled on active equipment (if possible)
  • Outgoing traffic must be allowed.
  • For the SIP protocol: traffic must be allowed to go out on ports 5060 and 5061
  • The port range 10000 to 20000 in UDP must also be opened outbound on the (RTP ports, sound range).

On the PBXWare machine, live or connected via an SSH console:

Simply run this command:

tcpdump -i eth0 -n -s 0 port 5060 -vvv -w /home/capture_file_name.pcap 

By specifying port 5060 only the SIP exchanges will be captured, but not the RTP (audio) exchanges

To capture everything:

tcpdump -i eth0 -n -s 0 -vvv -w /home/capture_file_name.pcap

-i = interface on which you want to capture, eth0, eth1, eth2, etc.
-n = Do not convert IP addresses into names, prevents DNS lookups.
-s = How many bytes of data to capture from each packet, zero means use the length required to capture whole packets.
port = Which port to listen on, 5060 is the default port for SIP.
-vvv = Verbose, this will give you as much detail as possible.
-w = Write to a file to be analyzed later.


To perform an infinite packet capture without saturating the PBXWare server disk space:

tcpdump -i eth0 -n -s 0 -vvv -w /home/capture_file_name.pcap -W20 -C50

-W20 (Indicates the number of files to keep in retention, here 20)
-C50 (Indicates to split the capture files every 50 MB)
in this example we will therefore have 20x50MB = 1GB of files in retention.
Once it reaches 20×50 files, on the next capture file it will delete the oldest file and thus creates a loop.

In order to run the command in the background with the ability to close the console without stopping the capture:

nohup tcpdump -i eth0 -n -s 0 -vvv -w /home/capture_file_name.pcap -W20 -C50

Second solution:

Type this command:

/opt/pbxware/sh/sngrep

or to capture only calls

/opt/pbxware/sh/sngrep -c

or to capture only calls including the capture of RTP packets (audio)

/opt/pbxware/sh/sngrep -c -r

A table is displayed with the ongoing SIP traffic, including calls.

In order to analyze the packet captures, please consult our dedicated tutorial.

Simply add the IP addresses in the file:
/home/sipprot.blacklist

Only one IP address per line is allowed. Lines starting with the # character will be ignored. It is also possible to add a network range to it. Here is an example of a blacklist file:

nano /home/sipprot.blacklist

192.168.1.1
192.168.1.2
192.168.1.20/30

Brute-force intrusion attempts are quite common and VoIP PBX systems that are not protected are very susceptible to this type of attack. The most common consequence of this type of network attack can be:

  • VOIP service interruption and unavailability,
  • The possibility of password theft (SIP registration).

SIPProt automatically blocks IP addresses in the dynamic blacklist, then automatically unblocks after the time set in the parameter block_time of the file: /home/sipprot.conf

Then depending on the setting block_threshold It permanently blocks the IP address if it has been blocked more times than this value (for example, if the value is 3, the fourth block is permanent). The value can be set to 0, in which case it will never block permanently.

There are also the settings monit_period and hit_count to take into account.

example: monit_period = 60 and hit_count = 5

If during 60 seconds ago 5 sip registrations that have failed, sipPROT puts the IP address in the dynamic blacklist.

Leaf Illustration

© Bicom Systems France

Last updated: 9 July 2026 Legal noticePrivacyCookiesTerms © 2026 Bicom Systems