FR EN

TUTORIAL: Configure Snom RPS provisioning

Estimated reading: 13 minutes

RPS (Remote Provisioning Service) provisioning is a device configuration method that allows phones to be provisioned automatically without needing to enter the provisioning settings in their web interface, thus freeing you from all manual configuration in order to register the phones on PBXware.

The service SRAPS of Snom notably allows this provisioning method.

Note for administrators

Note that a preliminary step in order to configure RPS provisioning for the systems Multi-Tenant is required.

You must enable and set the RPS provisioning mode. To do this, in PBXware, navigate to Settings > Tenants > Show advanced options > General settings section > RPS provisioning mode and set the “Provisioning Mode” option to Tenant or General, which defines how the RPS provisioning will be configured.

General : The RPS provisioning configuration page will only be visible on the Master Tenant. Choose this mode if you want a single configuration to be used for all Tenants.

Per tenant : The RPS provisioning configuration page will be visible on each Tenant. Set this mode if you want to be able to configure the RPS feature on each tenant separately.

What is SRAPS?

SRAPS stands for Secure Redirection And Provisioning Service for secure redirection and provisioning service.

This service allows the phone to use Zero Touch Provisioning (ZTP) deployment in order to provision the phones without having to access their web interface and configure them. With SRAPS, you can remotely manage Snom phones without any on-site configuration, which saves time and avoids human errors.

Furthermore, SRAPS is able to push firmware updates of all phones to a custom version. 

This makes it possible to update dozens of phones even before automatic provisioning occurs. In addition, SRAPS provides a redirection feature that points the phone to the system where the configuration file is located, but can also provide general custom settings alongside the original configuration file.

Below you will find details to configure RPS provisioning with the SRAPS service step by step.

Preliminary settings

Before starting RPS provisioning of a Yealink desk phone, it is important to have defined several parameters: 

  • Have defined a provisioning URL in your tenant/server settings
  • Have defined a provisioning login/password pair for your tenant/server

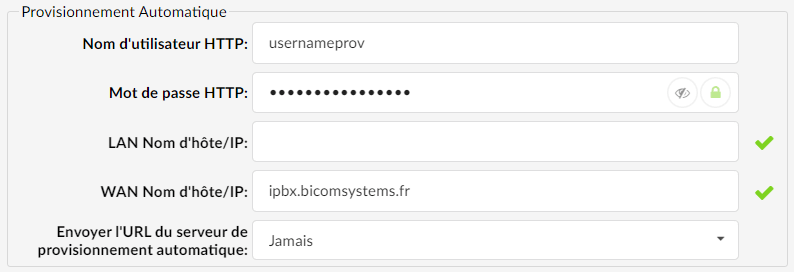
Enter a provisioning URL

Enter your server's provisioning URL in the Auto Provisioning section of your Master-Tenant (MT) or Server (Business/CC) in the field WAN Hostname/IP:

You will find this field through the following path:

  • For a Multi-Tenant system: Settings > Tenants > Master-Tenant > Tenant configuration > Auto Provisioning > WAN Hostname/IP
  • For a Business/CC system: Settings > Servers > Select your server > Server configuration > Auto Provisioning > WAN Hostname/IP
Enter provisioning credentials

The provisioning credentials are entered in the server settings for the PBXware Business/Contact Center editions and in the tenant settings for the Multi-Tenant editions.

  • On Business/CC editions, click Settings > Server > Click your server > Auto provisioning
  • On the Multi-tenant edition, position yourself on the Master-tenant & click on Settings > Tenants > Click your tenant > Auto provisioning

Access SRAPS

To obtain a SRAPS account, sign up for free at https://sraps.snom.comby clicking on Sign up and enter the basic account information (company name, country, city). 
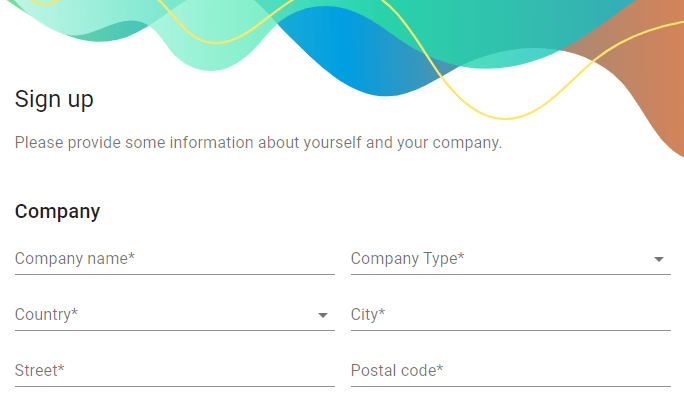
Then, the user can use the zero-touch provisioning feature.

Generate an SRAPS API key 

When you have created your SRAPS account, the first step in integrating PBXware with SRAPS is to create a pair of API key on your SRAPS space.

To do this, log in to your SRAPS account and go to the section API Keys located on the left side panel.

Click the button Add in order to create an API key.
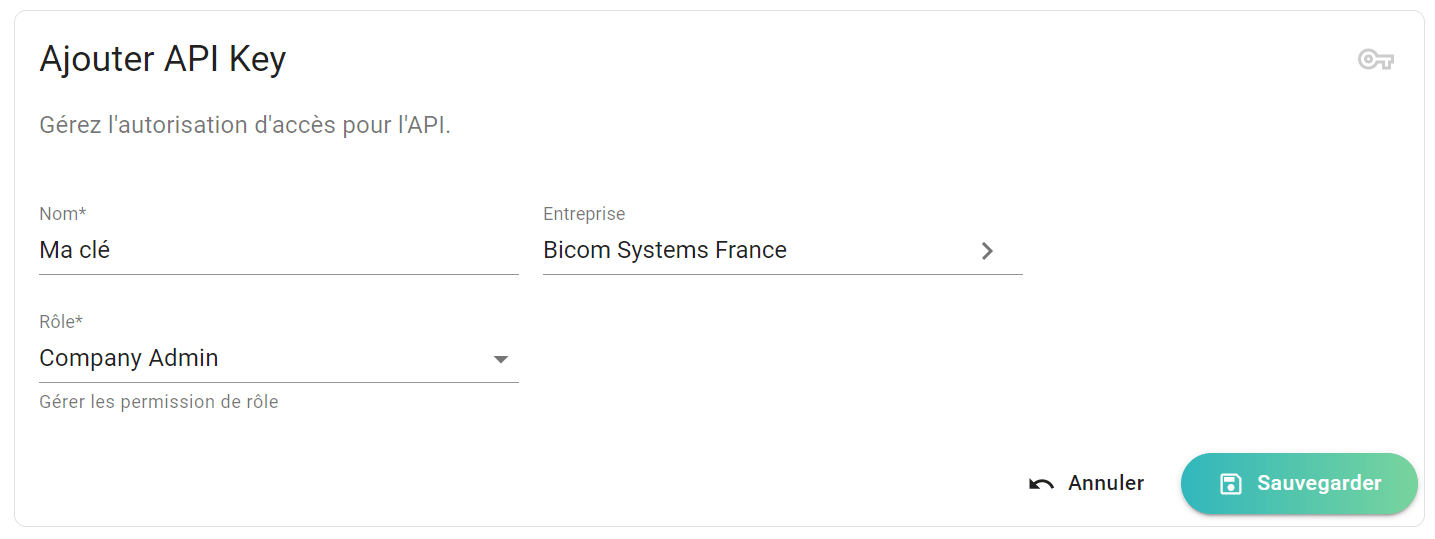
Choose a company name for each API key can prove useful when you need to provision multiple tenants with a different API key.

Be sure to select the role Company Admin as SRAPS does not allow the registration of the device if this role is not chosen. Click on Save.

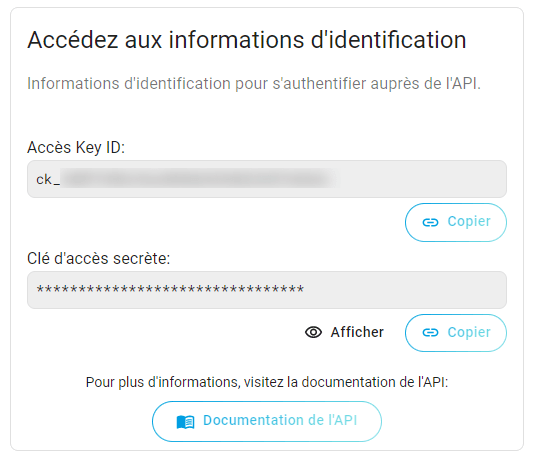
The key pair AccessKeyID and Access Key Secret (key password) will then be automatically generated.
Configure PBXware for SRAPS

The next step is to integrate PBXware with SRAPS via the previously created API key. 

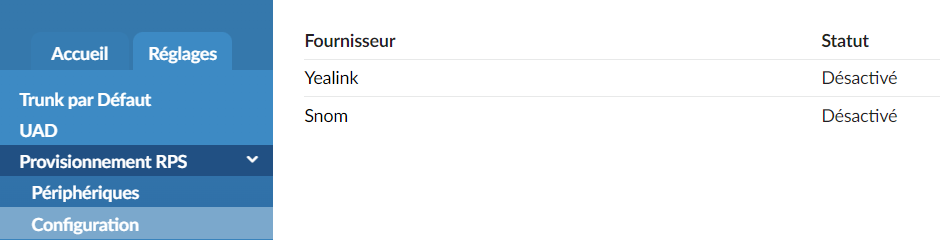
To do this, click on Master Tenant (on a Business or Contact-Center version, go directly to the settings) >Settings > RPS Provisioning Configuration and select the provider Snom.
Then insert theAccess Key ID and Access Key Secret of your API key previously created.
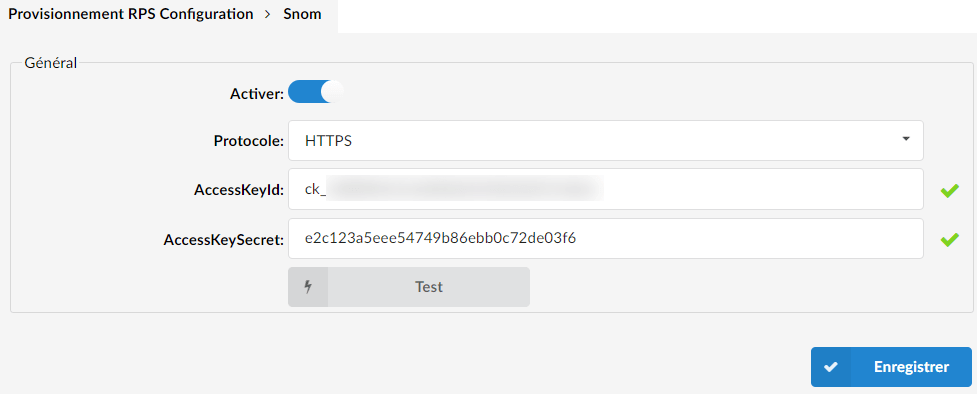
After inserting the credentials, click Save, then on the button Test

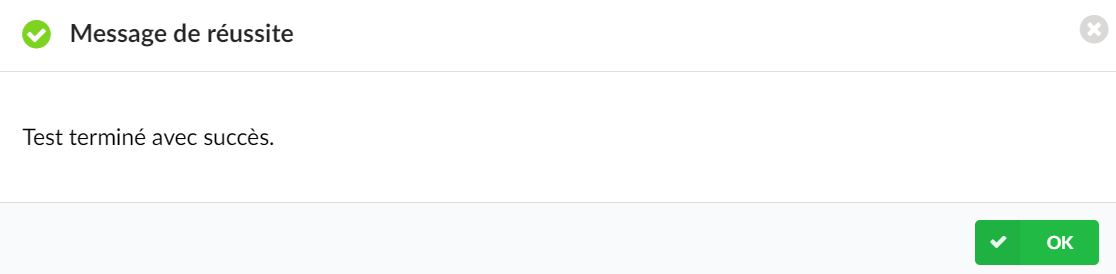
The following message indicates that PBXware is properly integrated with your SRAPS account: 
Provisioning configuration

Now, to provision a phone using the RPS service, follow these steps:

  1. Create/edit an extension and make sure three elements are set:
  2. The UAD location must be set to Remote.
  3. Auto provisioning must be set to Yes and enter the MAC address of your phone.
  4. In the UAD field, it must be a UAD from the Snom provider.
  5. Save the extension settings.
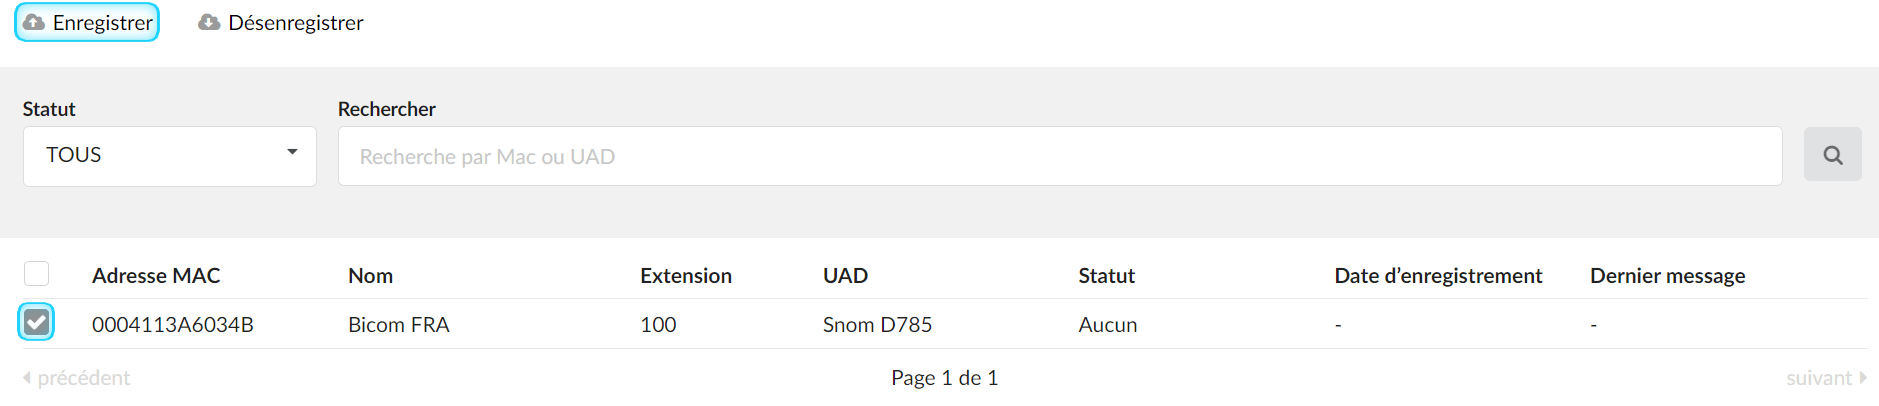
  6. Register the phone with the provider's redirection service. To do this, go to Settings > RPS Provisioning > Devices
  7. Select the device with the phone's MAC address and click the Save button.

On PBXware, when you create a new extension or have already created extensions with a Snom UAD, you will thus be able to provision it using the RPS feature.

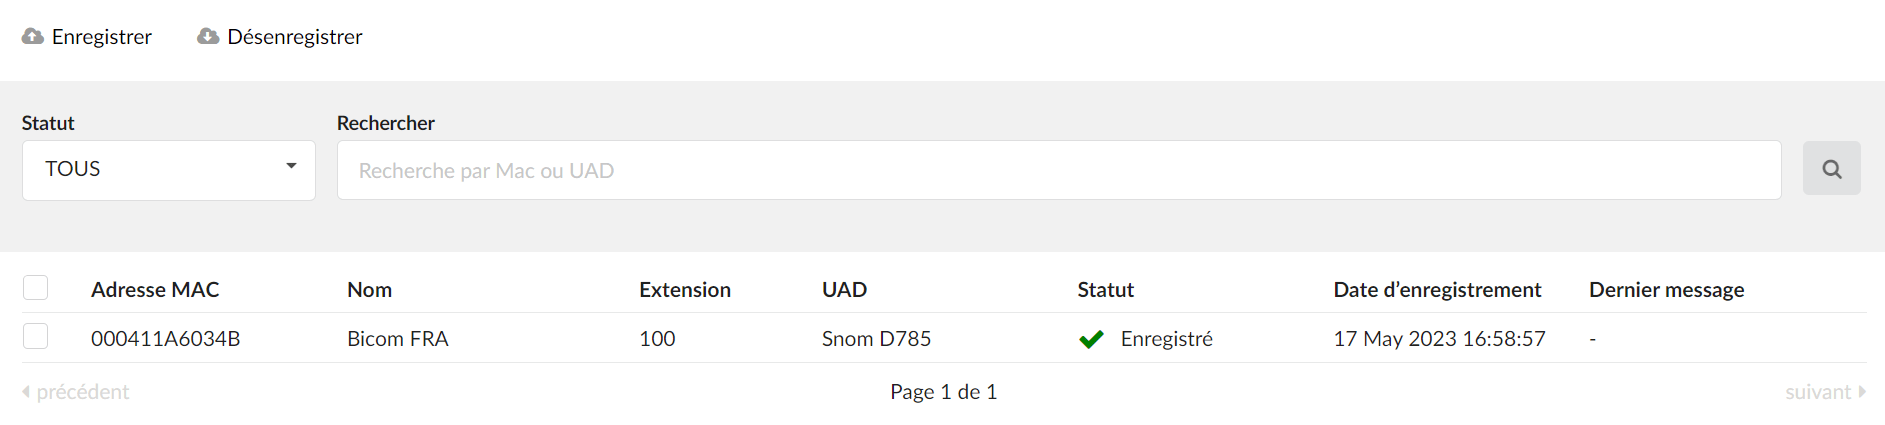
In the section RPS Provisioning > Devices of PBXware, you will be able to see a list of all recognized Snom devices that can be used for RPS provisioning as soon as an extension uses a Snom UAD.

In particular, you will be able to see the MAC addresses, name, extension number, UAD type, status, registration date and last message of each device.
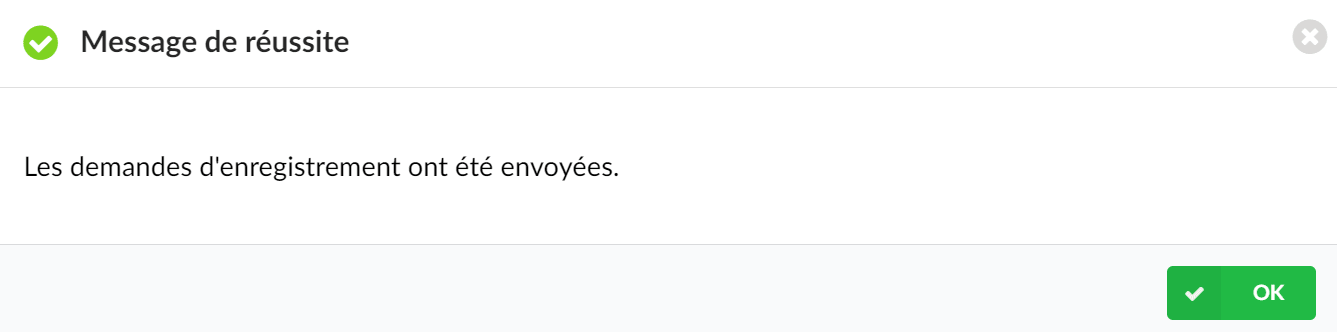
If the registration succeeded, the following message should appear:
You will thus be able to monitor the registration status of the devices and the date on which the registration took place. 

The column Last message displays the errors that may occur. 
If the registration was completed successfully, you will see the symbol ” ” in this column.

When you select the device and click the button Save, PBXware automatically generates the access details in its database and integrates them via the API on the SRAPS server. 

The dynamically generated details are as follows:

  • HTTP Username
  • HTTP password
  • Provisioning URL http://$PBXWARE_IP/ztprov/snom{$MODEL}-{$MAC}.htm
The following process then occurs:
  1. The URL, HTTP username and HTTP password are passed to the SRAPS server by PBXware, which in turn will be passed to the phone to transmit a provisioning authorization. This indicates that the phone visited the SRAPS server and collected the credentials.
  2. The phone then visits the provisioning URL and provides the HTTP username and password for authentication. 
  3. If the credentials are correct, PBXware approves the request and the phone receives the auto-provisioning template generated by PBXware. 

  4. After this step, the phone restarts and provisions itself with the normal provisioning configuration file using the HTTP username and HTTP password defined in the tenant/server settings.

Throughout this entire process, your role is only to create API keys and integrate PBXware with SRAPS. 

The Devices section of your SRAPS space is empty at first and no device is present. However, when you click the button Save on PBXware in order to register a Snom device, the SRAPS account is provisioned automatically with new devices. A provisioning URL, username, and password are then automatically generated. 

Your phone is now ready to be reset to factory state; all the prerequisites are met for its RPS provisioning.

Note that if the phone is new or still in its packaging, it does not require any reset. Only reset the phone if a configuration has previously existed on it.

Phone reset

You can reset your Snom phone in two ways:

  • Via the web interface
  • Manually

Factory reset via the graphical interface

Log in to the web interface of your Snom phone (for example 192.168.1.94) and in the left side panel, click on Advanced, then on Update and finally click the button Reset which will reset the phone to factory state.

Factory reset manually

Dial * * # # then hold # on the phone. The phone should then start in recovery mode. Then select Settings reset.

If every step is followed up to this point, the phone should be automatically provisioned and the extension will then go online on PBXware.
The user can dial *123 in order to enter their voicemail to confirm the provisioning.

Log files

During the provisioning process, the phone will authenticate to the web server in order to access its configuration file.

This file can be found at the following path:

/opt/pbxware/pw/var/log/nginx/localhost.access_log

ztprov request

The first request GET is sent by phone without credentials. However, the Nginx service responds with a response message 401 Unauthorized requesting authorization.

<snip> GET /ztprov/snomd717-ABC123EFG456.htm HTTP/ 1.1 " 401 <snip>

The initial request must be followed by the next one. When 200 is returned, Nginx allows the phone to access /ztprov/snomd717-ABC123EFG456.htm as the phone authenticated with the credentials received when connecting to the SRAPS server. 

<snip> GET /ztprov/snomd717-ABC123EFG456.htm HTTP/ 1.1 " 200 <snip>

The file the phone has just received contains, among other default general parameters, credentials that will be used as authentication when requesting the next file – /prov/snom{modèlel}-{mac}.htm . 

These settings are:

  • setting_server$:http:// <votreipbx.fr>/prov/snomd717-ABC123EFG456.htm
  • http_client_user$ :<PBXWARE_HTTP_LOGIN>
  • http_client_password$:<PBXWARE_HTTP_PASSWORD>

The http_client_user$ and http_client_password$ are defined by the PBXware administrator in the tenant settings under the Auto Provisioning section and will be used for authentication when requesting /prov/snom{modèle}-{mac}.htm

/prov request

The next step is to request /prov/snom{modèle}-{mac}.htm , after which the web server responds with 401 Unauthorized.

<snip> GET /prov/snomd717-ABC123EFG456.htm HTTP/1.1" 401 <snip>

The phone sends the request again but includes the credentials received from the file /ztprov/snom{modèle}-{mac}.htm and the request/response looks like this:

<snip> GET /prov/snomd717-ABC123EFG456.htm HTTP/1.1" 200 <snip>

This request must include a response code from 200 which completes the zero-touch provisioning process. 

The phone will reboot and use the auto-provisioning credentials received from /prov/snomd717-ABC123EFG456.htm  for each rolling restart. 

The phone will not contact the SRAPS server until it has been reset to factory settings.

Troubleshooting

The configuration file for the zero-touch provisioning service is located in /opt/pbxware/pw/etc/rps/rps.ini

You will find some contexts (sections) that define the behavior of the service. In a general context, you can control the queuing of events for the RPS service. Since each action in the graphical interface creates an event, the events must be queued (first come, first served). The following two directives define the number of queues and the number of events per queue:

  • queuenum : number of queues.
  • queuecap : number of events per queue

Generally, there is an HTTP listener in the RPS service that listens on port 15777, and any changes made from the GUI will be sent as events to the service on this port 15777.

Any event (i.e. registering a device, unregistering a device) will be retrieved by the DISTRIBUTOR and distributed into queues. 

There is, for example, a line in the rps.log file that explains what the event distribution service does:

[2021-10-26 10:20:40] INFO (DISTRIBUTOR): Distributing events. Num=1) 

Then, the queue retrieves the events and sends them as requests to the SRAPS server to add (register) a device. This request may look like this:

INFO (Snom): Sending Request. Mac=ABC123EFG456 Url=https://secure- provisioning.snom.com/api/v1/tokens/**ACCESS_KEY_ID** INFO (Snom): Sending Request. Mac=ABC123EFG456 Url=https://secure-provisioning.snom.com/api/v1/settings/ INFO (Snom): Sending Request. Mac=ABC123EFG456 Url=https://secure- provisioning.snom.com/api/v1/companies/5fab351853094e129cc2c1185ff329cf/endpoints/ABC123EFG456 

The database then adds a device to the MySQL database. Finally, the queues are cleaned since there are no events to handle.

The dispatcher sees that the queues are empty and tries to retrieve more events to send to a queue. If there are more events, they will be sent to a queue for execution.

Common errors

403 Forbidden

ERROR Error while handling Event. Action=add Err=403: Forbidden MAC=ABC123EFG456 Provider=snom Server=8

You may see this error when the SRAPS account does not have permissions. This is resolved by choosing Role in the SRAPS account when creating API keys.

Share

TUTORIAL: Configure Snom RPS provisioning

Or copy the link below

CONTENT