TUTORIAL: Configure Yealink RPS provisioning

RPS (Remote Provisioning Service) provisioning is a device configuration method that allows phones to be provisioned automatically without needing to enter the provisioning settings in their web interface, thus freeing you from all manual configuration in order to register the phones on PBXware.
NOTE:
RPS provisioning (Touchless provisioning) must be enabled in the PBXware license as it is an additional module. Please contact your reseller to request it.
Note for administrators
Note that a preliminary step in order to configure RPS provisioning for the systems Multi-Tenant is required.
You must enable and set the RPS provisioning mode. To do this, in PBXware, navigate to Settings > Tenants > Show advanced options > General settings section > RPS provisioning mode and set the “Provisioning Mode” option to Tenant or General, which defines how the RPS provisioning will be configured.
General : The RPS provisioning configuration page will only be visible on the Master Tenant. Choose this mode if you want a single configuration to be used for all Tenants.
Per tenant : The RPS provisioning configuration page will be visible on each Tenant. Set this mode if you want to be able to configure the RPS feature on each tenant separately.
NOTE:
By default, this option is set to Not selected and in that case, you will not be able to see the RPS provisioning menu on PBXware.
Preliminary settings
Before starting RPS provisioning of a Yealink desk phone, it is important to have defined several parameters:
- Have defined a provisioning URL in your tenant/server settings
- Have defined a provisioning login/password pair for your tenant/server
- You must have a YMCS Yealink account (https://ymcs.yealink.com/)
Enter a provisioning URL
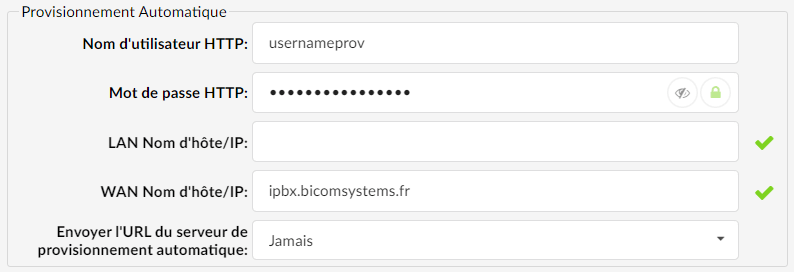
Enter your server's provisioning URL in the Auto Provisioning section of your Master-Tenant (MT) or Server (Business/CC) in the field WAN Hostname/IP:
You will find this field through the following path:
- For a Multi-Tenant system: Settings > Tenants > Master-Tenant > Tenant configuration > Auto Provisioning > WAN Hostname/IP
- For a Business/CC system: Settings > Servers > Select your server > Server configuration > Auto Provisioning > WAN Hostname/IP
Enter provisioning credentials

The provisioning credentials are entered in the server settings for the PBXware Business/Contact Center editions and in the tenant settings for the Multi-Tenant editions.
- On Business/CC editions, click Settings > Server > Click your server > Auto provisioning
- On the Multi-tenant edition, position yourself on the Master-tenant & click on Settings > Tenants > Click your tenant > Auto provisioning

Generate the Yealink APIs
To obtain the credentials, including the authentication token, you must have a Yealink RPS account. Please contact your distributor or Yealink support.
For more information, consult the Yealink FAQabout this.
NOTE:
If you have a Yealink channel account (reseller), you will need to create a site first.
Go to the section Enterprise management then click the button Add.
For all tenants, Business & CC
If you use the PBXware Business, Call-Center or Multi-Tenant version but want all your tenants to share the same site, and therefore the same credentials, follow the steps below.
Once your YMCS Yealink account is obtained, follow these steps to obtain the API credentials that will allow you to configure the Yealink provider on PBXware.
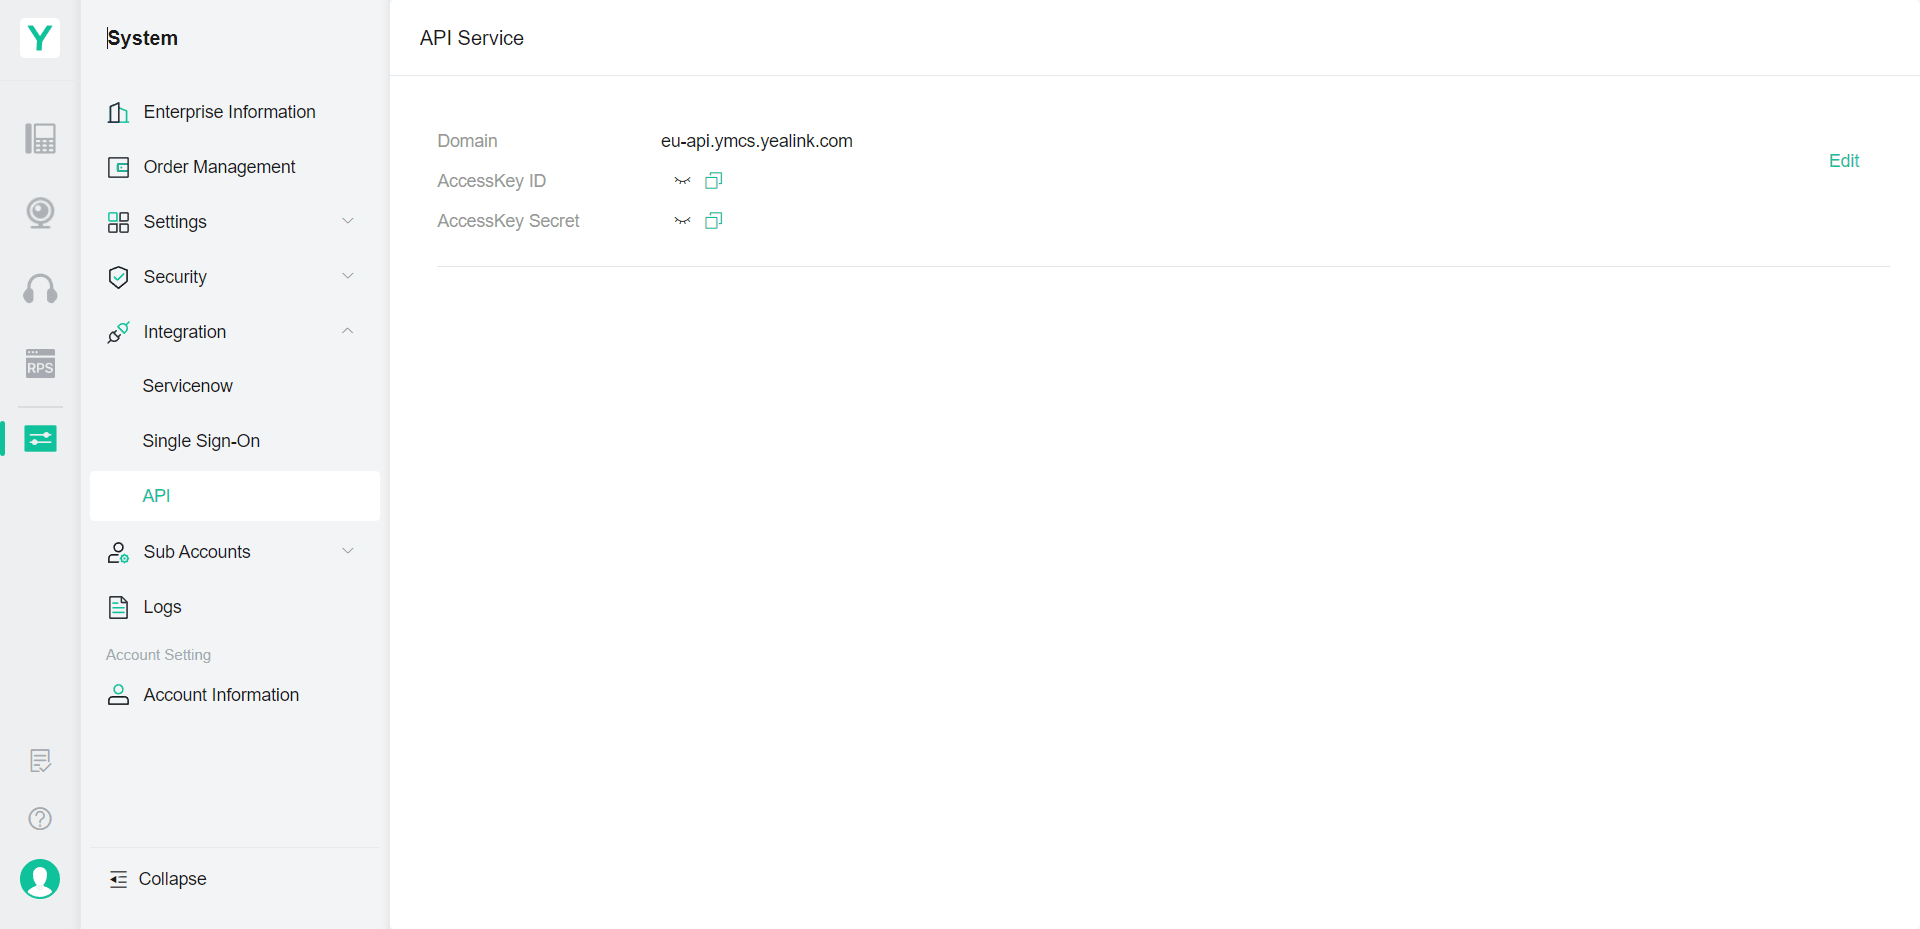
1. Go to the website https://eu.ymcs.yealink.com/ and enter the username and password that Yealink support provided you.
2. Once logged in to the portal, go to Settings
> Integration > API

3. Click the button Edit located at the top right of the window
4. Click the button Acquire to generate a new pair of credentials.
5. Copy the AccessKeyID and AccessKeySecret.
Per tenant
Note that if you are in a configuration Multi-Tenant and you want each tenant to be configured independently of the others with credentials API separate, you will need to create a company location on your Yealink portal in order to obtain multiple authentication tokens for each company. Note that you will need to have a Reseller or Channel Yealink.

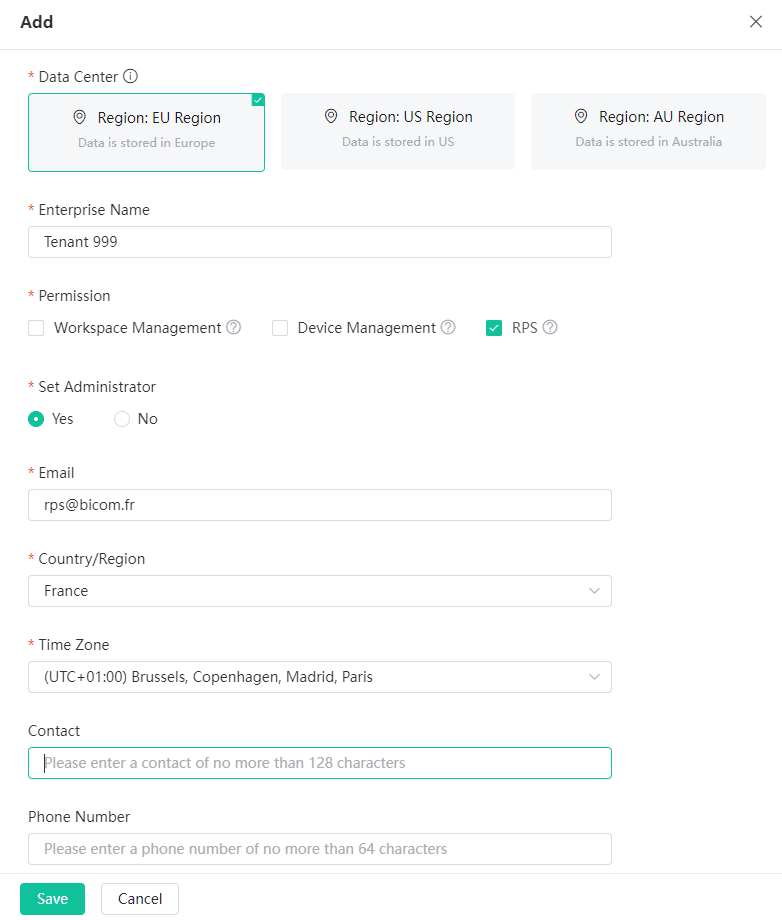
To do this, on your Yealink YMCS Reseller portal go to Enterprise Management and click the button Add.
Enter the region where the data will be stored, Europe (EU) for example.
Renter the company name then check the permission RPS.
You will also need to fill in the mandatory fields such as the access email address, the country of residence as well as the time zone.
NOTE:
The email address must be a valid address because an account configuration email will be sent automatically as soon as the creation is completed.
This address will be used to log in to the company's RPS portal or to delegate access.
Click Save to save the creation of the company on your RPS admin portal.
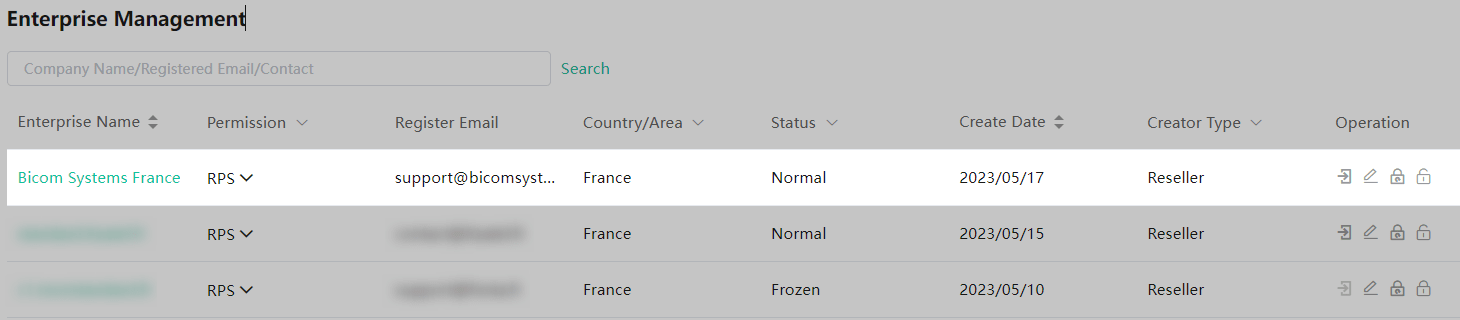
On the same page, click the right-pointing arrow icon located in the column Operation in order to connect to the company portal as shown in the image below.
Alternatively, when you provided a registration email address when creating the company on your PBXware portal, a request to set up a password was automatically sent by email. Provided the account is configured following receipt of the setup email, use the email and password to log in as a user of the company you have just created.
Once connected to the company portal, then follow these steps
1. Go to Settings > Integration > API

2. Click the button Edit located at the top right of the window
3. Click the button Acquire to generate a new pair of credentials.
4. Copy the AccessKeyID and AccessKeySecret.
Yealink RPS configuration on PBXware
The next step is to integrate PBXware with the Yealink RPS platform via the previously retrieved token.
To do this, click on Master Tenant (on a Business or Contact-Center version, go directly to the settings) >Settings > RPS Provisioning > Configuration and select the provider Yealink.
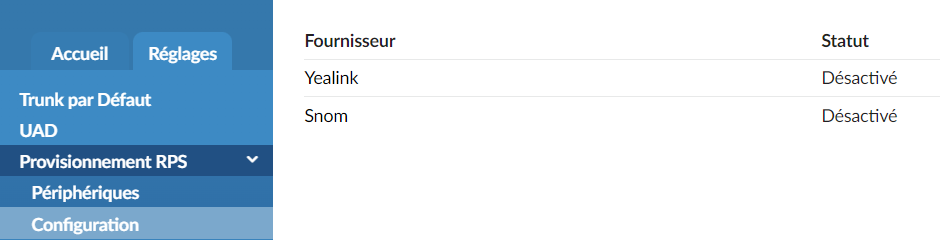
The configuration page can be visible either on the Master-Tenant, either per tenant independently of the others. If it is only visible on the Master-Tenant, the same configuration will be applied to all Tenants. If it is visible per tenant, each tenant must be configured separately.
The RPS configuration page displays a list of all available providers whose phones can be provisioned with the service RPS Provisioning.
After clicking on the provider Yealink, then follow these steps:
1. Enter the protocol HTTP/S
2. Choose the API version v2
3. Select the region defined in your site, EU for example.
4. Paste the AccessKeyId as well as the AccessKeySecret in the appropriate fields.
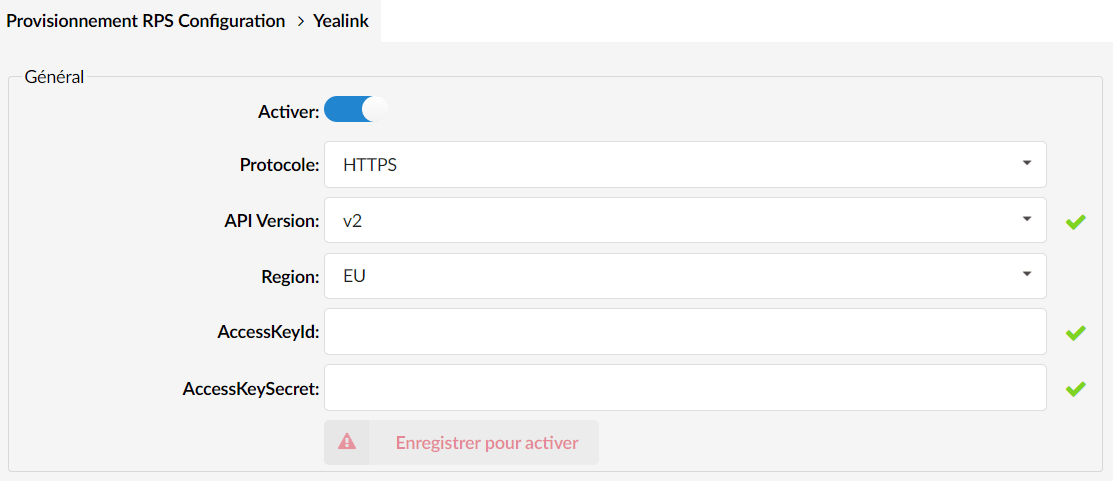
After inserting the credentials, click Save, then on the button Test.
A success message indicates that PBXware is properly integrated with your Yealink account, otherwise an error message will appear explaining the cause of the error.
Provision phones via RPS
Now, to provision a phone using the RPS service, follow these steps.
Create/edit an extension and make sure three elements are set:
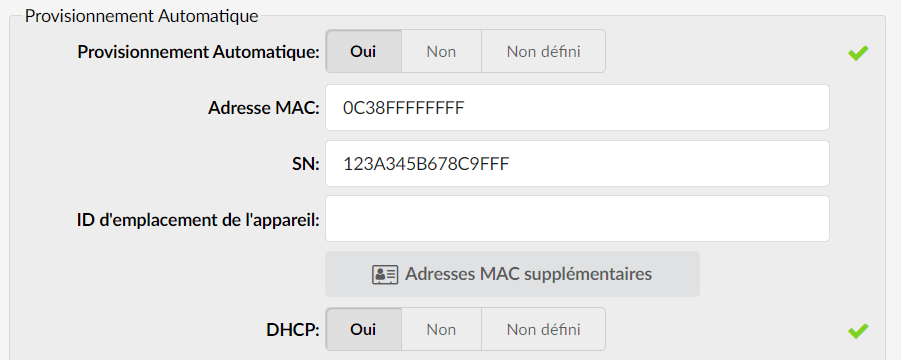
- The UAD location must be set to Remote.
- In the UAD field, it must be a UAD from the Yealink provider.
- Auto provisioning must be set to Yes and enter the MAC address as well as the serial number of your phone.

- Save the extension settings.
- Register the phone with the provider's redirection service. To do this, go to Settings > RPS Provisioning > Devices
- Select the device with the phone's MAC address and click the Save button.
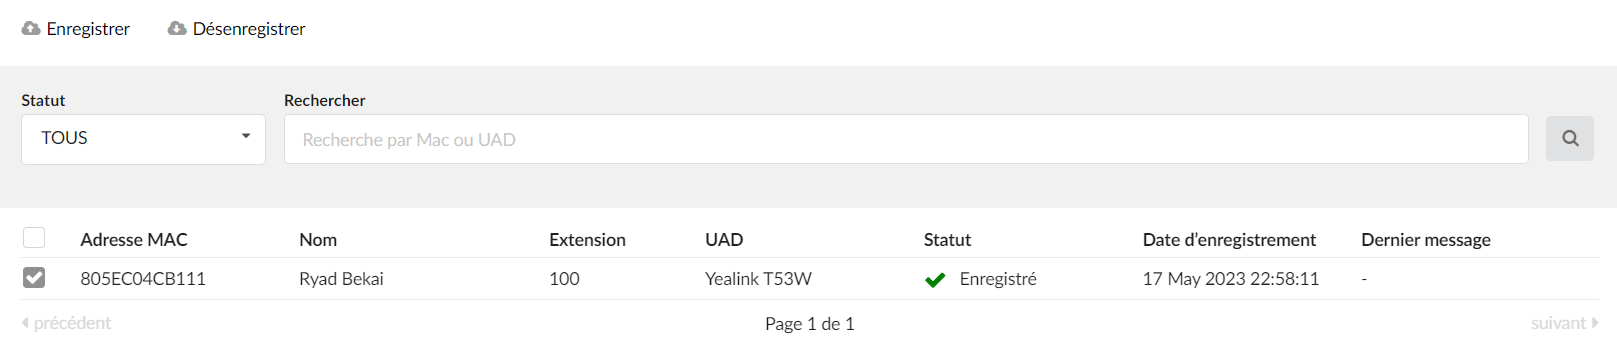

Now, if the phone is new or reset to factory state, it will contact the provisioning server and automatically retrieve all the data necessary for provisioning and will thus be provisioned to the assigned extension.
When adding a new extension or hot-desking device, it will be automatically registered with the provider's redirection service.
Once the phone is provisioned, it will be removed from the provider's redirection service.