TUTORIAL: Set up office hours

On PBXware, schedules are used to specify a period during which the system redirects calls to predefined destinations.
Thus, it is possible to manage the hours, closing days, exceptional closings & redirections in a very precise way and on all levels of PBXware.
Schedules can be defined in several different places in PBXware.
These can be defined for the following destinations:
- Queues
- IVR
- Extension groups
- Extensions
- Trunks
- Routes
However, the schedules can be defined at a higher level, on the entire system; this location differs between the two editions:
Multi-Tenant Edition
- At the Master Tenant level:
Settings > Tenants > Master Tenant > Advanced options > General settings > Schedules
- At the tenant level:
Master Tenant > Settings > Chosen tenant > Advanced options > General settings > Business hours
- At the DID level:
Chosen tenant > Home > DID > Chosen DID > Advanced options > Schedules
Business & Contact Center Editions
- At the server level:
Settings > Servers > Edit your server > Advanced options > General settings > Schedules
- At the DID level directly:
Home > DID > Advanced options > Schedules
NOTE:
Schedules defined at a higher level (for example, the entire system) will take precedence by default on everything, unless schedules are configured on another object (DID, group, route, etc.) and are enabled (position On), then in this case, the option Inherit (see below) will be disabled.
For example, if the entire Tenant is open from 08:00 to 12:00 and a DID on that same Tenant has opening hours from 08:00 to 17:00, calls can still arrive on this DID if the Tenant is closed, because the DID's schedules were not inherited from the Tenant and are enabled individually.
NOTE:
Since the layout of the time settings is the same for almost all the locations mentioned, this tutorial covers all the details required for the configuration. The only difference is the extension where a few additional options will be explained later in the document.
Click the button
located in the advanced options of the section to which you want to apply schedules.
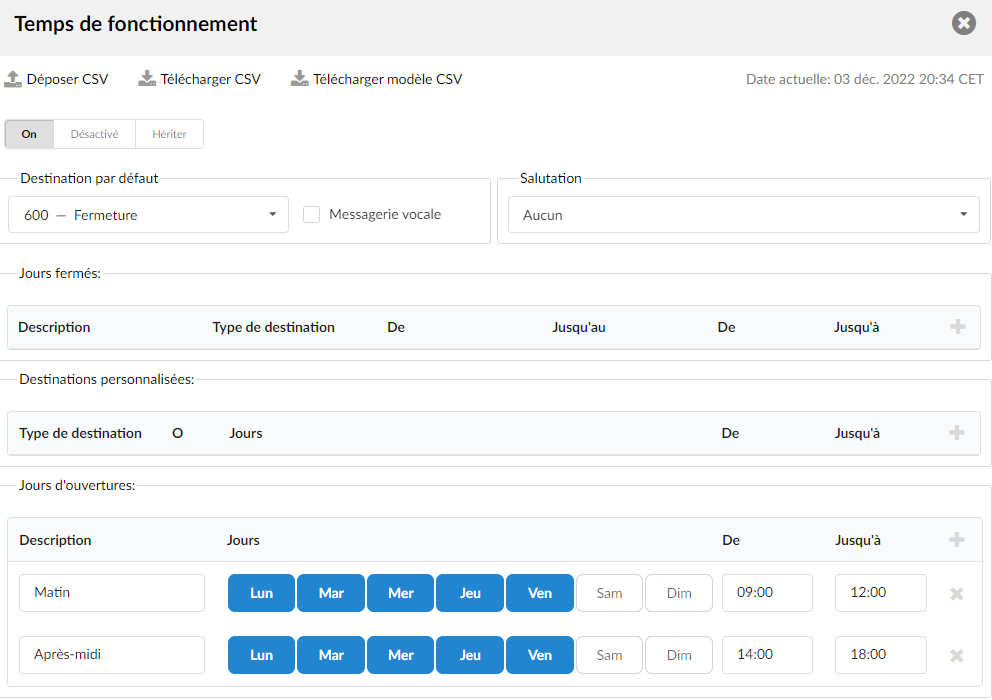
The screenshot below shows the schedules that can be seen on each of the destinations mentioned, except on the extension, as it is an enhanced extension service.
For more details, see Enhanced services > Schedules
Basic options
- Drop CSV
Click this button to load the schedule configuration from a CSV file.
- Download CSV
Click this button to download the current schedule configuration as a CSV file.
- Download CSV template
The CSV template is a file that already contains the necessary headers that should help a user when creating files. These can be dropped by clicking the button Drop CSV.
- Enabling schedules
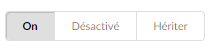
On
| If this option is selected, the time rules will be applied. |
Disabled
| If this option is selected, the time rules defined will not be applied. |
Inherit
| If this option is set, the time rules will be inherited of the higher level. (E.g. if a user sets schedules at the level of a Tenant, the time rules will be inherited from this Tenant.) |
By default, the schedules are in the position Inherit.
Default destination

- Default destination
Select a destination to which all calls will be redirected in case the call arrives outside working hours, and if it is not otherwise defined with additional rules available.
- Voicemail
If this box is checked, a call must be directed to the voicemail of the predefined default destination in case a default destination is called.
- Greeting

Choose a greeting sound file that should be played to callers during closing dates.
NOTE:
Your sound file must have been uploaded in System > Sound Files and it must have the prefix “greeting-…” as the file name.
For example greeting-accueil.
Closed days
This section allows users to define the specific date(s) and time(s) at which all calls are redirected to the Default destination.NOTE:
If the “Destination” field in the “Closed Dates” is set, all calls will go to the defined destination instead of the default one.
Custom destinations
This section allows users to redirect all calls received during the defined days/hours (for example the week- end ) to the specified destination. Example: every Tuesday afternoon, calls must be redirected to extension 102:

NOTE:
Option o – Once this box is checked, the defined greeting will be played for each defined destination, except when the call arrives during business hours .
Opening days
This section allows users to define the system's operating hours.
If a call is received outside the hours defined here, the call will be redirected to the Default destination.
You can set the opening days by clicking on them and applying hours ranging from 00:00 to 23:59 in the fields From and Up to.
You can also write a short description (Example: Morning opening…).
Schedules are stackable. For example, it is possible to overlap the morning and afternoon hours so that the schedules are closed in between, as in the screenshot below:
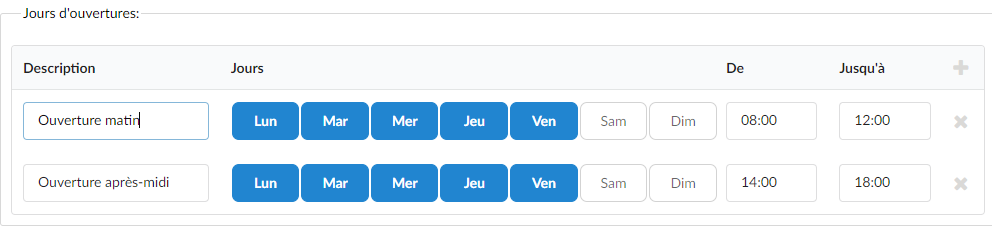
Here the schedules are applied to a DID.
As shown in the example, if a call comes in during business hours, which are set from 08:00 to 12:00 and from 14:00 to 18:00, the call will be correctly routed to a composed destination.
If the call arrives outside of business hours, the call is redirected to the Default destination configured above.
Configuration example
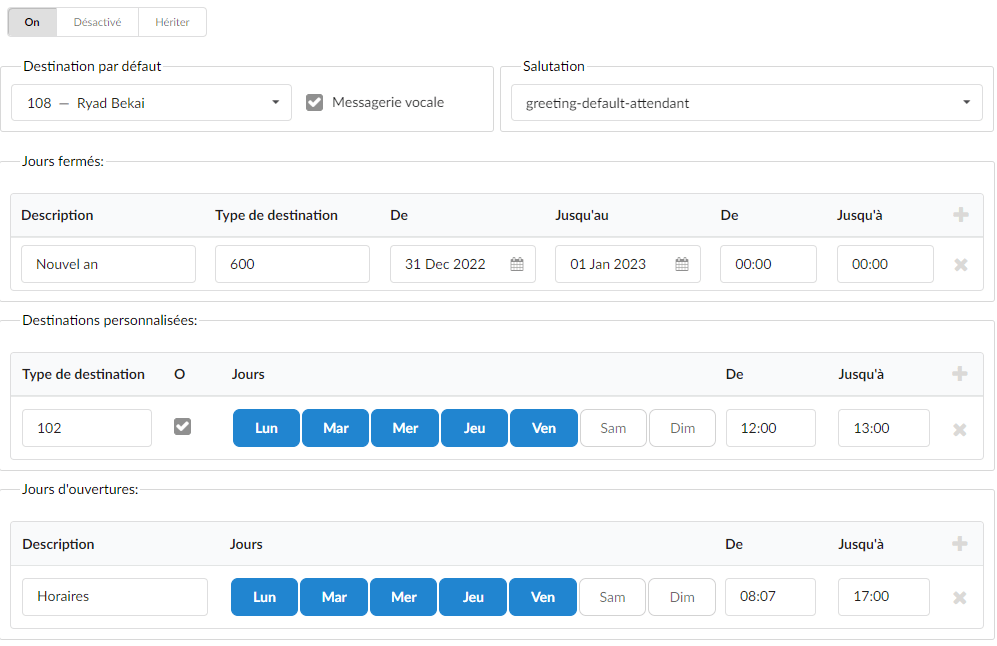
The screenshot above shows the functionality Schedules enabled on one of the destinations.
In this case, the time rules are applied at the DID level.
As shown in the example, if a call comes in during business hours, which are set from 08:00 to 17:00, the call will be correctly routed.
If the call arrives outside of business hours, the call is redirected to the Default destination which, in this example, is extension 108. Moreover, since the option Voicemail is checked, the call will go to voicemail of this extension instead of ringing extension 108.
Furthermore, if a call arrives between 12:00 PM and 1:00 PM, (for example during a lunch break), the call will be redirected to Destination 102. Also, since the option 'o' is checked, the caller will hear the greeting defined in the “Greeting” section.
If the call arrives during the dates mentioned in the “Closed Dates” section, the call will be redirected to destination 600.
Outside of all these time rules, the caller will be automatically redirected to the voicemail of extension 108, the default destination.
Access codes
Schedule management can also be performed via access codes .
- Opening hours
A user can dial *401 to open the opening hours.
(For example, during closed periods, users can dial the mentioned access code to open the operation times and thus become available).
- Close the schedule
A user can dial *402 to close the opening hours.
(For example, during business hours, users can dial the mentioned access code to close the operation times and thus become unavailable, after which the rules defined in the operation times settings will be applied.)
- Reset schedules
A user can dial *403 to reset the system schedules and restore the rules entered in the settings.
- Reset at midnight
A user has the ability to set the option to reset operation hours at midnight to one of the following options:
Yes
| If this option is selected, the access codes will be reset today. |
No
| If this option is selected, the reset* of hours at midnight will be ignored. |
Undefined
| If this option is set, the time rules will be inherited of the higher level. (E.g. if a user sets schedules at the level of a Tenant, the time rules will be inherited from this Tenant.) |
*Reset means a return to the previously configured schedules, not a full reset of the configurations. Since enabling an opening access code overwrites these schedules, the reset allows a return to the standard schedules.
NOTE:
Furthermore, all the access codes mentioned can be used in combination with a DID, a group, or a queue, in case a user does not want to open/close or reset the schedules at the global level and wants to do so at the level of a DID, a queue, or an extension group.
(Example *401500, with 500 being the number of a queue.)
The same applies to other codes such as *402 or *403.
BLF
Some additional settings related to operating times can be defined via the BLF keys.
- Open/Close: *404
A user can program a BLF key on their phone to *404 in order to monitor the status of schedules and use it to enable or disable time rules.
(For example, if a user stays at the office after the activation of the operation times rules during off-hours, the BLF will inform the user of the status change by lighting up the BLF indicator or changing its color.)
NOTE:
This behavior will depend on the device used. Once *404 is provisioned as a BLF, press the key to enable or disable the schedules, in the same way as if a user dialed *401/*402.
- Close/reset: *405
To reset the time rules, a user will need to dial *405 manually. Dialing the mentioned access code uses the initial schedule settings that were defined.
Furthermore, the two BLFs mentioned can be used in combination with a DID in case a user does not want to open/close or reset the schedules at the global level and wants to do so at the DID level. (For example, dial *404+DID would open the hours of operation only for a specific DID. The same applies to the other access code: *405.)
Extension schedules
It is possible to configure opening & closing hours on PBXware extensions. For this, a dedicated enhanced service exists and is configurable by the user.