FR EN

TUTORIAL: Create a dynamic trunk between two PBXware

Estimated reading: 5 minutes

Introduction

A dynamic trunk allows two different PBXs to be interconnected over the network.

On PBXware, this type of configuration can be achieved using a multi-user extension. This multi-user extension can be compared to a Trunk because it works in a very similar way.

When two companies or remote sites have their own IPBX systems and want to establish telephone communication between them, they can use a dynamic trunk to set up a link between these systems. This allows calls to pass from one IPBX system to the other seamlessly, as if they were on the same network.

Authentication methods used

Two authentication methods can be used for a multi-user extension:

– Registration method

– IP authentication method

Prerequisites

Enabling the feature

– Please enable a multi-user extension in the license (Multi-DID)

Enabling IP authentication

– Allow IP authentication on tenants (if you want to use the IP authentication method)

To do this, please navigate to:

* For the multi-tenant edition :

Master-Tenant > Settings > Tenants > Select the appropriate tenant > section Features> Allow IP authentication for extensions> Set to Yes

* For the Business/CC editions :

Settings > Servers> section Features> Allow IP authentication for extensions> Set to Yes
Create a dedicated extension

Create a standard extension.

For more information, please refer to this link

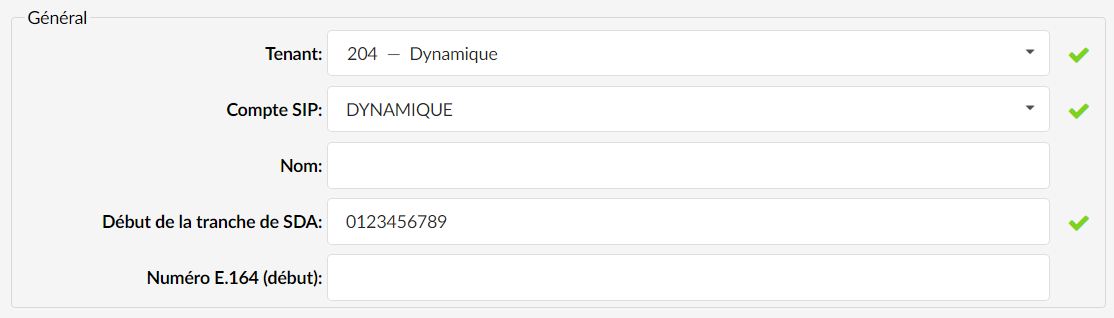
Create a dedicated DID

Create a DID dedicated to the dynamic trunk on the system that is to receive the calls. Here you can choose a random number (e.g. 0123456789); please make sure that the phone number can be called via a route if one exists.

Assign any existing trunk.

For more information, please refer to this link

After creating the DID, edit it at the tenant level and set the «Destination» and «Value» fields as shown below:

– Destination > Multi user

– Value > Set to a dedicated multi-user extension.

Registration method

When configuring a multi-user extension using a registration method, follow these steps on the PBXware that is to receive the calls:

* For the Business/CC edition:

Home > Extensions > Edit the extension dedicated to multi-user

* For the Multi-Tenant edition:

Go to the chosen tenant > Home > Extensions > Edit the extension dedicated to multi-user

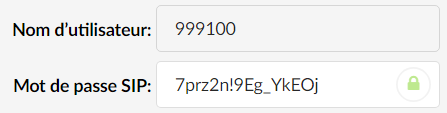
The following elements, findable in the section Authentication of the extension, must be set on the multi-user extension:

– Username (e.g. 999100)

– SIP password
Now create a Trunk on the third-party PBXware that needs to call via the dynamic trunk.

Now enter the authentication information contained in the multi-user extension into the appropriate fields

Enter the following fields in the Trunk:

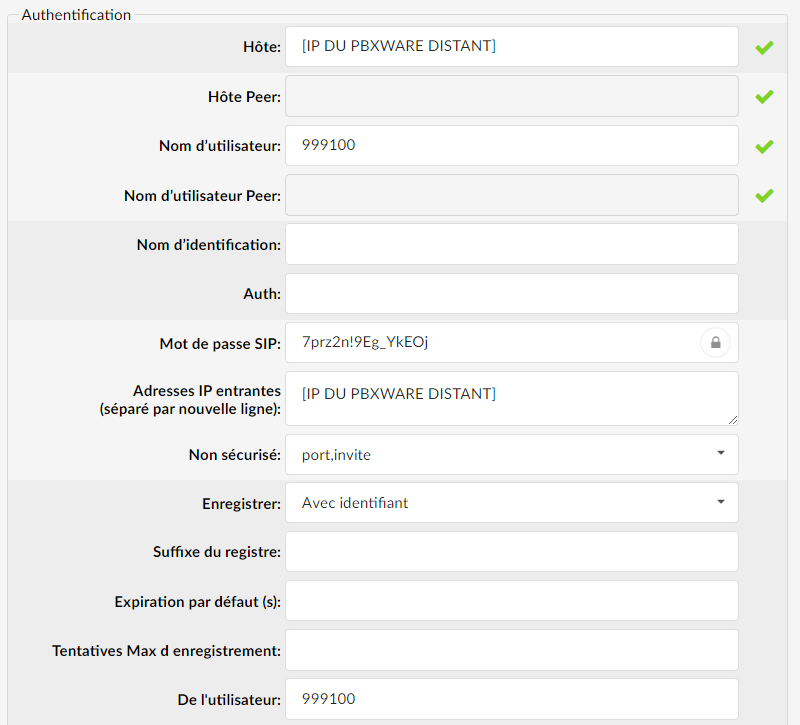
– Host : IP of the remote PBXware (the one on which the multi-user extension is created).

– Username : Username of the multi-user extension of the remote PBXware.

– SIP password : SIP password of the multi-user extension of the remote PBXware.

– Inbound IP addresses : IP of the remote PBXware.

– Save : with identifier

– From the user : Username of the multi-user extension of the remote PBXware.

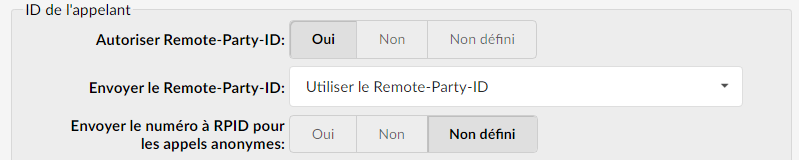
For a proper caller ID to be sent from the remote side, it must be sent via:

– RPID (remote party ID)

– PAI (P-Asserted-Identity)

Learn more about RPID

The Remote Party ID (RPID) header field enables popular services as well as certain regulatory and public safety requirements.

These services include the following:

– Call identity delivery

– Caller ID delivery blocking

– Search for the sender of the call

Learn more about PAI

The P-Asserted-Identity (PAI) and Privacy headers are defined in RFC 3325

IP authentication method

When configuring a multi-user extension using an IP authentication method, go to:

* For the Business/CC edition:

Home > Extensions > Edit the extension dedicated to multi-user

* For the Multi-Tenant edition:

Home > Extensions > Edit the extension dedicated to multi-user

For IP authentication to be set up correctly, fill in the fields as follows:

– Inbound IP addresses > Set an IP address on the remote side

– Not secure > Set to port, invite

– Host > Must contain the same IP address defined in the « Inbound IP addresses »

Furthermore, for a proper caller identification to be displayed, the following must be set on the multi-user extension as well as on the remote side:

  • Allow Remote-Party-ID > Set to Yes
  • Send the Remote-Party-ID > Set to Remote-Party-ID
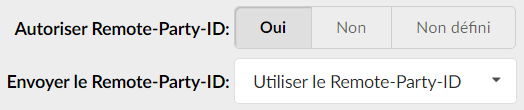

Also, configure the following field:

  • Configure the caller ID > Set to No

Set a different destination

By default, the DID's destination is the multi-user extension. Therefore, it will ring when the number is called. 

In order to ring destinations other than this extension, you can define schedules on the DID in order to route calls elsewhere. To do this, use the “Custom destinations” section of the Schedules of the DID.

Share

TUTORIAL: Create a dynamic trunk between two PBXware

Or copy the link below

CONTENT