9. IVR
The IVR (interactive voice response system) is an auto-attendant that guides callers to their destination by offering them a number of choices and waiting for the caller to make a selection through DTMF tones using the device's keypad.

The first page of the IVR section displays a list of all existing IVRs on the system. Please note that the "#" option can be used to transfer an IVR to another destination.
Name
Displays the name of an IVR.
Number
Displays the IVR number.
 Click this button to edit the existing IVR configuration.
 Click this button to delete an existing IVR.
Search
Search
Perform a search by entering data in the field and then pressing the “Enter” key.

Add/edit the IVR
 When a user clicks on the "Add an IVR" button, they are directed to another section where they can configure all the details of a specific IVR.
General
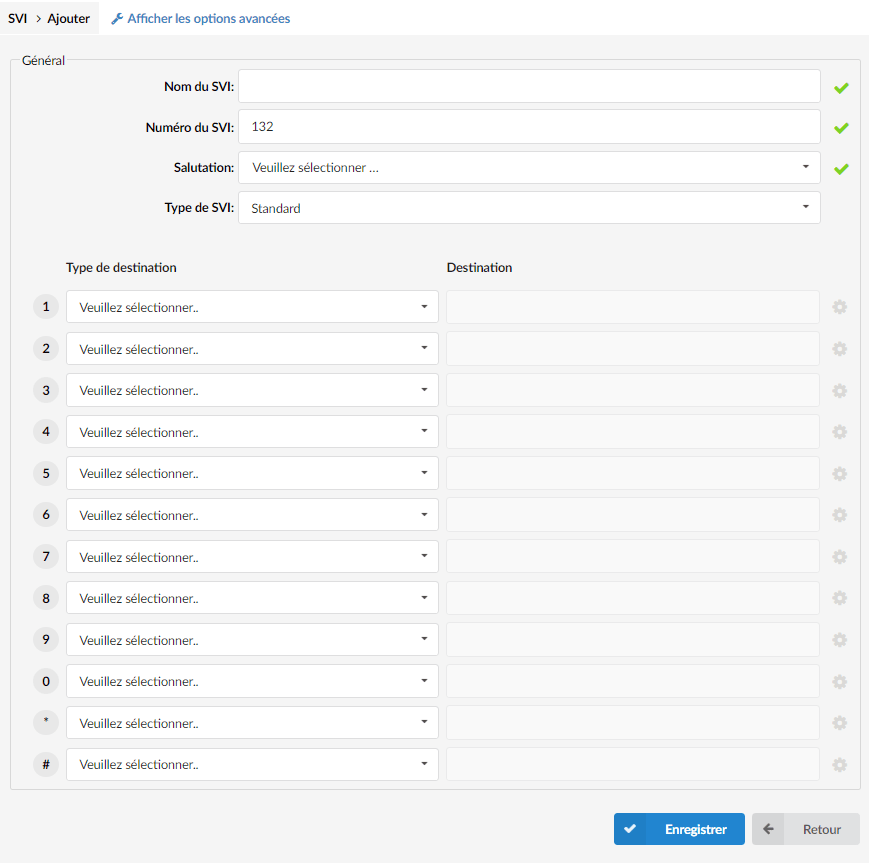
IVR name
Enter a unique IVR name (identifier).
(For example, this name will be played when accessing IVRs).
- Remote access – After selecting this “Destination Type”, choose from “Agent Login”, “Destinations”, or “Voicemail”.
- Fax to email – After selecting this “Destination Type”, enter the number to which the specific fax will be sent as an email.
- Dial the external number – After selecting this “Destination Type”, set an external number.
- CRM routing – After selecting this “Destination Type”, select a specific CRM rule.
- Destination
Select a specific destination to which the call will be redirected.
(For example, if "Extension" is defined as "Destination Type", a specific extension number must be entered in this field).
EXAMPLE: Once a greeting message (for example, "Dial 1 for sales") is played to the caller, the caller must be redirected to a specific destination. Here, users can set a destination to which the call will be directed after the caller presses '1'. So, if John from sales needs to be reached after pressing this digit, an "Extension" pointing to John must be selected in this field. If users want to provide additional options to the caller, they can direct them to another IVR with its own set of options by selecting "IVR" here.
 Click the “More settings” button to access additional settings.
Once you have clicked this button, a pop-up window with additional options is displayed. If one of the following “Destination Types” is chosen, users can configure two fields: “Default Caller ID” and “Language”: IVR, Conference, Extension, Ring Group, Voicemail, Remote Access, Fax to email, CRM Routing.
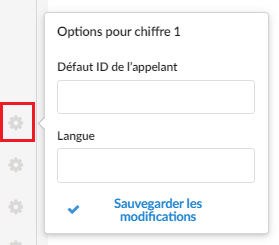 Default Caller ID
Enter a default caller ID that will replace the incoming caller ID with custom information.
(For example, it is useful to know which IVR the call came from. By setting ‘LobbyIVR’ here, all calls originating from this IVR will be displayed as ‘Lobby IVR’ on the phone screen. To display the actual phone number along with the name, use ‘%CALLERID%’ with the same text (for example ‘Lobby IVR %CALLERID%’). This will display ‘Lobby IVR 55528790’ on the phone screen, where ‘55528790’ corresponds to the phone number of the person calling us).
- Language
Set the language used for this "destination type".
If the Queue is set as a “destination type”, after clicking the “More options” button, an additional field appears:
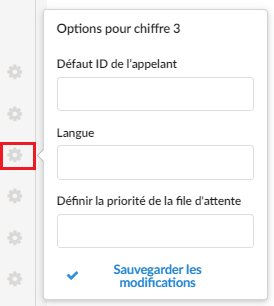
Set the queue priority
Set the priority relative to the other callers in the queue, with the number "1" having the highest priority.
If the Directory is defined as a “destination type”, after clicking the “More Options” button, other additional fields will appear:
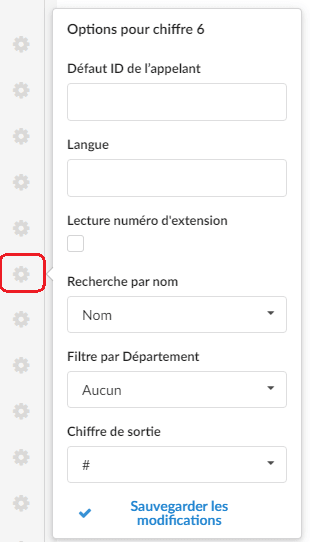 Playback of extension number
If this option is checked, the system will spell out the extension number after the extension name.
Search by name
Select whether you want to search the directory by first name, last name, or both.
Filter by Department
Select the department that will be applied to this directory.
Exit digit
Select the exit digit that a user can press to leave the Directory application at any time.
Advanced options
By clicking on “Show advanced options”, the additional configuration is displayed.
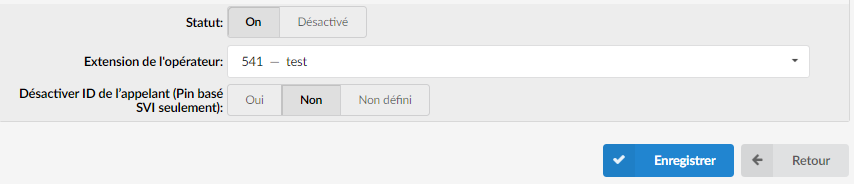
Status
Rather than deleting the IVR, users can set its status to ‘Off’. The IVR will then be inactive and all calls will be forwarded to the operator’s extension.
(For example, the “IVR greeting” option is set to “No”. John dials this IVR number, for example 1003, but instead of receiving further IVR instructions, his call is transferred to the operator's extension).
Operator extension
Choose the operator's extension to which all calls will be redirected if the “IVR Status” is set to ” Disabled “.
(For example, the lobby IVR status is set to “disabled”. John dials this IVR but instead of receiving further IVR instructions, his call is transferred to the extension number provided here).
Disable Caller ID (IVR-based PIN only)
Disable caller identification, but only for the IVR-based PIN.
General settings
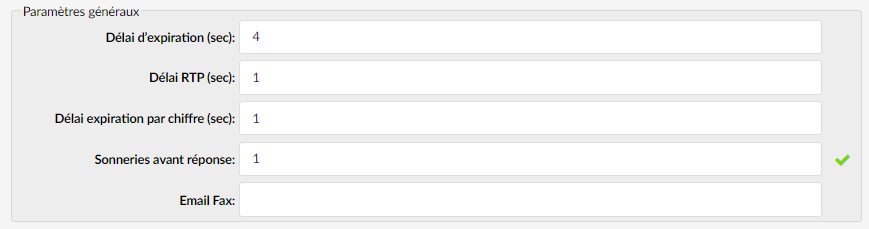
Response delay (sec)
Set the period in seconds during which an IVR option must be dialed by the user.
(For example, John enters the sales IVR and hears the instructions. If this field is set to ‘4’, John will have 4 seconds to dial an IVR option).
RTP delay (sec)
Set the delay in seconds inserted before the IVR greeting is played.
(For example, user A enters the IVR and hears this incomplete message: “…come. For sales, press 1”. If this field is set to ‘1’, there will be a one-second pause before the message is played. Now, when user A enters the IVR, he will hear “Welcome. For sales, press 1”).
Play Welcome Message

Play greeting
Set the number of times the greeting is played to the caller.
(For example, John enters the sales IVR and hears the IVR options. If John does not dial one of the options, the IVR options sound file will be played again, a number of times defined in this field, before the call is transferred to the “destination after timeout”).
Uptime
Calls can be redirected to different PBXware destinations depending on the time at which they are received.
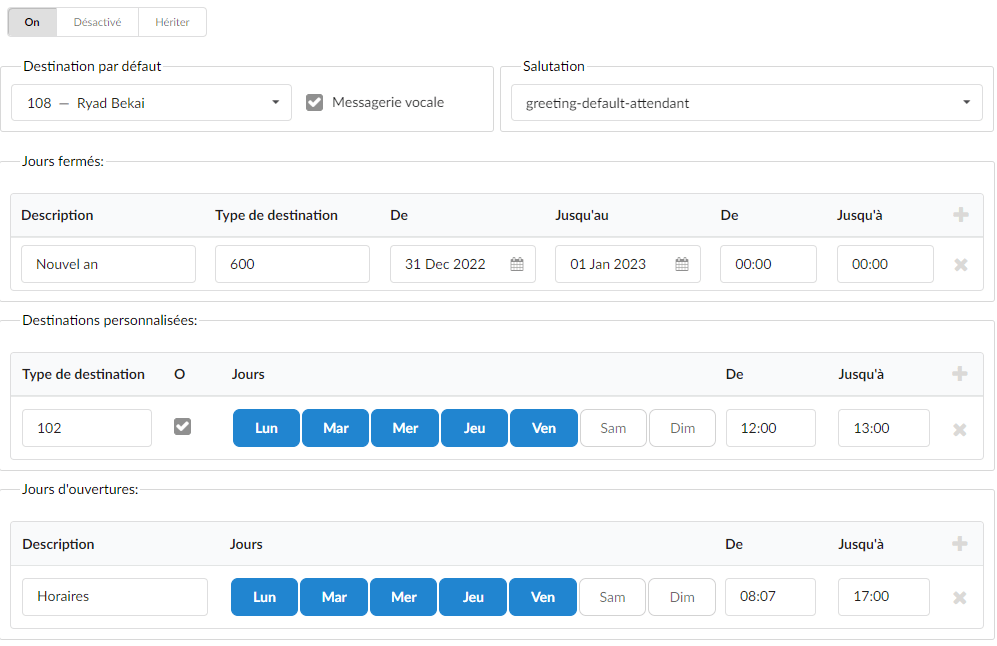
Uptime
Enabling operating hours
The "Inherit" option will allow administrators to re-enforce the upper-level "Uptime" settings if they deem it necessary.
Default destination
Set the PBXware extension to which all calls are redirected during closed hours.
- Greeting
Set the greeting audio file that is played to callers during closed periods.
Please refer to the following description:
Opening days
This section allows users to define the working hours during which the IVR redirects calls as defined in the IVR's "Add/Edit" window. If calls are received during hours that are not defined here, the calls will be redirected to the "Custom Destination". If this option does not apply, the call is redirected to the "Default Destination" ("Closed Dates").
- Custom destinations
This section allows users to redirect all calls received during the defined hours to the PBXware destination provided here. - Closed days
This section allows users to define the specific date(s) at which all calls are redirected to the "Default Destination". If the "Destination Type" field is set in "Closed Days", the calls will not be directed to the "Default Destination" but to that number.
Ring Type

Ring type
Select the type of ringtone played to the caller before they enter the IVR.
(For example, rather than "dropping" into the IVR, play the ringing sound to the user or the music files located in the MOH class).
Local dialing
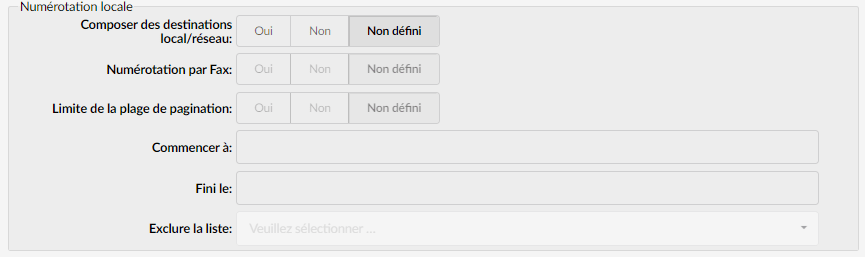
Dial local/network destinations
Enable dialing of local network extensions or own or mobile phone numbers
By setting this option to 'Yes', the IVR will be allowed to dial only local network extension numbers.
(For example, if this option is set to 'Yes', only extensions on the local network will be reachable from this IVR. Please note that no own/mobile numbers will be dialed).
Fax dialing
Set this option to 'Yes' to send a fax by e-mail to any local extension that is dialed.
(For example, if John dials an IVR that has this option enabled, he will have the option to dial the number of the local extension to which the system will generate a fax tone. He will then send a fax that will be sent to the email of the extension he dialed).
Start at
Set the starting number in the list of available extensions.Finished on
Set the ending number of the list of available extensions.- Exclude list
Set in this field any extension that cannot be called from this IVR, even if it is in the defined list.
Permissions
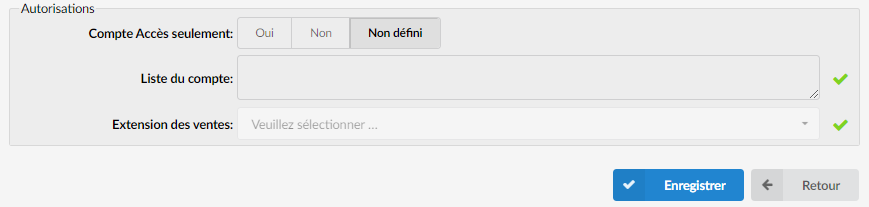
Permissions are used to allow an organization to restrict who can access an IVR. In particular, there are organizations where IVR access is only allowed to callers with a valid account number, but it can be used for other similar purposes.
Access-only account
Allows only certain PBXware extensions to access the IVR.
(For example, if this option is set to "Yes", only the extension numbers defined in the "Account List" will be allowed to access this IVR).
List of accounts
Set the local extension numbers that will be allowed to enter this IVR.
Multi-digit IVR codes
The only difference between the "standard IVR" and the "multi-digit IVR" is that the latter accepts two or more digits as a response, for example, digits between 10 and 100. The multi-digit IVR therefore offers more options than the standard IVR, but some advanced features are excluded.

Access code
Displays the multi-digit IVR access code.Description
Displays the description of the access code.Destination
Displays the destination to which the call will be transferred.
Click this button to edit the existing access code configuration.
Click this button to delete an existing access code.
Search
- Search
Perform a search by entering data in the field and then pressing the “Enter” key.  When a user clicks on the "Add an access code" button, they are directed to another section where they can configure all the details for a certain IVR.
Add/edit the access code
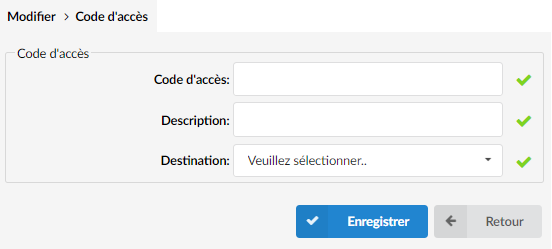
Access code
Set the access code to be dialed from multi-digit IVRs to transfer users to the PBXware destination number.
PIN-based IVR
PIN-based IVR makes it possible to dial local or remote destination numbers by providing a predefined IVR PIN code. The PIN code-based IVR is generally used for temporary cases. A PIN code with an expiration date is useful when there is no need for a permanent IVR option. After a certain "expiration date", the same defined PIN code will no longer be valid. The PIN-based IVR does not have certain advanced functions.

PIN code
Displays the IVR PIN code.
Description
Displays the description of the IVR PIN.
Expiration date
Displays the PIN expiration date.

Click this button to edit the existing PIN code configuration.
Click this button to delete an existing PIN code.
 Click this button to upload a CSV file containing several PIN codes and destination codes in a single step.
To do this, click the “Browse” button and select a .csv file, then click the “Open” button to add new PIN codes to PBXware.
.csv file example
10002 John Smith Office 31-08-2021 123456789
20002 George Nimara Home 31-08-2021 987654321
 Click this button to download a CSV template.
Search
Search for a phrase by entering data in the field and then pressing the "Enter" key.
Add/Edit the PIN
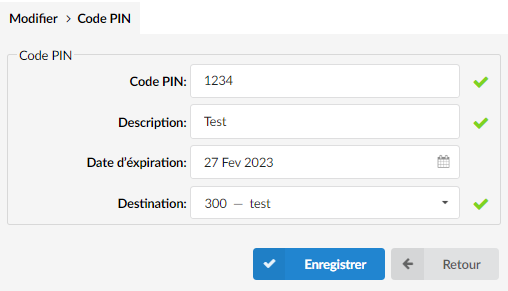
PIN code
Set a unique PIN number.
(For example, John dials the local IVR number ‘1003’ and is asked to provide a PIN. He enters the PIN ‘1234’ and PBXware then dials the number provided in the ‘Destination’ field).
IVR tree
The IVR tree is a special form of IVR where the creation of a particular IVR is more graphically oriented than with an ordinary IVR.
Once the “Create” button has been clicked, users are prompted to enter an IVR name and an extension, after which the IVR can be edited.

After creating a certain IVR tree, users can select the tree in question from the drop-down menu and click the ” Edit ” button, as shown in the screenshot, to modify the additional configuration.
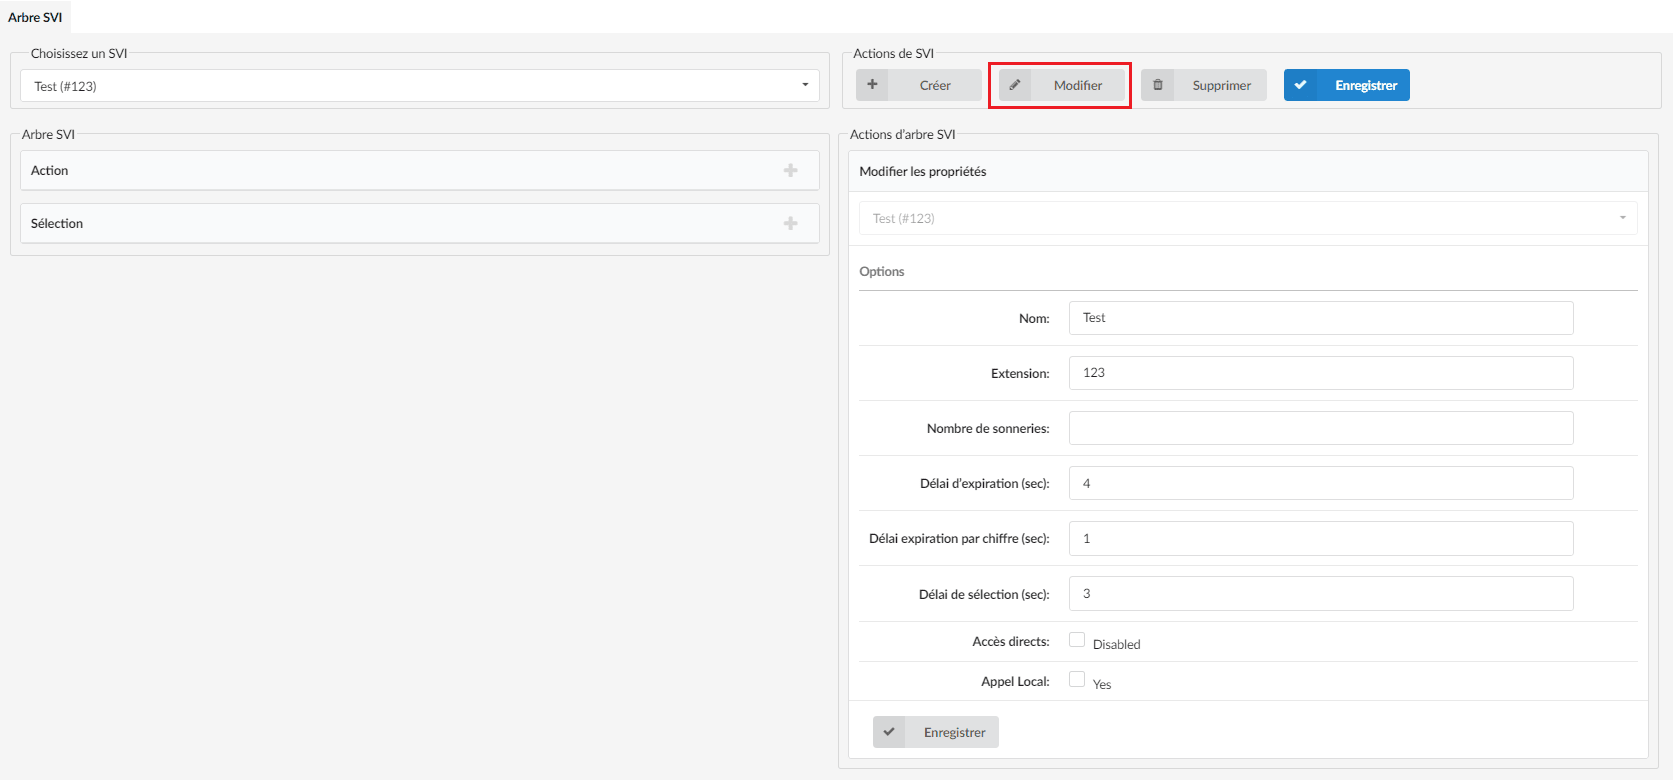
IVR tree actions
Name
Enter the name of the IVR.
Extension
Enter the IVR extension number.Number of rings
Set the number of rings before the caller enters the IVR.Timeout (sec)
Set the period in seconds during which an IVR option must be dialed by the user.
IVR tree
The main elements of the IVR tree are "Action" and "Selection". They can be added by clicking the "plus" icon and removed by clicking the "Remove" button located right next to it. Actions are elements that will be executed when the user enters the IVR. They will be executed in the order in which they are placed in the list.

When the “Action” option is selected in the “IVR Tree” section, users can add various “actions”:
- Dial the local extension – This option allows users to dial the local extension defined in the ‘Extension’ field when the action is executed.
- Dial the remote extension – This option allows users to dial the remote extension defined in the “Destination” field.
- Call voicemail – This option allows users to leave a voice message for the given extension.
- Check voicemail – This option allows users to check the voicemail of the extension provided with the keypad.
- Go to context – This option allows users to go to the given ‘Context’ and ‘Extension’, for example ‘Context’ -> ‘heure’, ‘Extension’ -> ‘222’.
- Start recording – This option allows users to start recording the conversation. Please note that if the “Silent Recording” option is checked, the user will not hear the announcement that their call is being recorded.
- Set the queue priority – This option allows users to set the queue priority, so that if a user is about to enter a certain queue, they will enter it with a given priority.
- Set the language – This option allows users to set the language to be used in the IVR. Please use the two-letter notation such as ‘fr’.
- Listen to the recording – This option allows users to listen to a sound file they can select and to set a language if the sound file is provided in multiple languages. In addition, users can choose to accept DTMF tones or keypad keys during playback, so they can dial local extension numbers if this option is enabled in the IVR properties.
- Change your number (Caller ID) – This option allows users to change the caller ID.
- Wait – This option allows users to wait the specified number of seconds before the IVR continues executing actions.
- Busy signal – This option allows users to play the busy signal to the caller.
- Hang up – This option allows users to hang up the current call.

When the “Selection” option is chosen in the “IVR Tree” section, users can add various “Actions”. These can range from “Selection 0” to “Selection *”. Users can also choose between “Invalid selection” and “Selection timeout”.
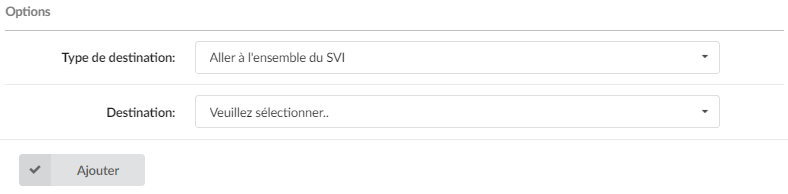
Once users have selected the desired selection from 'Selection 0' to 'Selection *', the destination types that can be added are as follows:
- Go to the entire IVR
- Local destination
- Remote destination
- Voicemail
- Call group
- Queue
- IVR
- Destination
Select the PBXware destination applicable to the type selected first.
(For example, if "Go to IVR set" is selected as "Destination", select the number of the applicable IVR tree).
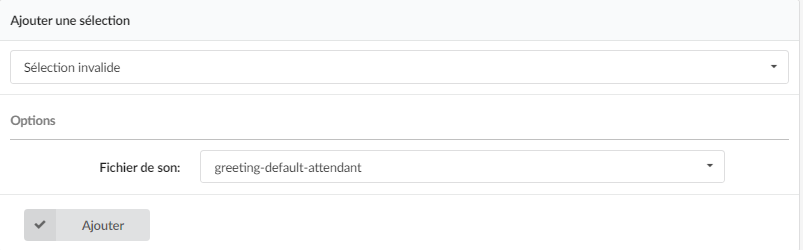
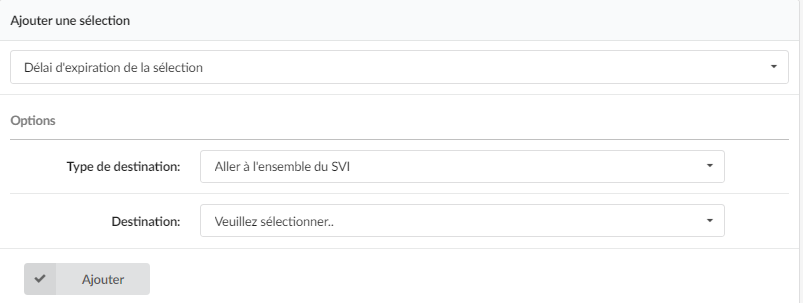
In other cases, if the selection is "Invalid selection" or "Selection timeout", the configuration will be different. Please refer to the screenshots.
Invalid selection
- Sound file
Select the sound file
Selection timeout
- Sound file
Select one of the destination types listed above - Destination
Select the PBXware destination applicable to the type selected first.
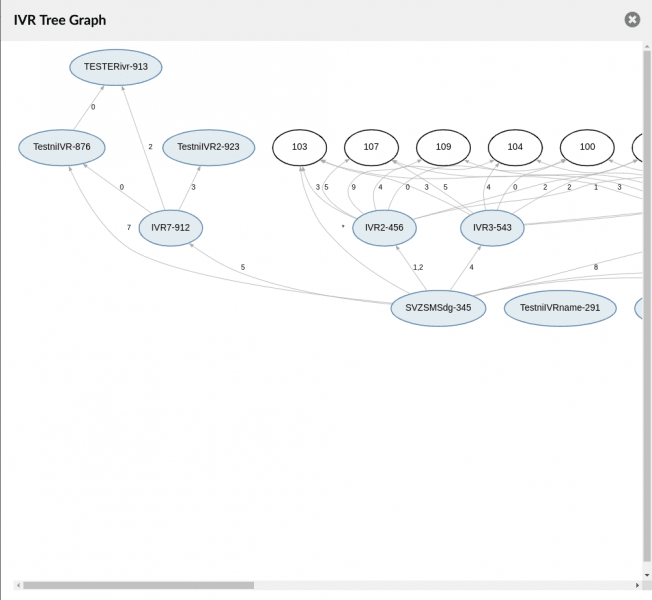
IVR Tree Graph
Once the IVR tree is created, when users click on the "IVR tree graph" in the side menu, they get a graphical representation of their IVR tree, as shown in the screenshot below.