



3. Extensions
Extensions are associated with all UADs/Phones registered in the chosen tenant. On the Multi-Tenant version of PBXware, this menu item is only available when you edit a tenant, since the Master Tenant is used to control the behavior of the system and the functionality of the tenants.
*UAD = User Agent Device, these are the devices linked to the extension, they can be physical (phones, intercoms), or virtual (Communicator softphone).
System
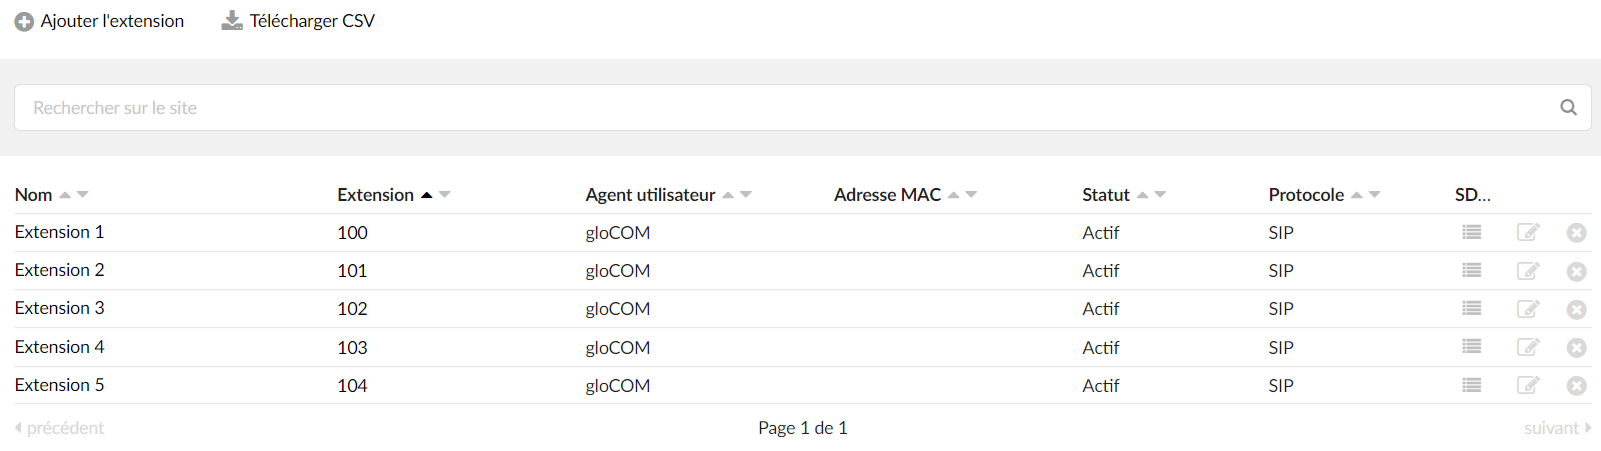
In this section, all the extensions configured on the tenant are listed.
- Add an extension
Click the Add extension icon to access the extension creation screen.
- CSV download
This option allows you to download the CSV file with all the extensions already created on your system. This type of file can be used later to import extensions with their details into a new system.
In this section, all the extensions configured on the system are listed.
- Name
Full name of the user - Extension
UAD extension number - User agent
UAD type (example: Fanvil X5U..) - MAC address
MAC address of the UAD(s) - Status
Phone status (Active/Inactive) - Protocol
Protocol used by the phone - Edit
Allows you to edit the extension configuration - Delete
Allows you to delete an extension from the system
You can find the list of UADs supported by PBXware on this link
Add/Edit an extension
The procedure for adding a new system extension is divided into two steps.
In the first step, the UAD type and the location of the extension must be filled in.
In a second step, the basic UAD information such as the user’s name and email address are filled in.
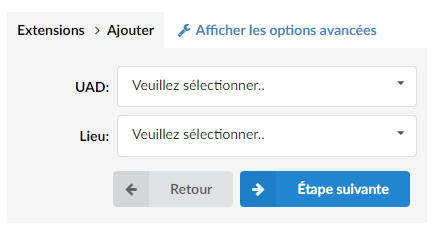
- UAD
The UAD is the type of device that will be connected to the system.
If the UAD is not listed in the drop-down list, go to Settings > UAD and modify the desired UAD and set its Status on « Active ».
The UAD will now be available in this list.
- Location
Select the location of the new UAD. The location refers to whether the PBXware system is on a network:
- Local (example, a PBXware installed on a physical machine in the same network as the phones)
- Remote (example, a PBXware hosted on a remote network, in the cloud)
General
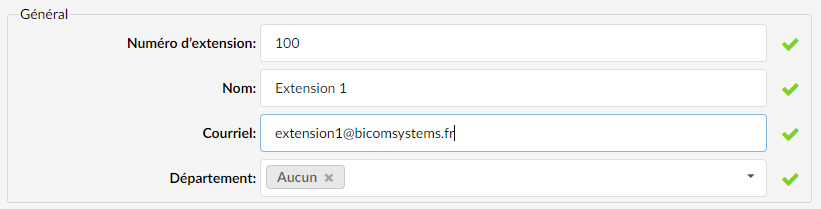
- Extension number
By default, this field is automatically filled, but it can be overridden with any free extension number.
(For example, setting ‘1008’ will create a new system extension with the same network number).
- Name
Full name of the person using the extension. This name is sent in the Caller ID information.
Email address associated with the extension and used for various system notifications.
(For example, entering test@bicomsystems.fr will forward all voicemail notifications, the extension PIN and other details to this email. In addition, the email used with the user's password will be required to log in to the OSC or the applications).
- Department
Department to which the extension will belong. This is used so that the mobile and desktop applications can group extensions according to the department they belong to.
PIN-based devices
- DBD PIN
PIN used for PIN-based dialing.
Call rating
The call rating (billing) option must be enabled on the PBXware license for this section to appear.
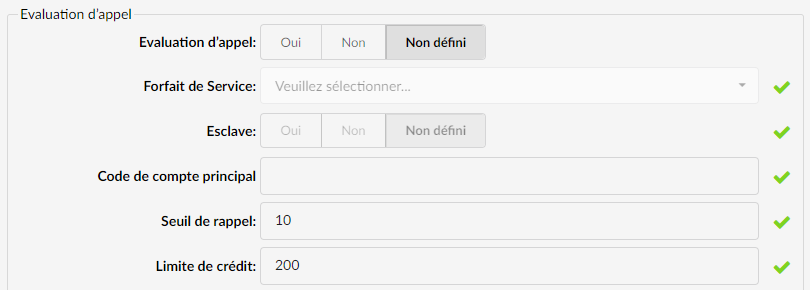
- Call rating
This section allows you to enable or disable call rating for the current extension. If you set this option to Yes, you will also need to add an appropriate service plan.
- Service package
Service plan that will be applied to the extension. The call rates defined in this service plan will now apply to the extension.
- Slave
Define whether this extension is a slave or not.
- Main account code
Set the master account code (extension number) of a master extension from which the current extension uses funds.
- Callback threshold
Account balance at which a reminder should be sent to the user.
(For example, if this field is set to 10, the user will receive an email notification when the account balance reaches this amount.)
- Credit limit
The maximum amount the system will extend to the billing account.
(For example, if this field is set to 10 and the account balance has dropped to 0, your account will still have 10 units of funds available.)
Authentication
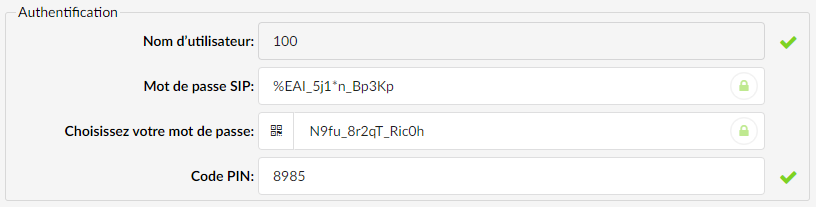
- Username
Username used by the UAD to register with PBXware.
By default, this field is the unique number that will be used to identify the extension on the network.
By default, this field is the extension's network number prefixed with the tenant code and cannot be modified.
(For example, if the extension number is 100 and the tenant code is 999, the username will be 999100).
- SIP password
SIP password used by the UAD to register with PBXware.
By default, this field is automatically filled but can be overridden with any value.
- User password
Password used for gloCOM registration with PBXware.
By default, this field is automatically filled but can be overridden with any value.
- Show the QR code
The Show QR code button will display the QR code that can be scanned with the Communicator GO mobile app. This feature will make configuring the mobile app and the registration process as fast and simple as possible. In order to configure Communicator GO with QR code scanning, you will need to enter the public address of your PBXware in the QR code server in Settings > Servers > Network Info section.
- PIN code
Number used for account authorization.
For example, if this extension's PIN code is set to 8475, PBXware will request it when checking your voicemail box or enhanced services.
Auto provisioning

- Auto provisioning
Option to enable the auto-provisioning service for this extension.
This feature allows you to connect the UAD/Phone to PBXware without entering the MAC address of the UAD/Phone (and optionally by adding the static IP address of the UAD/Phone if the address is not provided by a DHCP server).
- MAC address
Enter in this field the MAC address of the phone you wish to provision.
Multiple add
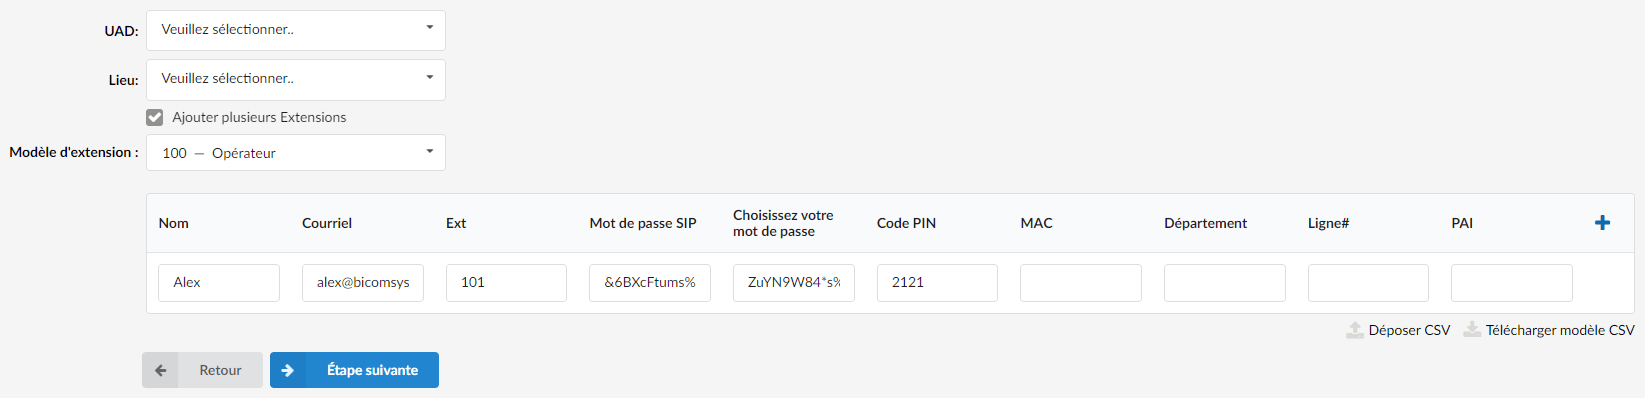
Extension template
- Select an extension that will be used as a template
Users can add multiple extensions to PBXware in two ways:
1. Manually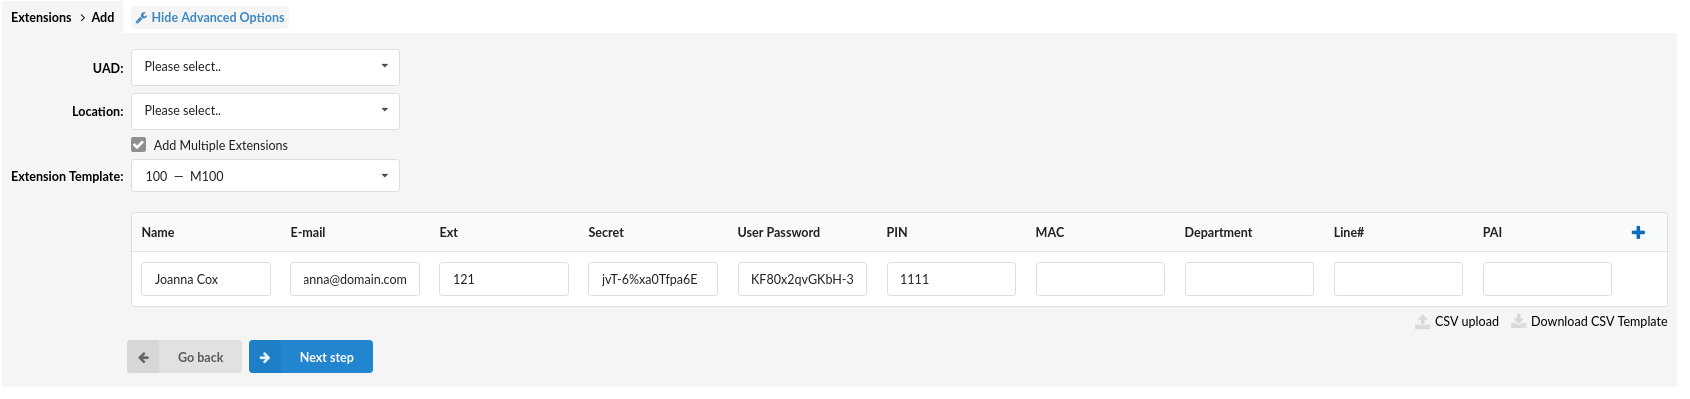
- Click the icon +
- Manually fill in the following fields:
- Name
- Ext
- SIP password
- User password
- PIN
- MAC
- Service
- Line#
- PAI
2. Creating and uploading a .csv file
- Click the button Download CSV template
- Populate the CSV according to the downloaded template
- Save the file as multiple-extensions.csv
- Click the button Drop CSV
- Select the file multiple-extensions.csv on your hard drive
- New extensions will be created from your CSV file.
csv file example:
After importing the file:
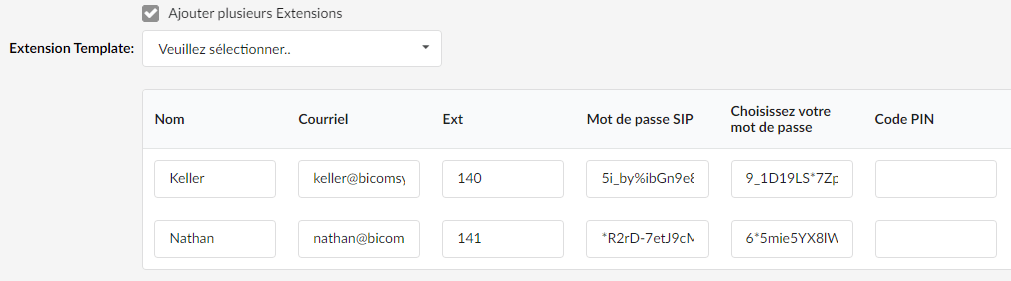
By clicking on Next step, a report indicating the number of extensions added will be displayed, with an error message in case of an error:

Advanced options
By clicking on the button Advanced options, the advanced configuration options and fields that were previously hidden are displayed.
By opening the section Advanced options, the following options are added:
General
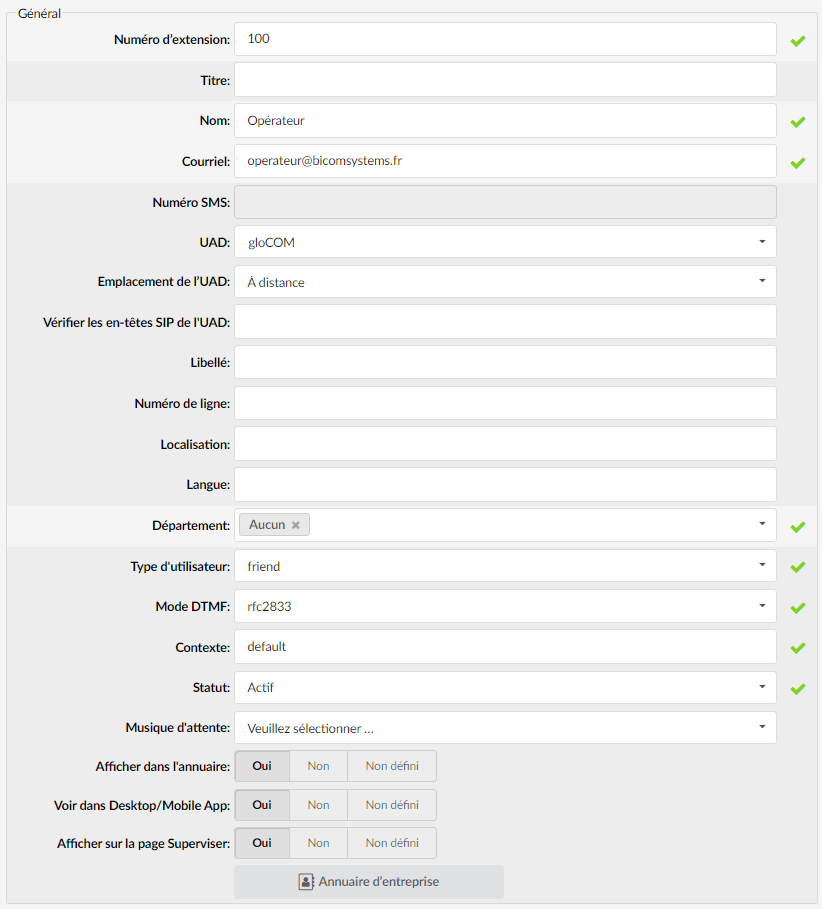
The following options are frequently used and are mostly required for the normal operation of the extension. Some of these fields are preconfigured with default values. It is not recommended to modify them unless prompted to do so when saving the changes.
- Title
The user's title (e.g. Mr, Mrs, etc.).
- SMS number
Displays the SMS number, if it is assigned to this extension.
- UAD
UADs (User Agent Devices) are various IP phones, softphones, ATAs (Analog Telephone Adaptors) and IADs (Integrated Access Devices) used for the extensions. PBXware supports a wide range of UADs using the SIP, IAX, MGCP and ZAPTEL protocols. If your phone is on the list of supported UADs and the UAD is enabled on your PBXware, you will be able to choose the UAD that matches the phone registered on the extension.
- UAD location
This option is related to the PBXware Auto Provisioning feature.
Extensions located on the same network as PBXware must be set to Local whereas extensions connecting to PBXware from the WAN must be set to Remote .
- Check the UAD SIP headers
Allows you to list the desired SIP headers that will be forwarded from a UAD to the outgoing Trunk. (For example p-early-media, x-tn-mobility).
For example, if the UAD sends the « p-early-media » header via the SIP INVITE and users want to keep it on the outbound Trunk, they can add this header to the « Check UAD SIP headers » field. During a call, a check will then be performed to see if the UAD sends one or more headers listed in this field. If set, this header will be forwarded to the outbound Trunk.
- Label
The name displayed on the screen of the device used.
- Line number
When auto-provisioning multiple extensions on a phone, the extensions are assigned to lines in the order in which they were created in PBXware. The line field will allow customers to specify the extension line where this extension will be assigned on the device.
- Location
Information about a user's geographic location (for example Lille, Paris…)
- Language
Allows you to set a language on the extension (when connecting to the online supervisor, for example), which will override the one configured by default. (Example: en, fr, de…)
- User type
The extension can be configured to make calls only, receive calls only, or both make and receive calls
- User – only makes calls
- Friend – makes and receives calls
- Peer – receives calls only
- DTMF mode
DTMF is a combination of frequencies used in telephony. These specific frequencies are emitted when a key on the telephone keypad is pressed, each one emitting a different frequency so it can be recognized by the system.
DTMF is often used in interactive voice response servers (press 1, press 2…).
This option allows you to choose the DTMF mode that will be used: auto, inband, info, or rfc2833.
- Context
Each extension belongs to a certain context. The context can be described as a collection or group of extensions. Here, you can set the extension's context.
- Status
The status/presence of the extension makes it possible to know whether it is online.
Rather than deleting the extension and then recreating it later, the extension can be enabled/disabled using this field.
(Example: Setting this field to « inactive » will disable all incoming calls to this extension).
- Active: The extension is enabled, it can make and receive calls
- Inactive: The extension is not enabled, it can neither make nor receive calls
- Suspended: The extension is suspended and can only call the numbers that are defined as Emergency Services in Settings > Tenants > Edit > Locality (section) > Emergency Services
- Music on hold
This option allows users to choose the different classes of Music on Hold for each extension. All sound files belonging to this class of the Music on Hold will be played during the call to this extension.
Note: When you select the Music on Hold class, you need to enter « m » in the Inbound Call Options field.
For more information, consult our tutorial dedicated to hold music
- Show in directory
Indicates whether the extension should be displayed in the remote directory accessible via the interface of the desk phones.
- View in Communicator desktop/mobile
Enable/disable non-Communicator extensions from the contacts display in Communicator. Note that the device must support this feature
- Show on the Supervise page
This excludes an extension from appearing on the Monitor page. Useful for virtual extensions that will never be online, in order to determine the number of online phones more accurately.
- Company directory
When you click this button, a page (where you manage your contacts in your company directory) will appear. For more information about phone contacts, you can find it on the page Company directory.
Call rating
These options are used to rate incoming and outgoing calls. The extension is assigned to a service plan, and its call rates and additional call rating options are also defined here.
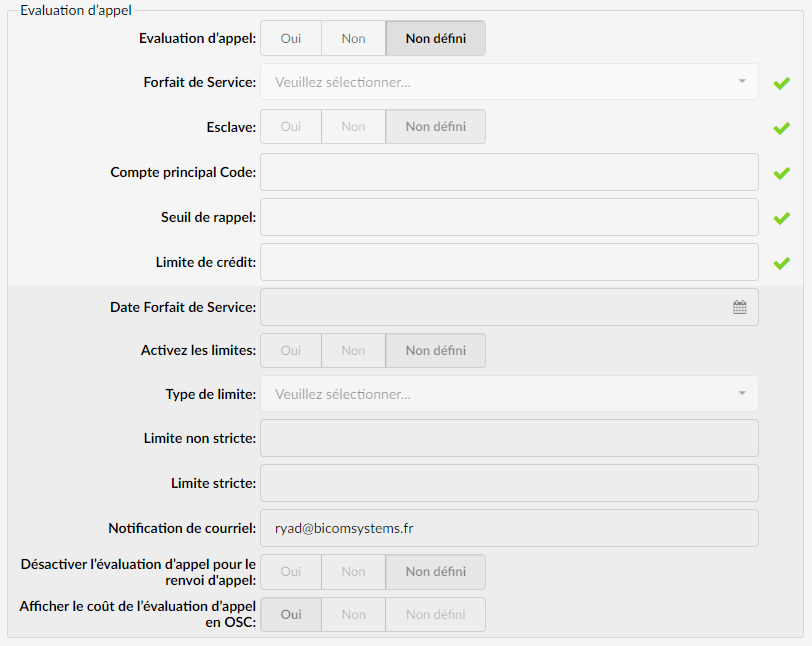
- Service Package Date
This option is only available if you set the extension as a master extension. (Call Rating > Slave > Yes/No). In addition, the Service Plan must be defined for this to work. This date is set when the Service Plan will be reset.
- Enable limits
If the extension in question is the master extension, it is possible to set this option to Yes. Setting this field to Yes allows limits to be defined on the current extension.
- Limit type
This option allows you to decide whether the limits you set will be applied on a daily or monthly basis.
- Non-strict limit
Depending on the type of limit, when the extension reaches the non-hard limit, it will send an email to the person in charge of a call assessment.
(For example, if you set this field to 10, an email will be sent to you when the user reaches this amount [10] while calling).
- Strict limit
Depending on the type of limit, when an extension reaches the hard limit, the system will prevent that extension from making further calls.
(For example, if you set this field to 20 and the user reaches this amount while calling, the system will prevent this extension from making other calls)
- Email notification
The email address that will be used when the user reaches the non-strict limit.
- Disable call rating for call forwarding
You can disable call rating for all transferred/forwarded calls.
- Show the call rating cost in the OSC
Users can choose to display the call rating for their extension in the window of supervisor online
Call rating information
This section displays the extension's call rating information, such as: account balance, available funds, remaining included minutes.
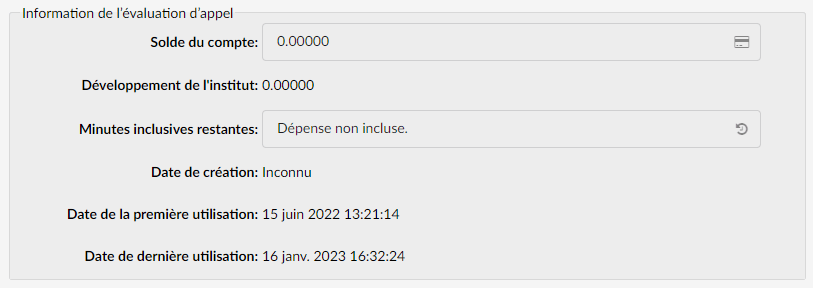
- Account balance
Displays the amount of remaining credit units (available funds minus the sum already spent by the user).
(For example, if the user has 100 credit units, 100 units + the credit limit can be spent in total. If this field displays a negative value (for example -4.00000), it means that the account balance has reached 0 and that the credit limit is being used).
- Credit card button
Clicking the button symbolized by a credit card opens a window with the call rating history, where you have the option to add an extension credit/debit.
- Type
Call rating type, select whether call rating is credit or debit.
- Amount
Call rating amount; if the call rating type is in euros and you add 100 here, 100 euros will be added to the extension amount.
- Ref No.
Reference number of the call note; depending on how your company bills customers, the invoice number can be assigned here, for example.
- Notes
Additional notes on call rating.
Once the funds are added, the following details will be displayed:
- Date: Time and date of the payment
- User: The username used to log in to the system of the user who added the funds
- Ref no.: Call rating reference number
- Notes: Additional notes on call rating
- Amount: Amount of funds added
- Type: Call rating type
- Available funds
Displays the funds available on the account (account balance + credit limit).
(For example, if the user account balance has 100 units + 10 units of credit limit, 110 units will be displayed here).
- Remaining inclusive minutes
Displays the remaining inclusive minutes. As long as inclusive time remains, call rating is not calculated for outbound calls.
(For example, you will see the remaining included minutes in the following form "0d 0h 4m 25s").
- Reset inclusive minutes button
To reset the extension's inclusive minutes, click this button and confirm with 'Yes' to reset the included minutes.
Notes: The buttons Reset inclusive minutes and Credit/Debit will only be displayed if call rating is enabled.
- Creation date
Creation date of the extension. Note that ii if your system has been updated to a newer version, all extensions created on the old version will display “unknown” in this field.
- Date of first use
Date/Time of the first use of the extension.
- Last used date
Date/Time of the last use of the extension.
Network link
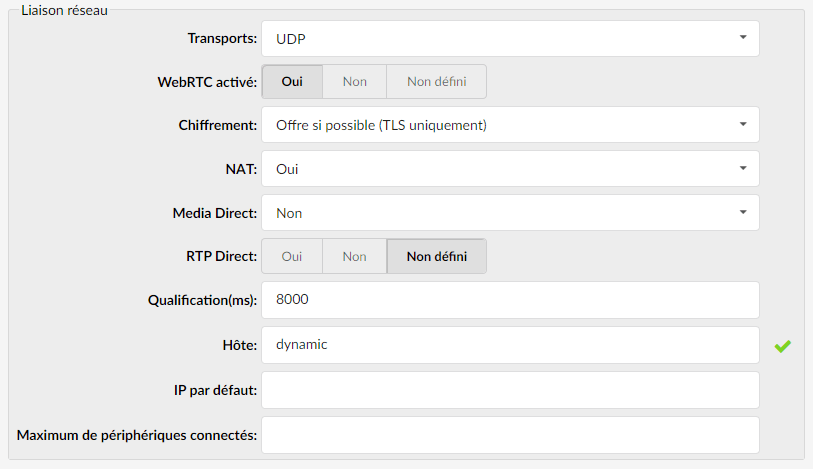 These options define important network-related values concerning NAT, monitoring, and security.
- Transport
Type of transfer protocol that will be used on PBXware.
Available options:
- UDP : Protocol primarily used to establish low-latency, loss-tolerant connections between applications on the Internet. UDP enables process-to-process communication. With UDP, computer applications can send messages, called in this case datagrams, and it is considered a best-effort mode of communication.
- TCP : This protocol provides reliable, ordered, and error-checked delivery of a stream of bytes between programs running on computers connected to an intranet or the public Internet. TCP sends individual packets and is considered a reliable means of transport.
- TLS : This cryptographic protocol ensures the security of communications over the Internet. It uses asymmetric cryptography for authentication of the key exchange, symmetric encryption for confidentiality, and message authentication codes for message integrity.
- WebRTC enabled
Sets whether the WebRTC option is enabled for this extension or not
To do this, go to Settings > Protocols > SIP and make sure that TLS is set to Yes.
For the allowed codecs, make sure that "Opus" is enabled and set.
Notes: For WebRTC to work properly, the following things must be done:
- Go to the Setup Wizard > SSL Certification page and make sure to upload a valid certificate or use the automatic Let’s Encrypt service.
- Go to Settings > Protocols > SIP and make sure that TLS is set to “Yes”.
- For the allowed codecs, make sure that "Opus" is enabled and set.
- Encryption
This option enables or disables transport encryption.
The proposed options are:
- Offer if possible (TLS only): Offers encryption only if it is possible and only with the TLS protocol.
- Required: Encryption is always required
- Offer (TLS only): Always offers encryption but only with TLS.
- NAT
Set the appropriate Extension – PBXware NAT relationship.
If extension 1000 tries to register with PBXware from a remote location/network and that network is behind NAT, select the appropriate NAT settings here.
Available options:
- Default (rport) – this parameter forces RFC3581 operation and disables symmetric RTP support.
- Yes – Always ignore the information and assume a NAT
- No – Use NAT mode only according to RFC3581
- Comedia RTP – enables RFC3581 operation if the remote side requests it and enables symmetric RTP support.
- Media Direct
This option is used to define whether you want to allow RTP traffic to bypass Asterisk.
Available options:
- No: tells Asterisk to never issue a re-invite to the client
- Yes: sends a re-invite to the client
- No NAT: Allow re-invite locally, deny re-invite in case of NAT
- Update usage: Uses the UPDATE header instead of INVITE.
- No NAT update: Uses the UPDATE header locally, refuses in case of NAT.
- Direct RTP
Here, you can enable or disable the direct RTP configuration. Setting this value to Yes configures the call directly with peer-2-peer media without re-invites.
Note that this option will not work for video and cases where the caller sends RTP payloads and FMTP headers in a “200 OK” response that do not match the caller's INVITE header. It will also fail if Media Direct is enabled when the device is behind NAT.
- Qualification (ms)
Time interval in milliseconds at which a "ping" is sent to the UAD/Phone or Trunk, in order to know its status (online/offline). Set this option to "2500" to send a ping signal every 2.5 seconds to the phone or Trunk to verify that it is online.
To check the status of the phone or the Trunk, go to the page Monitor.
- Host
Set the phone registration mode on PBXware. Set this field to "dynamic" to register the UAD/Phone from any IP address. Alternatively, the IP address or hostname can also be provided.
- Default IP
Default phone IP address. Even if the "Host" option is set to "dynamic", this field can be set. This IP address will be used if dynamic registration could not be performed or when it expires.
Note: The phone must be on a static IP address.
- Maximum number of connected devices
Maximum number of connected devices per extension.
Caller ID
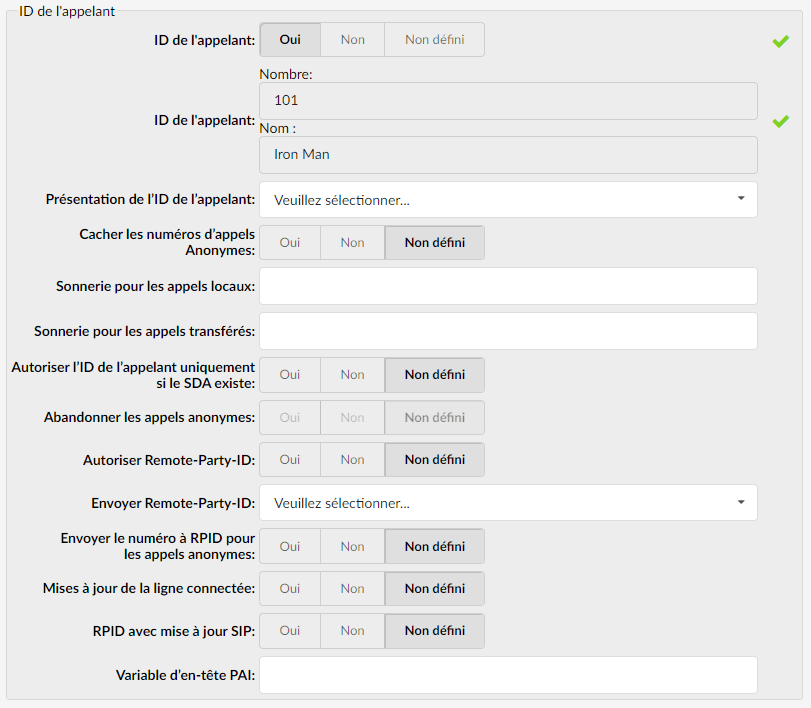
The caller name and number displayed here are sent to the person you are calling and are displayed on their phone screen. The information you see here comes from the extension number and username. To set different caller ID information, please go to “Enhanced services > Ialler ID” and set new information there.
- Set the caller ID
Enable the “Caller ID” service. Set this option to “Yes” to enable the Caller ID service.
- Caller ID
Extension number and name displayed on the phone screen of the called party. These options are read-only. Caller ID information can only be modified via Advanced services
- Caller ID presentation
This option allows you to change how the caller ID is sent by the extension.
If PBXware is connected to third-party software and there are problems transmitting the caller ID information to it, applying different caller ID presentation methods should resolve the problem
(For example: allowed, unchecked)
- Hide Anonymous call numbers
Setting this option to “Yes” formats all incoming calls for which the caller ID is set but the anonymous number is both anonymous.
- Ringtone for local calls
This option allows you to configure a custom ringtone for local calls. It is necessary to know which phone is registered on this extension.
- Ringtone for transferred calls
The ring for transferred calls works the same way as the Ring for local calls setting. Depending on your phone's manufacturer, you can send an instruction to the phone to use a different ring than the one set on the device. Once this instruction is set in the Ring for transferred calls field (as well as in your device itself), it will be used for all calls transferred to your extension.
- Allow caller ID only if the DID exists
When you assign the extension to a client and assign them DIDs, the client can make calls through this extension with caller IDs matching their DID numbers. If a client tries to make a call with a caller ID that does not match any of the DIDs assigned to them, the caller ID will be reset to Anonymous.
- Allow Remote-Party-ID
Sets whether PBXware allows the Remote-Party-ID header
- Send Remote-Party-ID
Allows you to add the “Remote-Party-ID” header to the URI.
- Use Remote-Party-ID: Use the "Remote-Party-ID" header to send the remote party's identity
- Use P-Asserted-Identity: Use the "P-Asserted-Identity" header to send the remote party's identity
- Send the number to RPID for anonymous calls
Sets whether the Caller ID will be sent in the RPID header for anonymous calls
- Connected line updates
This option is particularly useful because for certain providers, if "Use PAI" is enabled, calls may begin to be dropped shortly after the update is sent. Setting connected line updates to "No" will prevent these calls.
- RPID with SIP update
In some cases, the only method that will immediately transmit the connected line change is with a SIP UPDATE request. If you are communicating with another Asterisk server and want to be able to pass these UPDATE messages to it, you must enable this option. Otherwise, you will have to wait for a re-invite to transmit the information.
- PAI header variable
Set the value of the PAI header.
The available values are:
- %CALLERIDNUM%
- %EXT%
- %CALLERIDNAME%
- %PAIEXT%
Call properties
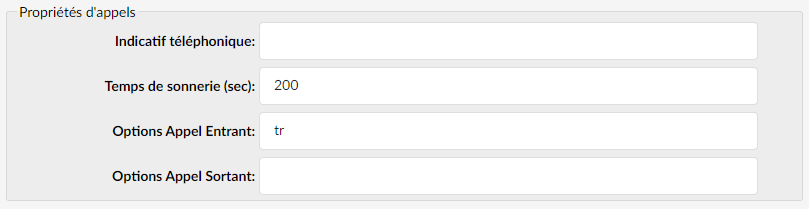
These options allow you to precisely adjust the incoming/outgoing call settings.
- Phone code
Phone code in which the system is located or from which it operates.
- Ring time (sec)
Ring duration of the phone in seconds.
Groups

These options define which extensions are allowed to take calls and which calls the extensions are allowed to take.
- Call group
Set the call group to which the extension belongs. Note that it is only possible to have a single call group.
- Pickup group
Set the groups that the extension is allowed to pick up by dialing *8. Here, however, it is possible to have as many pickup groups as needed.
Practical example:
Extension A:
- Call group = 1
- Pickup group = 3,4
Extension B
- Call group = 2
- Pickup group = 1
If A rings, B can intercept the ringing call by dialing *8.
In contrast, if B rings, A cannot take the ringing call because B's call group is 2, and A can only take call groups 3 and 4.
Default trunk
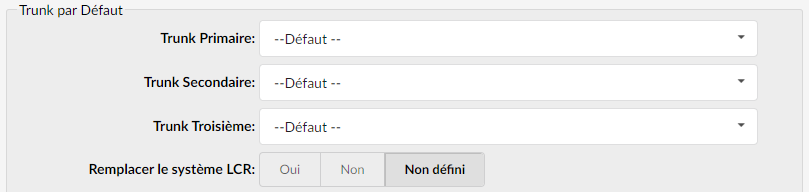
These options allow extensions to use custom default trunks for all outgoing calls.
- Primary/Secondary/Tertiary Trunk
Set the default trunks for all routes dialed from this extension.
If the connection is not established through the primary trunk, the secondary trunk is used, and so on. Default trunks can be defined per extension and under Settings > Default Trunk.
- Replace the LCR system
This option tells the system that during calls, it should skip checking the LCR at the system level.
- Routes (E.164)
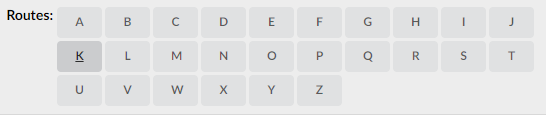
Set the extension's default trunk "per destination provider/country" (Routes: example). For certain countries/providers to be reached via non-primary trunks, or when one of the default trunks should take priority over another, a route can be defined for each destination provider
Important note : These routes are not available if the system is configured to use simple route mode and not E164.
(Settings > Servers > Edit server > Routing mode: simple route/E.164.
Priority
- Settings
- Default trunk: all system calls go through the trunks defined here.
- MiniLCR: Overrides the "Default trunks" and defines a specific line for a destination.
- Extension
- Trunks: Replaces "Settings: Default trunks"
- Routes: Replaces “Settings: MiniLCR”
Emergency trunk

- Primary/Secondary/Tertiary Trunk
These trunks will replace the trunks defined by default. The trunks available for selection are only those that are authorized to be defined on this tenant (defined in Trunks & Tenants), but only if the value is not "Default".
Call control
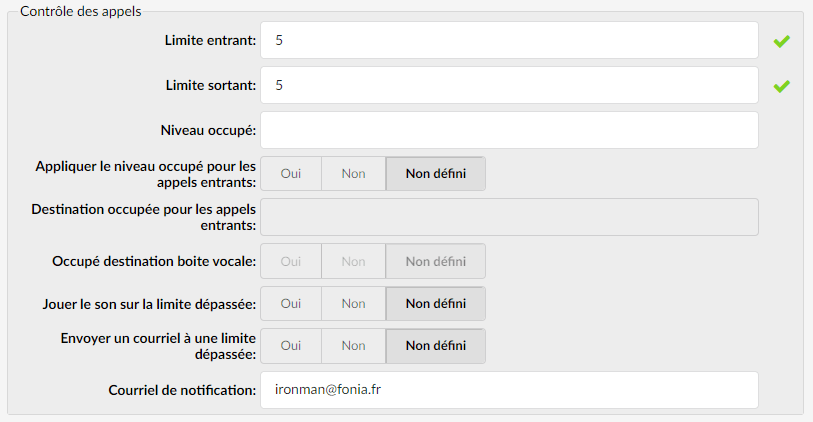
These options define the number of simultaneous incoming and outgoing extension calls.
- Inbound limit
Sets the maximum number of simultaneous incoming calls. If an extension receives more incoming calls than the number set here, the calls will all be redirected to the extension’s inbox.
- Outbound limit
Sets the maximum number of simultaneous outgoing calls. The outgoing call can be put on hold and another call can be made from the same extension. However, this feature must be supported by the phone.
- Busy level
Maximum number of simultaneous calls until the user/peer is considered busy. This option is not intended to block calls, but to correctly display the user's status, for example on a BLF.
- Apply busy level for inbound calls
If Apply busy level for incoming calls is set and the user receives an incoming call while the extension is on a call, the incoming call is blocked and redirected to voicemail or any other option defined for the extension. (For this to work, the Busy level option must be set to 1 under Group call control).
- Busy destination for incoming calls
Users can redirect calls to a custom extension when the busy level is set and they also have the ability to set the busy destination voicemail to yes/no.
- Busy voicemail destination
Sets whether the destination for the busy level is voicemail.
- Play sound on exceeded limit
If you try to make more calls than the limit allowed in the outbound limit, a message will be played indicating that the limit has been exceeded.
- Send an email when a limit is exceeded
Whether or not to send a notification email when the limit is exceeded.
- Notification email
Email address to which the notification mail should be sent if the number of calls exceeds the limit.
IAX extensions
- No transfer
Prevent Asterisk from getting out of the media path and connecting the two endpoints directly to each other. This, of course, affects your CDR and call rating information.
- ANI sending
Whether to send ANI with the caller ID.
- Trunk
If you want to use IAX Trunking. IAX Trunking needs the support of a hardware clock.
Authentication
These options are used for phone authentication with PBXware.
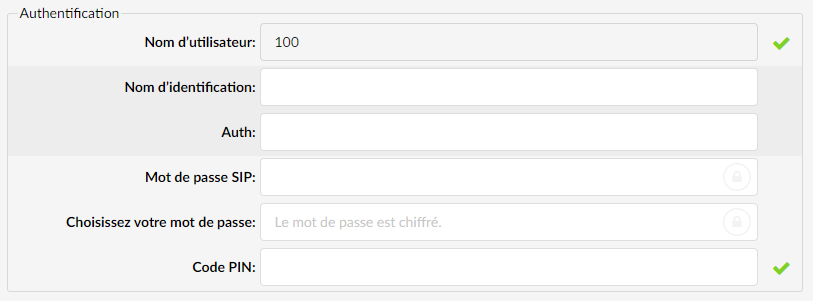
- Authentication name
Name used for authentication with the SIP provider.
(For example, if you set this field to 12345, for example, the SIP header sent will look like 12345@provider.com)
- Auth
Auth is the optional authorization user for the SIP server
The other options (Username, SIP password, etc.) are options that appear outside the advanced options, covered in the section General.
Permissions
The authorization section is divided into four options:


The button Destinations allows you to specifically allow or deny the call routes that the extension can use: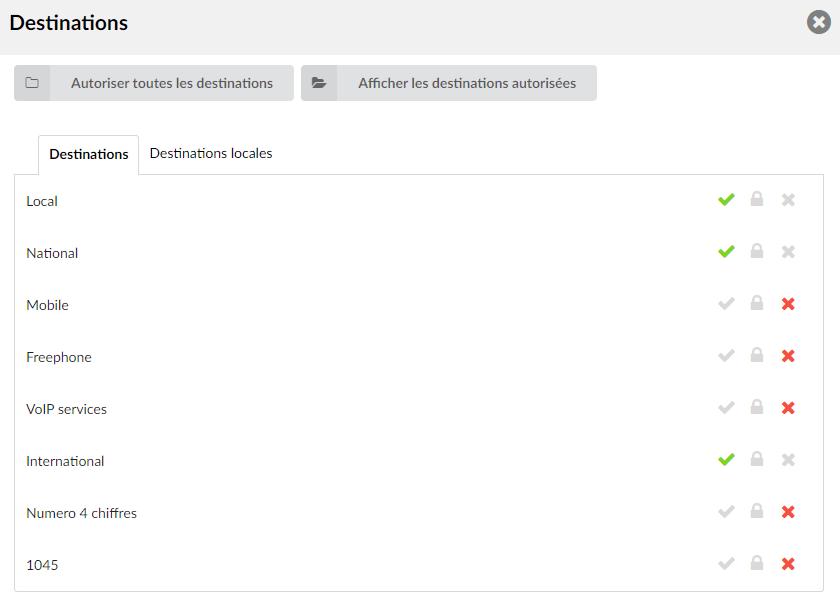
In simple routing, routes can be:
 Declined
 Allowed
 Allowed butPIN Required
In the example in the screenshot above, the extension will be authorized to call local, national, and international numbers. When the extension tries to dial a number going through a denied route, the system will inform it that it is not authorized to dial this number.
By clicking on Allow all destinations, all routes will be automatically allowed:

If E164 routing mode is enabled on the server, destinations can be defined via the following groups:
- Destinations – PSTN E164 destinations, ITSP, other VoIP networks, etc.
- Local destinations – All destinations within the system/network (Extensions, IVR, Queues, Conferences...).
- Special routes– Other PBX networks to which we are
connected
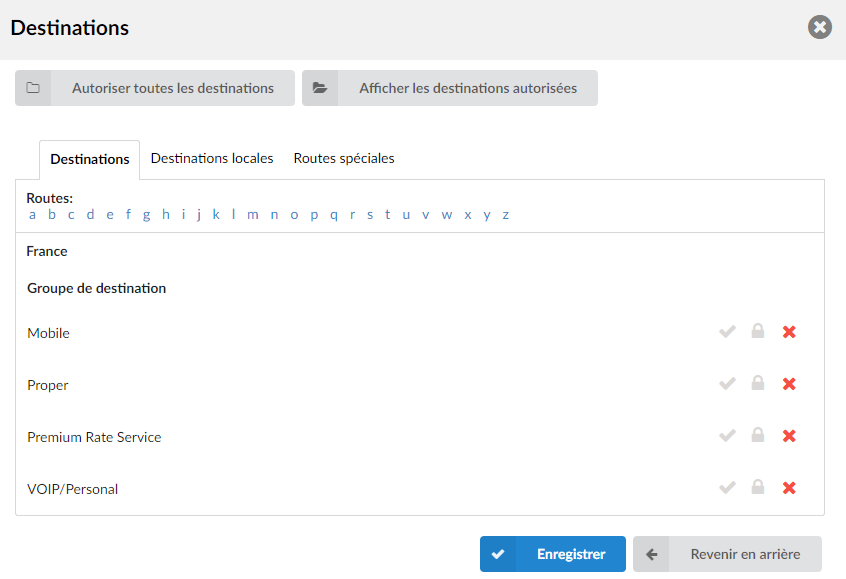
Again, in E164 routing, routes can be:
Declined
Allowed
Allowed butPIN Required


When you click on Enhanced services, a new window with various features opens. Before configuring and editing any of them, it is first necessary to enable it and save the changes.
See our dedicated page: Enhanced services.

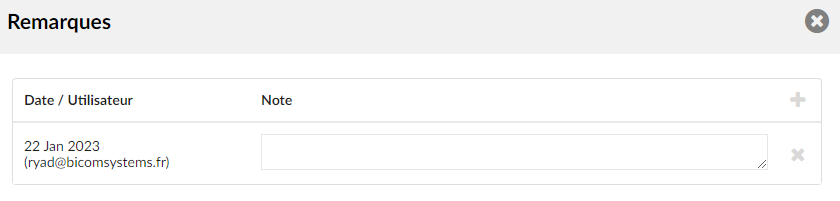
Remarks are notes added by administrators on certain extensions.
When you click this button, you can set notes about this extension.
- Date/User
When a new note is added, this field is automatically filled in with the current date and the email of the user creating a note.
- Note
In this field, enter the desired note.

The button Editions & Modules allows you to define which Communicator applications and modules of this application the extension can use.
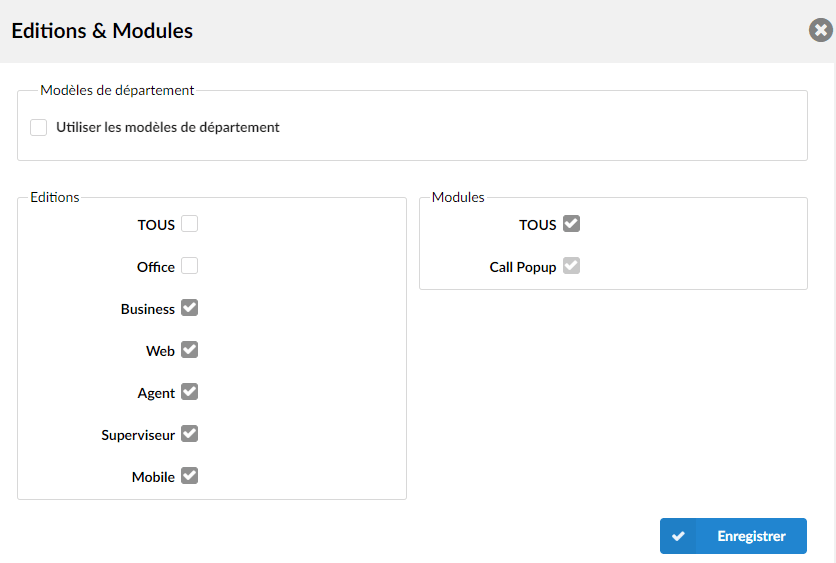
The option ALL is set by default, so the extension can use all editions.
You can uncheck the option ALL and choose the editions you want to enable per extension.
Features 
This section allows the PBXware administrator to allow or prevent Communicator users from using specific features when using the Communicator Desktop, Mobile, or Web applications.
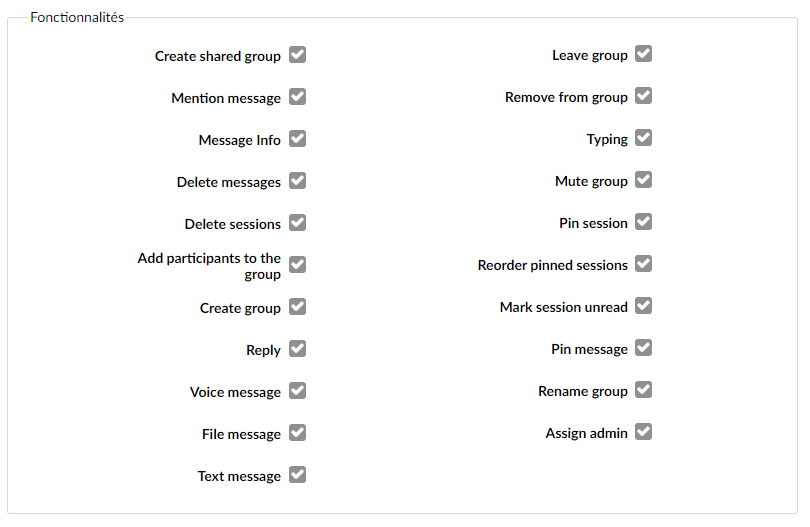
- Create a shared group
Enable or prevent the user from creating shared Communicator groups.
- Mention
Enable or prevent the user from using mention in the Communicator chat
- Information about the messages
Allow or prevent the user from viewing message information in Communicator chat groups.
- Delete the messages
Enable or prevent the user from deleting messages in the Communicator chat.
- Delete conversations
Enable or prevent the user from deleting Communicator chat sessions in the Communicator application.
- Add participants to the group
Enable or prevent the user from adding new participants to the Communicator discussion group.
- Create a group
Allow or prevent the user from creating a new Communicator chat group.
- Reply
Enable or prevent the user from replying to Communicator chat messages.
- Voice message
Enable or prevent the user from leaving voice messages on Communicator
- Message file
Enable or prevent the user from sending file messages in the Communicator chat.
- Text message
Enable or prevent the user from sending text messages on Communicator
- Leave a group
Allow or prevent the user from leaving the Communicator chat group.
- Remove from a group
Allow or prevent the user from removing participants from Communicator chat groups.
- Mute a group
Allow or prevent the user from disabling Communicator chat groups.
- Pin conversations
Allow or prevent the user from pinning chat sessions in their Communicator application.
- Reorder pinned conversations
Allow or prevent the user from reordering pinned chat sessions in their Communicator application.
- Mark a conversation as unread
Enable or prevent the user from marking chat sessions as unread in their Communicator application.
- Pin a message
Enable or prevent the user from pinning chat messages in Communicator chat groups.
- Rename a group
Enable or prevent the user from renaming Communicator chat groups.
- Assign an administrator
Allow or prevent the user from assigning administrator permissions in Communicator chat groups.
Voicemail
These options replicate the functions of an answering machine but with many additional features. Voice messages are recorded to a central location on the file system rather than on the phone directly.
- Access a voicemail box
To access a mailbox, dial *123 from a phone registered on the extension, enter the extension’s PIN code, and follow the instructions.
- Leave a voicemail
When the user is transferred to voicemail, the message “Please leave your message after the tone … “ will be heard.
Two options are available:
- Leave a voicemail (completed by pressing the # key or hanging up),
- Reach an operator by pressing 0
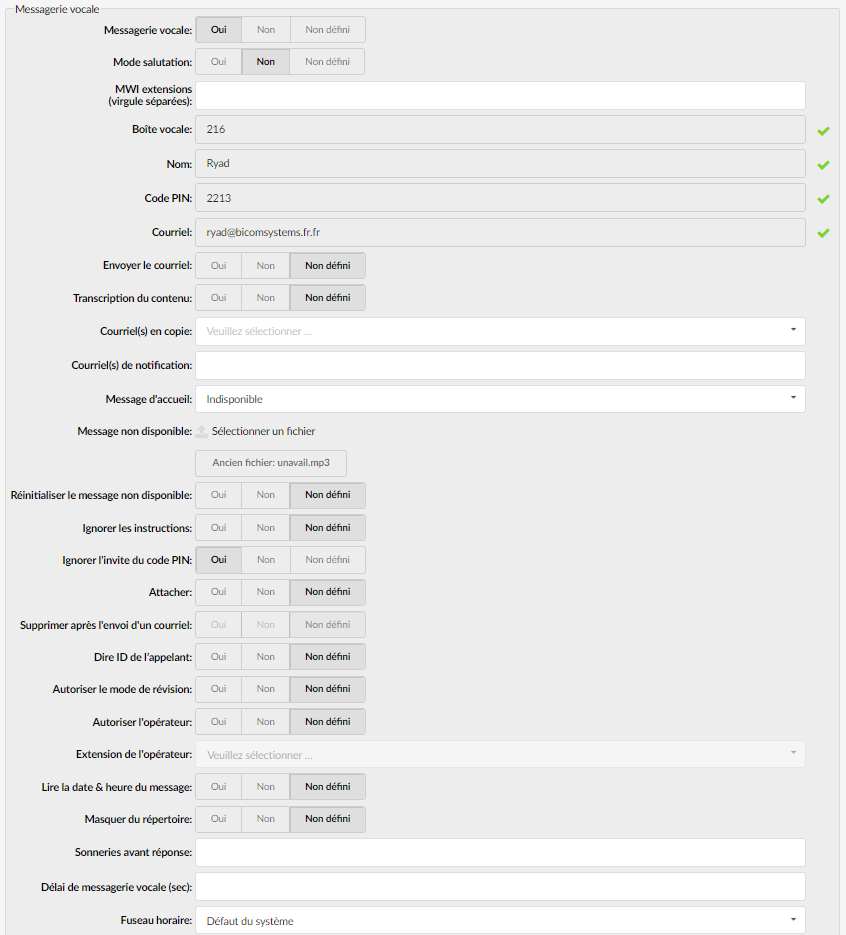
- Voicemail
Enabling the voicemail service. When no one answers the call, after a certain time, the caller will be transferred to the voicemail box of the dialed extension. The caller will then have the option to leave a voice message.
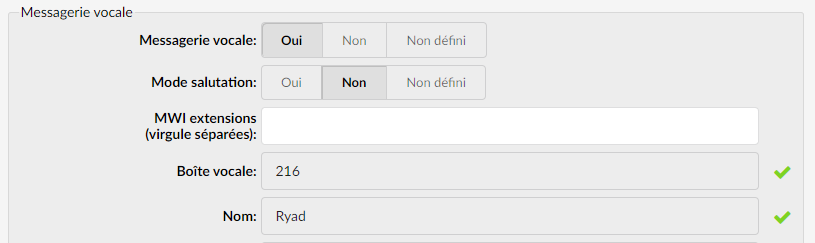
- Greeting mode
If your voicemail is enabled, you can set this option to yes to play a greeting message, then a busy tone.
- MWI extensions (comma-separated)
If you want your extension to be notified of several voicemails, you can enter them in this field.
(For example 200, 201, 202, …)
The phone will need to be re-registered for the changes to apply.
- Voicemail
Voicemail extension number. This value is identical to the extension number and cannot be modified.
- Name
Full name of the user associated with the voicemail box. This value is the same as the ‘Name’ field in the ‘General’ section and cannot be modified
- PIN code
Password used to access voicemail. The value of this field is set under ‘Authentication: PIN’. When you want to access your voicemail, you will be asked to authenticate with a 4-digit PIN code
Email address associated with the voicemail. The value of this field is set in the field Email of the section General.
(For example, when A calls B and leaves a voice message, B will receive an email notification about a new voice message at this email address).
- Send the email
Whether or not to send an email to the address indicated above
- Content transcription
Transcription, more commonly called speech-to-text of voicemail is a service that converts audio voicemail messages into text formats, which are then sent to the user by email or SMS.
- Email(s) in copy
Add additional email addresses to which you want the voicemail inbox to be associated.
- Notification email(s)
Pager email address associated with the voicemail.
(For example, when A calls B and leaves a voice message, B will receive an email notification on a pager about a new voice message at this email address).
- Greeting message
Greeting message played to users when they enter the voicemail box.
(For example, when A reaches B's voicemail box, the selected “greeting” is played to A before he is allowed to leave a message).
- Unavailable/busy message
Upload a sound file that will be played when the extension is unavailable/busy.
- Reset unavailable message
If the greeting is set to busy, you have the option to reset the busy message.
- Skip the instructions
Skip the instructions on how to leave a voice message.
(For example, once user A reaches the dialed voicemail, if this option is set to Yes, A will hear the greeting (if there is one) then will be directly transferred to the sound “beep” to leave their message).
- Skip the PIN code prompt
This option allows you to not require the PIN code when accessing the extension's voicemail with *123, in order to reach the voicemail options more quickly.
- Attach
Allows the voicemail to be sent as an attachment to the user's email.
- Delete after sending an email
Allows you to delete the voicemail after sending it as an attachment to the user's email.
- Say Caller ID
Announce the phone number (or extension) from which the voicemail was recorded.
(For example, if this option is set to "Yes", when checking voicemail, the message "From the phone number [number]” will be heard).
- Allow review mode
Allows A to review the voicemail before permanently committing it to B's voicemail box.
For example, A leaves a message on B's voicemail box, but instead of hanging up, presses #. Three options are then available to A:
- Press 1 to accept this recording
- Press 2 to listen to it
- Press 3 to re-record your message
- Allow operator
Allow the caller to reach an operator from the voicemail.
For example, A leaves a message on B's voicemail box, but instead of hanging up, A presses the # key.
Then the message “Press 0 to reach an operator” is played. The user is then offered the following options:
- Press 1 to accept this recording (if selected, the user is played the message “Your message has been recorded. Please wait while extension [extension] is being called” and the operator is then dialed)
- Or hold # (If B holds down # for a moment, they will hear the message “ Message deleted. Please wait while extension [extension] is being called » is played and the operator is dialed)
- Operator extension
Local extension number acting as operator.
- Play the message date & time
Announces the date/time and the extension number from which the message was recorded.
- Hide from directory
This option will allow you to hide your extension from the Directory/BLF list.
- Rings before answer
Number of rings before voicemail answers the call
- Voicemail delay (sec)
Duration of the pause in seconds before asking the user for their PIN/password.
(Some phones tend to truncate the beginning of audio files. As a result, the caller may hear “… passes” instead of “password“. Setting this field to 1 or 2 seconds will provide a long enough interval to correct this anomaly).
- Time zone:
Sets the correct timestamp.
Custom SIP header for speaker
These options allow the caller to use a UAD in a public address system. If the UAD fully supports this service, the call is accepted automatically and put on a speaker.

Define a custom UAD/phone header for this extension.
For example, if one of the predefined headers does not work, you can try setting a custom header for this service. The custom header line to use Call-Info:\;answer-after=0.
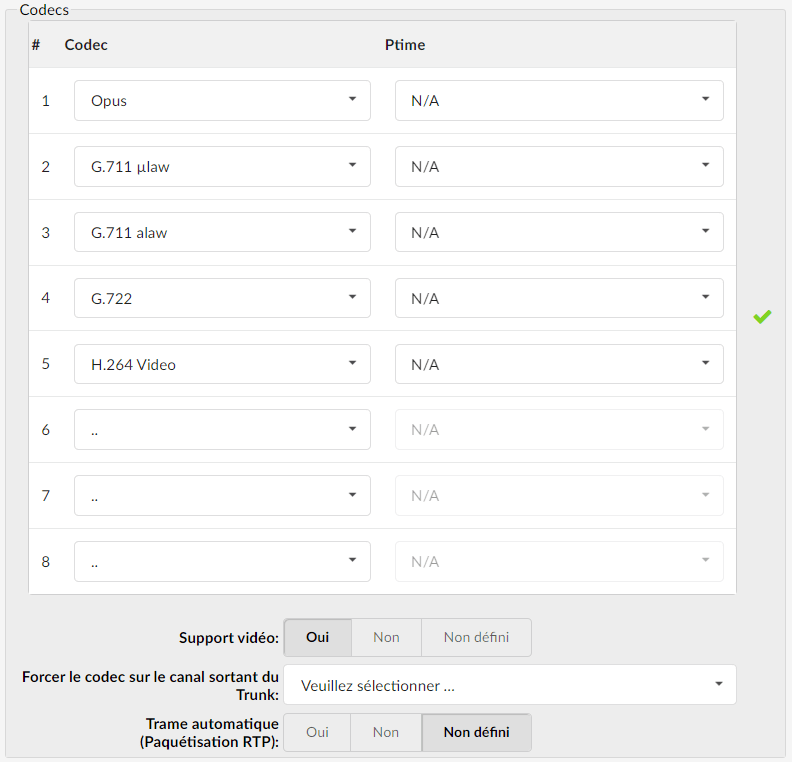
Codecs
Codecs are used to convert voice signals from analog to digital and vice versa. These options define the preferred codecs used by the extension.
Jitter Buffer
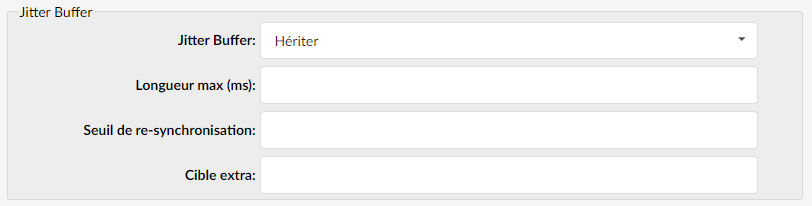
- Jitter buffer
Choose the type of jitter buffer
The available options are:
- Inherit – jitter buffer settings inherited from the tenant configuration.
- Fixed – Set a fixed jitter buffer on the channel.
- Adaptive – Set an adaptive jitter buffer on the channel.
- Disabled – Removes a previously set jitter buffer from the channel.
- Max length (ms)
Duration in milliseconds for the buffer. By default, it is 200 ms.
- Re-synchronization threshold
The duration in milliseconds during which a timestamp difference will cause the jitter buffer to resynchronize. By default, it is 1000 ms.
- Extra target
This only affects the adaptive jitter buffer. It represents the duration in milliseconds during which the new jitter buffer will fill to its size. The default is 40.
Hot-Desking
- Automatic logout (hours)
Sets the automatic logout time in hours for devices configured for hot-desking.
Recording in progress
This group of options is used for recording all incoming/outgoing calls.

- Play a periodic beep (sec)
To enable this feature, enter the time in seconds to define how often the periodic audio signal will be played to the parties informed that call recording is enabled.
For example, enter 60 to enable this feature and play a periodic signal every 60 seconds.
Auto provisioning
These options allow PBXware to automatically provision the UAD/phone. The configuration files are downloaded from the PBXware MT TFTP server
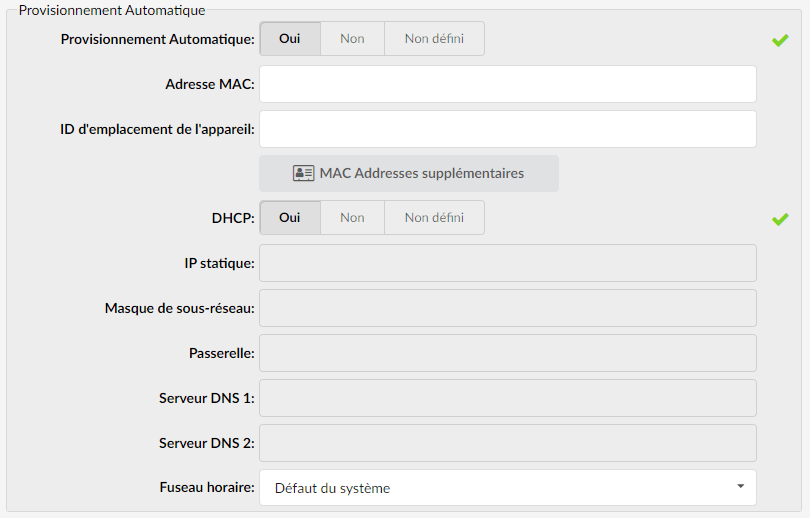
- Auto provisioning:
Enable the auto-provisioning service for this extension
Connect the UAD/phone to PBXware without any problem by providing the UAD/phone MAC address (and optionally by adding the static IP address of the UAD/phone and network details)
(Radio buttons)
- MAC address
Phone MAC Address
Enter the phone's address here. The MAC address is the unique physical identifier of each piece of hardware and makes it possible to identify the manufacturer of the device.
- Additional MAC addresses

This option allows the use of multiple MAC addresses by a single extension. This makes it possible to automatically provision multiple phones connected to the same extension.
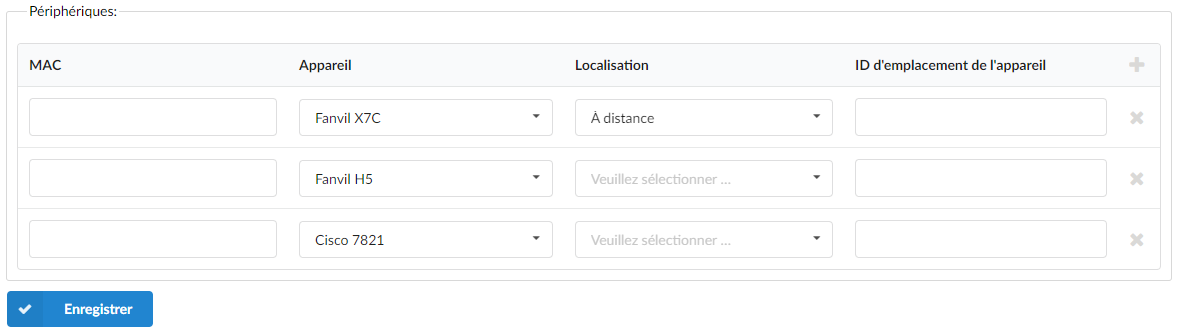
- DHCP
If there is a DHCP (Dynamic Host Configuration Protocol) server that provides IP addresses within the network in which the phone is located, and you want the phone to obtain an IP address from this server automatically, set this option to Yes.
If you set this option to no, you will be able to assign a static IP to the phone.
- Static IP
Enter the phone's static IP address. To do this, you must set the DHCP option to No.
- Network mask
UAD/phone network mask
- Gateway
IP address of the network gateway
- DNS1 & DNS2 servers
DNS server IP address
Presence
This option tells you whether device presence is enabled or disabled. Supported UADs can be viewed in the Settings > UAD menu.

- Presence enabled:
Enable presence support, but not all UAD/phones support this feature
- Supported UADs:
- Snom 190 (Firmware >= 3.60s), 320/360 (Firmware >= 4.1)
- Polycom IP30x/IP50x/IP600
- Xten EyeBeam
- Grandstream GXP2000 (Firmware >= 1.0.1.13)
- Aastra 480i
- Aastra 9133i
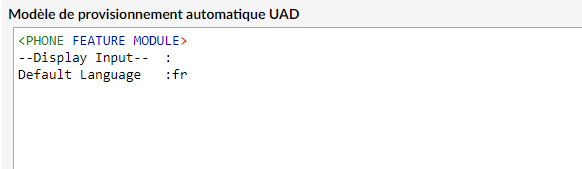
UAD auto provisioning template
This option allows you to add additional parameters (for example changing the default language or changing the wallpaper), if PBXware does not allow it, to the auto provisioning template. Auto provisioning parameters are generally defined in Settings > UAD and are customized for each device.
Additional configuration
This option is used to provide additional configuration parameters for the SIP and IAX configuration files. The values provided here will be written to these configuration files.
Buttons

- Save
Saves the changes
- Backup & email
Save the changes and send an email to the email address from the field Email of the section General
- Back
Go back without saving the changes
Custom extensions
Custom extensions are used to execute custom PBXware commands/scripts.
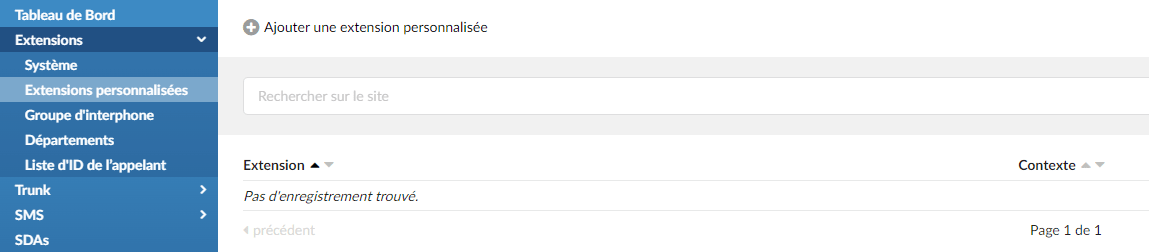
This screen lists all the PBXware custom extensions with the following details:
- Add a custom extension
Click the Add custom extension icon to access the Add custom extension screen.
- Search
In the search section, you can find your extension by typing its number of custom extensions per extension.
- Extension:
Custom extension network number
Dial this number to run a custom PBXware script
- Context:
Context to which the extension belongs.
Add/Edit a custom extension
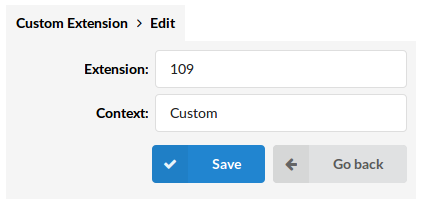
To add a new custom extension, click the “Add a custom extension” button
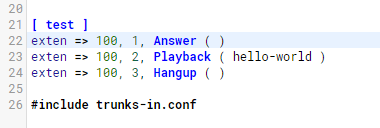
2. Save the changes.
3. Reload PBXware and call extension 100.
4. The tone Hello world will then be played to the other end of the line.
Intercom group
 The intercom group feature works in the same way as a standard intercom, except that this feature allows you to organize extensions into multiple intercom groups and assign a unique number to each of them. Since this feature is used with the access code *600, the intercom group number is entered after the access code.
For example, if we assign the number 300 to the intercom group and add 4 extensions to it, once we dial *600300, we will be able to broadcast the message via intercom to all extensions added to intercom group 300.
- Group name
Intercom group name
- Number
Intercom group number. Once the user dials *600 + this number, all extensions assigned to this intercom group will be paged.
Destinations
Extensions associated with an intercom group
Add/Edit an intercom group
Click on Add an intercom group or Edit on an existing group will open the following options:
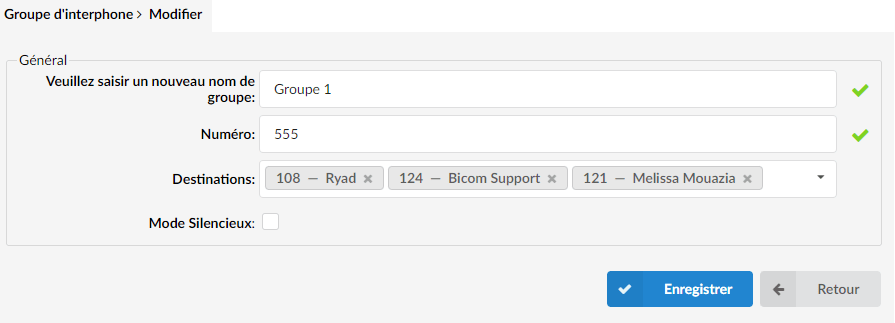
- Group name
Single intercom group name
- Number
Extension number of the intercom group
- Destinations
System extensions associated with the intercom group
- Silent mode
Does not beep to the called extensions.
Departments
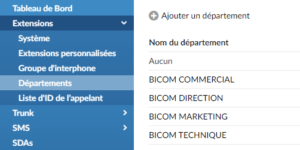
The Departments section lists all departments present on this system and provides the ability to edit them or add new ones. Departments are used by the Communicator softphone to sort extensions based on the department they belong to.
Add/Edit a department
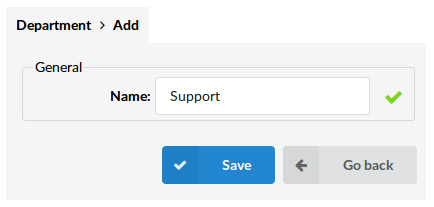
When you click on Add a department or on the button Edit, this screen is displayed:
- Name
Department name
Hot-Desking
Hot-Desking is a feature that allows your company not to assign permanent desks in a workplace, so that employees can work at any available desk.
From a managerial standpoint, Hot-Desking is attractive because it significantly reduces overhead. However, the concept will not work in environments where employees are expected to be at the office most of the time.
Hot-Desking, as a PBXware feature, is as simple as possible. By dialing the appropriate access code (*555 by default) on any desk phone preconfigured for Hot-Desking, the user will land on an IVR, where they will be asked for the extension and PIN code. Once the correct extension/PIN combination is entered, the phone will be rebooted and automatically provisioned with the new extension.
If a phone was already registered with the same extension, it will also restart and be automatically provisioned with a dynamic extension. If the extension is on a call, the phone will restart once the call is finished. Phones with a dynamic extension will not be able to call any destination other than the Hot-Desking IVR.
Emergency numbers can be dialed even if the shared desk device is not connected (if no extension is provisioned). In this case, the emergency caller ID will be used for the outgoing call.
Here is the Hot-Desking screen:

- MAC
MAC address of the phone.
- Device
Hot-Desking Device
- Extension
Extension number associated with the device.
- Enabled
Status of the Hot-Desking device.
Add/Edit a shared desktop device
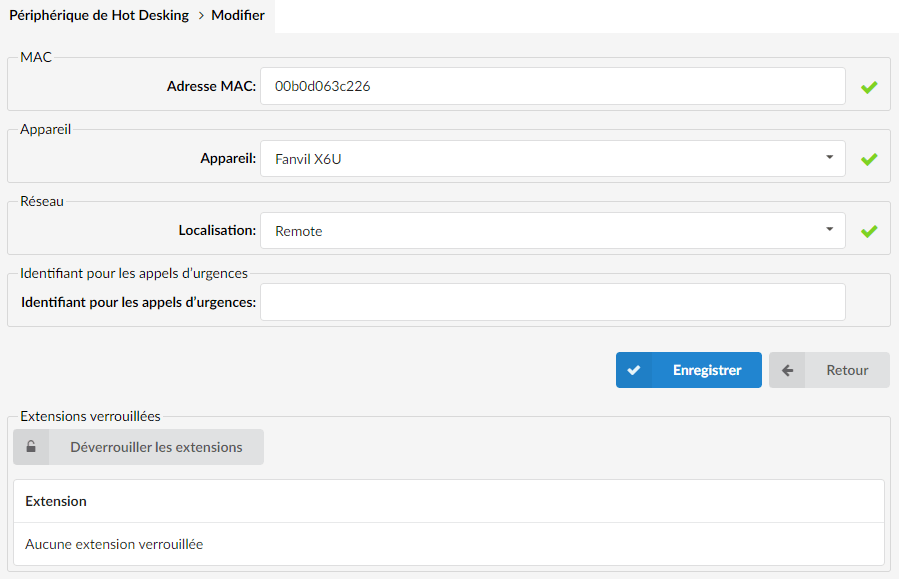
- MAC address
MAC address of the UAD.
- Device
Select a device for Hot Desking.
- Location
The location indicates whether the phone is in a network Local or Remote.
- Emergency caller identification
The caller ID entered here will be used only for calls to emergency service numbers.
Emergency numbers can be dialed even if the shared desk device is not connected. In this case, the caller ID defined here will be used for the outgoing call.
- Locked extensions
- Unlock extensions
Unlocks locked extensions
- Extension
List of all extensions locked to this device
PIN-based devices
Each extension has its own unique PBD PIN code. When you make a call from a device set as a PIN-based device, after entering the desired extension number you will be asked to enter your PBD PIN code. This PIN code will identify the user on the system, and then dialing will continue as if the user were dialing from their own extension. Call rating, CDRs and everything else will apply to the user's extension and not to the PBD device's extension. To make a call with an extension connected to a PIN-based device, you must enter that extension's PBD PIN code.
CSV download
There is an option to upload the CSV file instead of manually entering the PIN-based devices. Click the Browse button, select the .csv file on your hard drive, and press the upload button. Please make sure that the CSV file contains names, extensions, and information separated by commas indicating whether the device is active or not, as in the example below:
Download CSV
The CSV download button gives you the ability to download a complete list of PIN-based devices from a tenant, in CSV format, which can then be used to recreate the list on a new system/tenant
Download the CSV template
The Download CSV template button will present you with a file that already contains the necessary headers, which should help you create a CSV file more easily
Once you have clicked PIN-based Devices in the Extensions menu, the page containing the following details will open:
- Name
Name of a PIN-based device
- Extension
Extension used by the device
- Active
Sets whether the PIN-code-based device is active or not.
Click to edit a PIN-based device configuration.
Click to delete a PIN-based device from the system.
Add/Edit a device based on a PIN code
General
- Name
Name of the PIN-based device
- Extension
Extension that will be used by the device.
- Active
Sets whether the PIN-code-based device is active or not.
Additional information
PBD local extensions
PIN-based dialing is disabled for local extensions. It is not necessary to enter the PBD PIN code for local calls.
PBD access codes
Using access codes requires correct identification of the user with the PBD PIN code. Most access codes are bound per user, which means they can only be used if they are enabled as part of enhanced services. Dialing the access codes will require entering the PBD PIN code so that the system can identify the user and perform the required actions.
Access codes that can be used with PBD:
- General voicemail = *124
- Call parking = 700
- Call parking start = 701
- Call parking end = 720
- Short number = *130
- Call pickup = *8
- Asterisk call pickup = *88
Caller ID list
In this section, users can see all the extensions of the chosen tenant, as well as the enhanced service values
Caller IDassigned for each extension individually.

- Download CSV
By clicking on the CSV download icon, the user can download the CSV file containing all the data visible in the list.
- Extension number
Extension number
- Extension name
Full name of the user with whom the device is registered
- System/network caller identification
This value is applied here from Enhanced Services > Caller ID
- Emergency caller identification
This value is applied here from Enhanced Services > Caller ID
- Caller identification
This value is applied here from the enhanced services. By clicking on the Caller ID icon (four bars), users can see which caller ID is used by an extension on different network lines.
