



Configure geo-redundancy
To configure geo-redundancy between two servers, you will need:
- Create a dataset dedicated to redundancy on the server that receives the replications (for example Site A receives the replicas of Site B).
- Use the dedicated redundancy API key generated on Site A and insert it on Site B so that Site B knows which server to send the replicas to.
- Configure the replication task for VPS from Site B to Site A (number of restore points, replication frequency, selection of VPS to replicate, testing replication and restoration).
The SERVERware of the main site (for example Site B) will be connected to the receptacle server, where the VPSs will be replicated (for example Site A) with an API key once both sites have been configured with each other.
Before you can create a geo-redundancy site, you must first create a ZFS dataset for this purpose on Site A. This dataset will host the VPSs replicated from Site B.
The replication server dataset can be created on the host's main NETSTOR pool of the storage host. It is recommended that the minimum available storage capacity for the replication server be twice the size of the initial storage occupied by the VPSs.

Create a geo-redundancy site
To be able to create a GRS site, you must first create a ZFS dataset for this purpose.
The geo-redundancy dataset can be created on the NETSTOR pool (main pool) of the storage host.
The minimum available storage for the geo-redundancy server must be double the size of the initial storage occupied by the combined VPSs in the replication circle.
The storage for the geo-redundancy server should only be considered as a pool with SSD storage.
ZFS file systems are created using the zfs create command. The create subcommand takes a single argument: the name of the file system to create. The file system name is specified as a path starting with the pool name, as follows:
pool-name/[filesystem-name/]filesystem-name The pool name and the names of the initial file systems in the path identify the location in the hierarchy where the new file system will be created.
The last name in the path identifies the name of the file system to create.
In the following example, a database named GRS is created in the NETSTOR file system on the SERVERware of Site A.
~ # zfs create NETSTOR/GRS ZFS automatically mounts the newly created file system if it was created successfully. By default, file systems are mounted as /dataset, using the path provided for the file system name in the create subcommand.
In this example, the file system of the newly created geo-redundancy server is mounted on /NETSTOR/GRS.
Run the zfs list command to make sure the dataset is created:
~ # zfs list NAME USED AVAIL REFER MOUNTPOINT NETSTOR 489G 156G 142M /NETSTOR NETSTOR/CONTROLLER 1.38G 156G 1.38G /NETSTOR/CONTROLLER NETSTOR/GRS 483G 156G 112K /NETSTOR/GRS NETSTOR/logs 476K 8.00G 476K /NETSTOR/logs NETSTOR/templates 3.60G 156G 96K none SYSTEM-e274 10.1G 205G 96K none SYSTEM-e274/BACKUP 96K 205G 96K legacy SYSTEM-e274/rootfs 6.63G 8.37G 4.63G / SYSTEM-e274/rootfs/log 118M 1.89G 118M legacy SYSTEM-e274/swap 2.13G 207G 60K - Then continue creating the site.
On the selected host, run the swrepl-adm CLI tool.
~ # swrepl-adm The space used for the geo-redundancy dataset must represent 60% of the available storage space; this way you will ensure that enough space remains for replications.
You can now use the CLI commands to create a new site.
In our case, a new site must be created:
» site add -storage NETSTOR/GRS -quota 450G -throttle 70M -admin#false -allowedips "192.168.1.10,10.1.0.0/16" "Site A" A success message is then displayed:
OK 93010f9f4003723d2eec317bf7160e0d In the list of allowed IP addresses, the IP address of the remote controller and the IP addresses of the storage host must be allowed.
The site with the ID: 93010f9f4003723d2eec317bf7160e0d is created, to confirm the site settings enter the following command:
» site list ID | INFO | ADMIN | STORAGE | QUOTA | THROTTLING +------------+-----------------+-------+-------------+-----------+------------+ 93010f9... | this is my site | false | NETSTOR/GRS | 450.0 GiB | 70.0 MiB/s +------------+-----------------+-------+-------------+-----------+------------+ All available sites will be displayed; for a more detailed view, add the site ID after the command:
» site list 93010f9f4003723d2eec317bf7160e0d ID: 93010f9f4003723d2eec317bf7160e0d Description: mon site Admin: false API Key: 7e0f6463412acc17d3ff163065c1d897 Storage: NETSTOR/GRS Quota: 450.0 GiB Throttling: 70.0 MiB/s Allowed IPs: 192.168.1.10,10.1.0.0/16 To modify the site settings after creation, the command site update can be used:
» site update 93010f9f4003723d2eec317bf7160e0d -allowedips 0.0.0.0 OK » site list 93010f9f4003723d2eec317bf7160e0d ID: 93010f9f4003723d2eec317bf7160e0d Description: this is my site Admin: false API Key: 7e0f6463412acc17d3ff163065c1d897 Storage: NETSTOR/GRS Quota: 450.0 GiB Throttling: 70.0 MiB/s Allowed IPs: 0.0.0.0 If the site details are correct, let’s use the API key: 7e0f6463412acc17d3ff163065c1d897 to connect SERVERware to our newly created site and start the replication process.
The API key generated on Site A must be entered on the Site B server; when you wish to add a redundancy server (Site A in this case), you can see that the API key I entered is indeed the one that corresponds to the pool that has just been created on Site A:
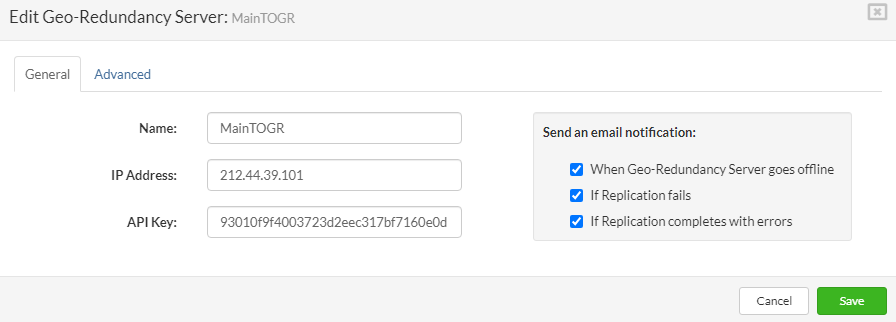
Geo-redundancy is now operational. In case of a failure on the main site after failover and restoration to a remote location, to return the data to the main site, using the same procedure, you will create a geo-redundancy dataset on the storage host (Site – A) and return the data to the main location.
You can now perform the procedure in reverse, in order to copy all the VPS from Site A to Site B by creating a redundancy site on Site B and entering the API key on Site A.
Create a dataset dedicated to geo-redundancy
Creating a new dataset allows you to allocate dedicated storage space to the geo-redundancy machines. This will notably allow the VPS to be returned to their original location. To create a new dataset on SERVERware, log in to the host on which the VPSs are hosted, in this case Site B.
- Exit the swrepl-adm console (exit).
- Find out the ZFS pool name by typing:
~ # zpool status | grep pool ~ # pool: SYSTEM-e694 When you know the name of the ZFS pool, you will be able to create a dataset for replication storage.
In our example, we will use the pool name from the previous command, namely ‘SYSTEM-e694', & we will add a trailing forward slash / and the name of the dataset, in our case GRS so that the command will look like this:
~ # zfs create SYSTEM-e694/GRS 3. Next, you need to create the mount point and boot parameters for the new dataset
~ # zfs set mountpoint=legacy SYSTEM-e694/GRS ~ # zfs set overlay=on SYSTEM-e694/GRS - Create a directory and mount our newly created ZFS dataset.
~ # mkdir /GRS ~ # mount -t zfs SYSTEM-e694/GRS /GRS 5. Add this mount point to the “/etc/fstab” file so that SERVERware mounts this dataset after a system reboot.
~ # cat /proc/mounts | grep GRS SYSTEM-e694/GRS /GRS zfs rw,relatime,xattr,noacl 0 0 The result of the last command must be copied into /etc/fstab.
~# nano /etc/fstab # /etc/fstab: static file system information. # # noatime turns off atimes for increased performance (atimes normally aren't # needed); notail increases the performance of ReiserFS (at the expense of storage # efficiency). It's safe to drop the noatime options if you want and to # switch between notail / tail freely. # # The root filesystem should have a pass number of either 0 or 1. # All other filesystems should have a pass number of 0 or greater than 1. # # See the manpage fstab(5) for more information. # # <fs><mountpoint><type><opts><dump/pass> # NOTE: If your BOOT partition is ReiserFS, add the notail option to opts. systemd /sys/fs/cgroup/systemd cgroup rw,relatime,name#systemd 0 0 /dev/zvol/SYSTEM-e694/swap none swap defaults 0 0 SYSTEM-e694 /rootfs/log /var/log zfs rw,relatime,xattr 0 0 SYSTEM-e694/GRS /GRS zfs rw,relatime,xattr,noacl 0 0 After editing, save the file and exit.
Restart the processing host.
Inspect the dataset and the mount point we just created in ZFS.
~ # zfs list NAME USED AVAIL REFER MOUNTPOINT SYSTEM-e694 117G 225G 19K none SYSTEM-e694/GRS 24K 225G 24K legacy SYSTEM-e694/rootfs 7.10G 7.90G 5.10G legacy SYSTEM-e694/rootfs-prev 4.94G 10.1G 4.94G / SYSTEM-e694/rootfs/log 24.9M 1.98G 24.9M legacy SYSTEM-e694/swap 2.13G 227G 12K - If you can see a new set of data as indicated (SYSTEM-e694/GRS 24K 225G 24K legacy), you have successfully created a new dataset dedicated to redundancy.
