



Agent panel

The Agent Panel is a valuable tool designed to improve the efficiency of customer service agents by bringing together all the essential features in a single, user-friendly window. It allows agents to effortlessly manage multiple calls, feedback forms, CRM popups, callbacks, collaborate with other agents and manage queues. This documentation provides a comprehensive overview of the Agent Panel’s features and shows how it simplifies multitasking for agents.
The Agent Panel offers a practical solution by integrating the phone dialer and phone-related settings directly into its window. This design eliminates the need for agents to switch between multiple windows while making calls, resulting in a more streamlined and efficient workflow.
The agent panel window can be opened by clicking the module icon in the main window.
The Communicator Agent edition is designed to meet the diverse needs of inbound, outbound, and blended call centers. With its adaptable user interface and rich feature set, this edition adjusts dynamically and provides specialized features tailored to the work strategy, license, and module options.
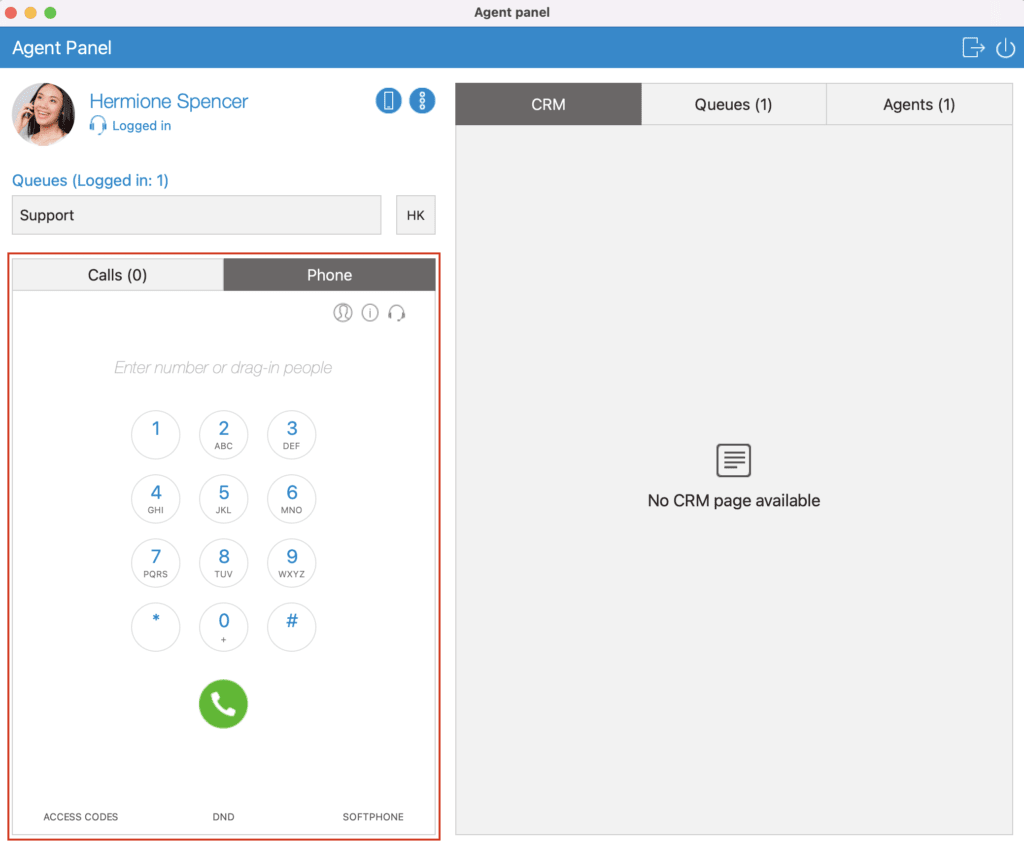
The blue top bar of the application features convenient shortcut icons on the right side, providing quick access to essential actions. These icons offer convenient options to log the user out of the application or to log out and close the application completely.
 Disconnect you of the application
Allows the user to sign out of the application while keeping it open, which provides a quick way to log out without closing the application and allows users to switch between accounts or give access to others.
 Log out and close the application.
Disconnects the user from the application and closes it, providing a streamlined way to log out and exit the application. This ensures a secure session termination and frees up system resources.
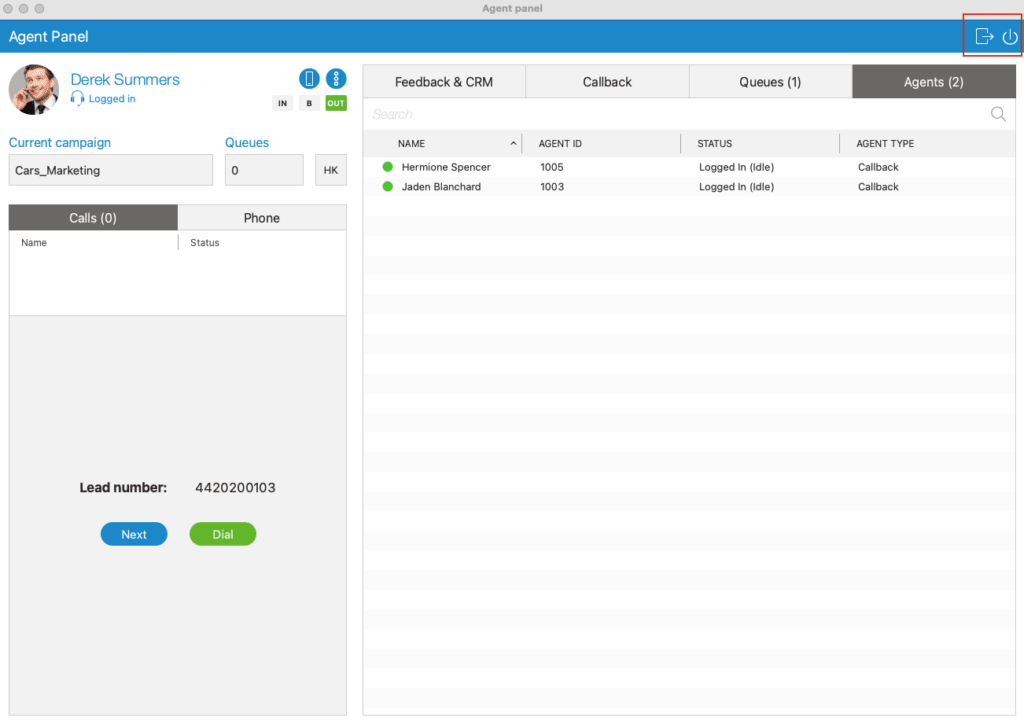
Information about the agents
The agent panel window offers agents a visually appealing and personalized experience. The left side of the window displays the essential information about the agent below the blue top bar. This includes a customizable agent avatar that serves as a unique representation.
The agent’s first and last name are displayed next to the agent’s image. In addition, below the agent’s name, a color-coded label indicates the agent’s current status. (Connected, Disconnected, Paused, Connected pause waiting).
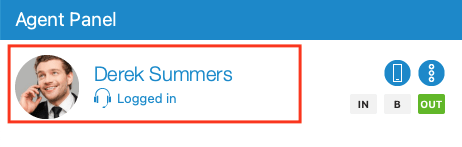
The Agent Panel provides an interactive status menu when the user clicks the status label while the agent is logged in. This menu offers a range of actions that agents can perform to manage their availability:
– Pause / Resume: Depending on the agent's connection state, the menu displays different actions: "Pause" when the agent is logged in and not paused, and "Resume pause" when the agent is logged in and currently paused. In addition, if an agent attempts to pause during a call, their state changes to "Pause pending". Once the call ends and there are no active calls, the agent's state automatically changes from "Pause pending" to "Paused".
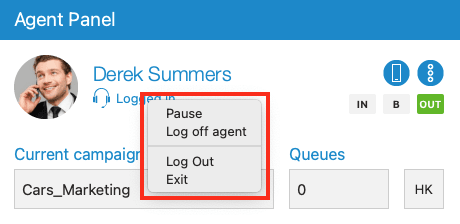
The Agent Panel gives agents the flexibility to adjust their pause status and change the pause reasons without having to resume the pause or worry about receiving calls from the queue. Additionally, after changing the pause reason, the pause counter resets and starts counting from the initial value of 0:00:00.
– Agent logout: disconnects the agent from all queues or campaigns and prevents further assignment of new tasks or calls to the agent.
– Logout: disconnects the Communicator user from the application and ends the user's session, thereby ending access to the application.
– Quit: disconnects the user from Communicator, closes the application, and offers a complete shutdown, thereby freeing up system resources.
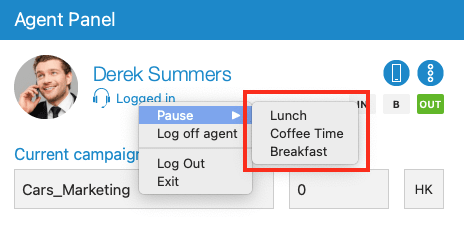
If you click the option Disconnect the agent, you will be logged out and the agent login window is displayed automatically. The color of the status label turns red. The status text is set to Disconnected .
Login window
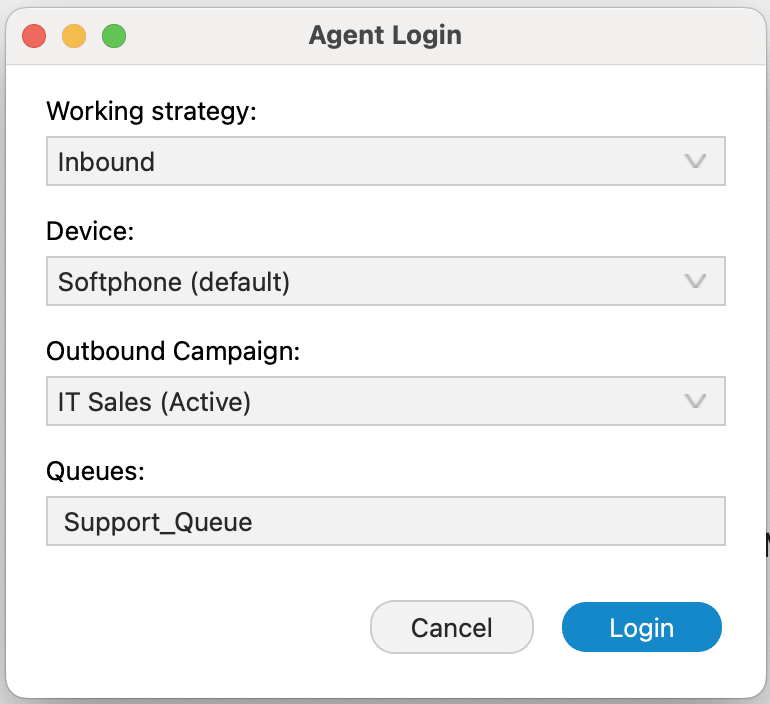
Agents have the option to choose between three different agent strategies: outbound, inbound, and blended mode. Each strategy serves a specific purpose and can be adapted to your business needs.
Inbound mode
Inbound mode allows agents to handle customer interactions by working exclusively in queues. This strategy is ideal when you are focusing on handling incoming calls or other forms of customer communication. Agents in inbound mode are dedicated to answering customer queries, resolving issues and providing assistance.
Outbound mode
Outbound mode is designed for proactive customer outreach. Agents working in this mode focus solely on outbound campaigns, calling customers to establish contact, provide information, conduct surveys or offer promotions. Outbound mode allows your team to interact with customers in a targeted way, thereby ensuring that your message reaches the intended audience.
Mixed mode
Mixed mode is a dynamic strategy that automatically adjusts agent assignments based on the real-time conditions of the call center. In this mode, the system intelligently moves agents between inbound and outbound strategies to optimize their productivity. If the inbound queues are not busy, agents switch to outbound mode to maximize their utilization. Conversely, when there are customers waiting in the queue, agents switch from the outbound strategy to the inbound strategy to ensure prompt customer service. Mixed mode establishes a balance between inbound and outbound activities, thereby improving overall efficiency.
When it comes to choosing a device to dial and receive calls, agents have two options:
Desk phone
Traditional devices designed specifically for voice communication. They generally offer a handset, a keypad and programmable buttons for various functions.
Softphone
Software applications that allow you to make and receive calls using a computer or a mobile device. They use VoIP technology to transmit voice signals over the Internet.
Outbound campaign
During an agent's login session, they are assigned to a specific campaign in which they will work. Although an agent can be associated with multiple campaigns, they can only work within a single campaign during a login session. This feature is available when using the outbound call center.
Queues
In this area, agents have the ability to view the voice queues to which they are currently assigned.
When you select the desired options, click the button OKin order to log in as an agent.
Additional options
In addition to the agent strategy, device selection, campaign and queue assignment, the agent panel window offers several other options:
 Show the main window
 Show more options
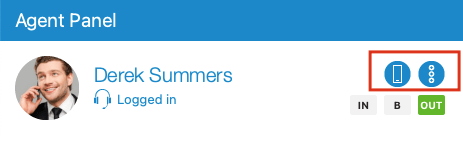
When a user clicks on this action, a menu with the following options appears:
– Agent panel settings: by selecting this action, agents can open the "Agent panel settings" dialog box. This dialog box allows agents to customize and configure specific options related to the appearance, behavior and features of their panel.
– Application settings: Clicking this action opens the "Preferences" window, with the "General" tab selected. The "Preferences" window allows agents to change the general settings and preferences of the application.
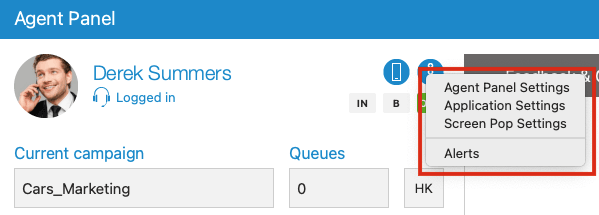
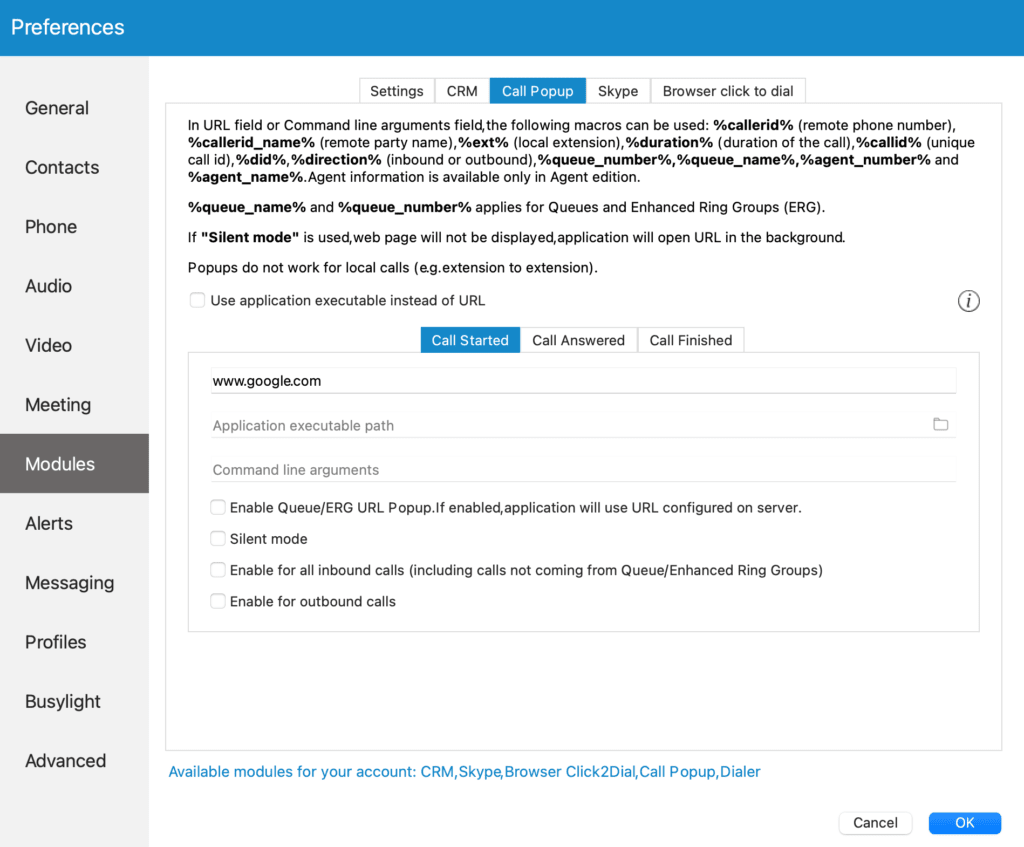
– Call notification: Selecting this action opens the "Preferences" window, with the "Modules" tab selected. In this tab, agents can configure the behavior and settings of pop-up windows.
– Alerts: this action opens the "Alerts" dialog box, which allows agents to manage and configure notification alerts in the agent panel.
Directional buttons
In a call center environment, agents have the ability to work according to different strategies: inbound, outbound, or blended mode.
To indicate the current strategy, direction buttons have been introduced. There are three types of direction buttons  each representing a specific strategy.
Here is a breakdown of the buttons and their corresponding strategies:
When the option  is selected, this means the agent is currently working in an inbound strategy.
The inbound strategy consists of handling incoming customer calls.
When the option  is selected, this indicates that the agent works in an outbound strategy.
The outbound strategy involves proactive customer outreach, where agents make outgoing calls as part of campaigns.
When the option  is selected, this means the agent works in blended mode.
Mixed mode is a dynamic strategy that automatically transitions agents between inbound and outbound activities based on the conditions of the call center.
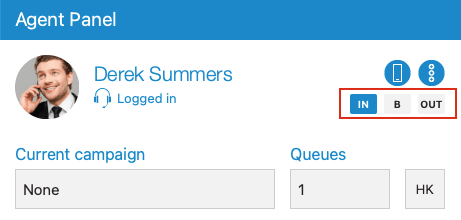
Blending in call centers can be implemented automatically or manually, thus offering flexibility in directing agents. The blending process is based on the “minimum idle agents” parameter per queue, which can be accessed and updated in PBXware systems. A work strategy can also be changed by a supervisor. With each change, the direction buttons are updated, so that the agent has an overview of the operating mode in real time.
In the agent information area, you will find the "Current Campaign" and "Queues" labels, providing essential details about the agent's assignments during the login session. Here is an explanation of what each label represents:
– Ongoing campaign – The “Current campaign” label displays the name of the campaign the agent is currently working in during the login session. This information helps identify the specific campaign or project the agent is dedicated to. In the case of an agent working in the inbound strategy, the “Current campaign” label will display “None” since inbound operations do not generally revolve around specific campaigns.
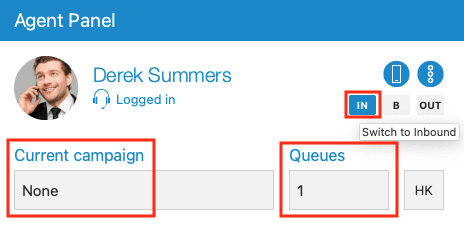
– Queues – The “Queues” label indicates the number of queues in which the agent is actively working during the login session. In the outbound strategy scenario, where agents primarily engage in proactive customer outreach, the "Queues" label will display "0" since the focus is on campaign-driven activities rather than queue-based interactions. On the other hand, in the inbound strategy, the "Queues" label will display the number of queues to which the agent is assigned, representing the variety of customer service areas or call types handled by the agent.
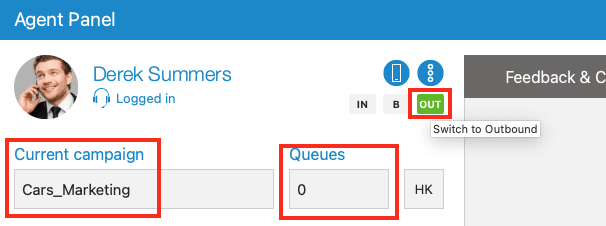
An agent cannot work in a campaign and a queue at the same time.
Agent session status
If an error occurs during an agent's login session, a specific message will be displayed in the agent window:
⚠️ The agent's login session has been interrupted. Click here for more details.
This message serves as a notification to the agent and provides essential information about the error encountered. Here are the details concerning the display of error messages:
– You are connected to both a queue and a campaign.
– You are not connected to any queue or campaign.
– You are not a member of any queue or campaign.
– You are not connected to all the queues of which you are a member.
– The service has been restarted.
When you encounter an error during the agent login session, the recommended solution is to log in again. By logging in again, the system attempts to reset the session and resolve any problems that may arise.
Call handling
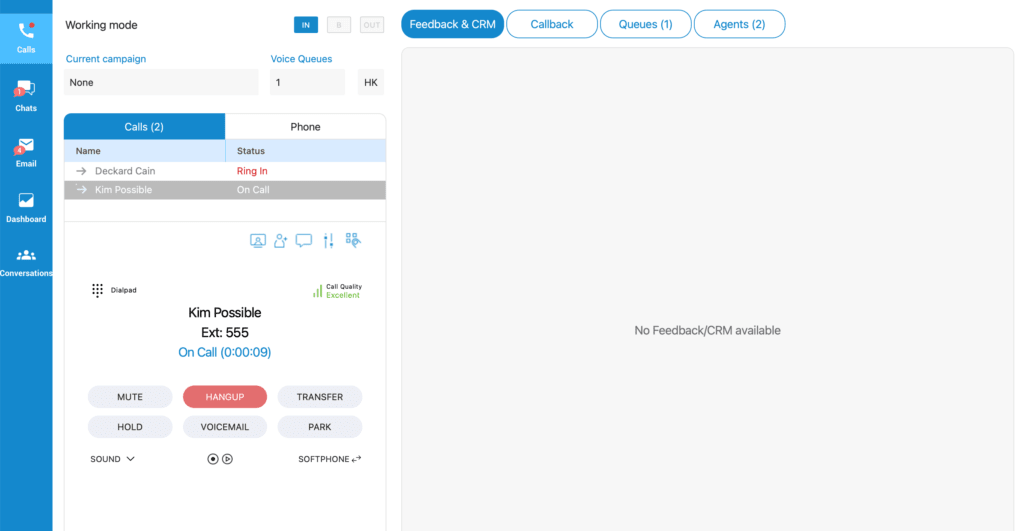
The section Calls displays ongoing calls and allows agents to easily manage multiple calls.
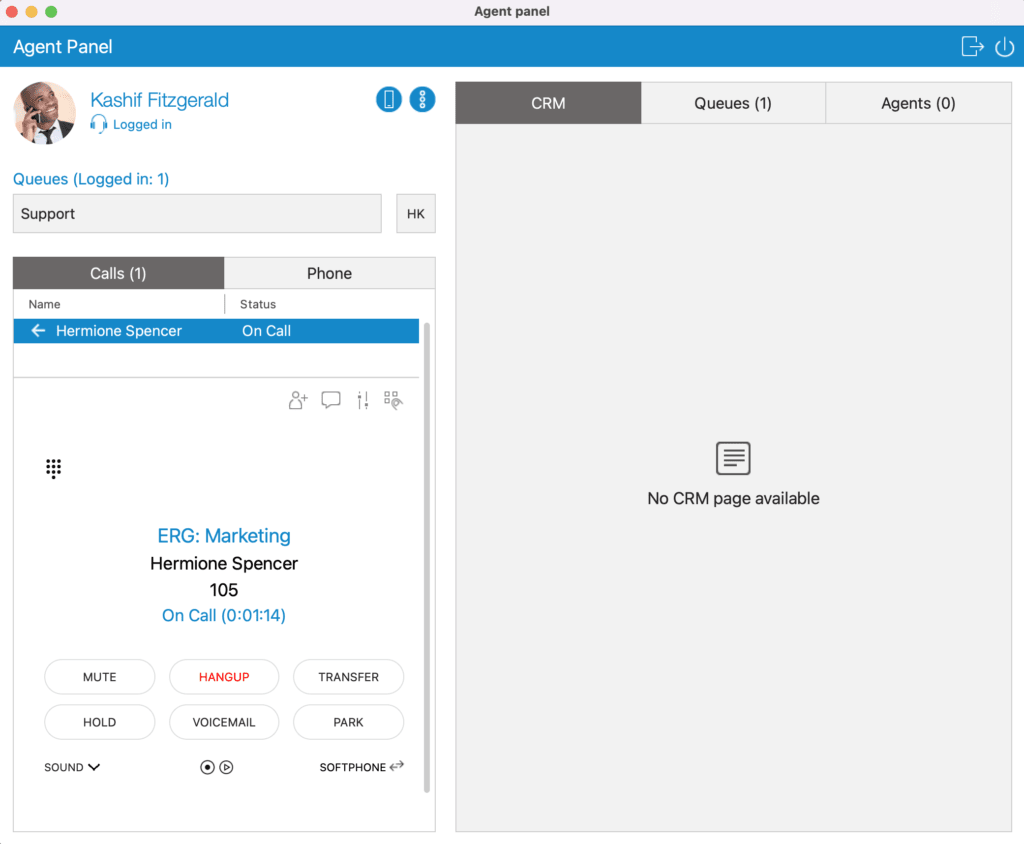
The list displays the direction of the call (inbound ← or → outbound), the name or number of the contact and the call status ("Incoming ringing, On call, On hold").
Switching between calls is possible by selecting the desired call.
Under Calls, the call widget section displays information about calls and agents can use it to manage calls.
Dialer calls
In Communicator, each dialer call is associated with a specific campaign, which can use different strategies to optimize call handling. Currently, Communicator supports the following campaign strategies: Power, Preview, and Progressive. The appearance and features of the application vary depending on the chosen strategy.
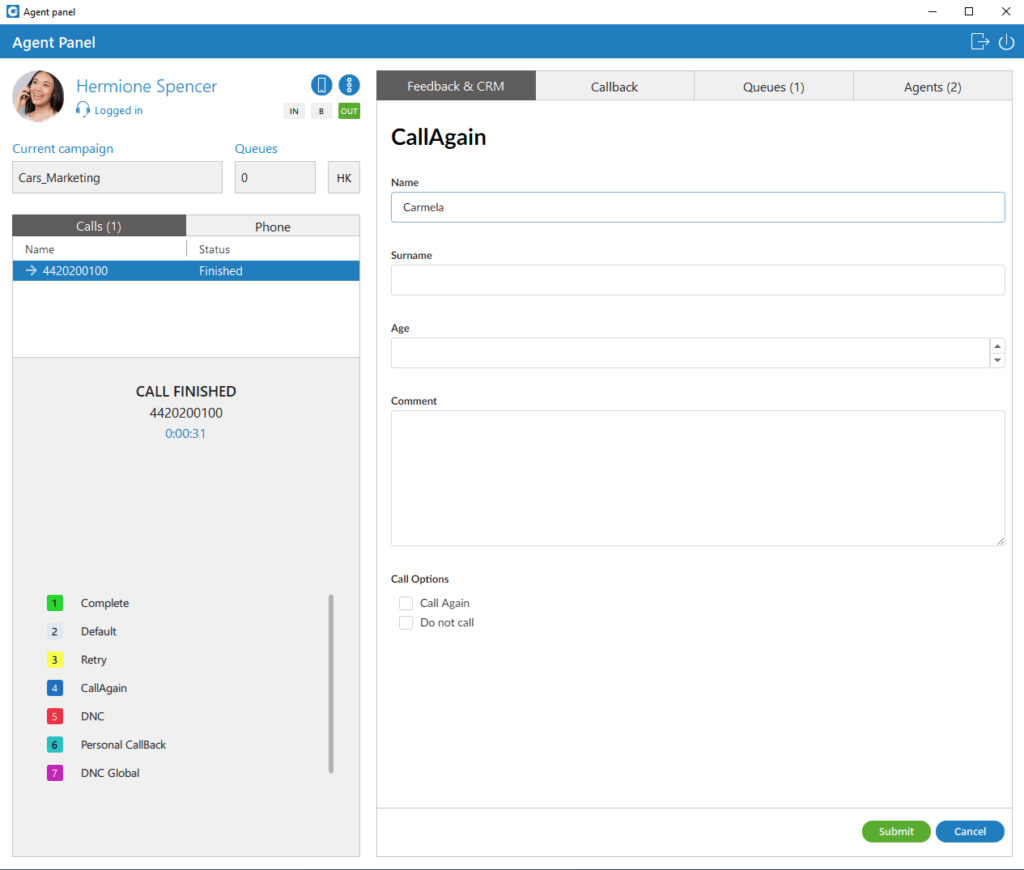
Each campaign has the ability to define specific options that agents must submit after a call. These options, called dispositions, allow agents to categorize and provide information about the outcome or status of each call. In addition, PBXware allows the configuration of feedback forms associated with individual campaigns. To configure and manage dispositions and feedback forms, adjustments must be made in the PBXware system.
Unlike normal calls, the dialer call is considered complete when the dispositions and the feedback form have been submitted (if enabled), and only then is the call removed from the call list. If this option is enabled, dispositions are displayed when the audio call ends and remain visible until the user submits a disposition. On the other hand, if enabled, the feedback form is always visible until it is submitted.
Power strategy
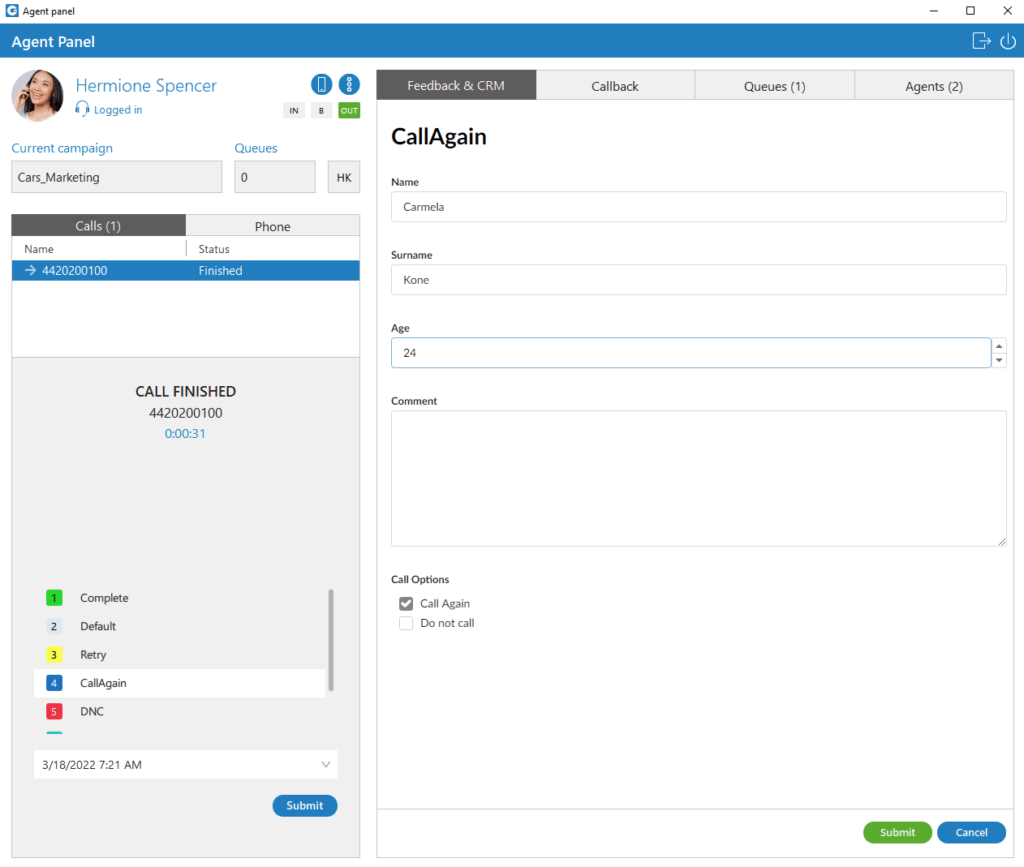
The power strategy is a dialing method in which multiple calls are automatically initiated for each available agent. It aims to maximize agent productivity by reducing idle time between calls.
Preview strategy
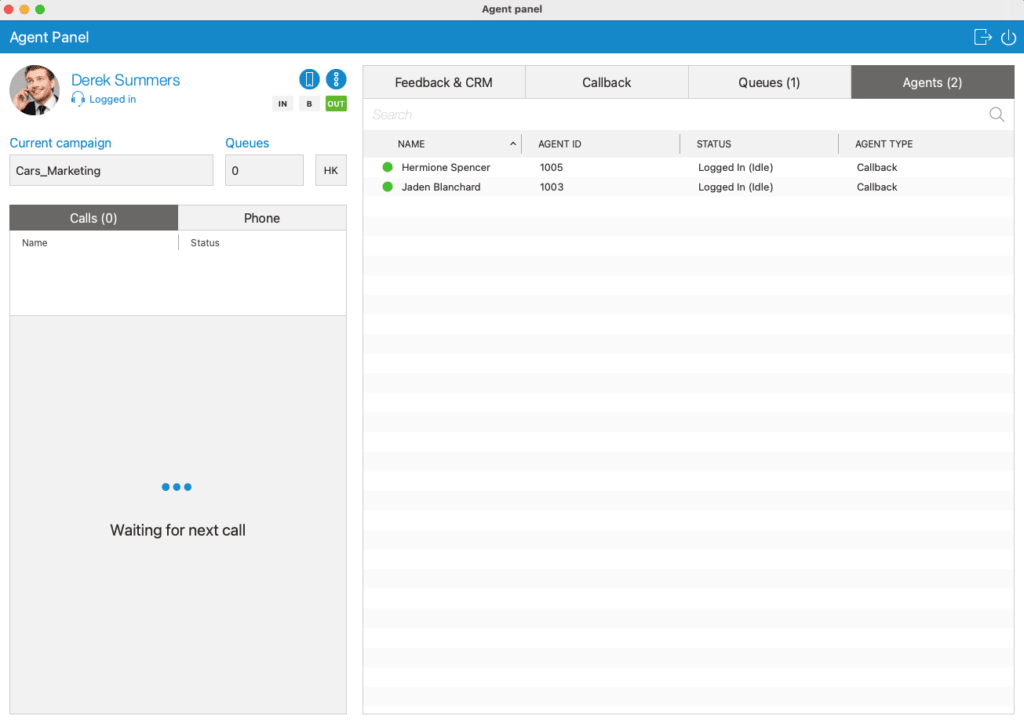
This strategy allows the agent to have a preview of the lead's details so that they can decide whether or not to dial the lead. The agent can retrieve the next lead in the campaign list by clicking the button Next. If they decide to call the manager, they must then press the button Dial. The feedback form is displayed but cannot be modified until the call begins.
Progressive strategy
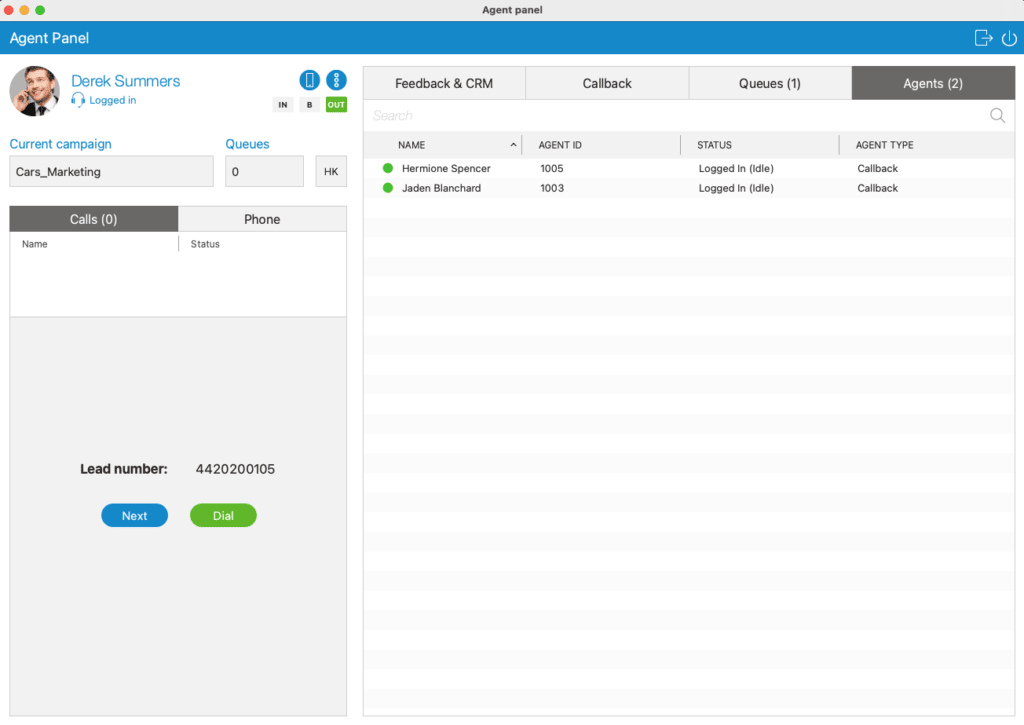
The progressive strategy works in the same way as a preview. The only difference is that the agent has a wait time during which they must perform the dialing, and they have no ability to manually retrieve the next lead. If the agent does not perform the dialing within the desired time, the system will automatically dial the next lead. There is an option in PBXware called Preview delay which indicates how long it will take before the system automatically dials the number. This information is displayed on the button Dial.
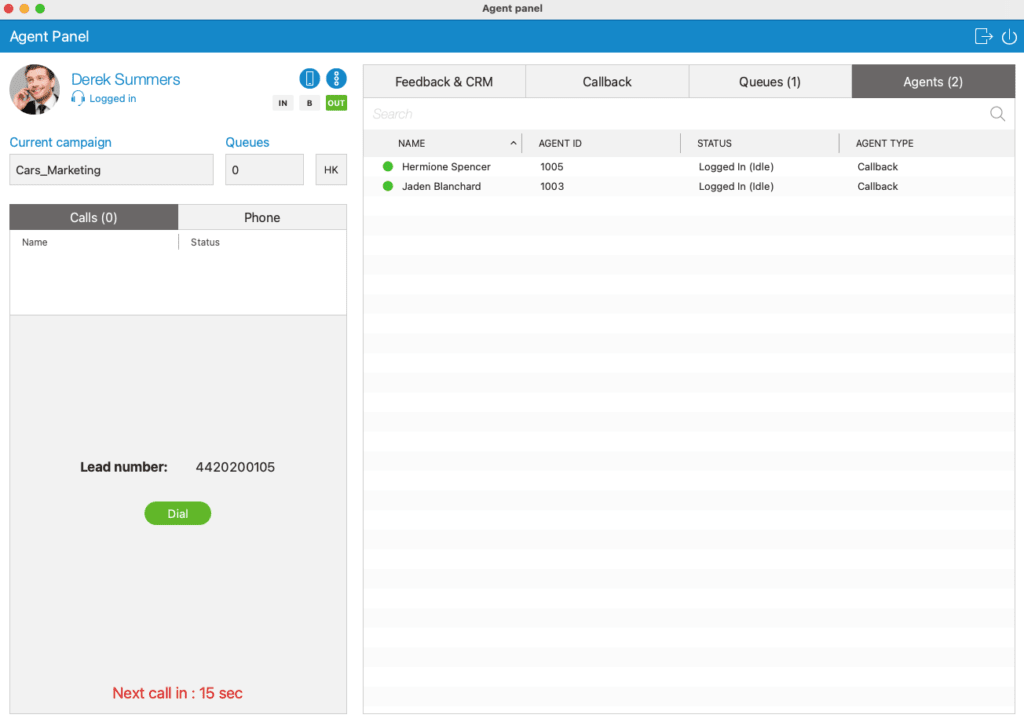
In all strategies, there is an information message label that provides details about the lead, the campaign, or informs you of errors that might occur, timeouts, etc.
Enhanced extension group calls
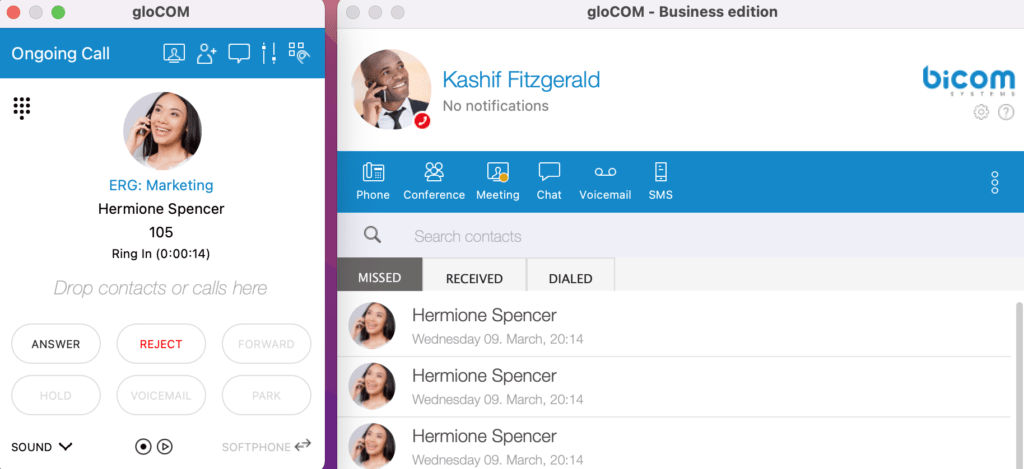
Calls from enhanced extension groups (queues) are supported for the Business, Office, Agent, and Supervisor editions.
The user can see the name of the group that called for all incoming calls.
Keyboard shortcuts
As long as the button  is hovered over, when you press a keyboard shortcut for a layout, this happens:

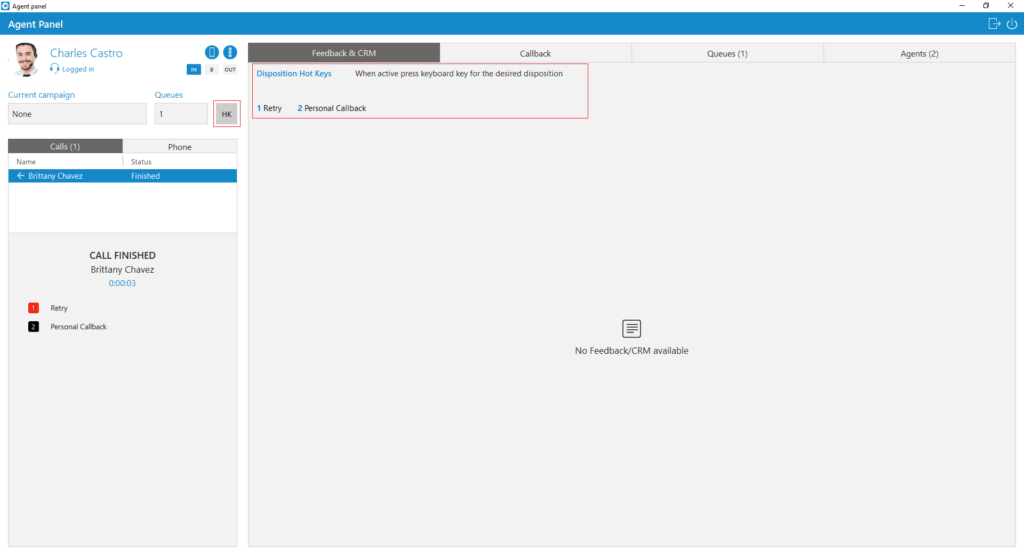
When you hover your mouse over the button you get the list of dispositions and their keyboard shortcuts for the current campaign/queue, displayed in the area next to this button.
– The call is ended
– The selected layout is submitted
– In preview/progressive mode, the next call will be dialed (applies only to campaigns)

Keyboard shortcuts are only used if you have active dialer/queue calls that are answered or ended. In all other cases, if you press a shortcut key, nothing happens.

Suppose the agent is a member of a single queue. When you hover over the button HK, the keyboard shortcuts area displays the keyboard shortcuts for this queue.
Otherwise, if the agent is a member of several queues at once, hovering over the button HK will display a message. A list of dispositions for an active queue call will be displayed in the keyboard shortcuts area. Please see the pictures.
CRM
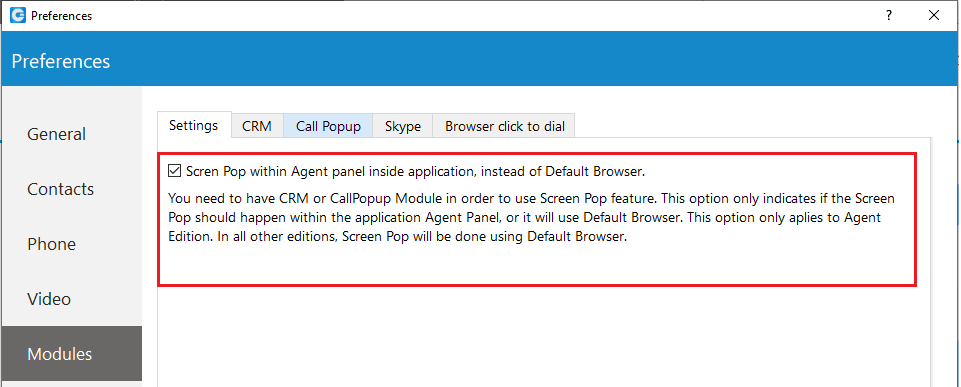
To use the CRM feature, the Call Popup module must be enabled.
In the settings (Preferences > Modules > Settings), the user must check the Call Notification option in the Agent panel inside the application instead of the default browser.
If this feature is enabled, the pop-up will appear in the application in the window Agent panel otherwise, it will use Default browser.
When the page loads, a progress bar appears indicating that the page is not yet fully loaded.
To stop the page from loading, click the button Stop.
If the page does not load, a Reload icon will appear, allowing the web page to be reloaded.
To the left of the reload icon, a “Warning” icon is placed, so that the user can get more information about the page status by hovering over the icon.
Also, two actions are possible:
Open in browser : Opens the page in “Default Browser”
Copy URL: Copies the URL of the page currently loading/loaded
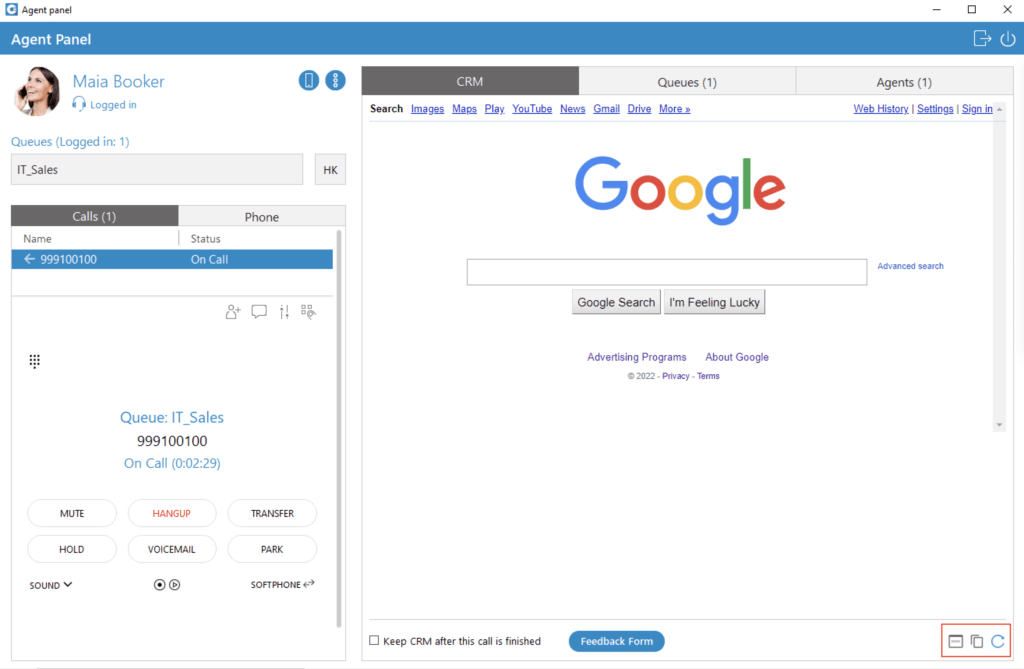
In addition, it is possible to perform pop-ups based on the URL defined per queue.
This can only be done if the option Enable the queue/ACD URL popup window. If enabled, the application will use the URL configured on the server if it is checked (Preferences > Modules > Call notification).
Feedback form
Comment forms are used for queues and campaigns. They are displayed each time there is a new call in the queue or a new call from the campaign. In order to display the comment form, it must be uploaded to PBXware and the queue option Send feedback formsmust be set to Yes. Otherwise, no comment form will be available.
To modify the feedback form, click the Start the commentbutton located at the bottom right of the widget Comments. Once editing is complete, click on Submit, to send all the data to the server. If we click on the button Cancel, all the information entered will be lost and the comments form will be closed.
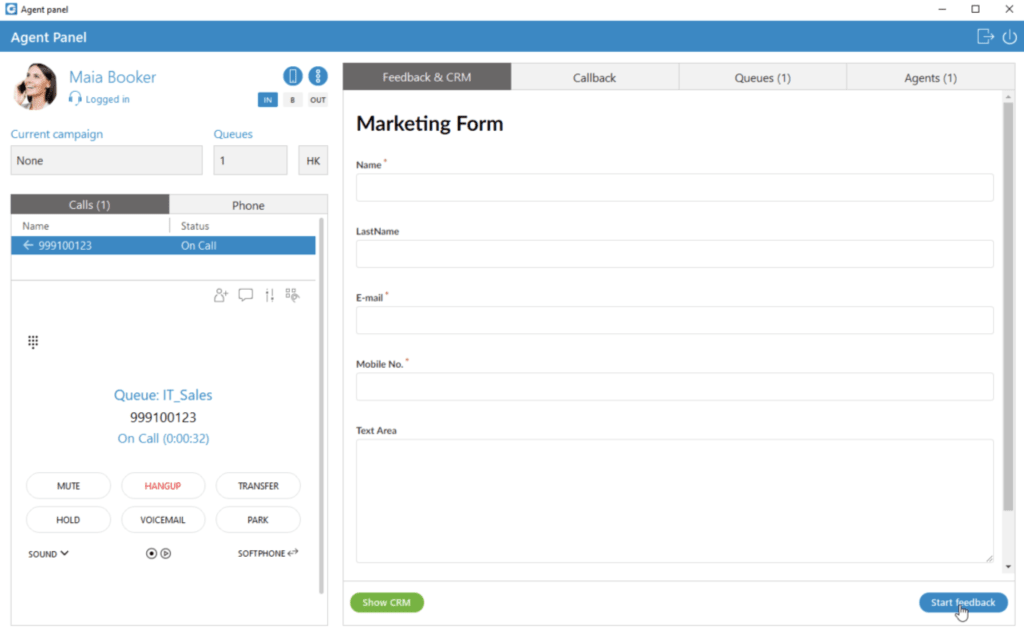
Regarding campaigns, in the Preview/Progressive strategy, a feedback form is visible before the call begins, but in this case, it is only possible to read the information, not modify it. This helps an agent decide whether they want to call this contact or move on to the next one.
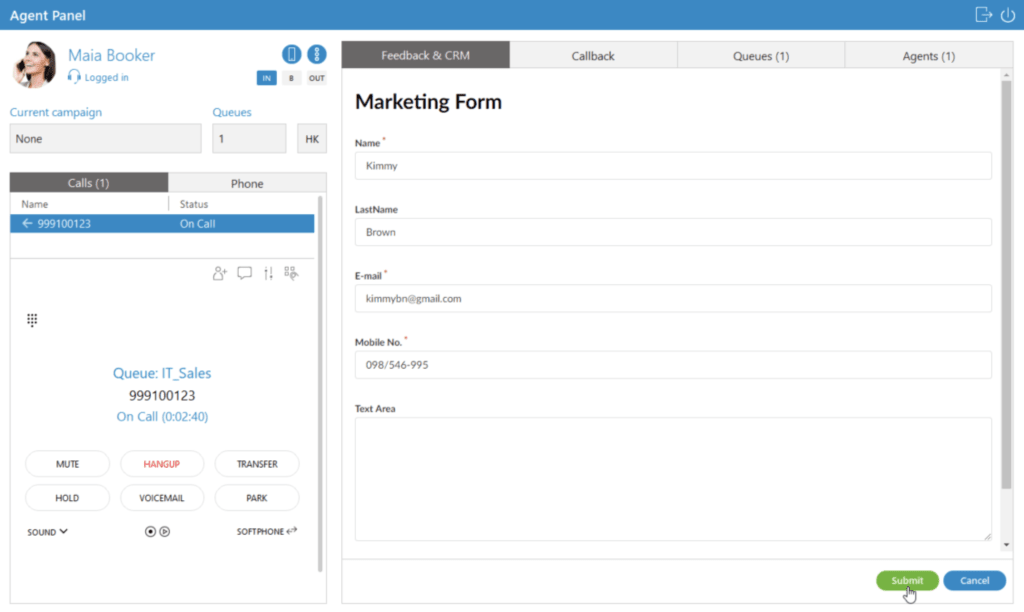
The feedback form remains visible even after the call ends until the agent submits or closes it. If the call is rejected, the feedback form will not be displayed.
Personal callback
The agent can choose the personal callback type disposition and must have an overview of all personal callbacks in order to manage them. The list of all upcoming and expired personal callbacks is placed in the Callback tab of the agent panel. Each personal callback is represented by a name, a number, the date of the last call, and the date of the next call.
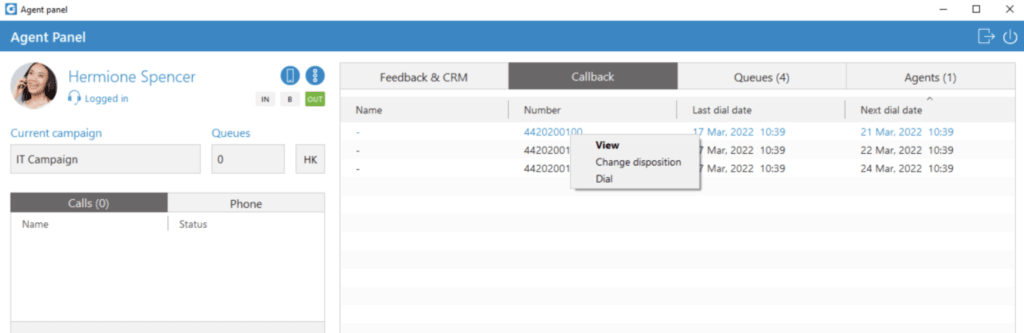
By clicking on the callback, a menu with the following actions appears:
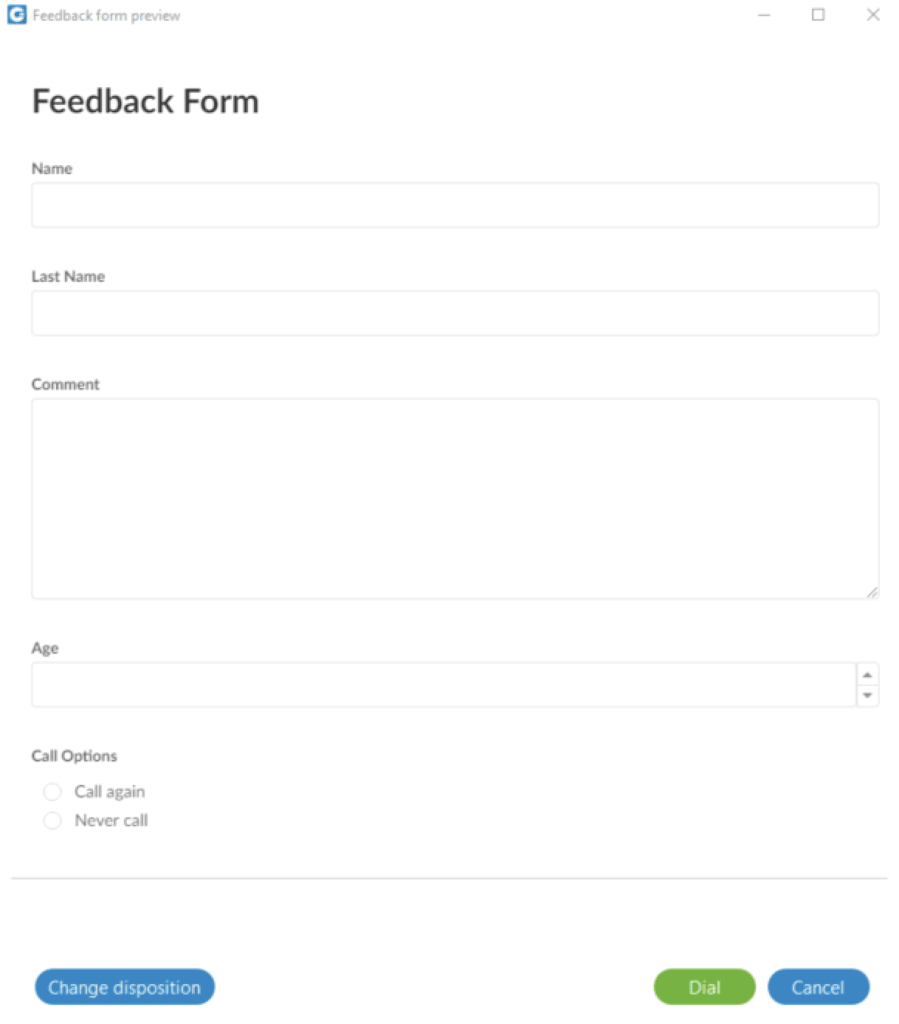
– Display: opens a new dialog box with detailed information about the lead (feedback form). From this dialog box, it is also possible to dial a callback and edit the callback disposition. This is a default option available with a double mouse click.
– Change the layout: Opens a new dialog box in which it is possible to edit the callback disposition.
– Dial: dial the callback.
Project codes
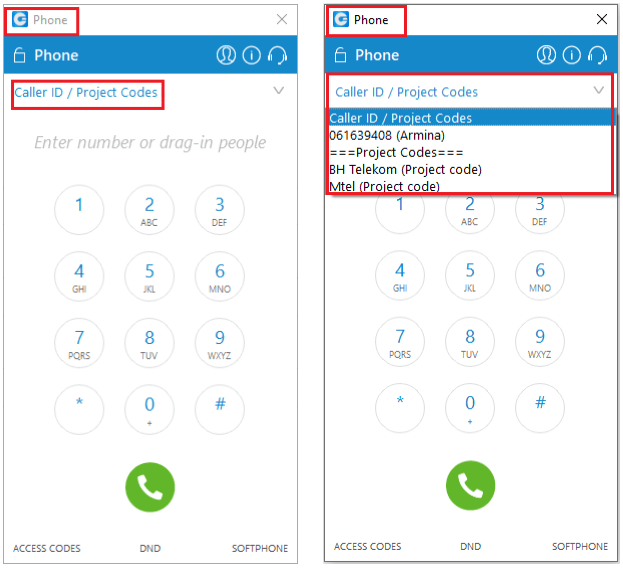
An agent can view and select project codes for their outbound calls.
Project codes can be found in the phone dialog box. They are defined in PBXware (Agents > Project codes)
Agents
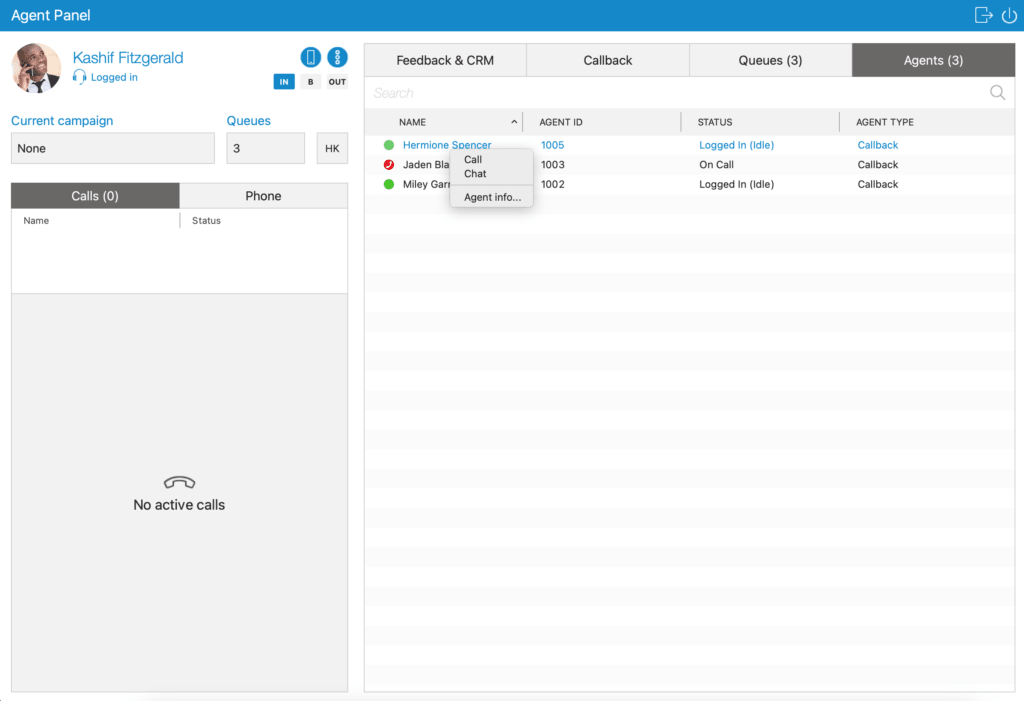
The Agents tab displays all the agents you choose to be visible in Agent settings Agent panel settings > Agents as well as the total number of these agents. It is possible to search for agents by their name or their number.
The following information is displayed for each agent: Name, Agent ID, Status, and Agent Type.
– Name
Displays the agent's name
(for example, agent 1001)
– Agent ID
Displays the agent ID
(for example 1001)
– Status
Displays the agent status
(for example, on pause: lunch break)
If the agent is paused, the reason for the pause will also be displayed.
– Agent type
Displays the agent type
(for example, callback)
Clicking a specific agent brings up an options menu:
– Call: calls the selected agent.
– Chat: start a chat with the selected agent. The shortcut for this is to double-click the agent.
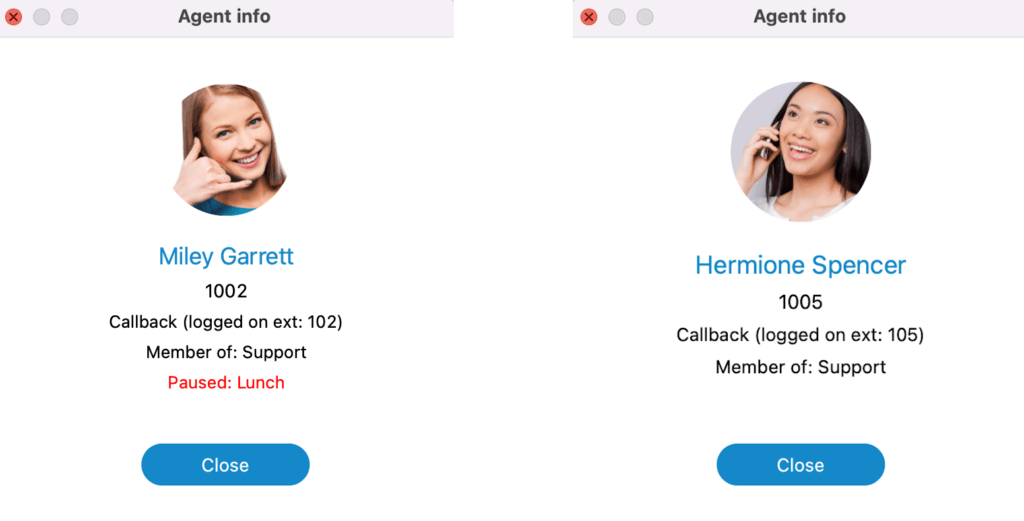
– Agent information: opens a dialog box containing all the agent's information, such as the agent name, agent number, agent login type, and the queues an agent is a member of. If you are logged in as a supervisor, additional actions appear (Listen, Log out, Transfer, Chat, Pause, Close).
Queues
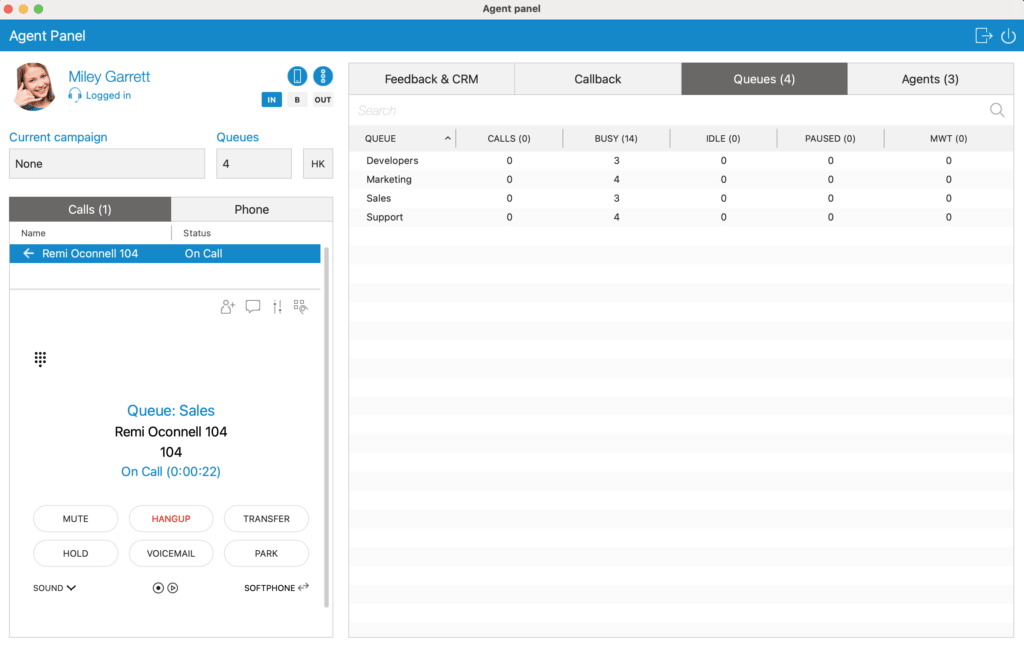
The tab Queues displays all queues that you choose to be visible in Queue Settings (Agent Panel Settings > Queues) as well as the total number of these queues.
It is possible to search for queues by the queue name or number. For each queue, the following information is displayed: Queue name, Calls, Busy, Idle, Paused, and MWT.
Queue dispositions
Each disposition contains the following information:
– Name
For example: 1 Retry & 2 Personal reminder
Each Disposition can have its own name. This way, the user knows what will happen if they press a specified disposition button. Using disposition names is useful on the Communicator interface when presenting a list of dispositions to agents.
– Keyboard shortcut
For example: 1 Retry & 2 Personal reminder
This is a keyboard shortcut that agents use to improve their performance. When using the button HK agents do not need to use the interface.
For example: If a layout's keyboard shortcut is 1, to submit this disposition, an agent can press the digit 1 of their keyboard. After pressing 1 if the disposition is submitted, the message indicating Disposition submitted successfully will appear.
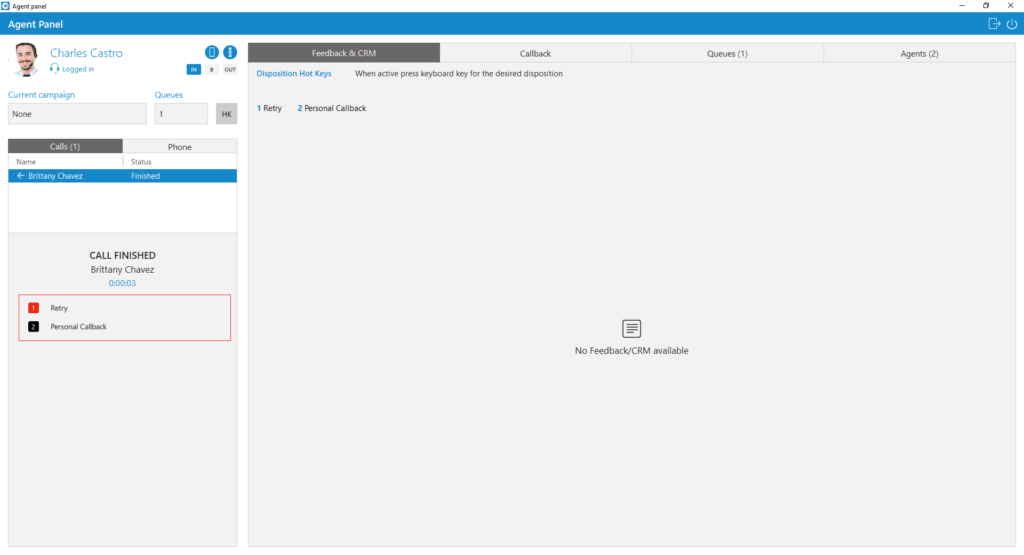
– Color
For example: 1 Retry & 2 Personal callback
Each disposition can have its own color for easier visual representation.
Using different layout colors is useful on the Communicator interface when presenting a list of layouts to agents.
Agent panel settings
This dialog box contains the settings for agents, queues, and alerts. As a result, there are 3 tabs: Agents, Queues, and Alerts.
Agents
The drop-down list is used to select the agents that will be visible in the agent panel window, in the Agents tab.
You can select the following options:
– Show only agents from my queues
– Show all agents
– Show custom selected agents
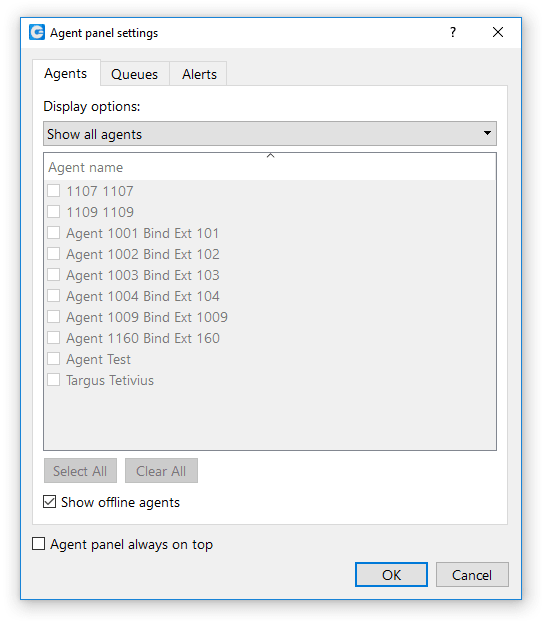
There is also a Show offline agents checkbox, which is used to display offline agents in the Agents tab. Below, there is another checkbox, Agent panel always on top, which is used in case you want to set the agent panel always on top.
Alerts
Maximum wait time (MWT):MWT displays the longest waiting caller in the queue.
- Threshold (minutes): If you want to be alerted when a caller waits more than X minutes in the queue, set the threshold on this value. When the wait time reaches the threshold , it will be displayed in red and the application will possibly display an alert to the user.
- Refresh time (seconds): select or enter the number that will represent the refresh interval in seconds.
Alert options
- Alert interval (minutes):the alert interval is the length of time the application will alert the agent for a specific type of event (alert). You can select or enter the number that will represent this interval in minutes.
- Show a pop-up for alerts: If this option is checked, the application will display a pop-up whenever an alert occurs.
- Alert me only for my queues: If this option is checked, you will receive alerts only for your queues.
Below, there is a checkbox Agent panel always on top which is used in case you want to set the agent panel always on top.
