Preferences
General
General settings
To get started, click on Tools >Preferences in the toolbar.
In the section General settings, check the box next to Launch the application at startup will start the application when your operating system starts, while checking the box Automatically log in at startup will automatically log you in each time the application is launched.
Depending on your operating system, the button Set the default program associationswill allow you to choose which protocols the application will open by default (tel://, sip://, callto://, etc.).
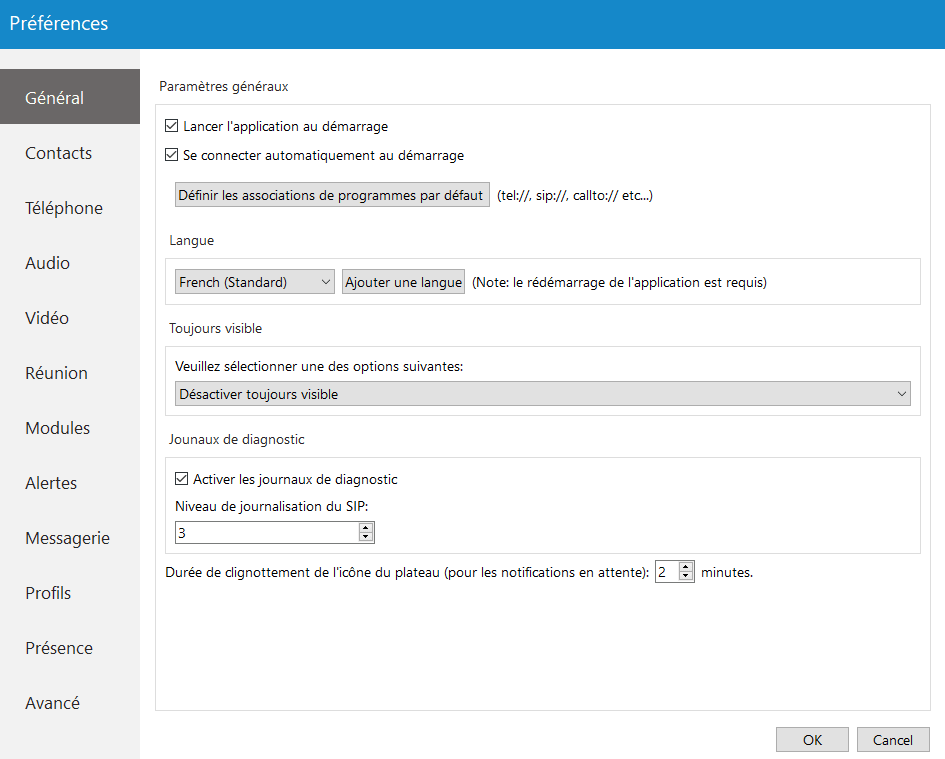
In the drop-down menu, you can select the language and if you have your own language file, you can add it by clicking the Add a language button, then select the language you want to add from a list, then choose your language file. You will need to restart the application for the language change to take effect.
In the section Always visible, you can choose whether you want a call or a call and contacts window to always be visible, or whether you want to disable the Always Visible option. This feature will keep the Communicator window on top even if another window, for example a web browser window, is selected.
You can also enable or disable diagnostic logs by checking the box next to it. When running, Communicator will store all logs on your computer. You can specify the amount of data/information you want to store by changing the SIP and Jabber log levels. By default, the SIP level is set to 3.
Depending on the situation, you can choose between 1 and 10 levels, with level 1 storing the least information and level 10 storing all information.
You can set the duration for which the Communicator status bar icon blinks when you have pending notifications such as missed calls or unread messages.
Contacts
General settings
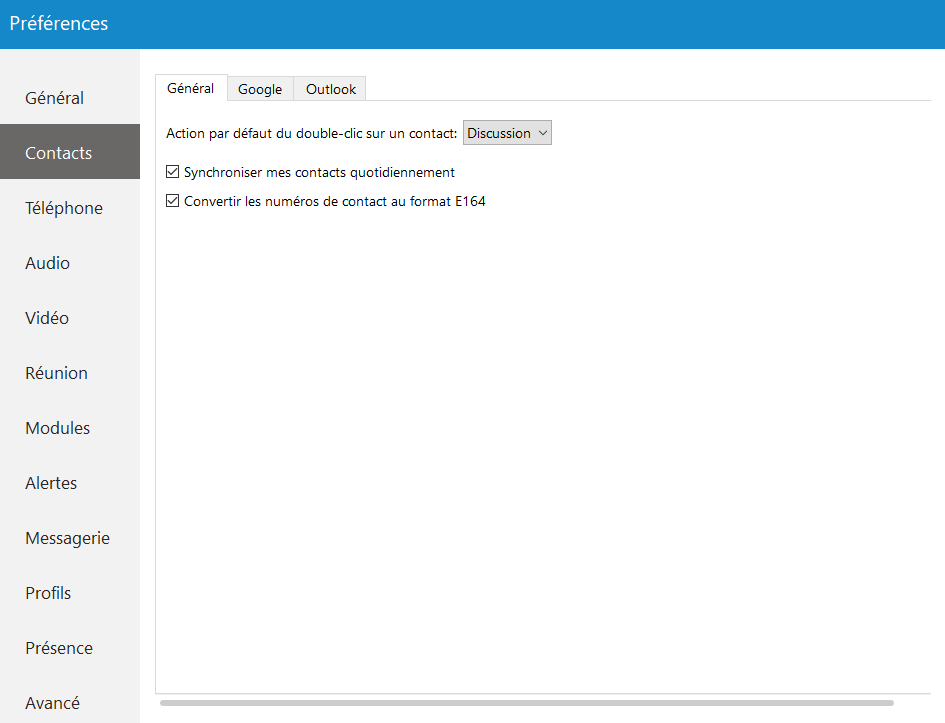
To get started, click the option Tools >Preferences in the toolbar and go to the section Contacts. At the top, you have 3 tabs: General, Google and Outlook.
Under the default double-click action on the contact, you can define the action that will be triggered when you double-click on a contact. If the option Chat is selected, a chat window with contacts will open, and if a call is selected, double-click the contact to call it.
If you want to synchronize your contacts daily, check the option Synchronize my contacts daily. In addition, if you wish to convert the contact numbers to E164 format, check the option Convert contact numbers to E164 format.
In the Google tab, you can choose to integrate the contacts from your Google account with Communicator. Simply check the case Enable Google Contacts integration, enter your Google email address and your Google contacts will synchronize automatically.
In the tab Outlook, the Outlook extension will allow you to launch calls directly from Outlook.
You can control whether the Outlook new contact window appears when a call is started, answered or ended.
Communicator automatically synchronizes your Outlook contacts.
When the option When I receive a call from an unknown caller, automatically display the “New Outlook contact” window is enabled, it will open a new Outlook contact form each time you receive a call on Communicator from a number that is not in your contact list.
To disable synchronization of Outlook contacts from the global address list, go to Preferences > Contacts > Outlook and uncheck the Synchronize Outlook contacts from the global address list (GAL) option. By default, it is enabled.
Phone
To get started, click the option Tools >Preferences in the toolbar and go to the section Phone.
When the option Confirm the number when calling from a browser and other applications is enabled, the browser and applications will ask you to confirm the number and will also give you the option to make corrections if necessary.
When the option Call waiting is disabled, the softphone will automatically reject incoming calls if you are already on a call.
The called party will thus hear a message indicating that you are currently busy on another call.
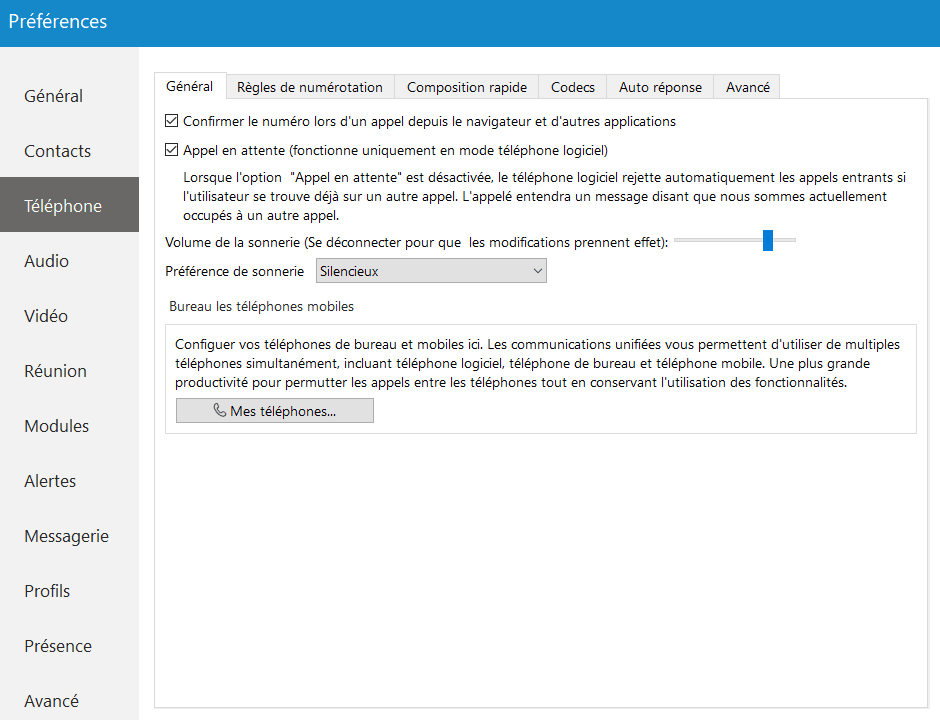
Use the slider Ring volume for adjust the ringer volume.
You will need to restart the application for the changes to take effect. The button My phones…allows you to configure your desk phone, your softphone and to add a mobile number.
In the tab Dialing rules, you can define rules for outgoing calls. For example, if you enter 061 under the text to be replaced and under the replacement text , you enter 0038761, Communicator will replace every phone number containing 061 by 0038761 . However, sometimes you will want to replace only the numbers starting with 061, and not those ending with 061…
For more precise replacement, you can use regular expressions. For example, if you enter 061{6}/d under text replacement and 0038761/1 under replacement text and you enable regular expressions, this will replace 061 digits of each number starting with 061 and having 6 additional digits followed by 0038761. with these 6 digits. For example, 061-123-456 would be replaced by 0038761-123-456.
Enabling the option Detect and format US and UK phone numbers for outgoing calls will automatically detect and format your local numbers in the United States and the United Kingdom so that they can pass through the system.
In the Speed Dial tab, click the button Add and from the drop-down menu, choose a number from 1 to 99, and in the field next to it, assign the phone number you want to call by speed dial. For example, by dialing the number 7, you will dial 0901020304. To modify an existing speed-dial number, select the number from the list and click the button Edit or press Delete to delete the number.
In the tab Codecs, select the codecs you want to use. Some codecs provide higher quality but consume more bandwidth, while others offer better compression, making them less demanding on network resources. Depending on your needs, you may want to enable or disable certain codecs, and if you have several codecs, you can sort them by priority using the up and down arrows on the right.
In the tab Auto answer, you can enable the auto-answer feature that allows you to automatically answer incoming calls without having to use the answer key. If the Auto Answer option is enabled, incoming calls will be answered automatically after a certain time (seconds) depending on the application settings. By default, the delay is set to 15 seconds, but it can range from 1 to 100 seconds. Once the call is received, the call window is displayed with a countdown. The call will then be answered at the end of it.
In the Advanced tab, you can choose to enable or disable encryption for voice and video calls, or you can select Use server settings to use the settings defined by your administrator.
Under the field Save, you can set how often Communicator will send the SIP registration to the SIP server or VoIP provider to let it know where it is located. It is recommended to leave the local SIP port empty to allow the SIP protocol to use any available port. However, if you want to restrict the (outgoing) SIP traffic to a specific port, you can enter the port number here.
Check the option Send keep-alives to send SIP keep-alives to the server.
Check Enable QoS to enable the Quality of Service feature. QoS is a set of technologies that work on a network to guarantee its ability to reliably run high-priority applications and traffic within a limited network capacity (must be supported by your network).
Audio
You can set input, output and ringing devices, or test your devices. To test your microphone, speak and observe the changes in the microphone sound bar. To test your speaker or ringing device, press the button Test to hear a sound on the selected device.
Check the option Enable Plantronics headset support in order to integrate a Plantronics headset with Communicator. This will allow you to use the Plantronics headset buttons such as answer, hold, transfer, etc.
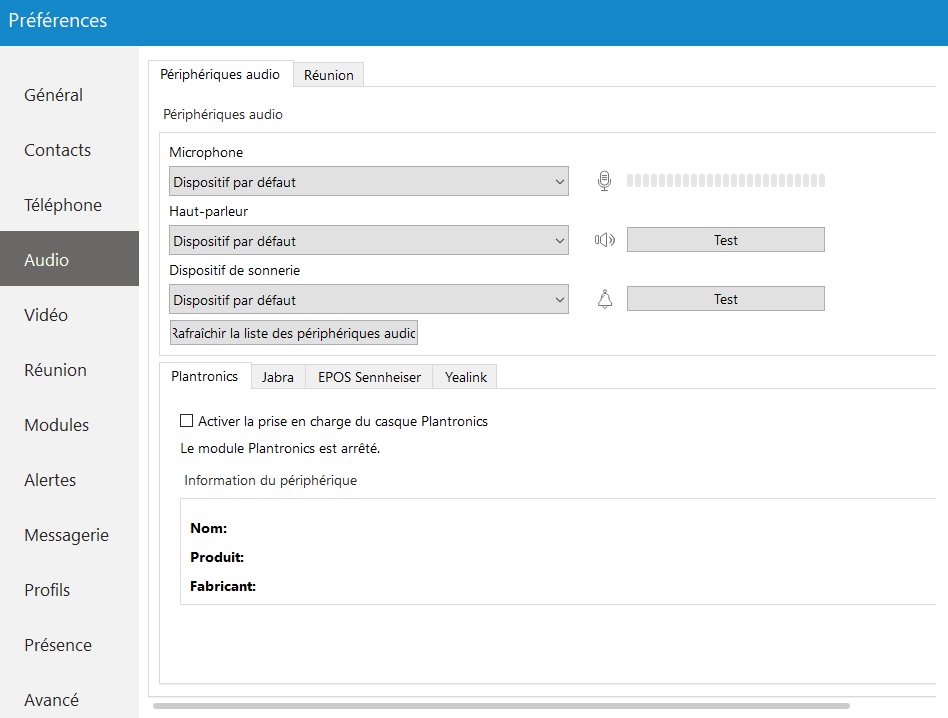
The same applies to Jabra and EPOS Sennheiser headsets. Enable the option Enable Jabra headset support, in order to integrate a Jabra headset with Communicator. Enable the option Enable EPOS support for Sennheiser headsets, in order to integrate an EPOS Sennheiser headset with Communicator.
Check the option Enable Yealink headset integration to integrate a Yealink headset with Communicator. It will enable Yealink headset buttons such as answer, hold, transfer, etc.
Plantronics Runtime (Windows)
Communicator deploys Plantronics Runtime, which is required for the Plantronics module to function properly. The runtime is installed automatically during the installation wizard.
If Runtime is not installed correctly for any reason, Communicator will detect it at startup and automatically notify you. It will redirect you to the dialog box Preferences > Audio where Communicator lets you install the Runtime manually. To do this, check the optionEnable Plantronics headset support and click Install Plantronics Runtime.
Video
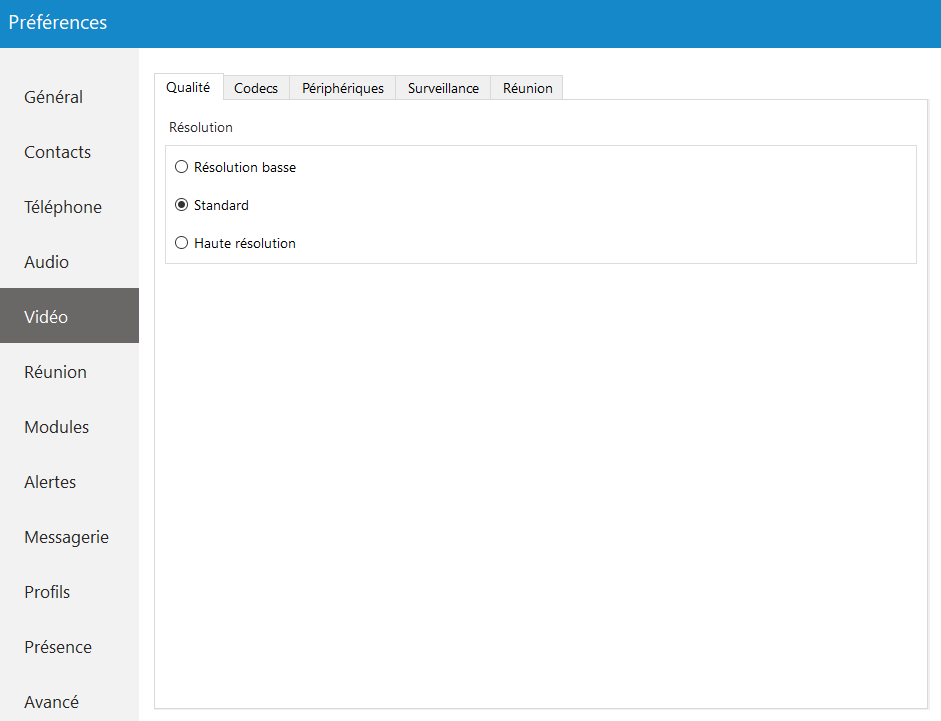
The section Video is divided into 5 tabs. In the Quality tab, you can set the resolution of the video call. You must adjust these settings according to the quality of your network connection.
For example: if your bandwidth is low or you are experiencing temporary network issues, you can set the video quality to Low resolution to obtain better video call performance.
In the tab Codecs, you can enable or disable video codecs, and if you have several codecs, you can sort them by priority using the up and down arrows on the right.
Under Advanced codec settings, you can adjust the compression level that the codecs will use. The higher the bitrate, the less compression the codecs will use, which is directly related to better video quality but also to larger files. Use the default values for the codecs if you are not familiar with video codecs.
In the tab Devices, you can select the video capture device. For example, if you have a laptop with a built-in webcam and you connect another webcam to your laptop, you can specify which camera Communicator will use for the call video in a drop-down menu. Then, in the Surveillance Camera tab, you can enable or disable the surveillance camera and choose whether the surveillance camera video should always stay in the foreground even if another window is selected. Under the URL field, enter the URL of your IP surveillance camera stream.
Please note that only the MJPEG stream over HTTP is supported at the moment.
Meeting
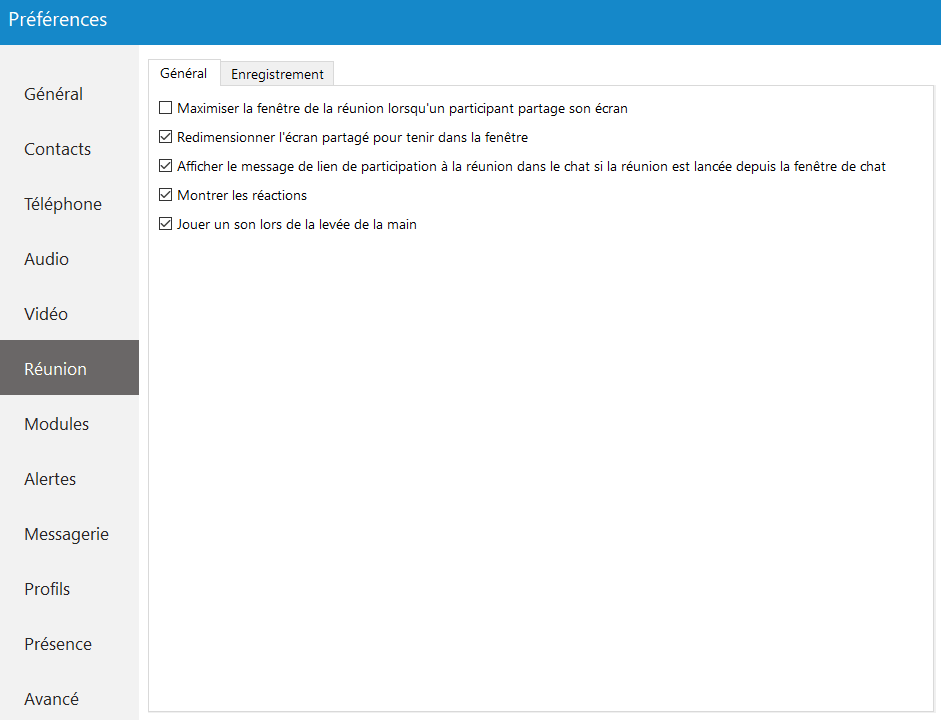
In the Meeting menu, you can define the appearance of your meeting window when someone shares the screen.
You have two options:
– Enlarge the meeting window when a participant shares their screen.
– Fit the shared screen to the window
The option Show reactions allows you to show or hide the reactions (emojis) of the other participants during meetings.
If a participant raises their hand, you can trigger a sound with the option Play a sound when a hand is raised.
Modules
Communicator is compatible with several CRM solutions, such as Salesforce, SugarCRM, Zoho, Zendesk, MS Dynamics, and Bullhorn.
CRM
To enable CRM integration with Communicator, click Tools > Preferencess, go to the section CRM and check the option Enable CRM integration.
Under the context options, you can define:
– When a page containing customer information should open (this can be configured to open when answering the call, or immediately when the phone starts ringing before even answering, and to not open at all for calls inbound ).
– For outgoing calls, you can configure it to be displayed when the call is initiated or when the call is answered, and as with incoming calls, this can be disabled by selecting the option Never.
Under Authentication, you can enter the account details for CRM. Each CRM is different and requires you to enter a security token, a password, or a combination of both.
Under thelogging options, you can specify the information they want to record. In addition, you can choose to log the information defined by your administrator by selecting the option Use server settings.
Call notification
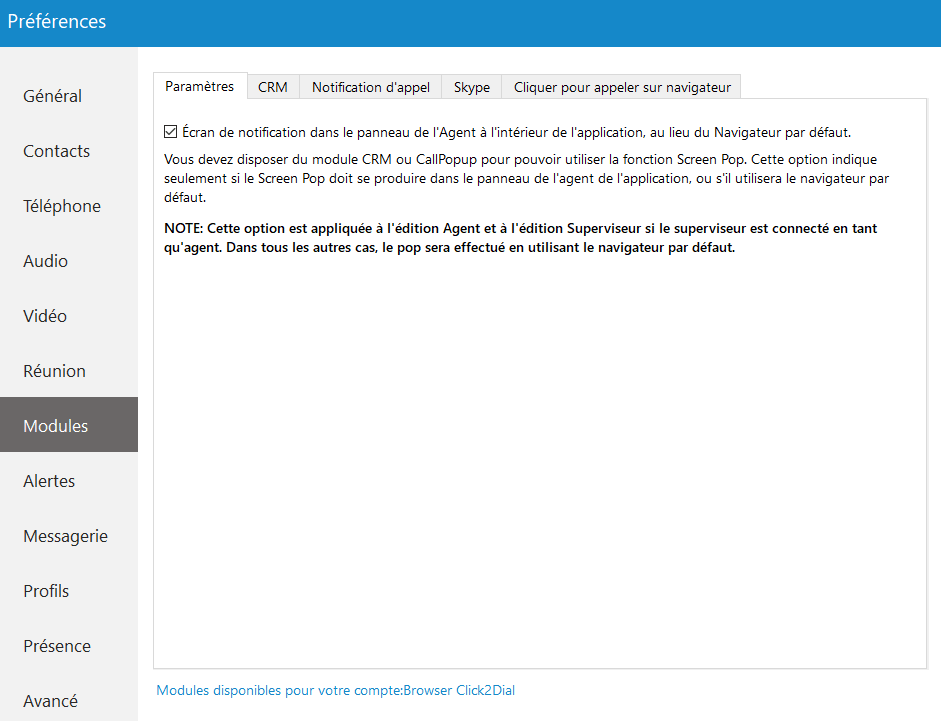
The module Call Popup can be used to pass call details to the browser or third-party software.
It is possible to create a URL-based call pop-up, and this can be set per queue. This can only be done if the option Enable the queue URL popup window is enabled. The application will use the URL configured on the server. is checked. (Preferences > Modules > Call notification).
You can configure the call pop-up to open when the call has started/been answered or when the call is ended. For each setting, you can specify whether to enable it for incoming and/or outgoing calls and enable it in silent mode. In silent mode, a URL request will be sent silently to the server, which means it will not open a web browser.
The call pop-up window is based on macros. In the URL field, the following macros can be used: caller, caller name, extension, duration, call ID, done, direction, queue number, queue name, agent number and agent name .
(For example, in the started call URL field, you can enter mycrm.com/calls?id=%callerid% and check the incoming calls below. From now on, each time you receive a call from a customer, the call pop-up window will open a web browser and display the customer's phone number.).
All this information can be sent silently to your CRM server and create reports such as the number of incoming calls you have received, the number of outgoing calls you have made, the average call duration, etc.
Specify the EXE file, the application under MacOS or the URL that will be executed in the Call Notification module.
Alerts
To get started, click Tools > Preferences in the toolbar and go to the section Alerts.
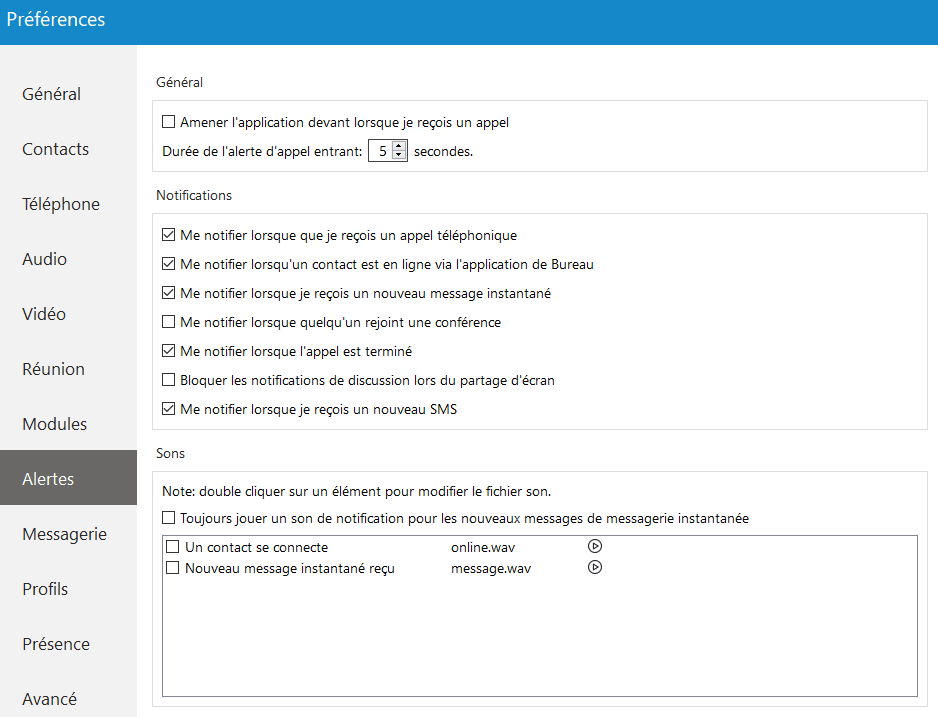
Enable Bring the application to the front when I receive a call bring Communicator to the foreground whenever someone calls you. If you do not want your work to be interrupted by call alerts, you can uncheck this option. You will still be able to receive calls, but you will have to manually access the application to be able to answer.
The incoming call alert duration can be set between 5 and 15 seconds. This option controls the duration of a small notification window that appears in the lower-right corner of the screen whenever you receive a call.
To completely disable the incoming call alert, simply uncheck the option Notify me when I receive a phone call. You can also configure the reception of notifications when a contact logs in, when you receive a new message, when someone joins a conference and/or when a call ends. Only the duration of the call alert notification is adjustable; all other notifications have a fixed duration of 5 seconds.
In the Sounds section, you can choose to enable or disable sound notifications for contact login and/or for new chat messages. If you select Tlways play a notification sound for new instant messaging messages, you will hear an audible notification for each message received, even if a chat window is currently open. For this feature to work, the option New instant message received must also be selected, otherwise you will not hear any sound.
To preview a sound, click the play button on the right, and if you want to modify a sound, double-click an item and select the sound file you want to use. Please note that only .wav files are supported.
Messaging
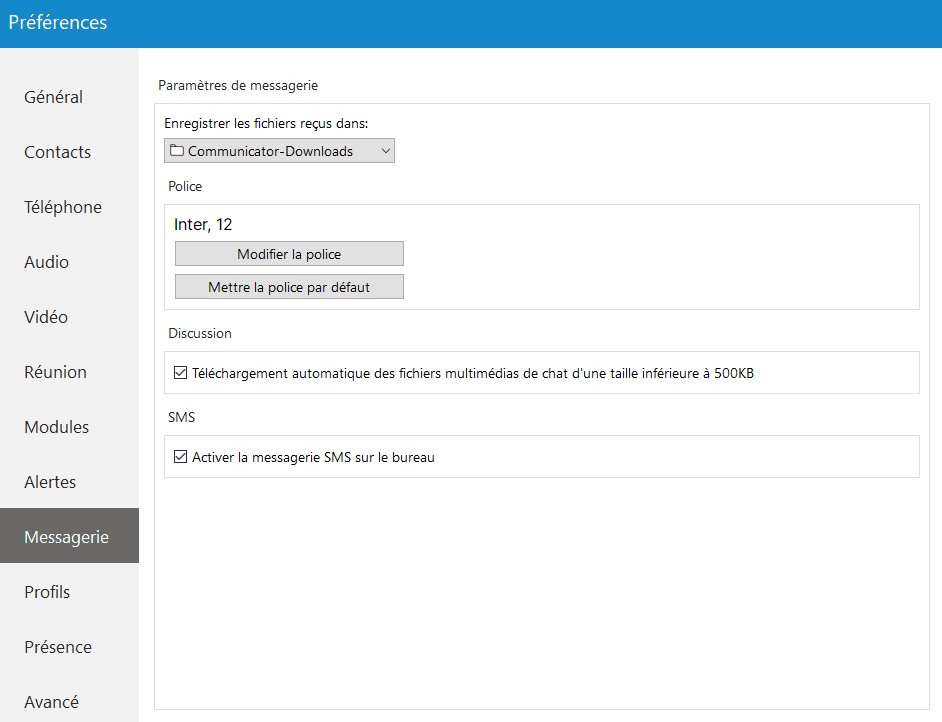
Click the drop-down menu under Save received files in and select Other to specify the location where Communicator will save received files. In the menu Edit the font, you can choose the default font for the chat layout.
The option Automatic download of chat media files smaller than 500 KB allows you to enable/disable the automatic download of media files smaller than 500 KB in chat conversations. By default, this option is enabled (does not apply to SMS conversations).
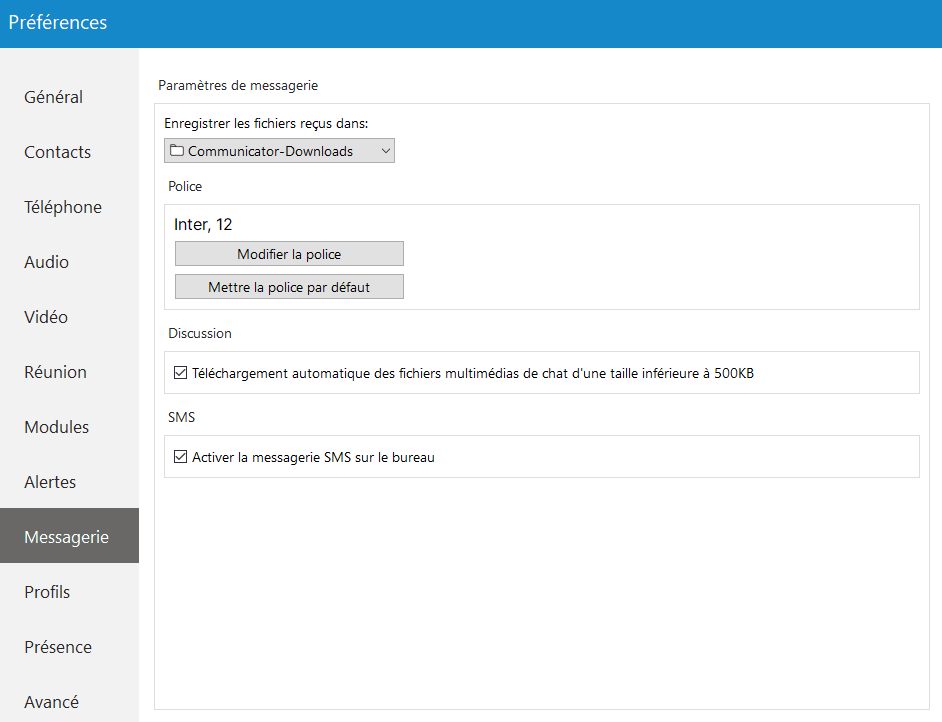
Changes made to this section will apply to Chat and SMS messages.
Profiles
To enable profiles, click on the mode Enable multiple connection profiles. With this option enabled, you can add, modify or delete an existing profile.
To add a profile, click the Add button, follow the configuration wizard, enter the profile name, enter your Communicator email address and password, and under the Advanced tab, enter the server address and, if necessary, specify the SIP proxy as well. Once done, click Next to continue.
Adjust the phone settings according to your preferences and click Next, review your information again and click Finish to create a profile. Once created, you can edit the profile by selecting it from the list and clicking the Edit button, or you can delete the selected profile by clicking the Delete button.
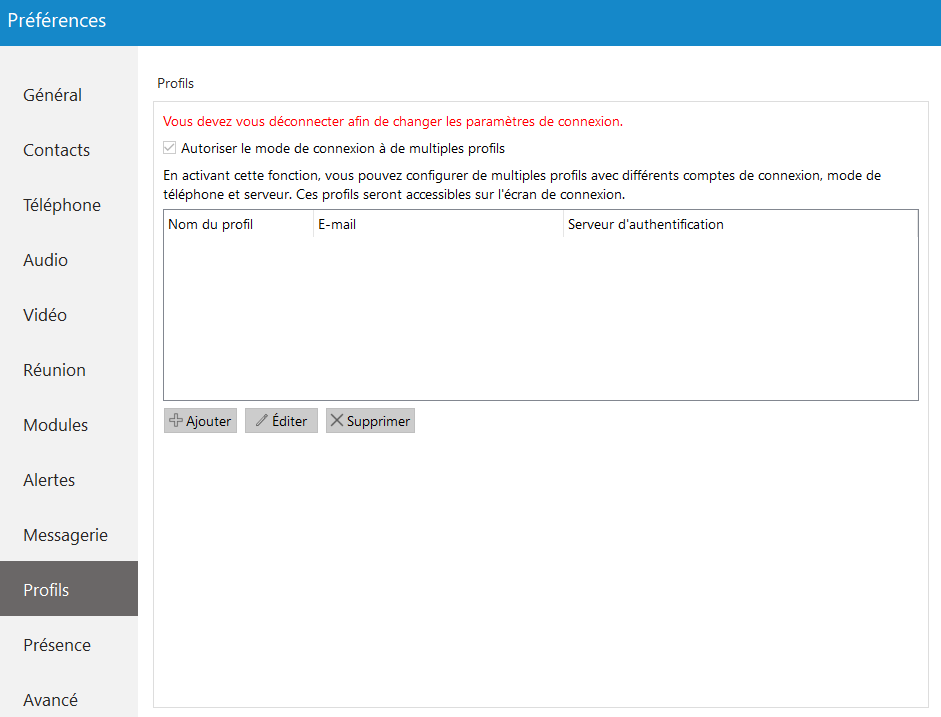
To log in with your newly created profile on the gloCOM login screen, in a profile drop-down menu, select your profile and click the Login button.
Presence
Busylight
Systems integration Kuando Busylight allows you to use your Busylight devices as part of the Communicator Desktop application. This way, you can inform your colleagues of your current presence status.
To start using the Busylight integration, navigate to Preferences & go to the section Presence and check the option Enable BLF integration. On the right side of the window, you will be able to see the status message, which tells you whether their device is connected or not.
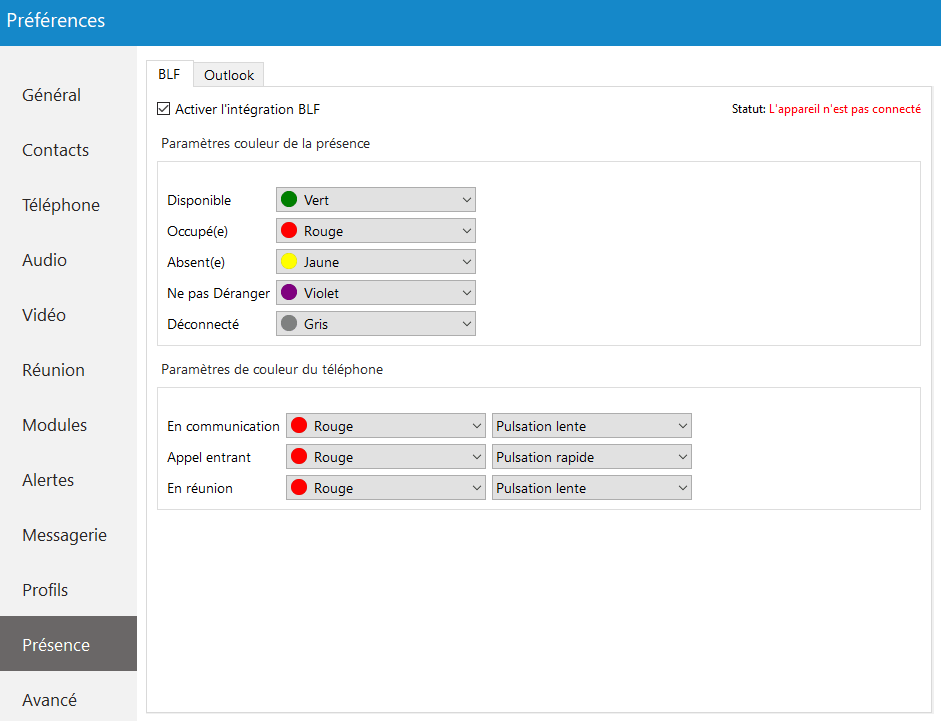
Furthermore, you can modify the color of the status presence for each status as you wish. By default, these colors correspond to the status colors of presence in the Communicator application. You can also modify the status color of the phone and the heartbeat frequency.
Outlook Presence
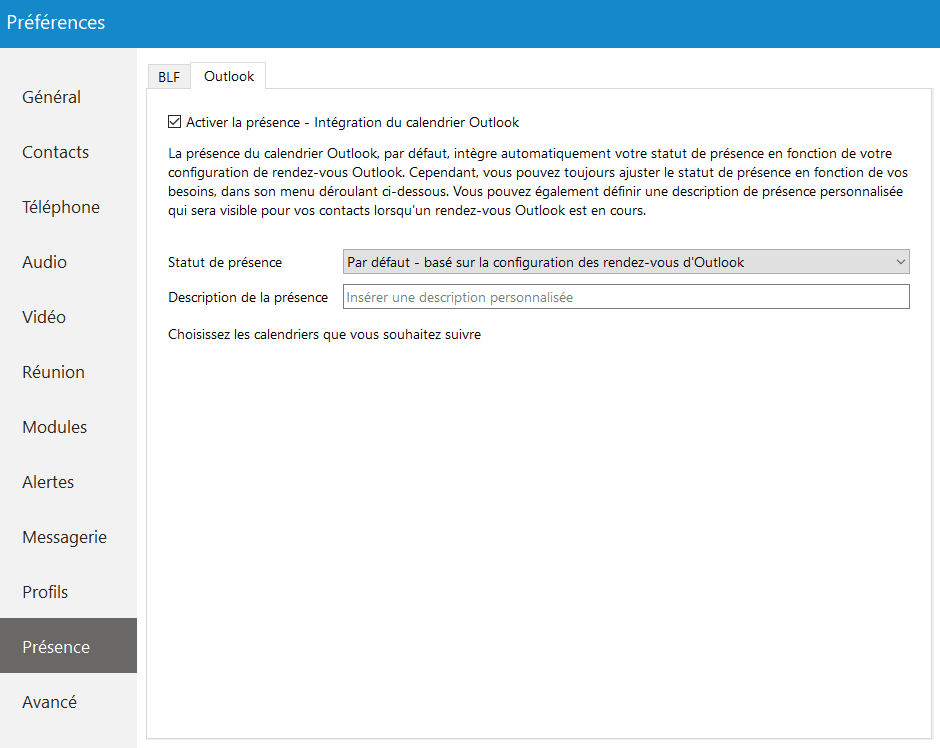
Outlook presence integration only works for Windows. To enable Outlook integration with the Communicator application, go to Preference > Presence > Outlook and check the Enable Presence – Outlook Calendar Integration option, which is disabled by default.
Outlook calendar presence, by default, automatically integrates the users' presence status based on the configuration of their Outlook appointment.
However, you can always adjust your presence status according to your needs. You can also set a custom presence description that will be visible to your contacts whenever an Outlook appointment is in progress.
Advanced
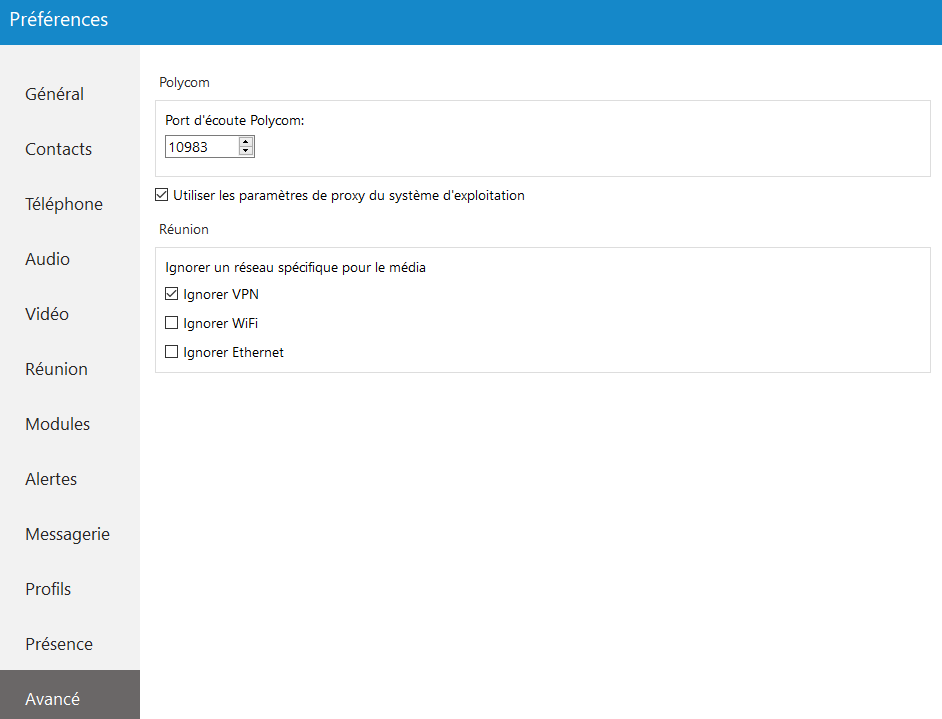
In the Advanced menu, you can change the Polycom listening port according to the needs of your Polycom phone.
The default port is set to 10983 and can be changed by clicking in the box and entering your listening port number.