



Connect a phone
Introduction
In order to be able to make & receive calls via PBXware, an IP phone can be used. The phone is said to be provisioned because it receives the configuration of the switchboard in the form of a package.
Provisioning a phone on PBXware provides a powerful and flexible solution for deploying multiple configurations to phones, going beyond simple key customization. This feature allows the system administrator to define and distribute specific settings for each phone connected to the PBX, thus providing centralized management and consistency in device configuration.
NOTE:
To view the provisioning tutorials for all supported phones, please see the following link:
What is provisioning for?
1. Network settings : Provisioning allows you to define the phone’s network parameters, such as the IP address, default gateway, and DNS servers, thereby facilitating the smooth integration of the phone into the existing infrastructure.
2. Security : Essential security settings, such as SSL certificates, can be deployed via provisioning to ensure secure communications between the phone and the PBX.
3. Phone features : In addition to customizing the keys, provisioning also makes it possible to configure advanced phone features such as extension ranges, call forwarding, voicemail configurations, and other settings specific to each user.
4. Updates : Software updates and security patches can be deployed centrally across all provisioned phones, ensuring that the entire phone fleet runs with the latest improvements.
Provision a phone
This document presents various approaches to provisioning a phone, emphasizing that the method to adopt depends on the brand of the device you intend to deploy.
Concisely, this documentation offers a quick understanding of the provisioning process, covering the full range of endpoints you might put into service.
It is important to note that, although phone brands may vary, the provisioning process generally remains similar and shows few differences from one phone/terminal to another. We provide detailed provisioning tutorials for all phones supported by PBXware.
Process
- Set a dedicated username/password pair for provisioning on the PBXware.
- Enable the phone UAD on PBXware & create an extension
- Enter the phone's MAC address in the extension
- Enter the server URL, the login and provisioning password in the phone
Retrieve the provisioning login/password
Phone provisioning will be carried out using a provisioning URL linked to your phone system, along with a provisioning username and password to authenticate the requests.
This password is configured in the server settings for the PBXware Business/Contact Center editions and in the tenant settings for the Multi-Tenant editions.
- On Business/CC editions, click Settings > Server > Click your server > Auto provisioning
- On the Multi-tenant edition, position yourself on the Master-tenant & click on Settings > Tenants > Click your tenant > Auto provisioning

Enable the UAD
On PBXware, when you want to provision a phone, the server will need to send a configuration file specific to the phone.
This is why you will need to enable a UAD matching your phone model. When you create a new extension, choose this model.
To enable your first UAD, go to Settings > UAD (place yourself in your tenant if you are on a Multi-Tenant system).
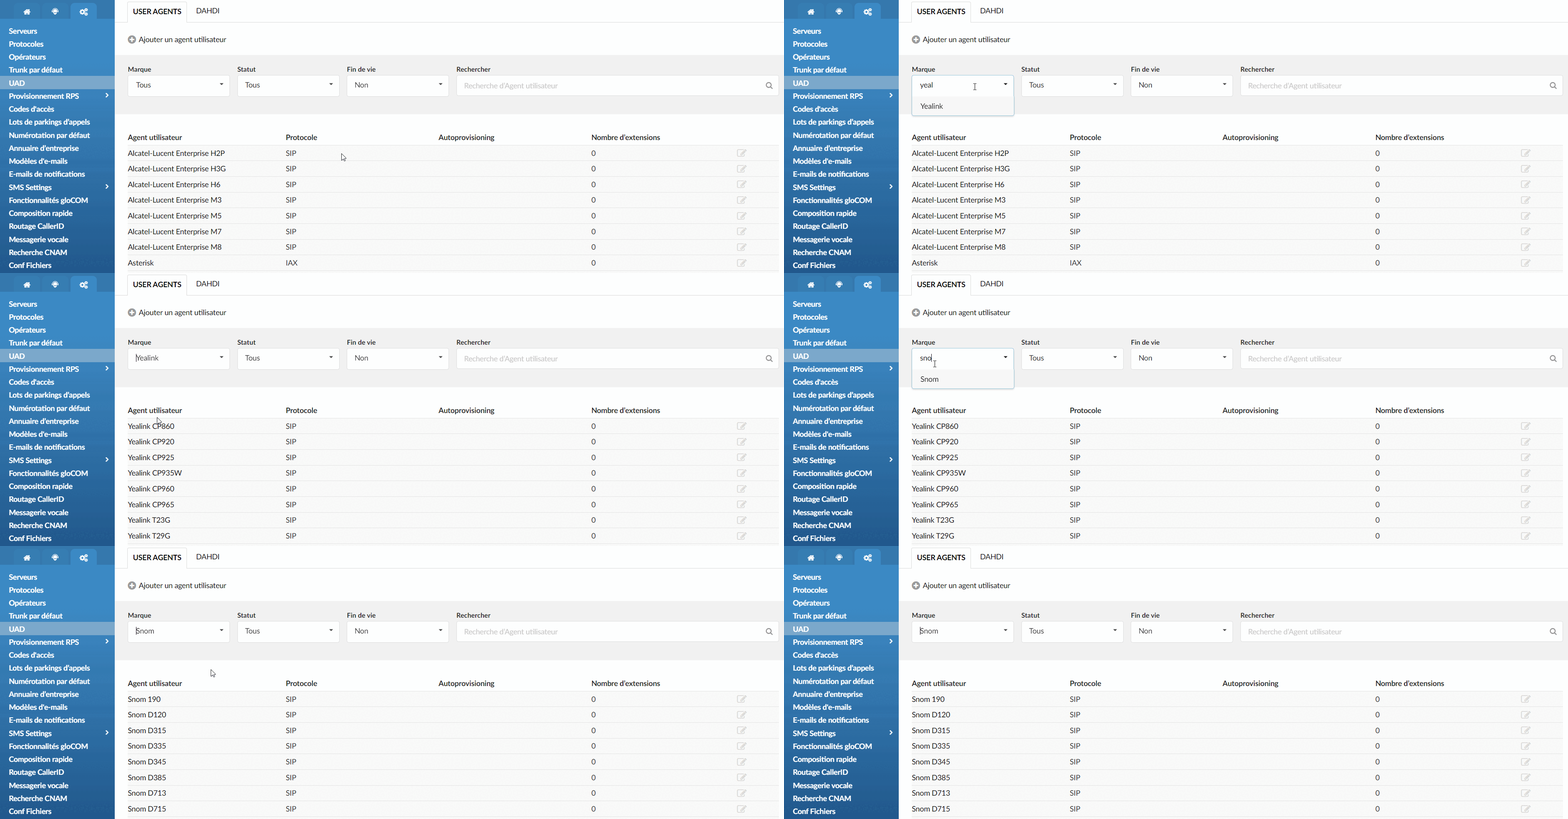
Click the UAD you want to enable then change the field Status of Inactive to Active:
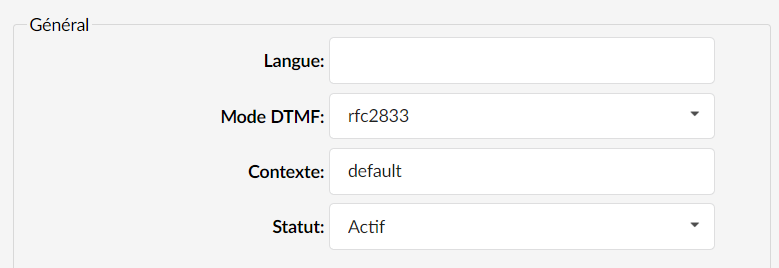
Set the field Auto provisioning on Yes and DHCP on Yes:

You are now ready to create a new extension.
To create your first extension, click the tab Home >Extensions.
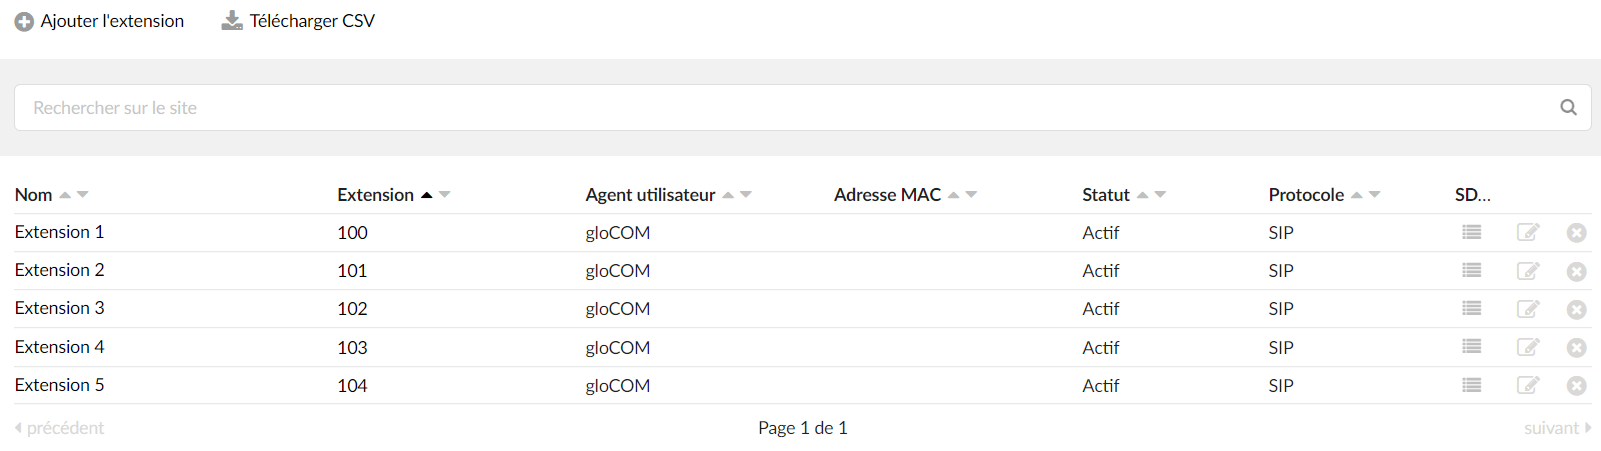
Then click Add an extension.
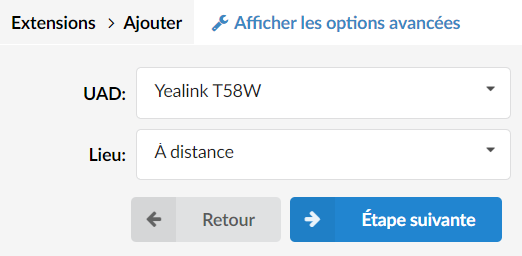
Then choose the UAD you previously activated. The field Location allows you to define whether the phone is on the same network as PBXware or on a remote network.
Click on Next step.
In the previously created extension,
Now, retrieve the MAC address of your phone (via the phone's graphical interface), copy & paste it into the field MAC address :
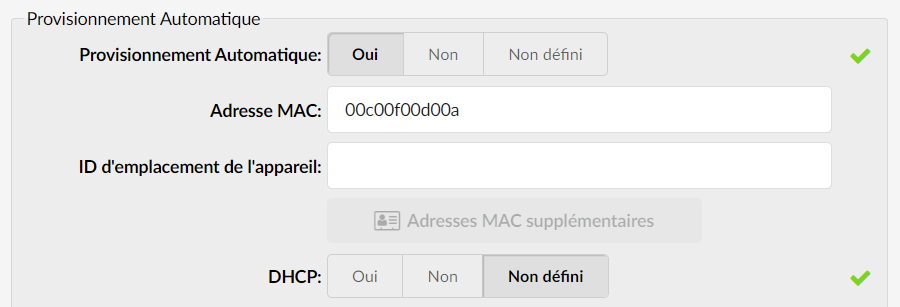
Everything is configured on the PBXware side. Now, go to your phone.
Make sure that it is plugged in and reachable on your local network.
The process differs depending on the manufacturer of your phone; please find some examples below:
Yealink
- On the PBXware side, make sure you have enabled the UAD corresponding to your phone as well as entered its MAC address in the extension.
- Open a new browser window and enter your phone's IP address, for example http://192.168.1.22
- Enter the username and the password of the phone (default admin:admin) and press the Confirm .
- Click the tab Settings in the left navigation menu.
- Click the link Auto provisioning under the tab Settings.
NOTE:
The interface may change depending on how recent your device is
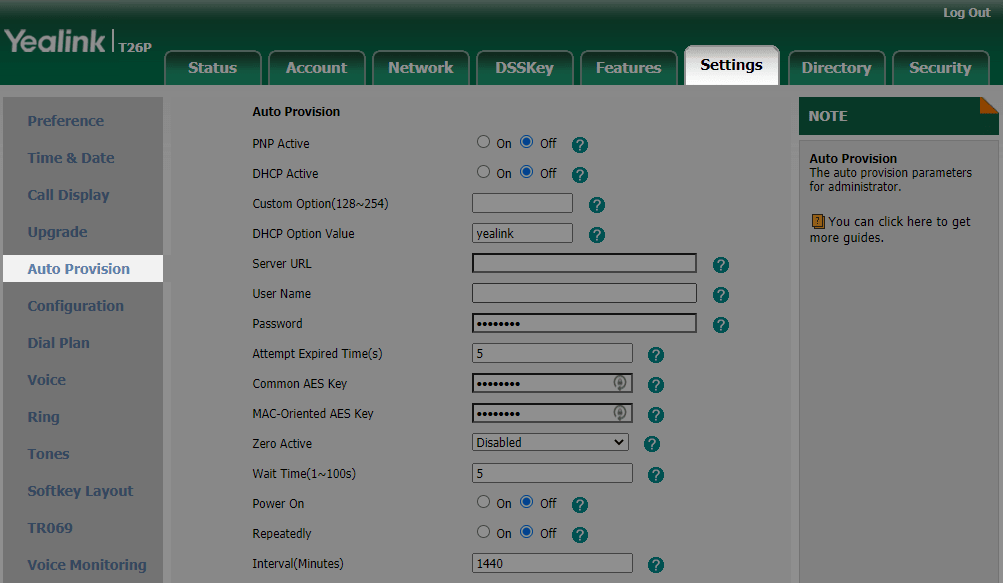
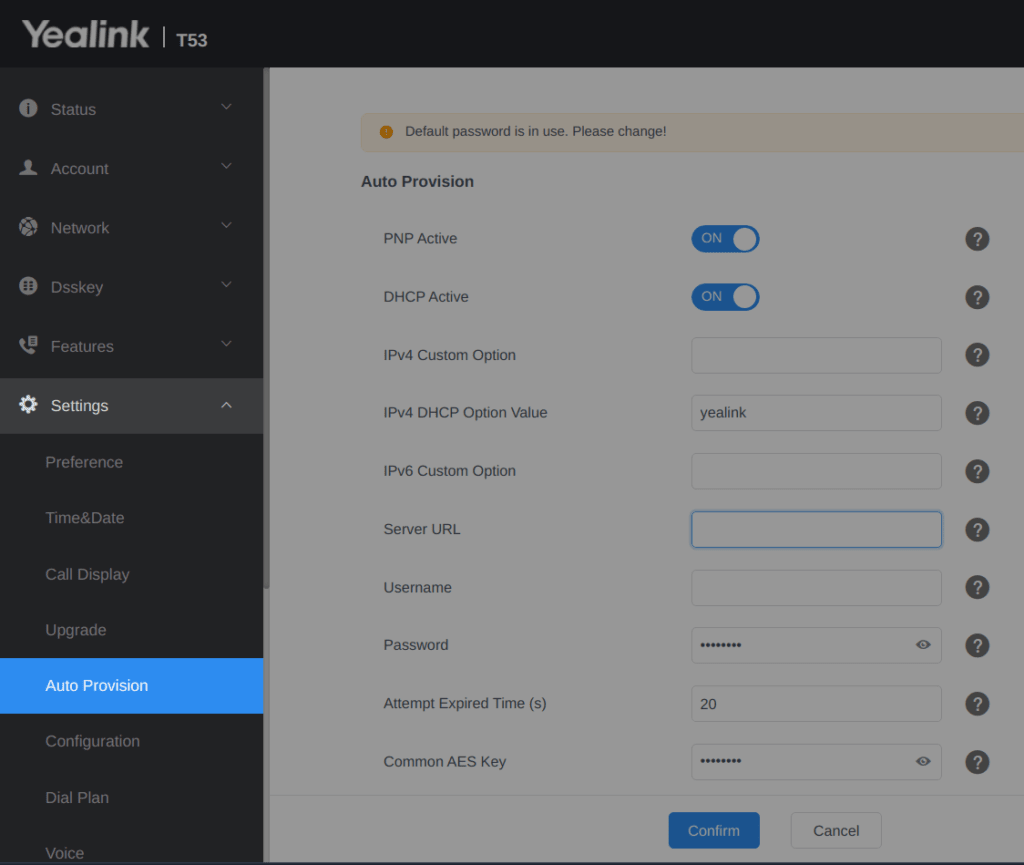
Fill in the following fields:
- Server URL: snter http:// followed by the hostname or address IP of the PBX followed by /prov (e.g. http://abc.ags-next.com/prov)
- Username : Enter the tenant provisioning username defined in the section Retrieve the provisioning login/password
- Password : Enter the tenant provisioning password defined in the section Retrieve the provisioning login/password
- Click the button Confirm.
- Click the button Autoprovision now. A pop-up window will appear, click the button OK to confirm your action.
You will need to wait a few seconds for the configuration to be updated.
The auto-provisioning process will start during the phone reboot process; the phone will retrieve the appropriate configuration file from PBXware. If everything is done as described above, you should have successfully registered your phone on PBXware.
Fanvil
- On the PBXware side, make sure you have enabled the UAD corresponding to your phone as well as entered its MAC address in the extension.
- Open a new browser window and enter your phone's IP address, for example http://192.168.1.22
- Enter the username and the password of the phone (default admin:admin) and press the Login.
- Click the tab Autoprovision.
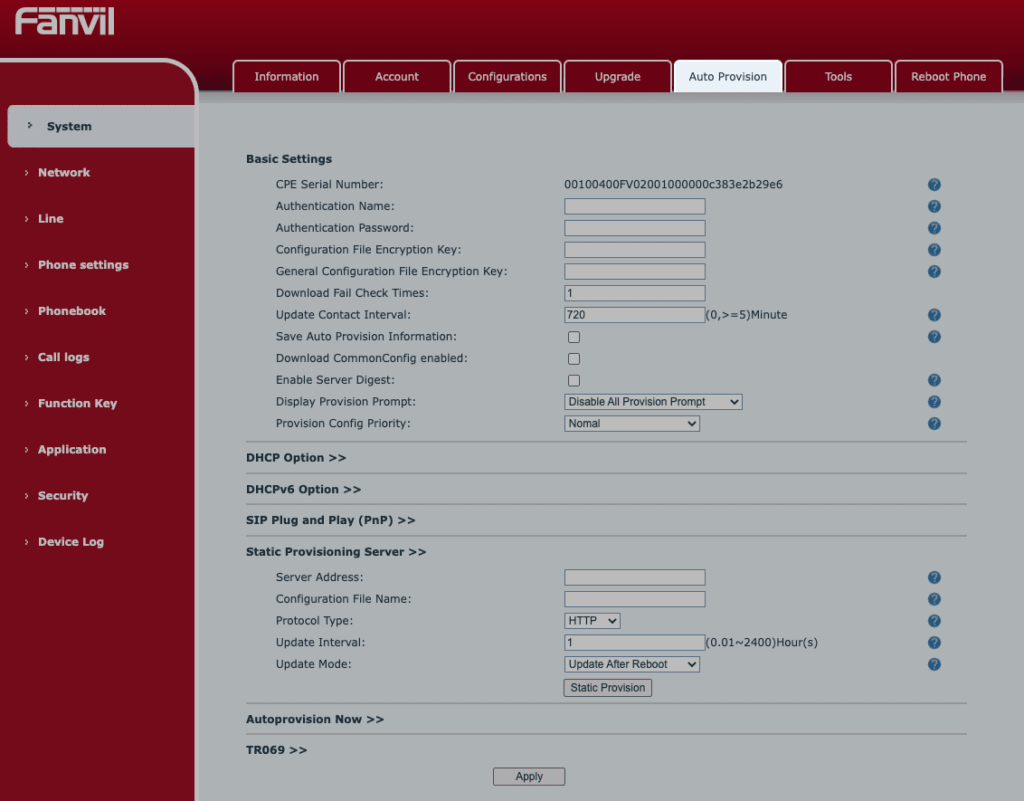
- Authentication name : Enter the tenant provisioning username defined in the section Retrieve the provisioning login/password
- Authentication password : Enter the tenant provisioning password defined in the section Retrieve the provisioning login/password
- Make sure that the box Download CommonConfig enabled east unchecked.
Expand the section Static provisioning server then:
- Server URL: snter http:// followed by the hostname or address IP of the PBX, followed by /prov (e.g. http://abc.ags-next.com/prov)
- Click the Apply button
- Expand the section Autoprovision Now & click the button Autoprovision now
Snom
- On the PBXware side, make sure you have enabled the UAD corresponding to your phone as well as entered its MAC address in the extension.
- Open a new browser window and enter your phone's IP address, for example http://192.168.1.22
- Enter the username and the password of the phone (default admin:admin) and press the Confirm .
- Click on Advanced in the left navigation menu.
NOTE:
The interface may change depending on how recent your device is
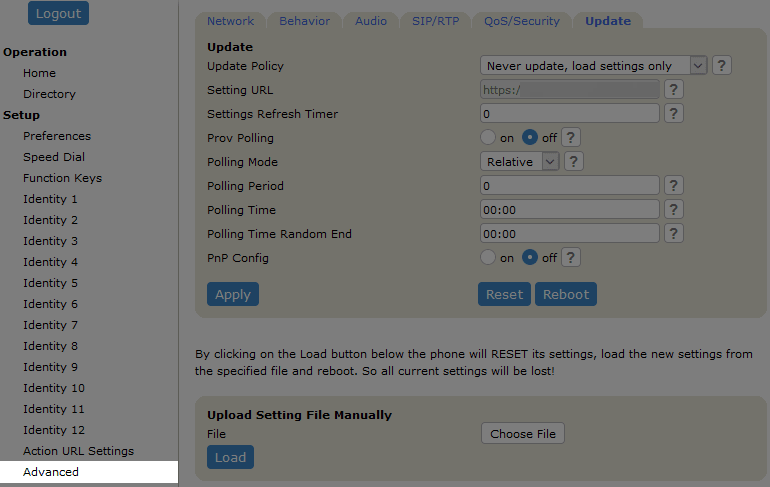
- Click the tab QoS/Security in the top navigation menu.
- Enter the autoprovisioning username and password defined in the section Retrieve the provisioning login/password in the fields User and Password under HTTP Client.
- Click the button Apply.
- Click the tab Update in the top navigation menu.
- Choose the server type you want to use: HTTP , HTTPS or Trivial FTP. Our recommendation is to use HTTP.
- Enter http:// followed by the hostname or IP address of your PBXware server then followed by /prov/snomd717-{mac}.htm
- Replace snomd717 by your phone's model (example: /prov/snomd785-{mac}.htm)
- Do not substitute {mac} by the phone's MAC address; leave this variable spelled out unchanged.
- URL example:
- http://abc.ags-next.com/prov/snomd717-{mac}.htm
- http://abc.ags-next.com/prov/snomd785-{mac}.htm
- http://abc.ags-next.com/prov/snomd715-{mac}.htm
NOTE:
For DECT base stations, namely the M500, M700 & M900 models, the provisioning URL must be in the following format:
- http://abc.ags-next.com/prov/snomm500-{mac}.xml
- http://abc.ags-next.com/prov/snomm700-{mac}.xml
- http://abc.ags-next.com/prov/snomm900-{mac}.xml
- Click the button Apply (if the option appears)
- Click the button Reboot or Save and reboot depending on the template
- A pop-up window will appear, click the button Yes to confirm the action and restart the phone.
- Once the restart is complete, dial *123 on the phone to check the registration.
Polycom
- On the PBXware side, make sure you have enabled the UAD corresponding to your phone as well as entered its MAC address in the extension.
- Open a new browser window and enter your phone's IP address, for example http://192.168.1.22
- Enter the password phone administrator (default 456) and press the button Confirm .
- Go to Settings in the top navigation menu and choose Provisioning Server
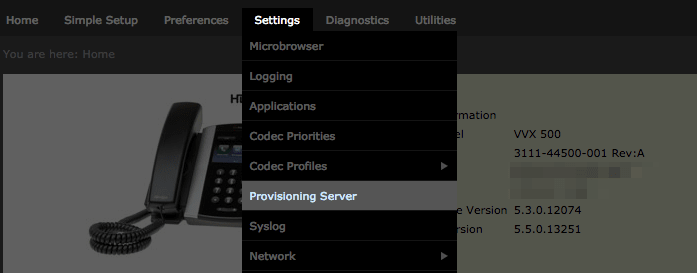
- Choose the HTTP protocol in the menu Server Type
- Enter http:// followed by the hostname or address IP, followed by /prov in the field Server Address.
Example hostname using HTTP: http://abc.ags-next.com/prov
Example IP address using HTTP: http://192.168.1.10/prov
- Enter the autoprovisioning username and password defined in the section Retrieve the provisioning login/password in the fields Server User and Server Password.
- Click the button Save
- Confirm by choosing Yes
- Wait while the phone restarts.
- The auto-provisioning process will start during the phone reboot process; the phone will retrieve the appropriate configuration file from PBXware
- Dial *123 to verify the registration.
