FR EN

sipPROT

Estimated reading: 18 minutes
Brute-force intrusion attempts are quite common and IPPBX systems that are not protected are susceptible to this attack. The most common consequence of this type of network attack can be:

VOIP service interruption and unavailability
The possibility of password theft (SIP registration)

Operation

When sipPROT detects an attack, it acts immediately by updating the blacklist rules and preventing access from the IP addresses originating the attack. This protects your system from any further damage. Unlike other similar security solutions, sipPROT is capable of working with live SIP traffic and is more effective at stopping attacks.
Depending on the configuration you are using, sipPROT can be installed in two possible locations:
  • PBXware – if you are running a standalone PBXware installation.
  • SERVERware – If you run PBXware as a VPS in a SERVERware virtual environment, sipPROT must be installed on all SERVERware hosts.

Install the sipPROT GUI

To install sipPROT 5 in the PBXware graphical interface (GUI), you must ensure that PBXware is running version 7.x.

Go to the setup wizard on port 81 of your instance.

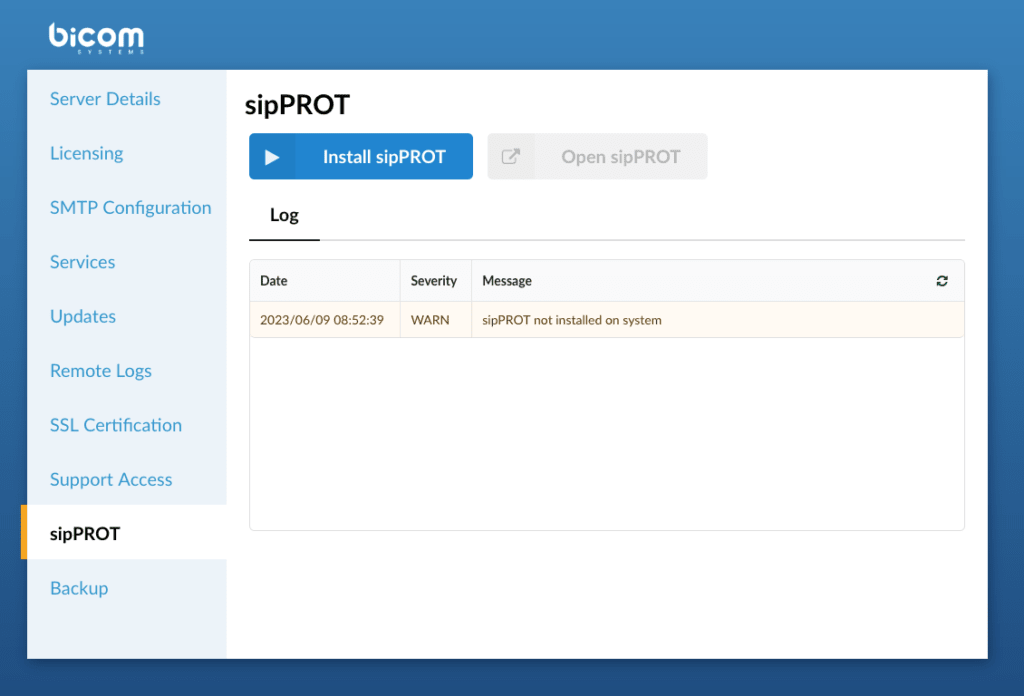
The menu sipPROT must be present in the left-hand menu.

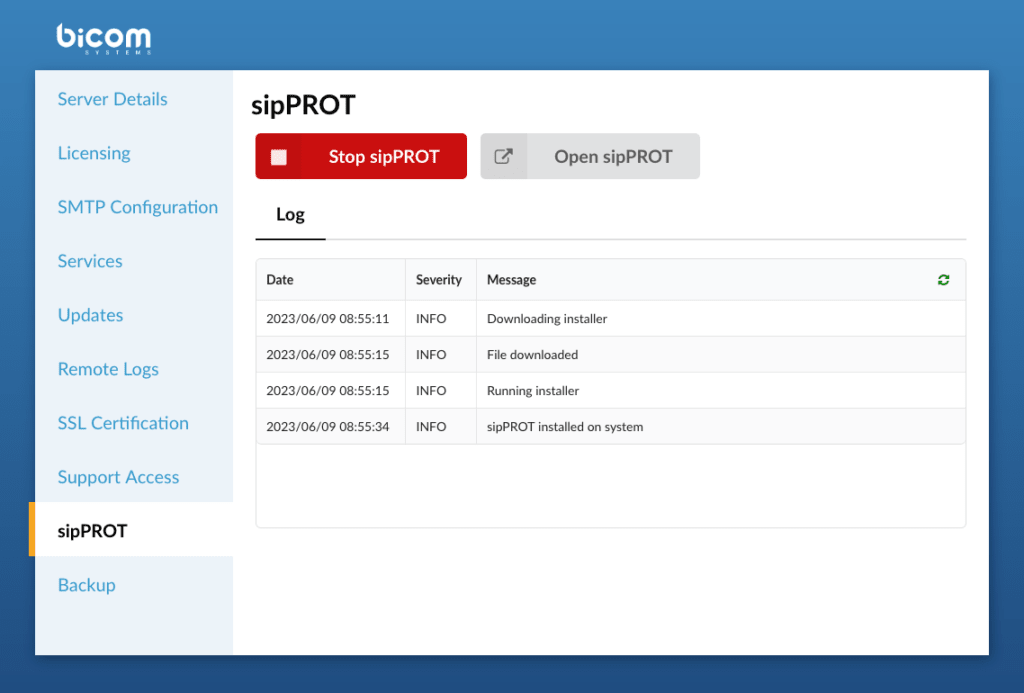
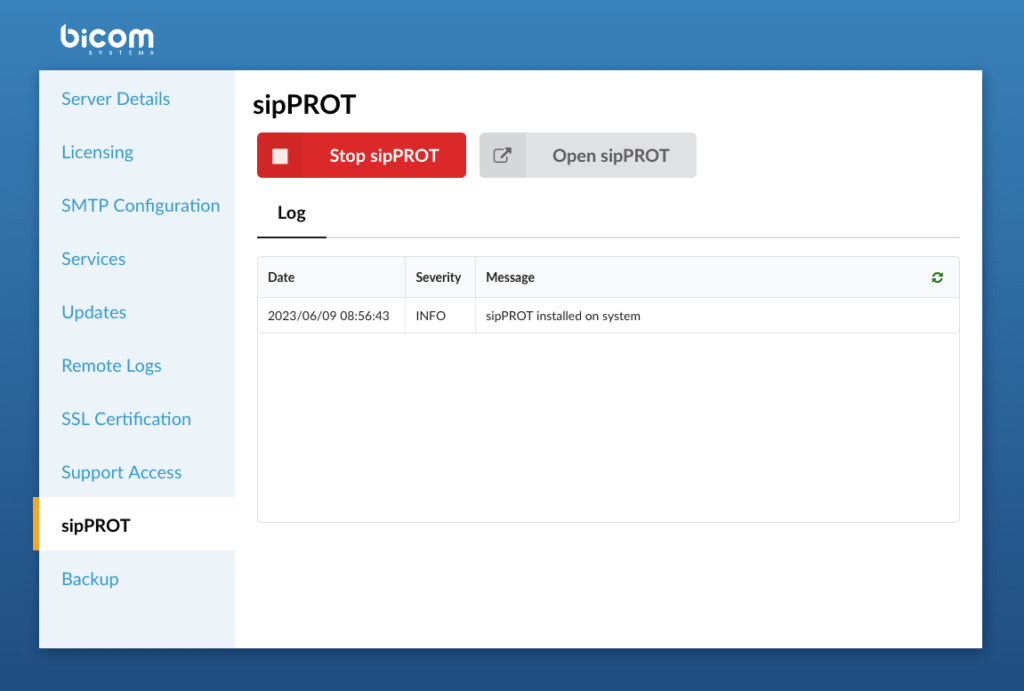
Click install sipPROT and wait until the installation process is complete.

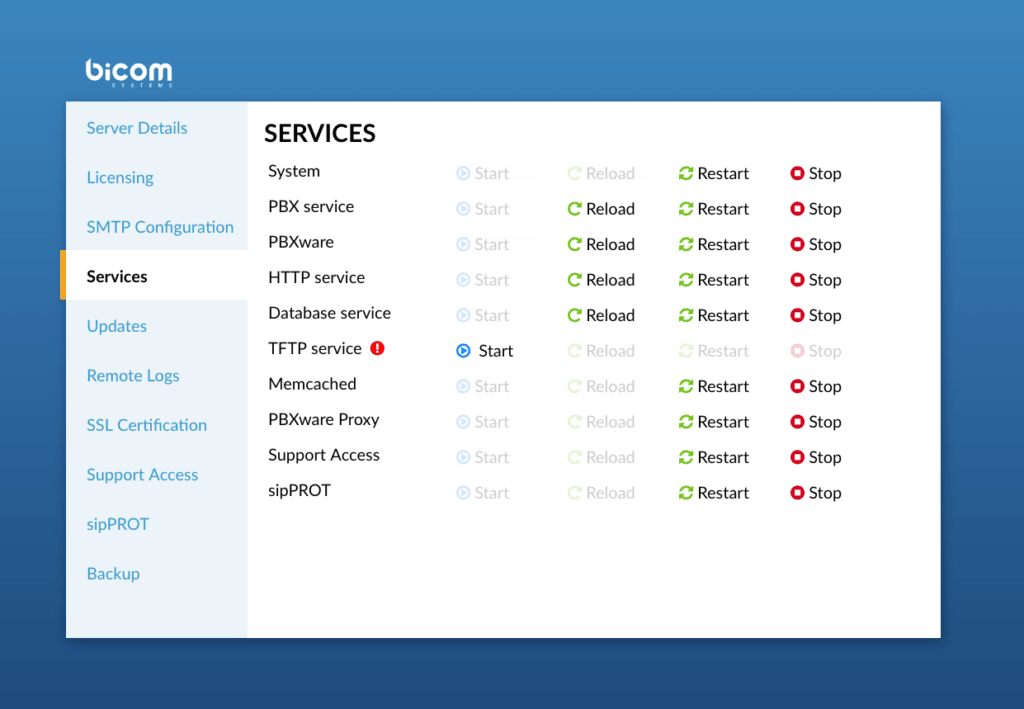
Click the Services tab in the left menu.

You can start/reload/restart/stop sipPROT from the menu Services.

When you click the button Open sipPROT, a new tab will open and you will be redirected to the sipPROT – Web UI page.

Be sure to follow the indicated steps carefully to ensure a successful update.
Download the update script with the command:
wget http://downloads.bicomsystems.com/sipprot/updates/latest/sipprot.tbz2.sh

Run the script with the command:

sh sipprot.tbz2.sh 

Dashboard

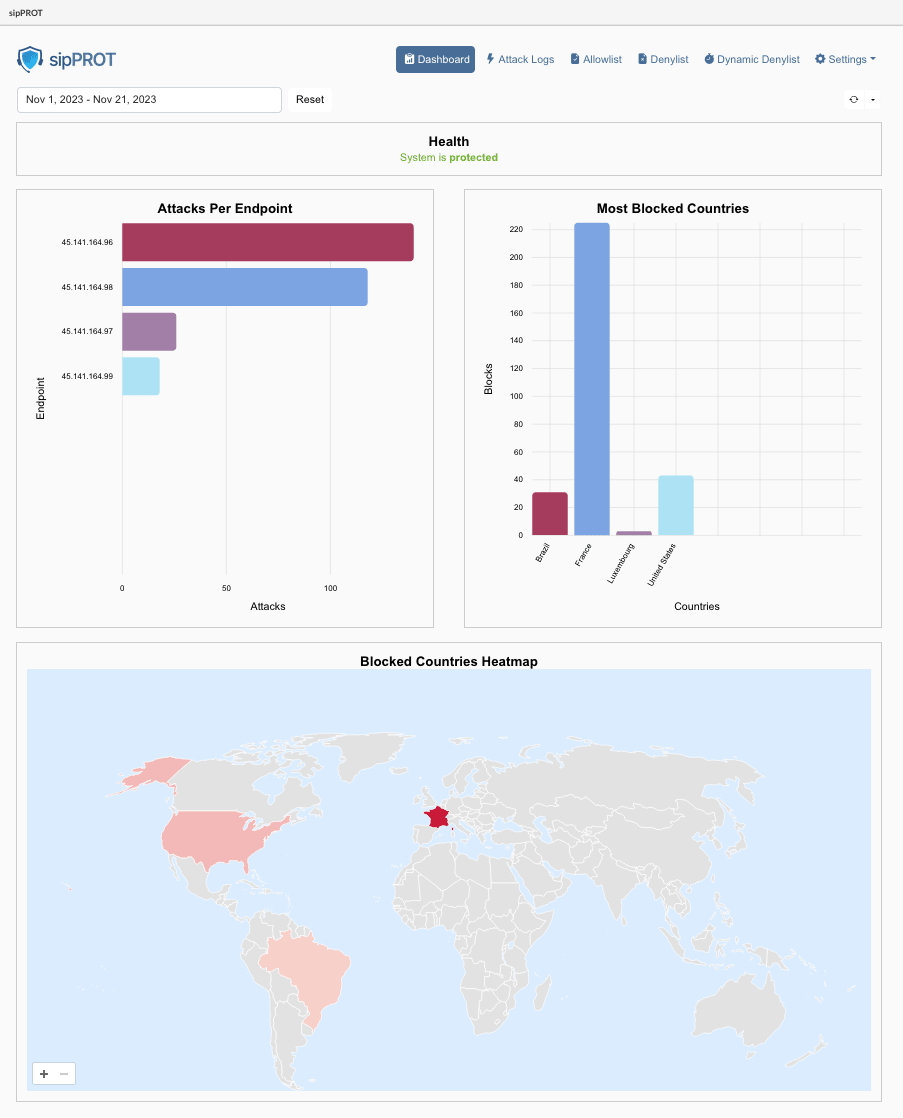
The sipPROT dashboard is designed to provide critical information about the health and status of the protection system. Here is a brief overview of what each dashboard widget represents:


WidgetDescription
Health:This widget displays the health status of the sipPROT service. It indicates whether the service is working correctly or whether there are issues. If issues are detected, users are prompted to check the hosts page for more details. A direct link to the hosts page is also provided for quick access.
The system is protected. The system did not detect any integrity problems.
Issues detected: please consult the hosts page via a direct link or from the menu to see the details.
Endpoint attacksThis widget displays a list of attacks for a specified time period, helping to identify the most targeted IP addresses or virtual private servers (VPS) on your server. For PBXware users, this will usually show attacks on a consistent IP address.
Most blocked countriesThis widget displays information about the countries of origin of blocked IP addresses. It groups blocked IP addresses according to their country of origin, providing an overview of geographic patterns in the attack data.
Mapping of the most blocked countriesA geolocation heat map that visually represents the density or intensity of attacks based on geographic location. It uses a color code to indicate areas with higher and lower attack concentrations. Darker colors indicate higher attack concentrations, while lighter colors indicate lower concentrations.
All these widgets are affected by the date selector filter and the refresh interval selector on the dashboard. This means you can customize the displayed data according to specific time periods and set how often the information is updated.
Each widget provides valuable information about different aspects of the security and health of the system managed by sipPROT, thus making it easier for users to monitor and respond to potential threats or issues.

Configuration page

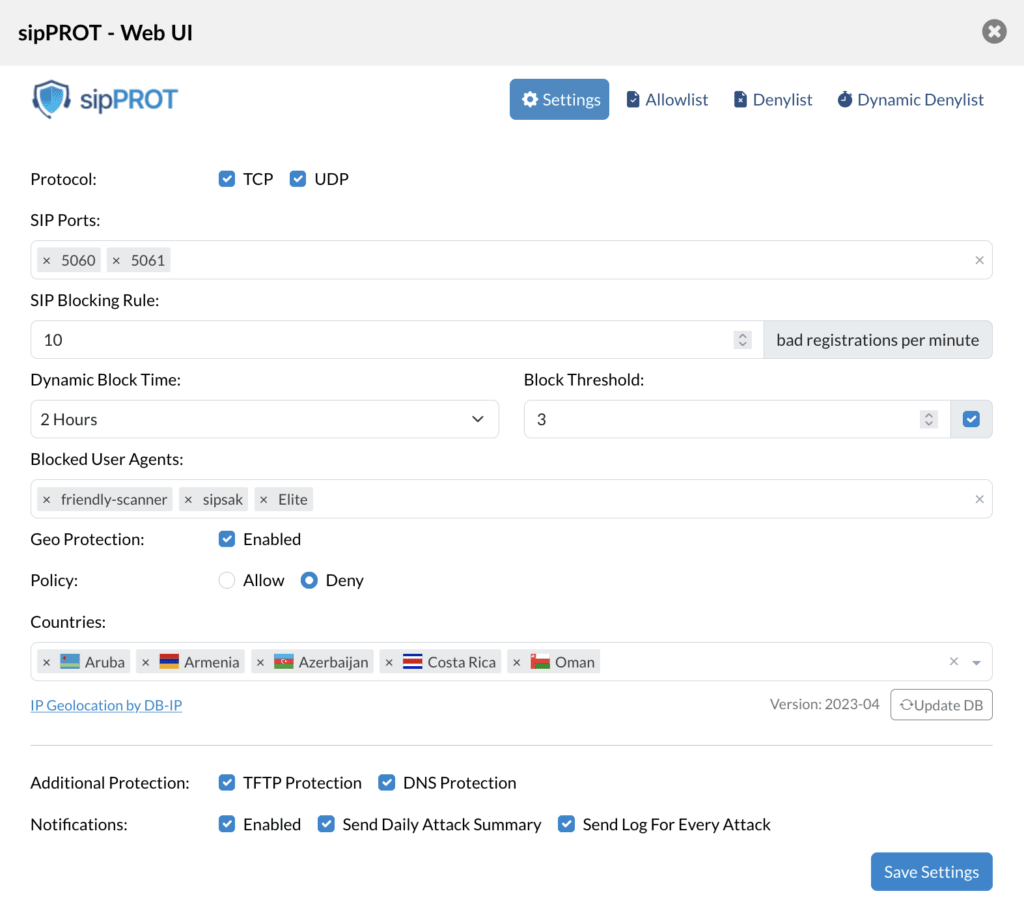
Under PBXware > Admin Settings > sipPROT > Settings, the configuration options for sipPROT are located.

Available options

FieldDescription
Protocols:Choose the protocols to monitor for attacks (TCP, UDP or both).
SIP ports:Specify one or more ports or ranges to monitor, such as "5060" or "5060:5062".
SIP blocking rule:Set the maximum number of unauthorized registration attempts per minute before blocking an attacker's IP address for a specified period.
Dynamic blocking time:Choose how long blocked IP addresses will remain blocked after preventing an attack.
Blocking threshold:Set how many times an IP address will be dynamically blocked before being permanently blocked by being added to the block list. The acceptable range is (1-20).
Blocked user agents:Specify the SIP user agents from which to block incoming traffic. Keep the list as short as possible to avoid affecting system performance.
Geo-protection:Enable or disable GEO blocking and select the Allow or Deny option.
Allow: if "Allow" is selected, only traffic originating from the selected countries will be allowed and all other traffic will be denied.
Note that resources the server needs to access outside the selected country range, such as external mail or archiving servers, must be explicitly allowed.
Decline: if "Deny" is selected, all traffic originating from the blocked countries will be denied.
Blocked countries:Select the countries from which to block incoming traffic. sipPROT will block the entire range of IP addresses belonging to the selected countries or allow it if a different method is selected above
Additional protections:
TFTP: Protect your server against TFTP brute-force attacks by using a rate limit. The default rate limit is 10 requests per minute, with a maximum burst of 100 requests.
DNS: Protect legacy systems from the glibc stack-based buffer overflow in the getaddrinfo() security vulnerability.
This feature is enabled by default and should not be modified without the proper knowledge.
If you do not know what the feature is for, you should under no circumstances modify this option.
Notifications:
Enable: enable or disable sipPROT notifications.
Send a daily summary of attacks: receive an email with a daily report of attacks if this option is checked.
Send the log for each attack Receive a notification for each attack. The default value is once per hour.
Notification recipient:sipPROT uses the SMTP configuration provided by PBXware and requires functional SMTP settings. The default recipient of notifications is the PBXware administrator.
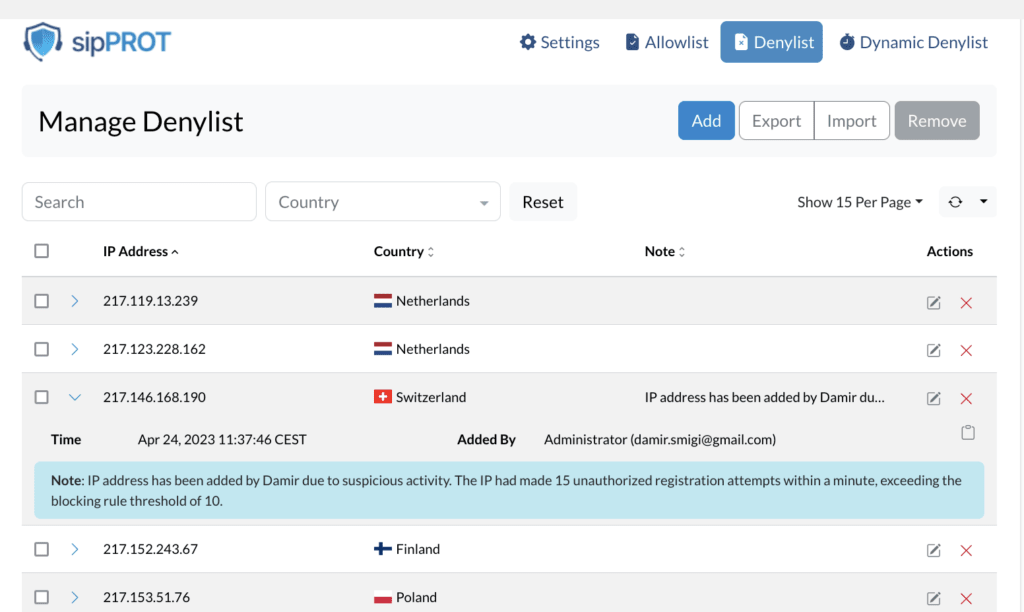
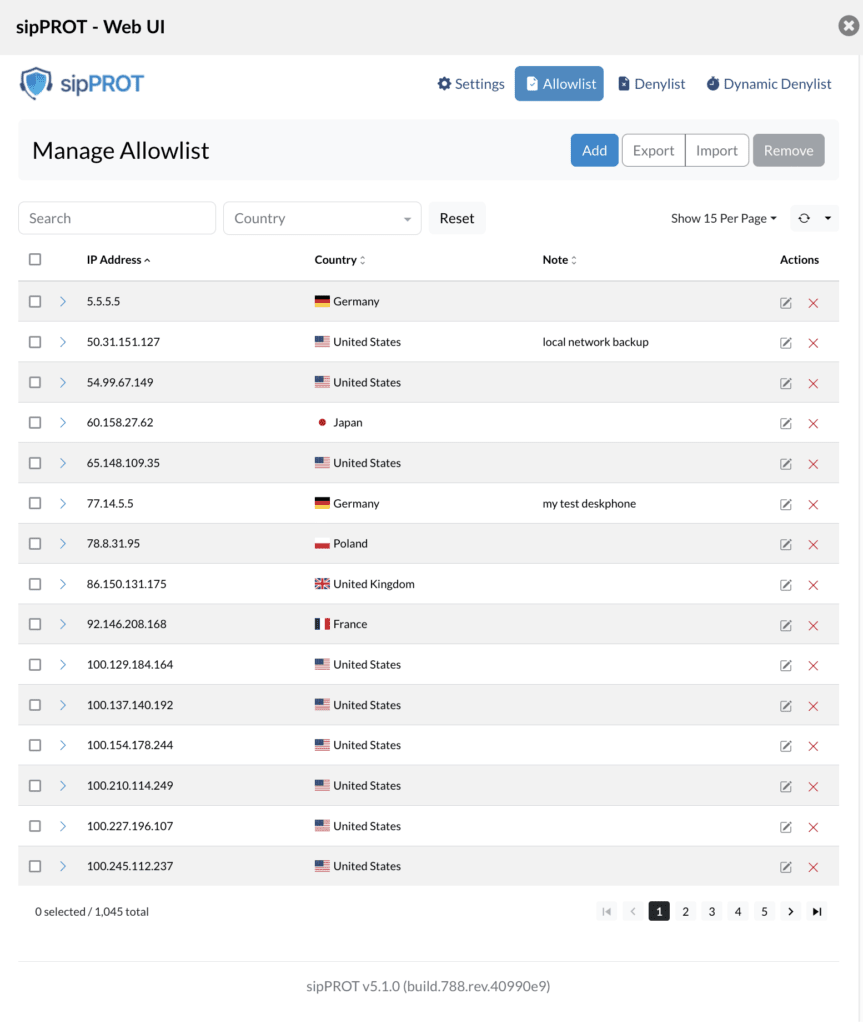
The Allow/Deny lists offer several options to manage the list, including search, export, import, and delete functions. Users can also expand the additional information for each record in a single click, providing valuable data to better manage their list.

1. Managing the allow list

  • Add (Manually add an IP record to the list)
  • Export (export the entire list to a CSV file)
  • Import (import the list from a CSV file)
  • Delete (deletes the selected IP record)

2. Search

  • Search (Searches the list by IP record or by note)
  • Country (Search IP address records by country)
  • Reset (Clear the country and reset the search)

3. Display and refresh options

  • Show per page (drop-down list allowing you to select the number of records displayed per page)
  • Refresh (The "Refresh" option in the permissions list is a drop-down list that allows users to set the list's refresh interval. When a refresh interval is set, the list is automatically refreshed at the specified interval. However, it is important to keep in mind that this action may clear any current selections in the list.)

At the bottom of the list, users can find:

4. Number selected / total entries

5. Page numbers with selector
Also, for convenience, additional information regarding the specific IP address can be found with a single click on the arrow at the beginning of the record to expand the additional information for the record content.

  • IP: the IP address concerned
  • Note: the note for the record if available.
  • Time: the date and time of the addition or modification
  • Added by : the user who added the record.
  • Copy button: copy the recording data to the clipboard in json format.

Whitelist

The Whitelist is a list of IP addresses allowed to access the system without interruption. This list can be populated manually via a form or uploaded using a CSV file. It is important to keep the whitelist up to date to ensure that legitimate users are not prevented from accessing the system. The whitelist provides an additional layer of security to the system and helps prevent any unauthorized access.

Add IP records to the whitelist 

To add an IP address to the whitelist, proceed as follows:

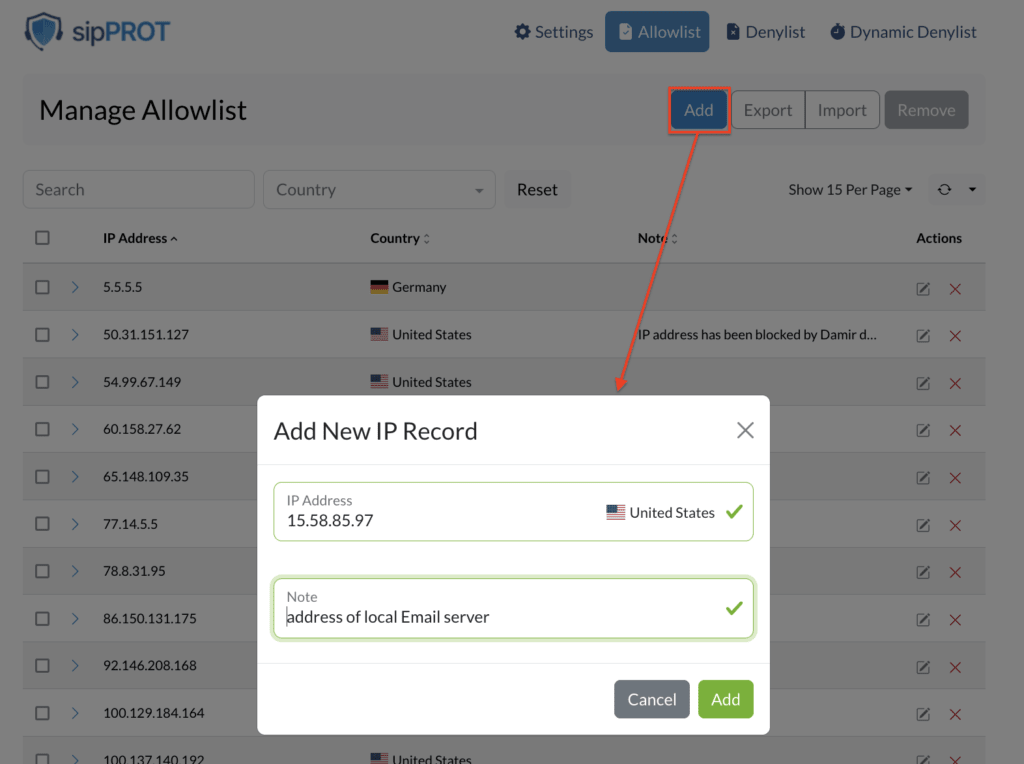
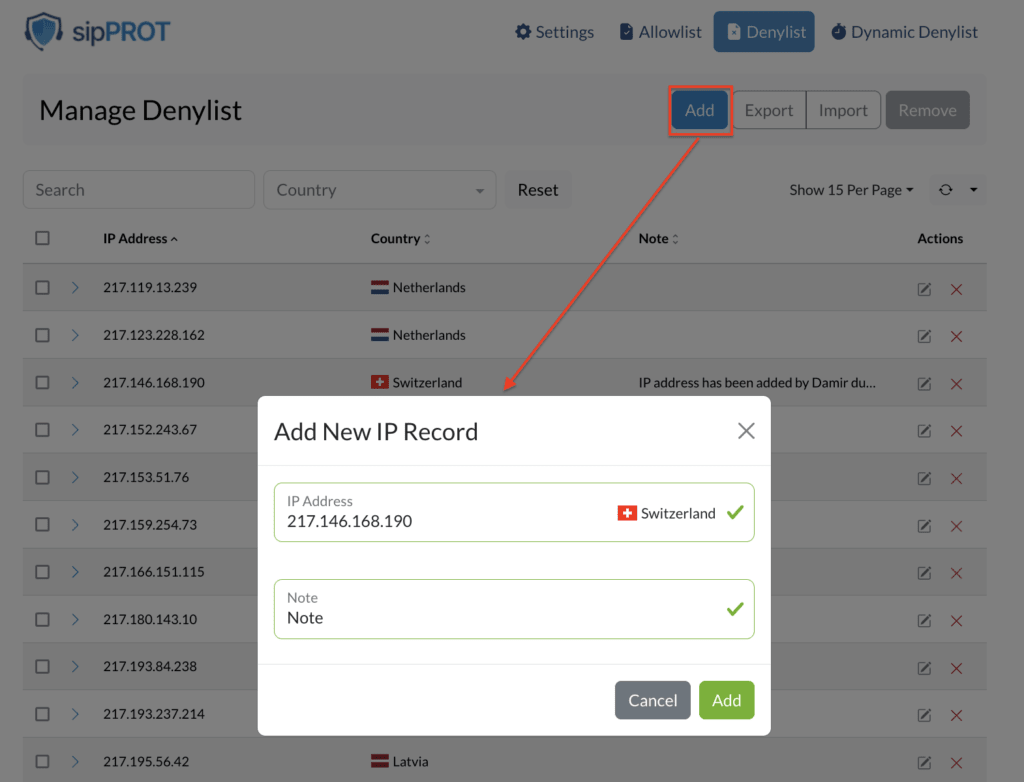
  • Open the sipPROT “Allowlist” tab in your system. Click the "ADD" button.
  • Enter the network or IP address in the designated field.
  • Enter any optional notes to help you remember why this address was added.
  • Click the "ADD" button to add the IP address to the whitelist.
It is important to make sure that the IP address entered is accurate and valid. Once an IP address is added to the whitelist, it will be allowed uninterrupted access to the system.

Import/export multiple IP records to the whitelist

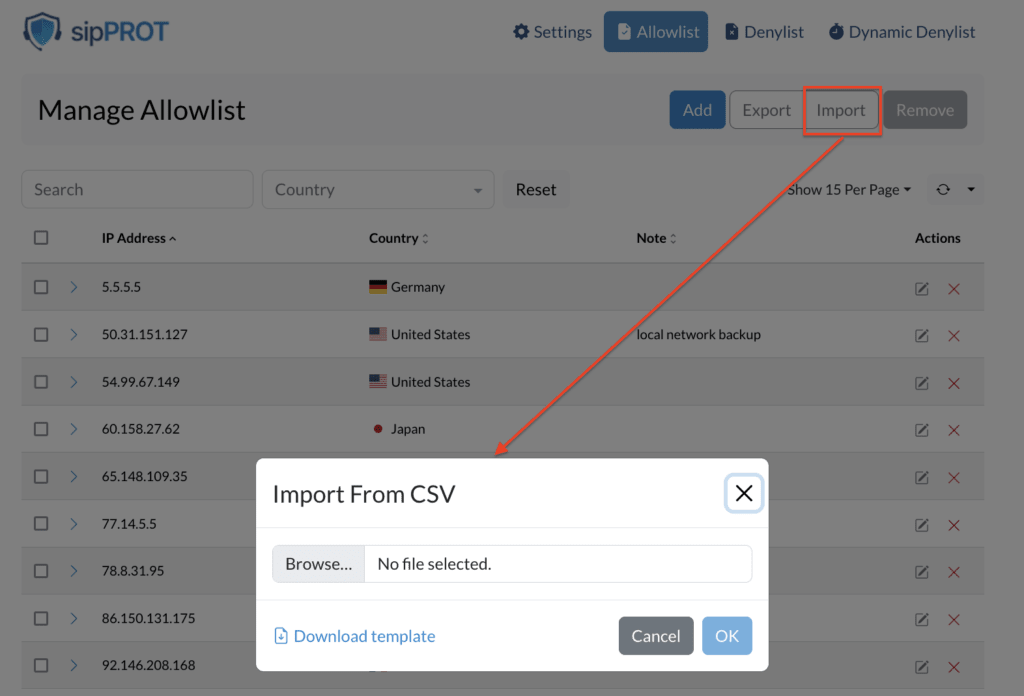
To import multiple IP addresses into the allowed IP whitelist, you can use the Import CSV option located in the top right corner of the Whitelist IP Addresses tab. To use this feature, you will need a CSV file containing the list of IP addresses you want to add to the green list.
To create the CSV file, you can download the provided template file that contains headers and examples to help you get started. Once you have the file, open it in a spreadsheet program like Microsoft Excel or Google Sheets. Then add the IP addresses to which you want to allow access to the system in the “IP_ADDRESS” column. You can also add an optional note for each IP address in the “NOTE” column.

CSV file example:
IP_ADDRESS,NOTE,TIME,ADDED_BY 192.168.24.1,"réseau privé interne",2023-09-01 15:44:35,"Bicom France (support@ags-next.com)"
 
Save the file in CSV format and make sure it is in the correct format. Then, return to the system's sipPROT Allowlist tab and click the "IMPORT" button. Select the CSV file you just created and click "DOWNLOAD" again. The system will import the IP addresses from the file and add them to the whitelist.
 
If you need to export the list of IP addresses from the allowed list, you can also use the "EXPORT" option to download a file containing all the IP addresses currently on the whitelist.

Remove an IP address from the list

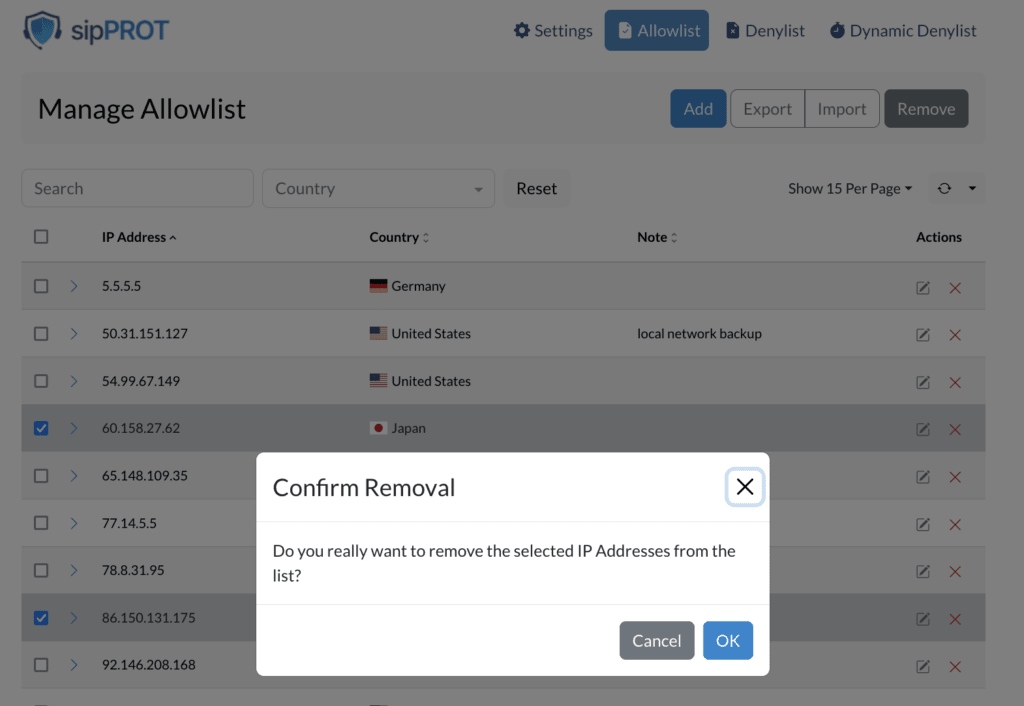
There are two ways to remove a network or IP address from the list. First, you can select one or more IP addresses by checking the box next to each of them, then clicking the "REMOVE" button. A confirmation dialog box will appear, and you can click "OK" to remove the selected network or IP addresses.
Second, you can delete all the IP addresses from the list by checking the « Select all » box, then clicking the « Remove » button. A confirmation dialog box will appear and you can click “OK” to delete all network or IP addresses from the list.
Changes made to the list are applied automatically. If you need to remove a large number of IP addresses, you can also use a CSV file to make bulk changes. A link to a template file with headers and examples is provided to help you get started.

Blacklist

The blacklist is a collection of IP addresses whose access to the system is restricted. This list can be populated manually by entering an IP address and an optional “note” via a graphical interface or by importing a list of IP addresses via a CSV file. In addition, the blacklist can be populated dynamically with IP addresses from the “dynamic blacklist” if they are identified as being associated with persistent attacks on the system.

Add IP records to the blacklist

To add an IP address to the blacklist, proceed as follows:

  • Open the sipPROT Denylist tab in your system.
  • Click the “ADD” button.
  • Enter the network or IP address in the designated field.
  • Enter any optional notes to help you remember why this address was added.
  • Click the “ADD” button to add the IP address to the deny list.

Import/export multiple IP records to the blacklist

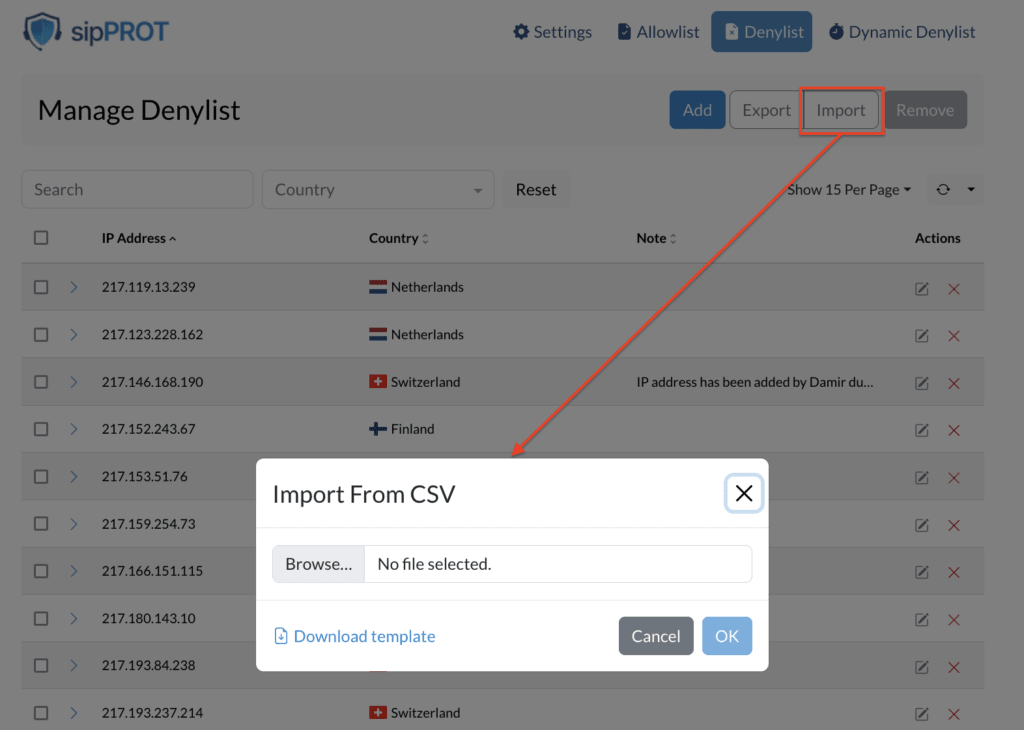
To import multiple IP addresses into the deny list, you can use the Import CSV option located in the top right corner of the Deny List tab. To use this feature, you will need a CSV file containing the list of IP addresses you want to add to the deny list.
To create the CSV file, you can download the provided template file that contains headers and examples to help you get started. Once you have the file, open it in a spreadsheet program like Microsoft Excel or Google Sheets. Then add the IP addresses to which you want to allow access to the system in the “IP_ADDRESS” column. You can also add an optional note for each IP address in the “REMARQUE” column.


CSV file example:

IP_ADDRESS,NOTE 192.168.x.x,"example note1" 77.14.x.x,"example note2"
Save the file in CSV format and make sure it is in the correct format. Then, return to the system's sipPROT Denylist tab and click the "Download" button. Select the CSV file you just created and click "Download" again. The system will import the IP addresses from the file and add them to the deny list.

If you need to export the list of IP addresses from the deny list, you can also use the "Export CSV" option to download a file containing all the IP addresses currently on the deny list.
Remove an IP address from the list

There are two ways to remove a network or IP address from the list. First, you can select one or more IP addresses by checking the box next to each of them, then clicking the "Remove" button. A confirmation dialog box will appear, and you can click "Yes" to remove the selected network or IP addresses.
Second, you can delete all the IP addresses from the list by checking the “Select all” box, then clicking the “Delete” button. A confirmation dialog box will appear and you can click “Yes” to delete all network or IP addresses from the list.
Changes made to the list are applied automatically. If you need to remove a large number of IP addresses, you can also use a CSV file to make bulk changes. A link to a template file with headers and examples is provided to help you get started.

Dynamic block list

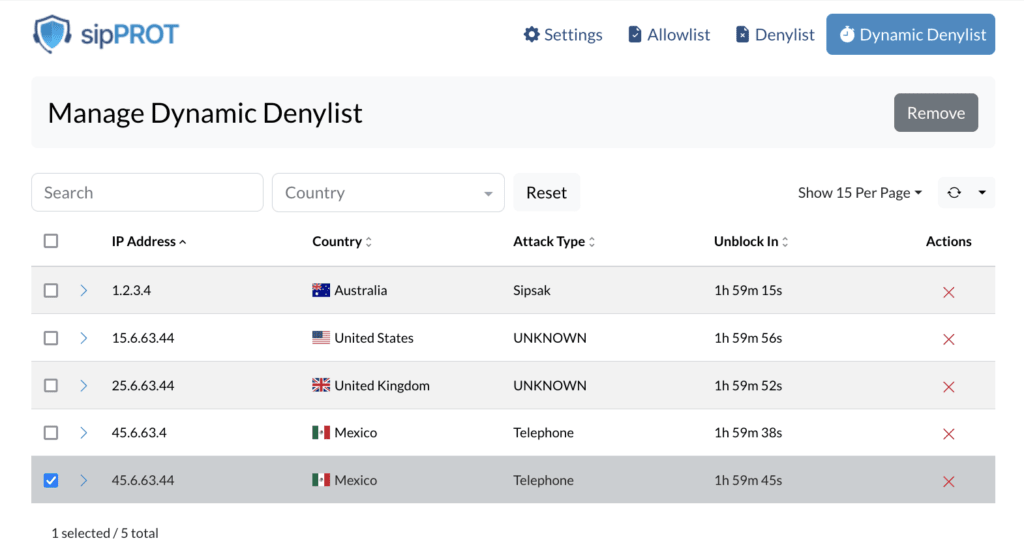
The dynamic blocklist automatically displays the blocked IP addresses identified as sources of malicious traffic or attacks. These IP addresses are added automatically to the blocklist without any manual intervention. The dynamic blocklist is constantly updated with the latest information on malicious IP addresses, thus ensuring that the system remains protected against new threats.
Administrators have the option to manually unblock the IP address or wait for the timeout to expire, after which the block will be automatically removed.
Dynamic blocking is a sipPROT feature that allows the software to automatically block IP addresses that attempt to attack your system. When an IP address is dynamically blocked, it means it has violated the rules set by the administrator on the settings page. The "Dynamic Block Time" is a variable that determines the length of time an IP address will be blocked if it violates the rules.

For example, if the dynamic block time is set to 1/hour and an IP address violates the rules, sipPROT will block that IP for the following hour. If no new attack comes from this IP address once the hour has passed, sipPROT will unblock it. However, if there is a new attack from this IP during the block period, the dynamic block time will be reset and the IP address will remain blocked for an additional hour.

It should be noted that for an IP address to be blocked, it must break the rules during the dynamic block time. Conversely, if an IP address is on the deny list, it will be blocked by sipPROT, whether or not it is attacking your system.

In summary, dynamic blocking is an automated blocking feature of sipPROT that allows the software to block IP addresses that violate your system's rules.

Share

sipPROT

Or copy the link below

CONTENT