



Channels
Channels serve as the means through which customers can establish communication with agents. Whether via live chat, email, or instant messaging, these channels ensure a seamless interaction experience.
Channels are more than simple paths; they are strategically designed interfaces that respond to the diverse communication preferences of customers. By offering several means such as live chat, email, and messaging, we ensure that every customer can reach us in the way that suits them best.
This enhancement not only strengthens customer engagement but also streamlines the agent's workflow, making it easier for them to manage and respond to customer requests across various platforms.

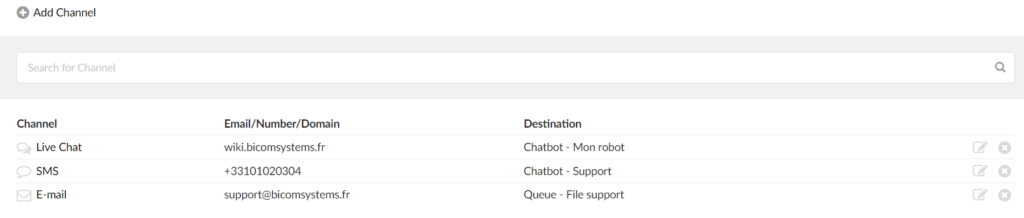
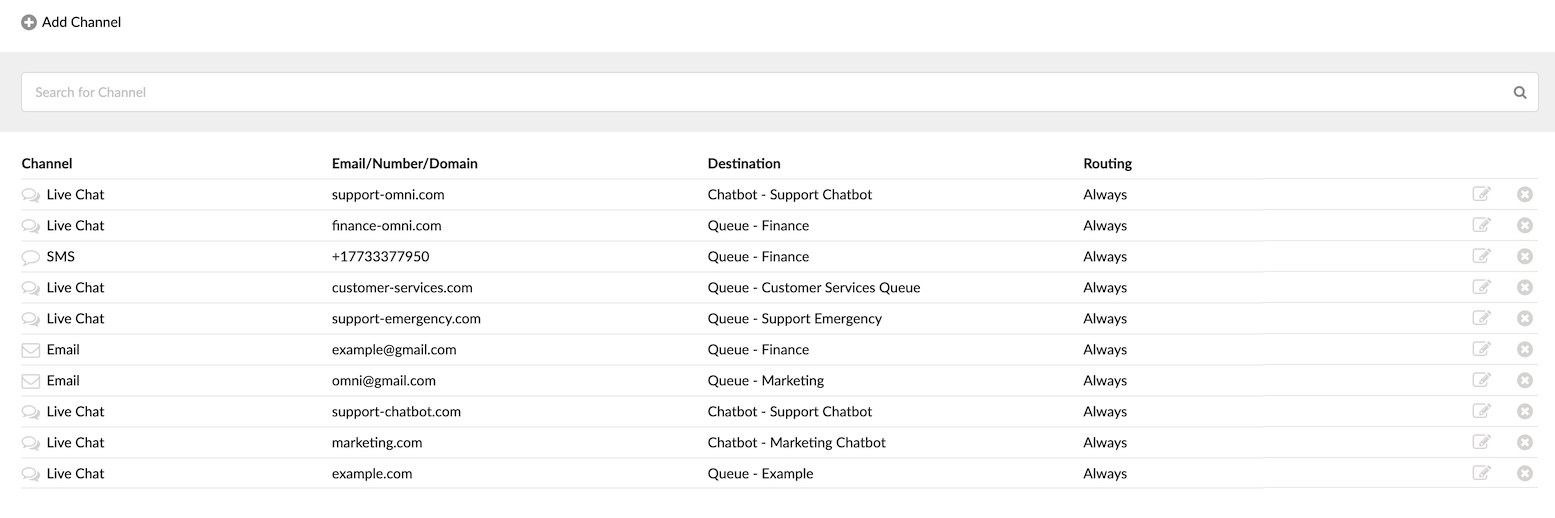
The channels home page section is divided into six columns, each providing important information about the channels you have configured.
- Channel
The first column is the channel type, which can be a live chat, an SMS or an email.
- Email/Number/Domain
The second column displays the email/the number/the domain specific to which the channel is associated.
- Destination
The third column is the Destination, which allows you to choose where the channel will be routed. You can select either a queue or a chatbot to receive and manage the incoming messages.
- Routing
The fourth column is Routing, which provides information on how the messages will be routed within the system.
Live chat channel
The live chat channel allows you to specify a domain name that will be used for the chat, choose a queue to which the chat will be directed, and select pre-chat and leave-a-message forms that customers will fill out before or after chatting with a support agent.
This page allows administrators to customize the live chat experience for their customers and streamline the process of handling customer requests and support inquiries.
Add a chat channel
Go to the channels section

- Locate the Channels section : The Channels section is located under the MESSAGING section of the Contact Center module. Once you click on “Channels”, you will be directed to a page that displays a list of the available channels.
- Start channel creation : click the button “Add a channel” to display the channel creation dialog.
Choice of channel type
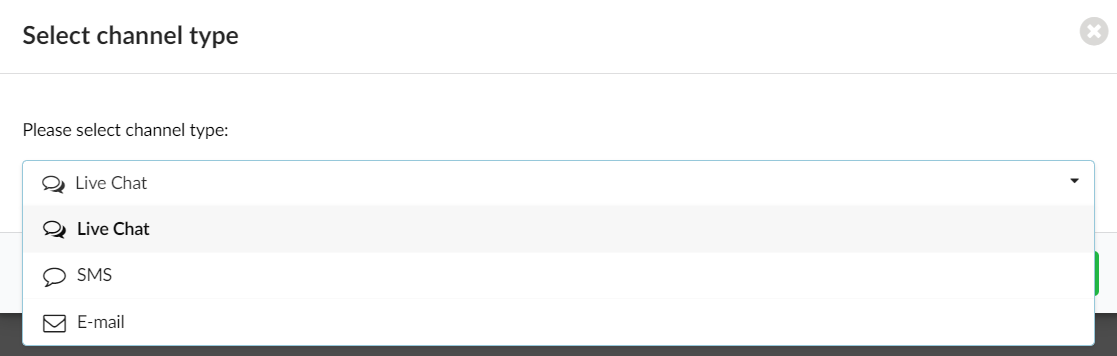
Show options : once the dialog box is open, you will have access to multiple options.
Select“Live chat” as the channel type.
Click on “OK” to finalize your selection and proceed with the channel configuration.
Configure a chat channel
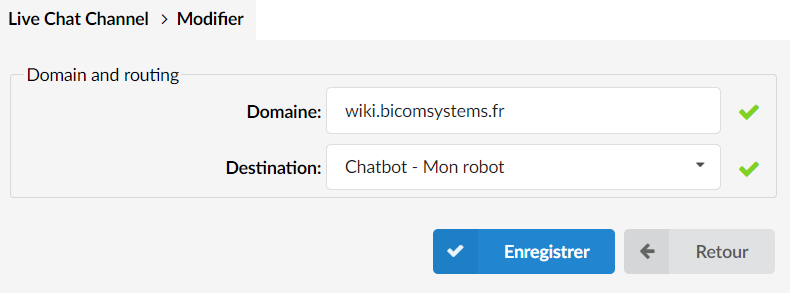
After selecting Live chat as the channel type, you will be guided to the channel settings page. Here you can fine-tune various options:
Domain configuration
- Domain : Specify the domain where your Live Chat will operate. Once set, this domain will be where the live chat runs after users copy a provided code snippet in the Chat Widget section. This is the platform or website where customers can access the Live Chat feature.
Destination selection
- Destination : Users can decide on the method for distributing requests: either through the Chatbot or directly to a queue. If chosen through the Chatbot, users accessing the Live Chat will encounter options that guide them to a specific queue. In contrast, if directed straight through, they will be immediately placed in a queue. Both methods aim to streamline the user’s journey to the desired destination.
Back up your settings
- Revision : check all the parameters again to make sure they match your needs.
- Save : Click the button Save to finalize and activate your Live Chat channel.
SMS channel configuration
The SMS Channel page is your gateway to configuring a dedicated phone number for customer messages. These messages are routed to a predefined destination such as a queue or a chatbot. You can also customize automated responses, thus making customer-business SMS communication efficient and streamlined.
Add SMS channel
Go to the channels section
- Go to the channels under the MESSAGING section.
- Press the “Add channel” button to display the channel creation dialog.
Choice of channel type

Show options : once the dialog box is open, you will have access to multiple options.
Select“SMS” as the channel type.
Click on “OK” to finalize your selection and proceed with the channel configuration.
Configure an SMS channel
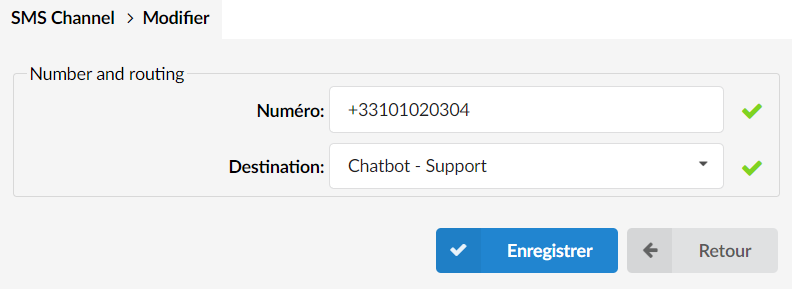
After selecting SMS, you will arrive at the SMS channel settings page. Here is what you can configure:

Number : enter a valid SMS number to send and receive messages. Make sure the number is correctly formatted and linked to an active SMS service.
Destination : decide where to route the SMS messages. Options include specific queues or chatbots. Choose based on your workflow and how you want to interact with customers.
- Check the SMS number and destination settings again.
- Click “Save to finalize the SMS channel configuration.
By following these steps, you will be able to effortlessly integrate SMS as an additional customer engagement channel within your system.
NOTE:
When configuring SMS webhook providers, it is important to distinguish between standard and omnichannel webhook endpoints.
- For example, standard Webhook (Telnyx): when configuring a standard Telnyx webhook, the endpoint must be
https://%URLPBX%/smsservice/telnyx. - Omnichannel webhook: in contrast, for omnichannel webhook configurations, use the endpoint
https://%URLPBX%/smsservice/telnyx/omni.
Email channel
The email channel page allows administrators to configure the IMAP and SMTP configurations, designate a destination queue for incoming emails, and modify other settings such as attachment size limits or email check intervals.
This makes it easier to integrate emails into your omnichannel system, enabling agents to handle customer emails efficiently.
Add an email channel
Go to the channels section

- Locate the Channels section : The Channels section is located under the MESSAGING section of the Contact Center module. Once you click on “Channels”, you will be directed to a page that displays a list of the available channels.
- Start channel creation : click the button “Add a channel” to display the channel creation dialog.
Choice of channel type

Show options : once the dialog box is open, you will have access to multiple options.
Select“Email” as the channel type.
Click on “OK” to finalize your selection and proceed with the channel configuration.
Configure an email channel
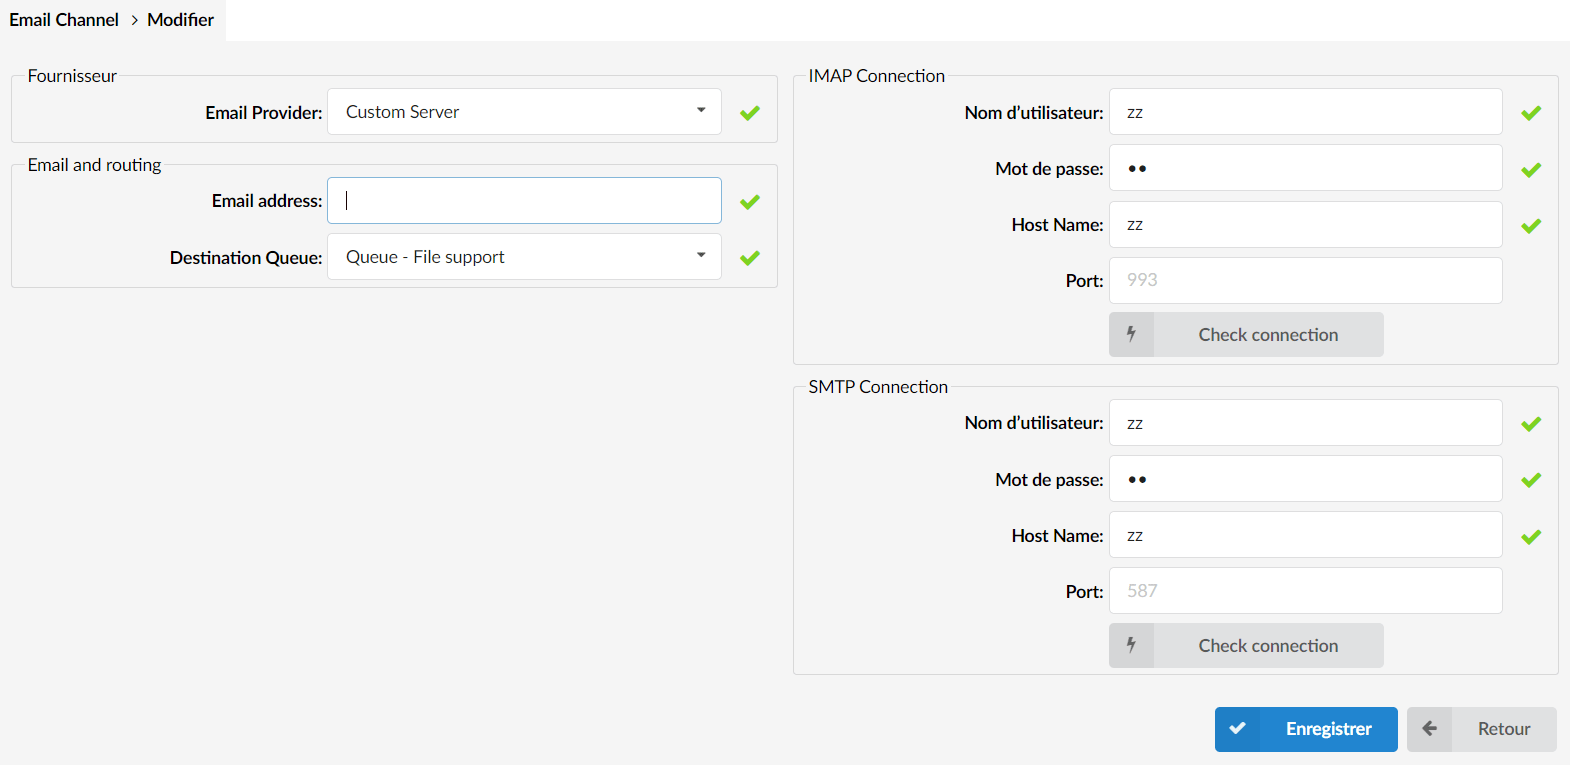
Custom server
When "Custom Server" is chosen from the "Email Provider" drop-down menu in the email channel settings window, detailed configuration options will be presented to you:
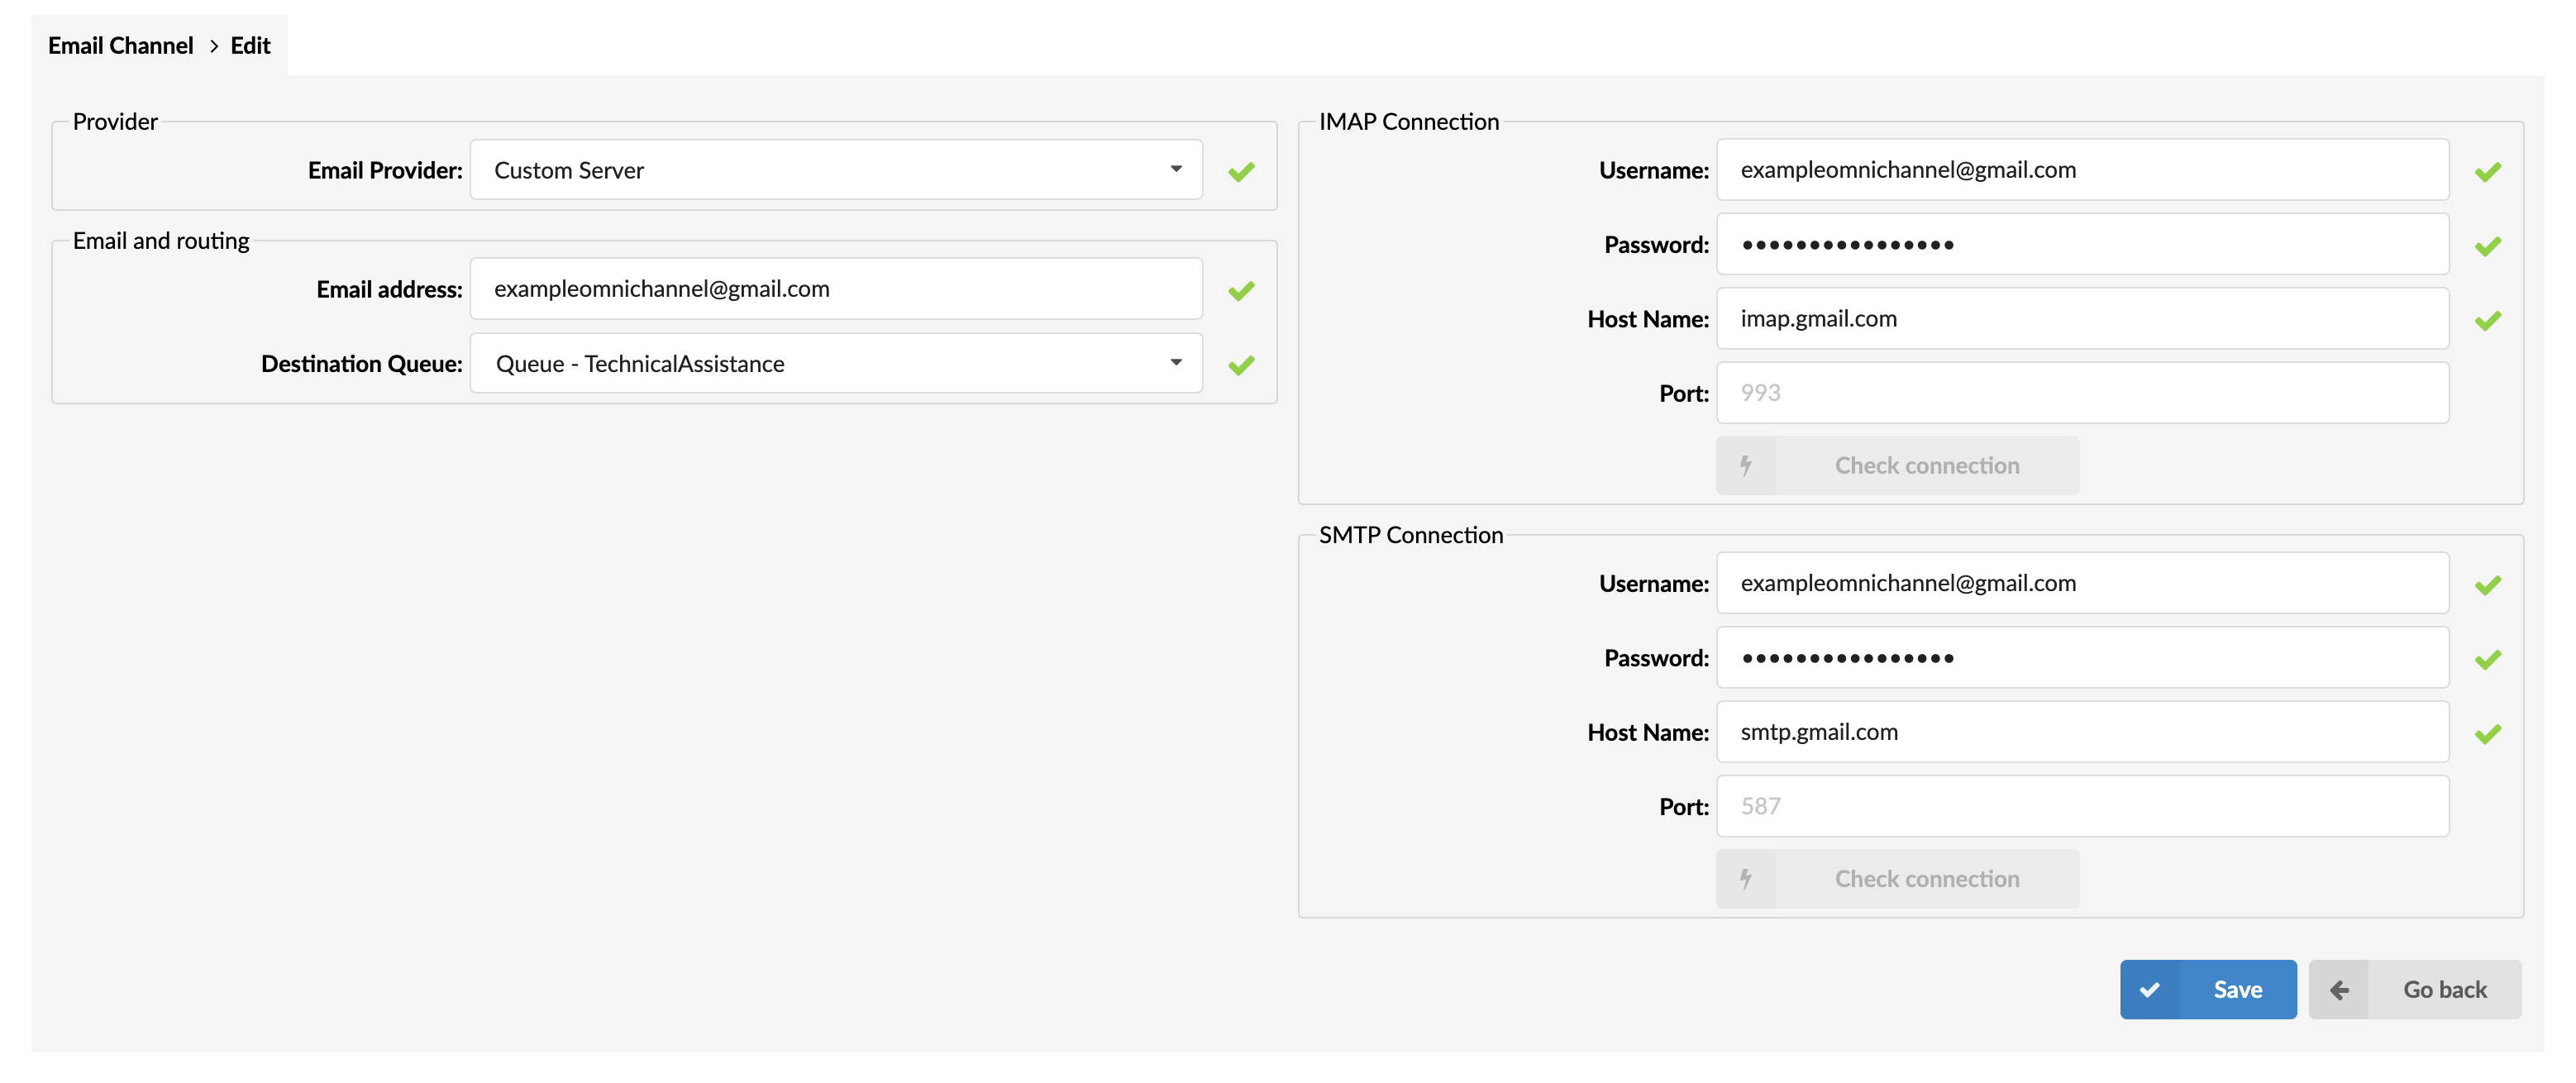
Email address : enter the email address designated for this channel.
IMAP connection :
- Username : provide the username for IMAP.
(for example,exempleomnichannel@gmail.com) - Password : enter the password for IMAP.
- Hostname : specify the hostname of the IMAP server.
(for example,imap.gmail.com) - Port : Set the port of the IMAP server.
(for example,993)
- Username : provide the username for IMAP.
SMTP connection :
- Username : enter the username for SMTP.
(for example,exempleomnichannel@gmail.com) - Password : enter the password for SMTP.
- Hostname : specify the hostname of the SMTP server.
(for example,smtp.gmail.com) - Port : Set the port of the SMTP server.
(for example,587)
- Username : enter the username for SMTP.
- Fill in all the required fields, referring to the example images if necessary.
- In the "Destination Queue" drop-down menu, select the queue to which you want the emails to be directed.
- After configuring the SMTP and IMAP connections, click «Save» and use the «Check connection» buttons to validate whether the IMAP and SMTP connections are working correctly.
Microsoft
By selecting "Microsoft" from the "Email provider" drop-down menu in the messaging channel settings window, the interface adapts to facilitate a streamlined integration with Microsoft services:
- Microsoft SignOn button : This button will become visible. By clicking on it, you start the Microsoft authentication process.
1. Microsoft login window : After clicking the “Microsoft SignOn” button, you will be directed to a Microsoft login page. Enter your Microsoft credentials to continue.
2. Authorization : once connected, a following window will appear, listing the required permissions that PBXware needs to access your Microsoft account. It is crucial to verify and grant these permissions by clicking "Accept" or a similar confirmation button. This step ensures a seamless email integration between PBXware and Microsoft.
3. Automatic field filling : after authentication, the need to manually enter the password details on the PBXware side becomes redundant. The fields related to the email configuration (such as SMTP and IMAP) will be automatically filled in based on your Microsoft account settings.
4. In the "Destination Queue" drop-down menu, choose the queue to which you want the emails to be routed.
Gmail
After selecting «Gmail» in the «Email provider» drop-down menu in the email channel settings window, the interface will adjust to provide easy integration with Gmail services:
- Gmail login button : this button will be displayed prominently. Starting the Gmail authentication process is as simple as clicking on it.
1. Gmail login window : After pressing the “Gmail SignOn” button, you will be redirected to a Gmail login page. Here, enter your Gmail credentials to continue.
2. Authorization : after logging in, a window will appear, outlining the permissions requested by PBXware to access your Gmail account. Carefully review and accept these permissions by pressing the “Allow” button or an equivalent confirmation button. This action ensures a smooth email linkage between PBXware and Gmail.
3. Auto-fill of fields : Once the authentication phase is complete, PBXware will automatically fill in certain fields related to the email configuration, thus eliminating the need for manual password entry.
4. In the "Destination queue" drop-down menu, select the appropriate queue to route the emails.
Facebook channel
The Contact Center Edition enhancement includes integration with Facebook Messenger. This means that companies can communicate directly with their customers on Facebook, leveraging its vast user base for increased engagement.
In today's digital landscape, where consumers are more connected and more autonomous than ever, companies must adopt a comprehensive approach to interact with their audience across multiple channels.
Requirements
Before proceeding with the integration of Facebook into the Omnichannel configuration, make sure that your system meets the following requirements:
Requirements
- PBXware
You must have the PBXware system with Contact Center Edition version 7.2 or higher. This version is required to ensure compatibility with the Facebook integration features.
- Communicator client
Make sure that gloCOM, the unified communications client for the PBXware system, is installed on your system with version 7.2 or higher. gloCOM provides the essential features required for seamless communication between channels.
- License requirements
Make sure that your PBXware system license includes the following components:
- Edition Agent – Ensure that a sufficient number of agent licenses are enabled to handle the expected workload for managing Facebook interactions.
- Edition Supervisor – Enable supervisor licenses to supervise and manage Facebook interactions in the omnichannel configuration.
- Omnichannel – The Omnichannel module must be enabled in your license to support the integration of Facebook as a communication channel.
- COMMSware Messaging Platform (CMP):
A solution designed to act as a proxy between your omnichannel system and the meta-information related to messaging interactions.
Integrating the CMP service into your omnichannel architecture improves the interoperability and versatility of your messaging capabilities. By acting as a dedicated proxy for managing meta-information, the CMP service allows your omnichannel system to focus on core functionalities, such as message processing, routing and orchestration, without having to handle the complex details of messaging.
Facebook integration requirements
- Facebook account
Access to an active Facebook account is essential, as is obtaining or creating a Meta developer account when integrating Facebook into the omnichannel system.
Please note that due to Facebook's policies targeting fake profiles containing false information and images, newly created accounts may be banned. This can affect your ability to integrate Facebook with omnichannel services. We recommend using real information when setting up your Facebook account to avoid any integration issues.
- Meta Enterprise account
Before you can create a Meta application, you need to create a Meta business account in Business Manager. To create a Meta business account, go to the official Business Manager website.
- Meta Developer account
Similarly, access to a Meta developer account is required to manage the technical aspects of integrating Facebook into the omnichannel.
To begin the process of configuring your Meta developer account, go to the Facebook developer website and log in with your active Facebook account credentials.
- Meta App
The Meta App is essential for integration with the Facebook channel. It can be created using your company's developer account, or you (your company) can be added to an existing Meta app. Either way, the integration process cannot be completed without it.
You can view or download a detailed guide on how to integrate Facebook with your PBXware system by following our link. ( bicomsystems.com/wiki/facebook-and-whatsapp-integration-userguide.pdf )
Working logic of the Facebook integration
This diagram illustrates the logical flow of the Facebook integration, describing the path from customer requests (indicated by red lines) to agent responses (indicated by blue lines).

Adding the Facebook channel
Locate the Channels section : To access the Channels section, go to the MESSAGING in the Contact Center module. By clicking on « Channels », you will access a page where you can view a list of the available channels.
Start channel creation : To initiate channel creation, simply click the button “Add a channel” , which will bring up the channel creation dialog box.
Channel options : when the dialog box is open, you will find options to create a channel for live chat, SMS, email, Facebook, or WhatsApp.
- Channel type: To begin the process of creating a Facebook channel, select the channel type Facebook .
- Proceed : Confirm your selection by clicking “OK” to finalize it and proceed with the channel configuration.
Channel configuration
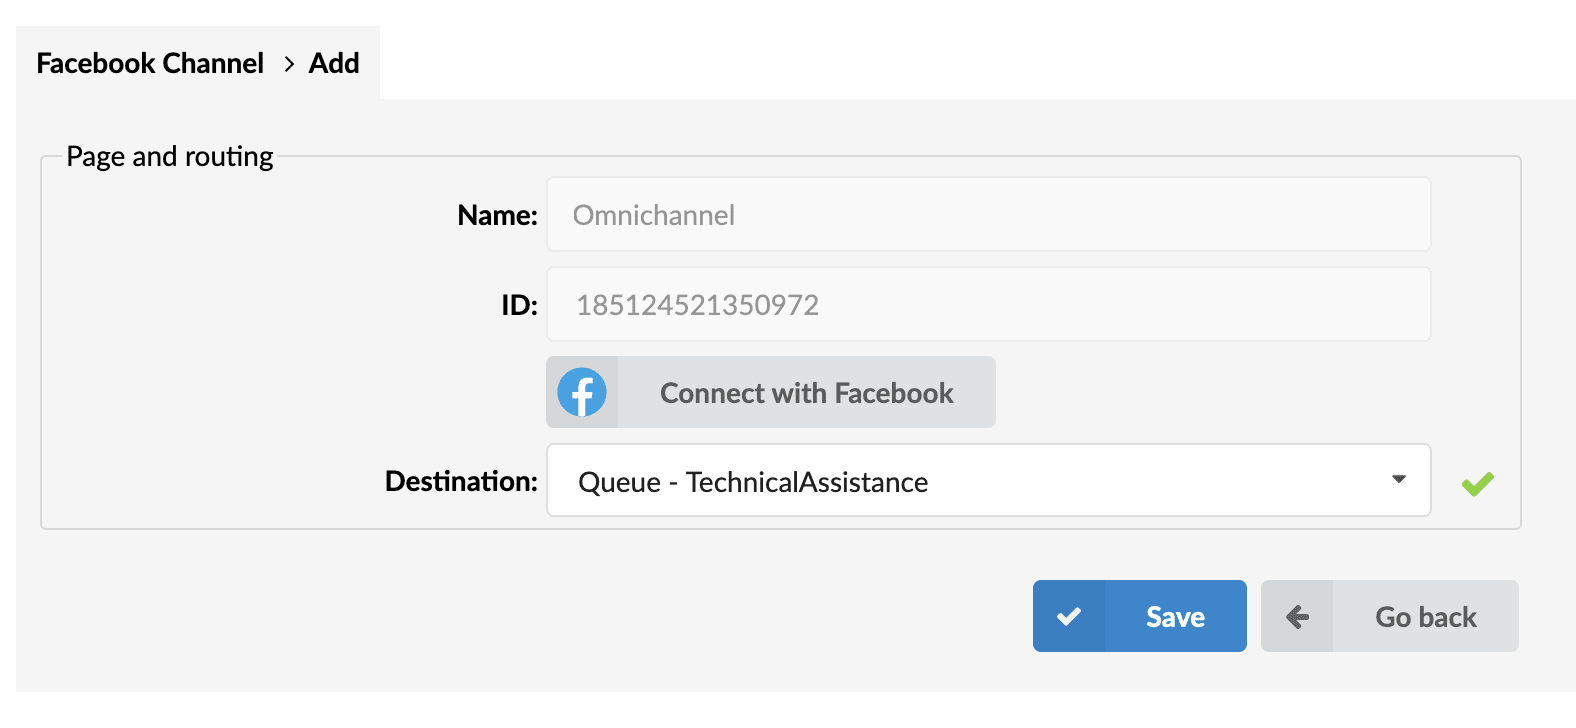
After confirming the creation of your Facebook channel, you will be directed to the following window:
Name and ID : The first two options (Name and ID) cannot be modified; they will be filled in automatically once you connect your Facebook account.
Log in with Facebook : The “Log in with Facebook” button allows you to link your Facebook account to the system, enabling integration of the Facebook channel.
Destination : The field Destination allows you to select a messaging queue to handle requests received through the Facebook channel.
CMP configuration and connection with Facebook
When you click the « Log in with Facebook » button, a new CMP window will appear, prompting you to log in via your Facebook account.
Simply continue by clicking the "Log in with Facebook" button in this window.
There is no need to manually add information such as "Page ID", "Page Name", or "Page Access Token", as these fields will be automatically filled in once you connect to your Facebook account.
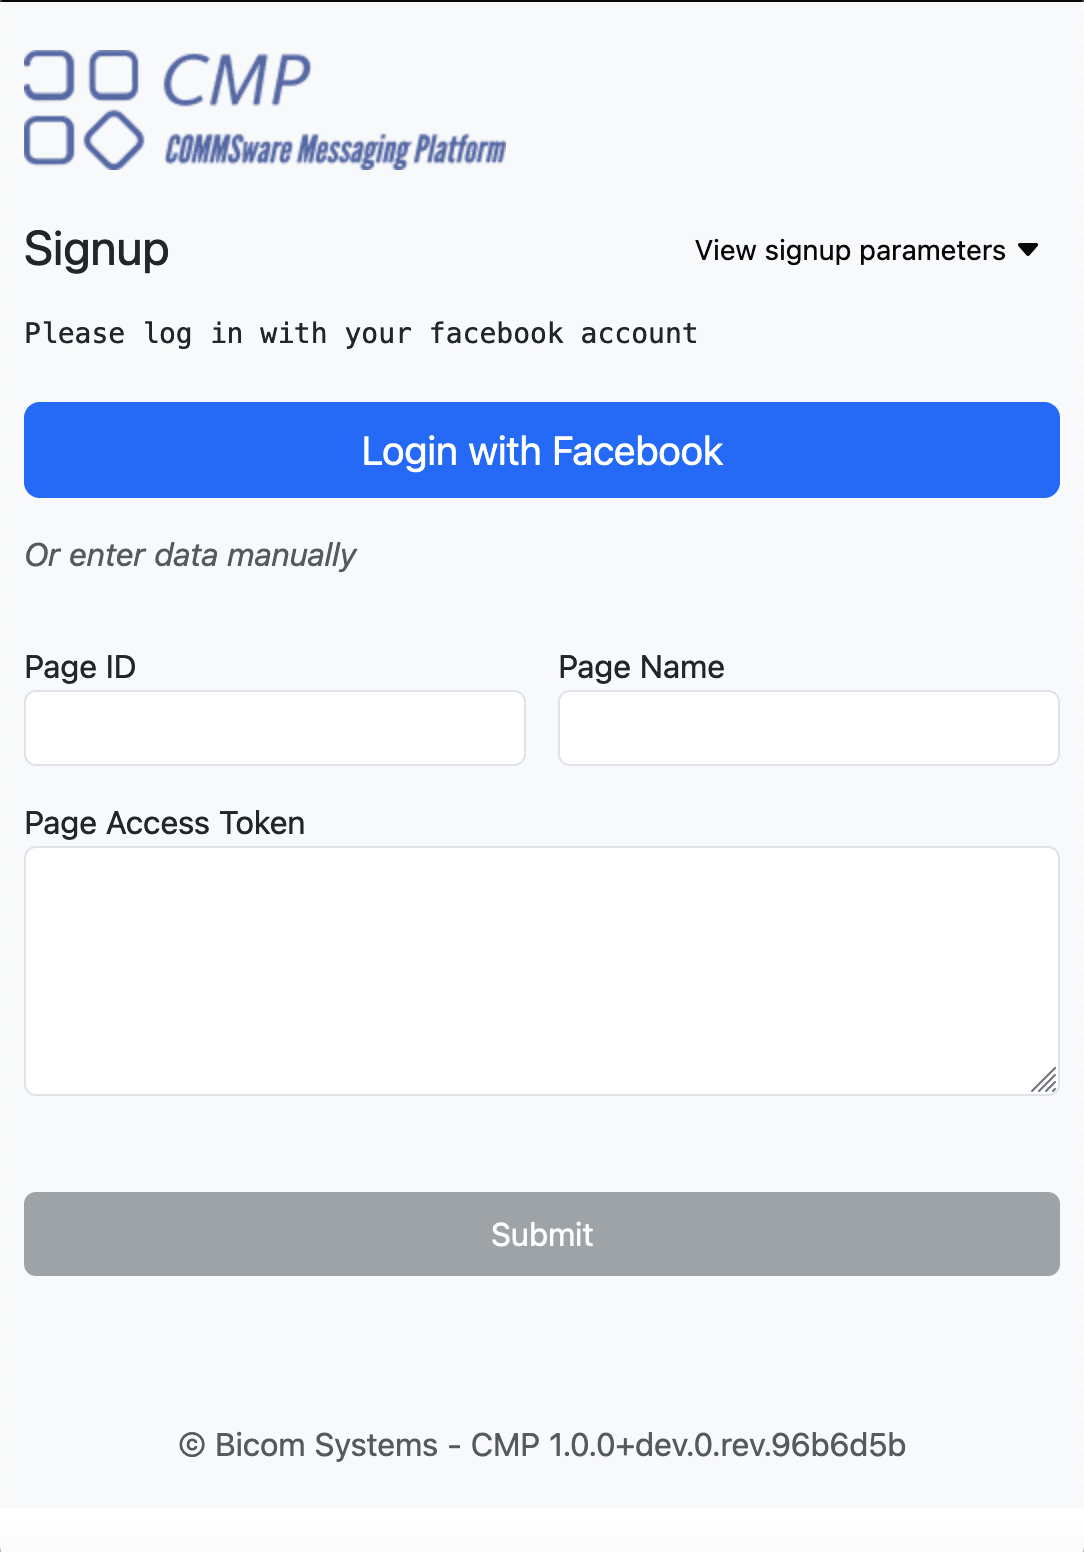
You will encounter a new window in which you will need to log in with your Facebook account.
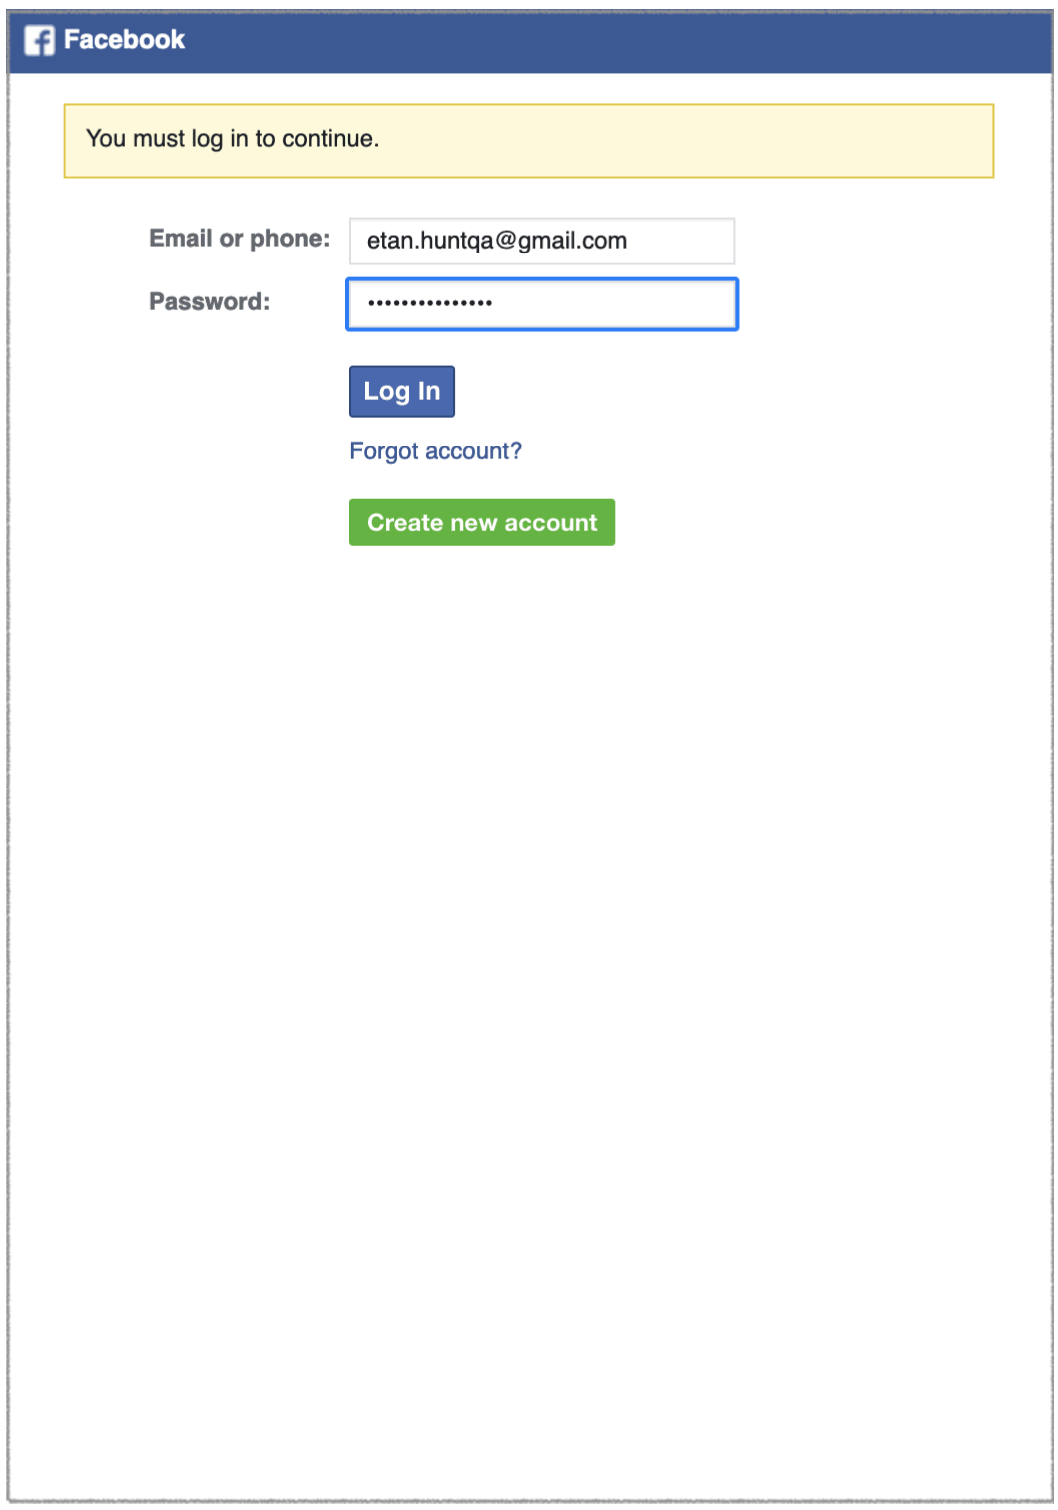
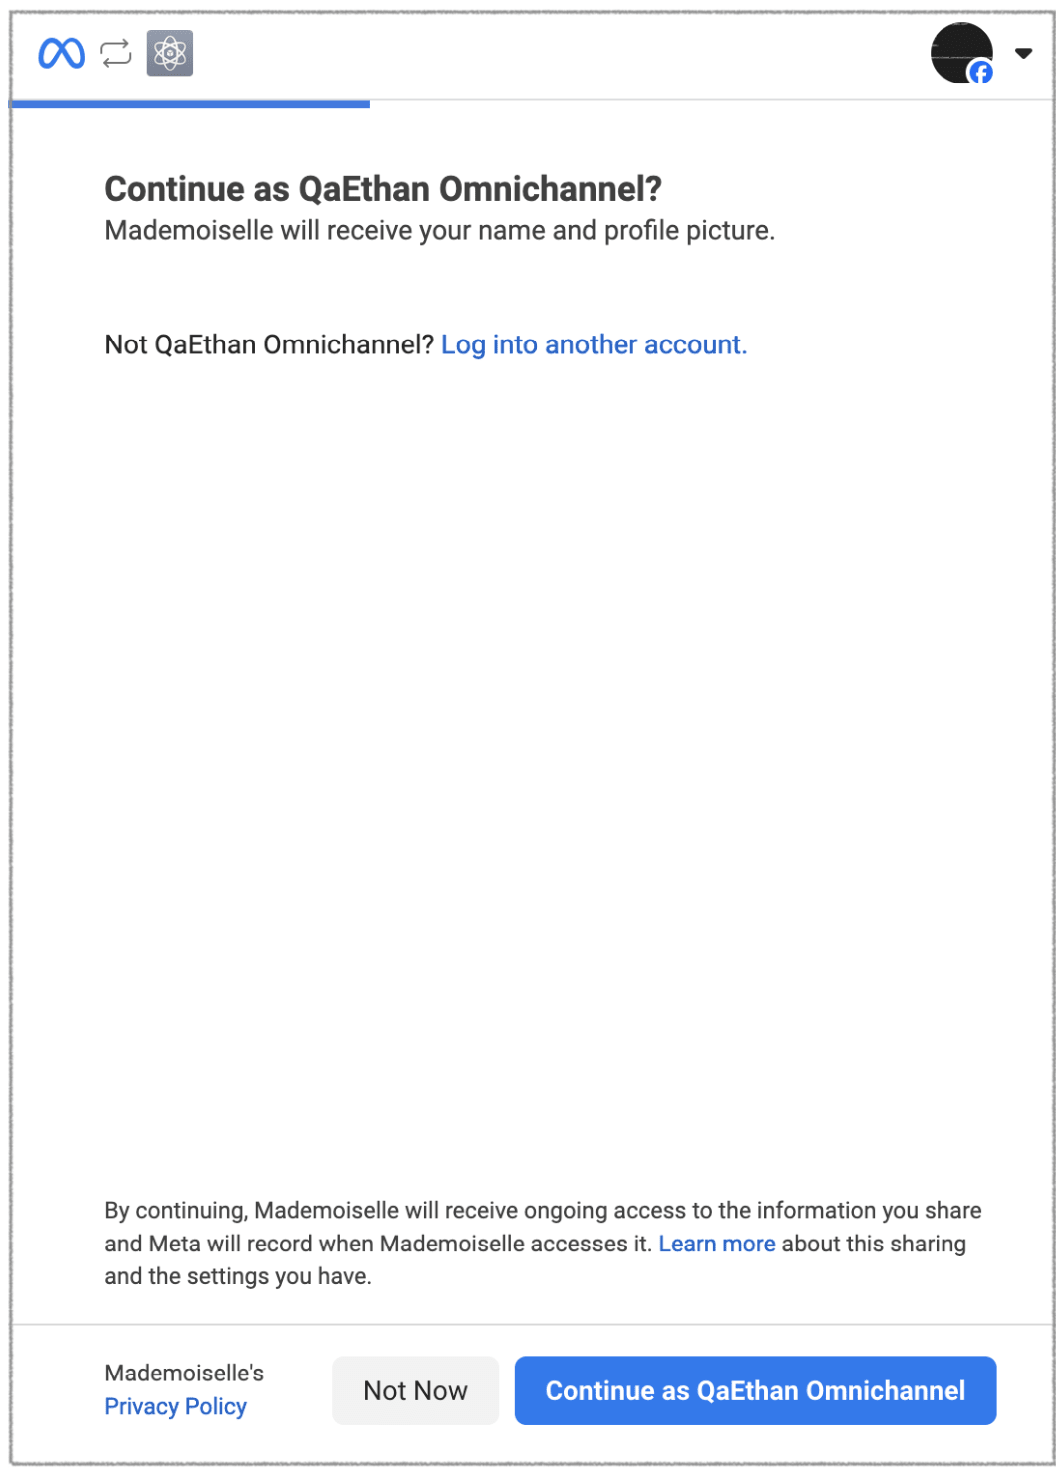
Once logged in, the following window will ask you to link your Facebook account to the Meta project to which you were previously added. Click "Continue" to proceed:
Then, you will be asked to add the page(s) that the Meta project (application) will have access to. Select the relevant pages and click “Continue” to proceed:
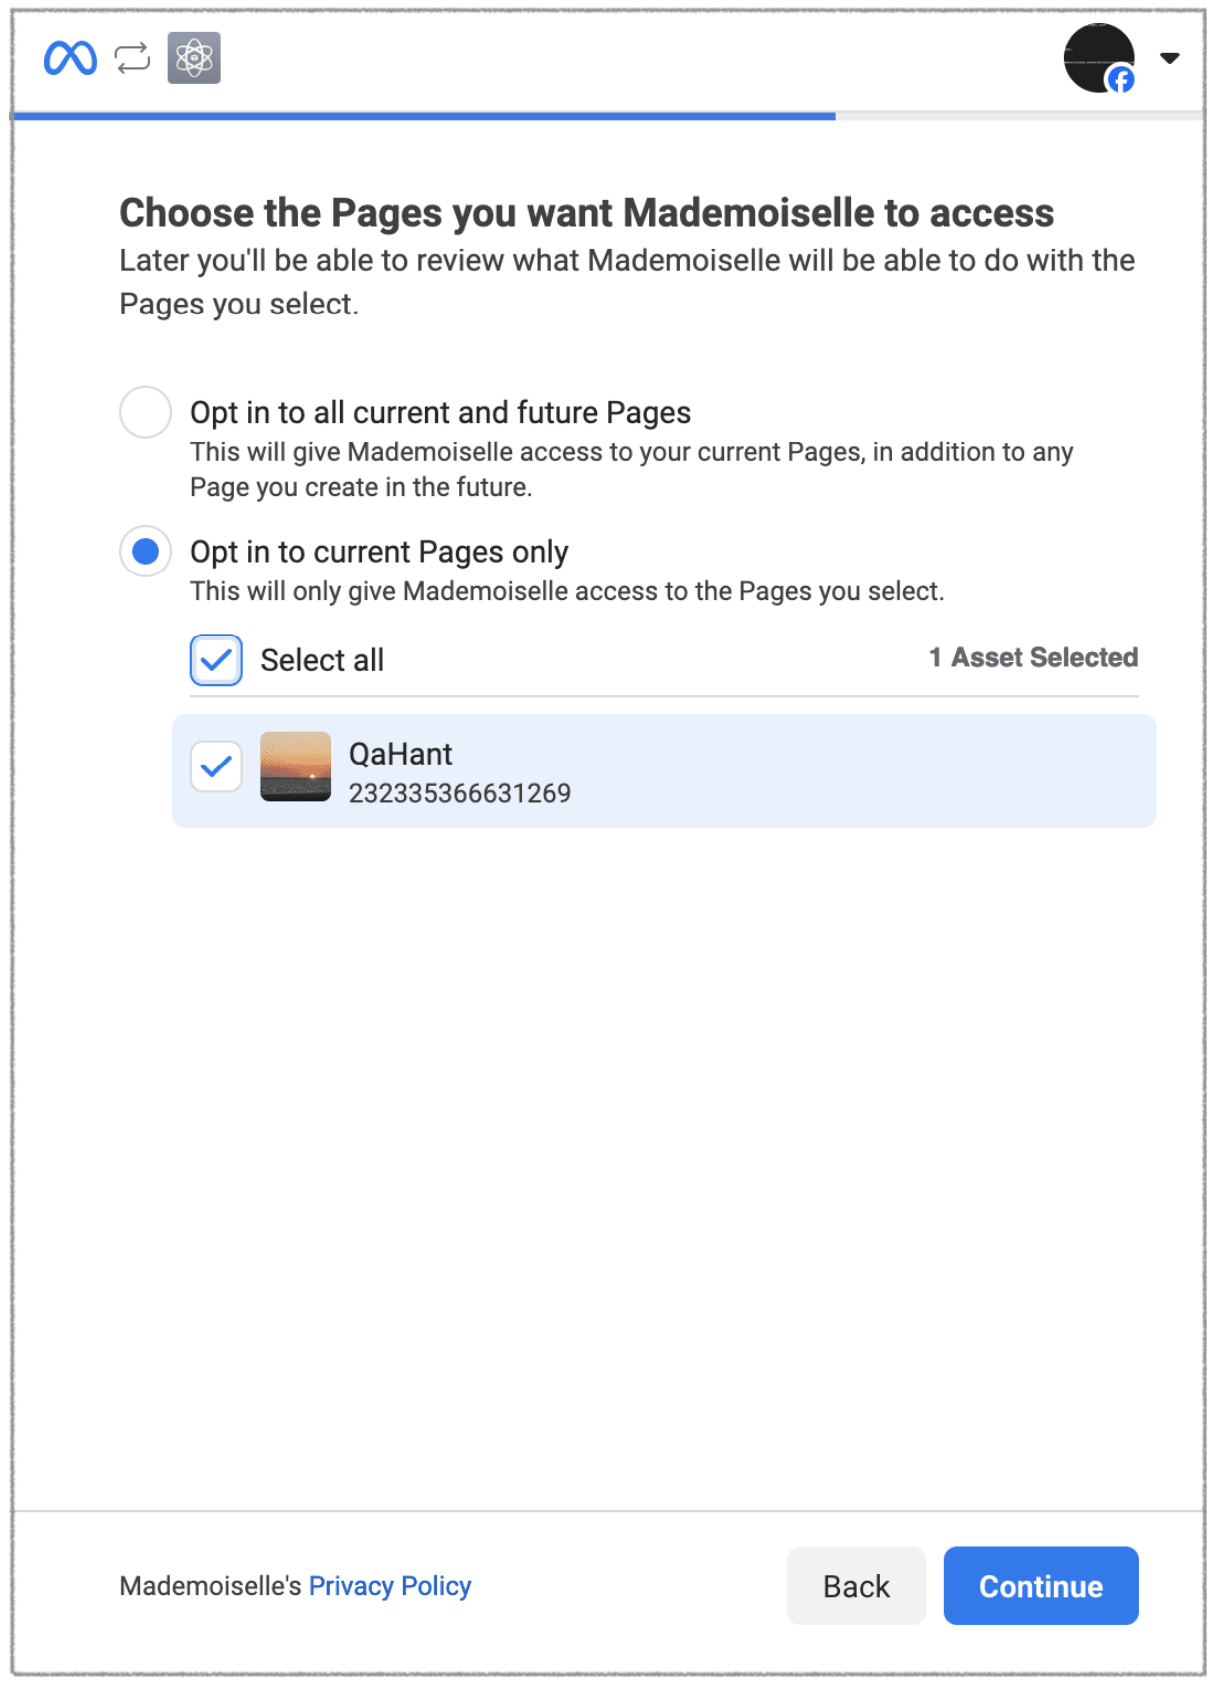
To access meta projects, you will need to either create a meta application using your meta developer account, or be added by an administrator to a previously created meta project. In both cases, having a meta developer account is essential. Please refer to the requirements necessary for integration with Facebook.
After adding the pages, a brief overview of the Meta access will be presented to you. Carefully review the information and make sure it matches your intentions:
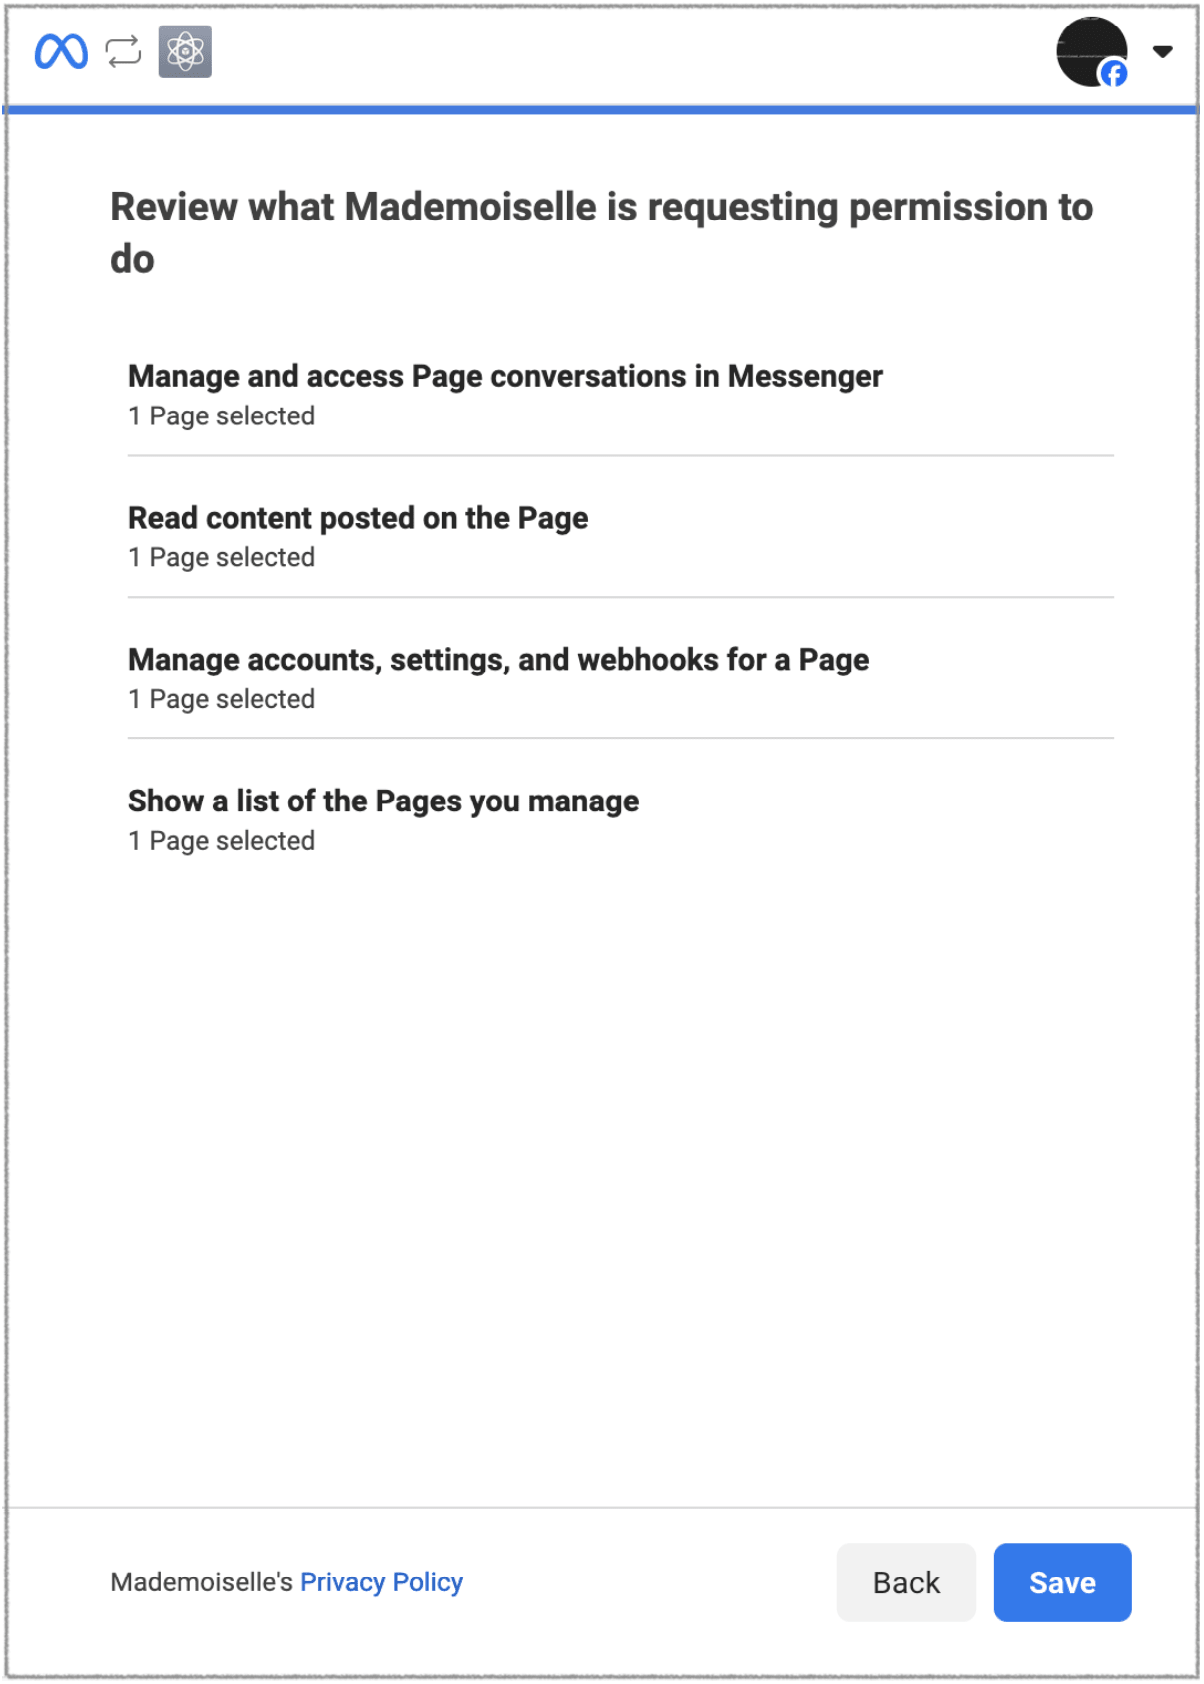
Once you have confirmed the details, save and go to the CMP window to continue the configuration process.
After a successful connection with your Facebook account, the fields in the new window will be automatically populated. At the end of the installation, the CMP window should look like the following image:
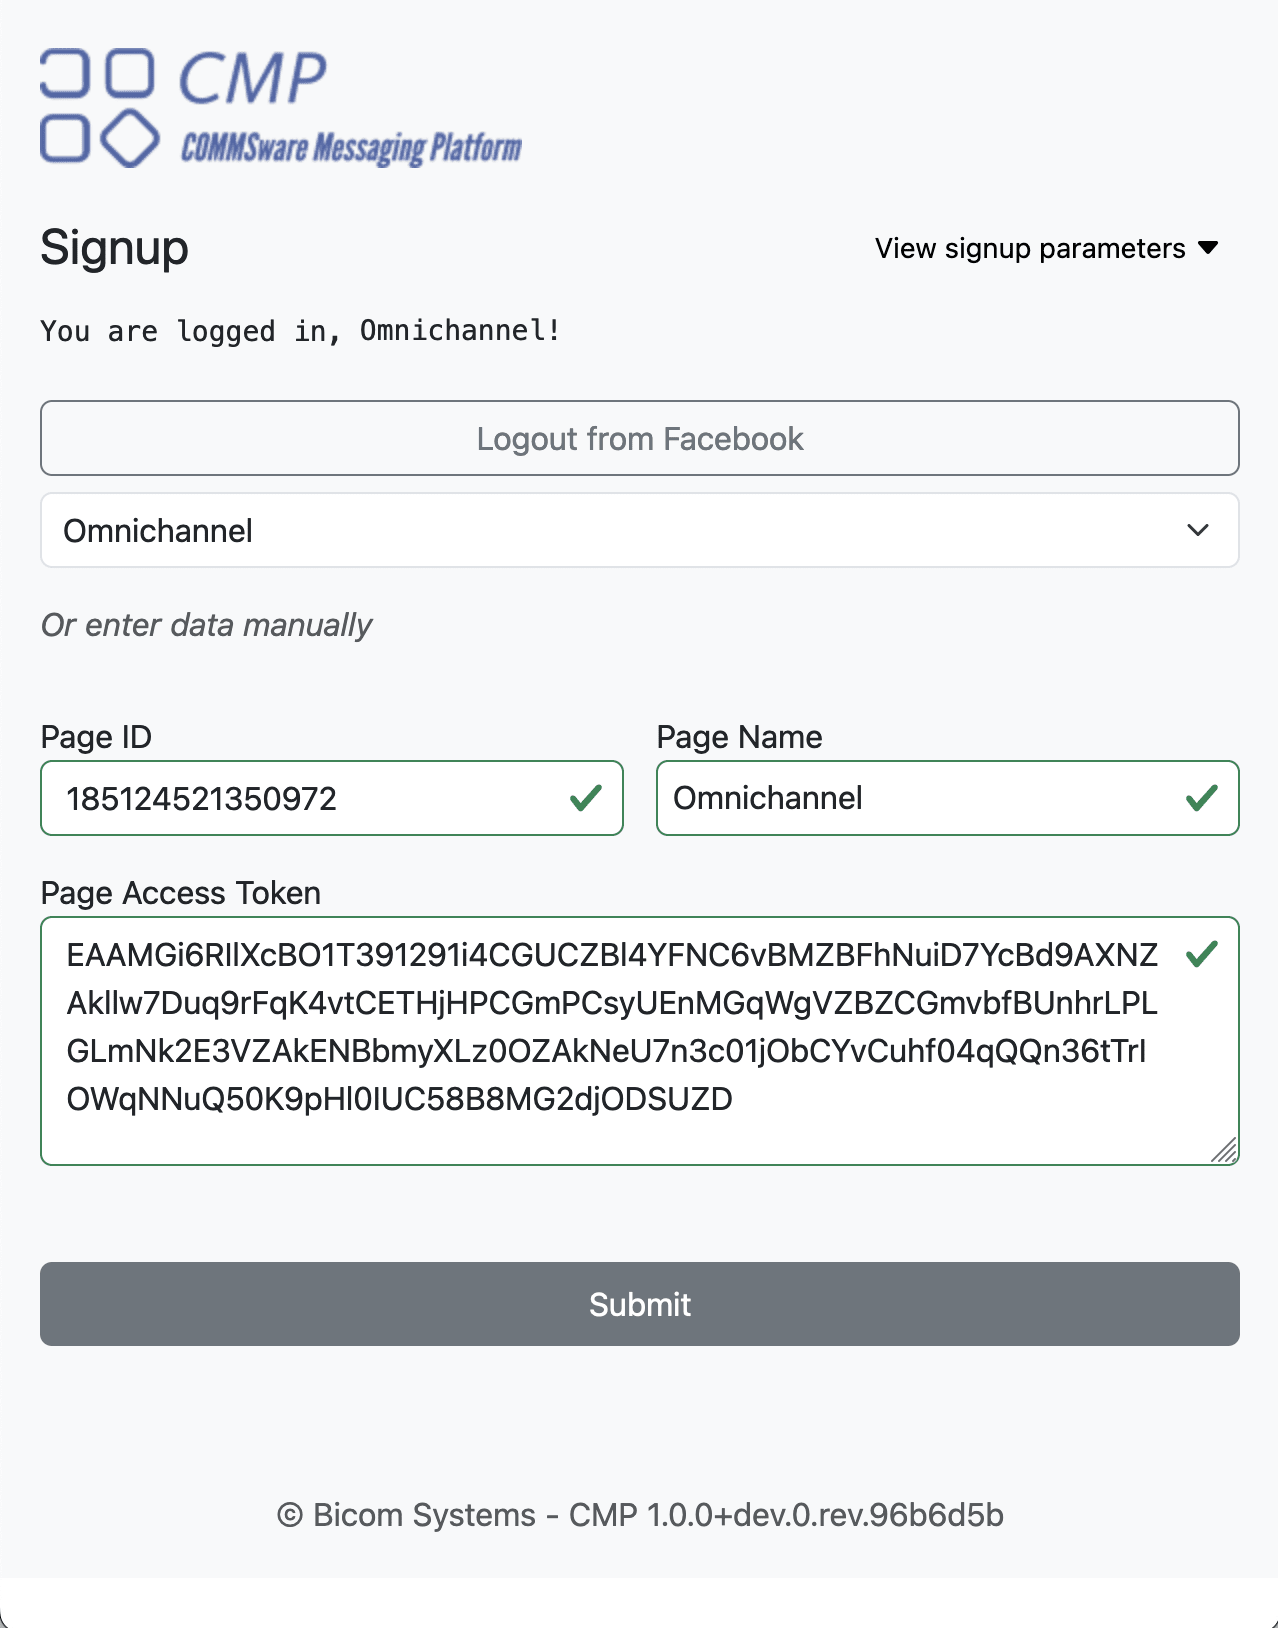
After clicking the «Submit» button, you will be redirected to the PBX GUI. From there, you will need to select the destination queue to integrate the Facebook channel.
The first two fields will be filled in automatically (mandatory).
To confirm the creation of the Facebook channel, click the “Save” button.
Whatsapp channel
With the latest update of Contact Center Edition, users can now integrate WhatsApp. This means that businesses can connect with their customers on WhatsApp, making communication easier and more convenient for everyone.
Requirements
Before proceeding with the integration of Facebook into the Omnichannel configuration, make sure that your system meets the following requirements:
Requirements
- PBXware
You must have the PBXware system with Contact Center Edition version 7.2 or higher. This version is required to ensure compatibility with the Facebook integration features.
- Communicator client
Make sure that gloCOM, the unified communications client for the PBXware system, is installed on your system with version 7.2 or higher. gloCOM provides the essential features required for seamless communication between channels.
- License requirements
Make sure that your PBXware system license includes the following components:
- Edition Agent – Ensure that a sufficient number of agent licenses are enabled to handle the expected workload for managing Facebook interactions.
- Edition Supervisor – Enable supervisor licenses to supervise and manage Facebook interactions in the omnichannel configuration.
- Omnichannel – The Omnichannel module must be enabled in your license to support the integration of Facebook as a communication channel.
- COMMSware Messaging Platform (CMP):
A solution designed to act as a proxy between your omnichannel system and the meta-information related to messaging interactions.
Integrating the CMP service into your omnichannel architecture improves the interoperability and versatility of your messaging capabilities. By acting as a dedicated proxy for managing meta-information, the CMP service allows your omnichannel system to focus on core functionalities, such as message processing, routing and orchestration, without having to handle the complex details of messaging.
WhatsApp integration requirements
To successfully integrate WhatsApp into your omnichannel strategy, you will need to make sure you have the following prerequisites:
- Phone number
To be eligible for registration, business phone numbers must meet the following criteria:
• Belonging to you
• Have a country and area code (short codes are not supported)
• Able to receive voice calls or SMS (you will receive an SMS message or a call to verify the registration of the number.)
- Facebook account with a Business Manager
An active Facebook account with a business manager is essential for WhatsApp integration.
By meeting the access requirements for your Facebook page and Facebook business, you will be well equipped to integrate WhatsApp into omnichannel and improve customer engagement across all channels.
- 360Dialog WhatsApp partner account
Creating a WhatsApp partner account involves communication with a third party, such as 360Dialog, which will provide all the necessary information. They will guide you throughout the process, including the requirements, documentation and specific steps needed to create your WABA.
You can view or download a detailed guide on how to integrate WhatsApp with your PBXware system by following our link. ( bicomsystems.com/wiki/facebook-and-whatsapp-integration-userguide.pdf )
Adding the Whatsapp channel
Locate the Channels section : To access the Channels section, go to the MESSAGING in the Contact Center module. By clicking on « Channels », you will access a page where you can view a list of the available channels.
Start channel creation : To initiate channel creation, simply click the button “Add a channel” , which will bring up the channel creation dialog box.
Channel options : when the dialog box is open, you will find options to create a channel for live chat, SMS, email, Facebook, or WhatsApp.
- Channel type: To begin the process of creating a Facebook channel, select the channel type Whatsapp.
- Proceed : Confirm your selection by clicking “OK” to finalize it and proceed with the channel configuration.
Number: The first "Number" option cannot be modified, as it will be filled in automatically once you connect your WhatsApp account.
Log in with WhatsApp: The "Log in with WhatsApp" button allows you to link your WhatsApp account to the system, enabling WhatsApp channel integration.
Destination: The Destination field lets you select a messaging queue to handle requests received via the WhatsApp channel.
When you click the « Log in with WhatsApp » button, a new CMP window will appear, prompting you to log in via your WhatsApp account.
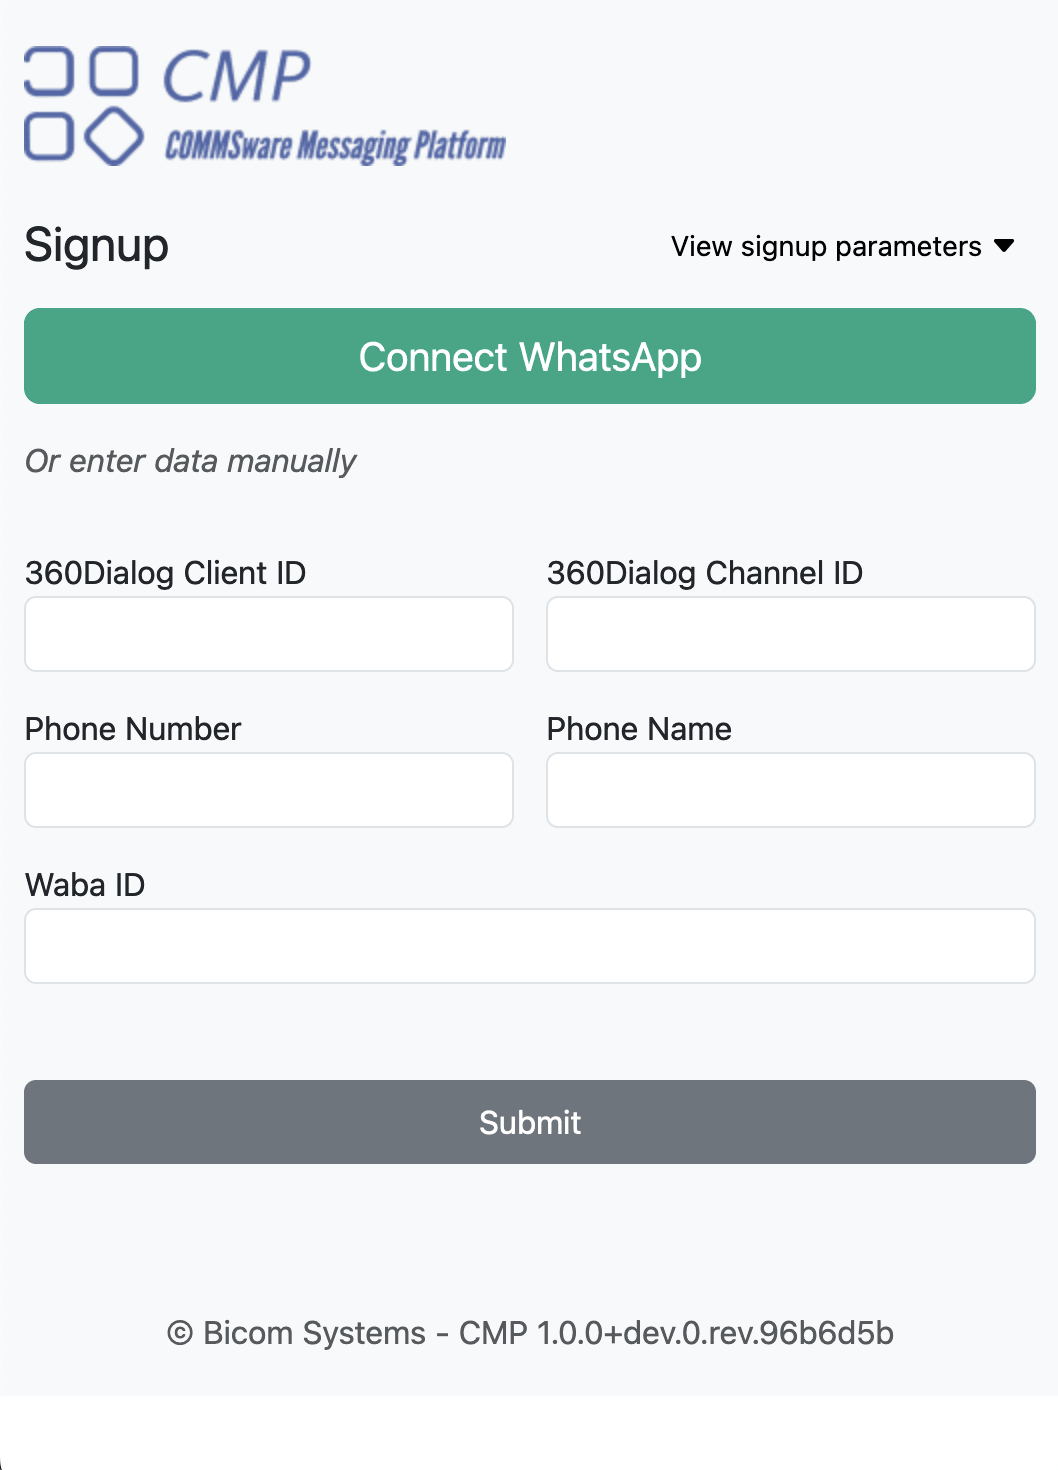
There is no need to manually add information such as "360Dialog Client ID", "360Dialog Channel ID", "Phone Number", etc., as these fields will be automatically filled in once you connect to your WhatsApp account.
Continue by clicking the "Log in with WhatsApp" button. You will then be redirected to the 360Dialog page, where you will need to create your account or log in if you already have a 360Dialog account.
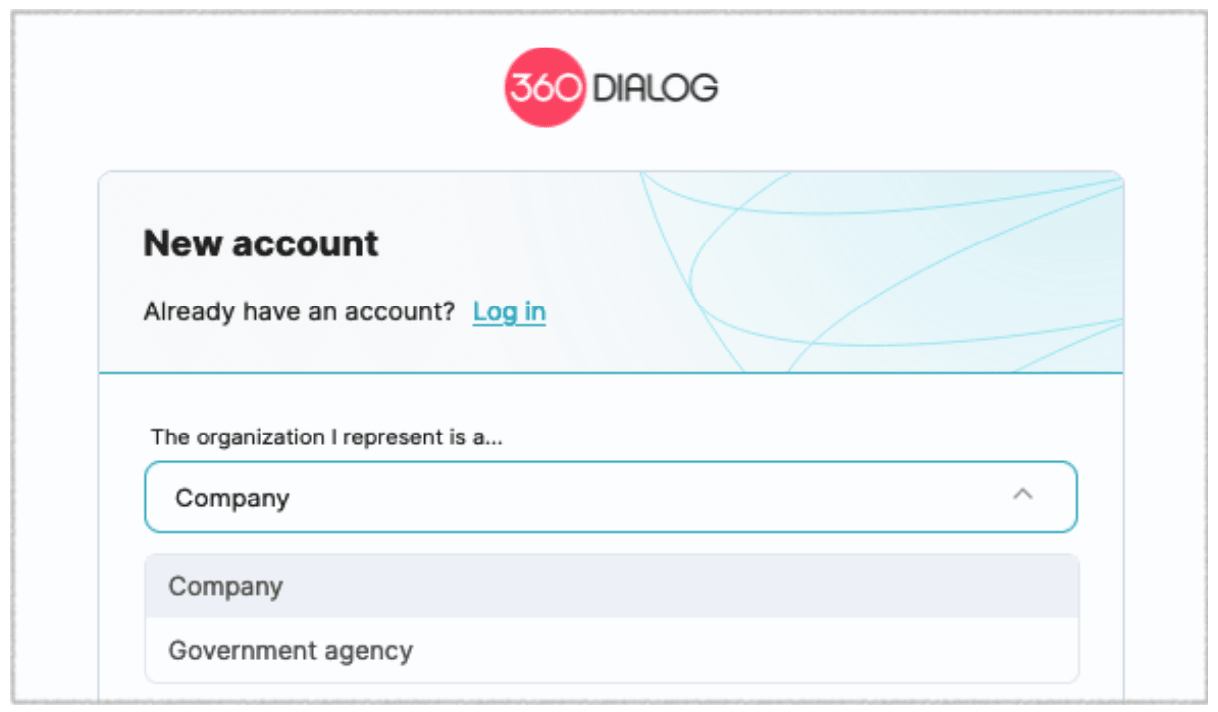
You can start by indicating whether your organization is classified as a business or a government entity.
Enter your company name and choose your country from the options provided. Add your company email address and provide a secure password for your account. This will serve as your login credentials to access the 360 Dialog platform.
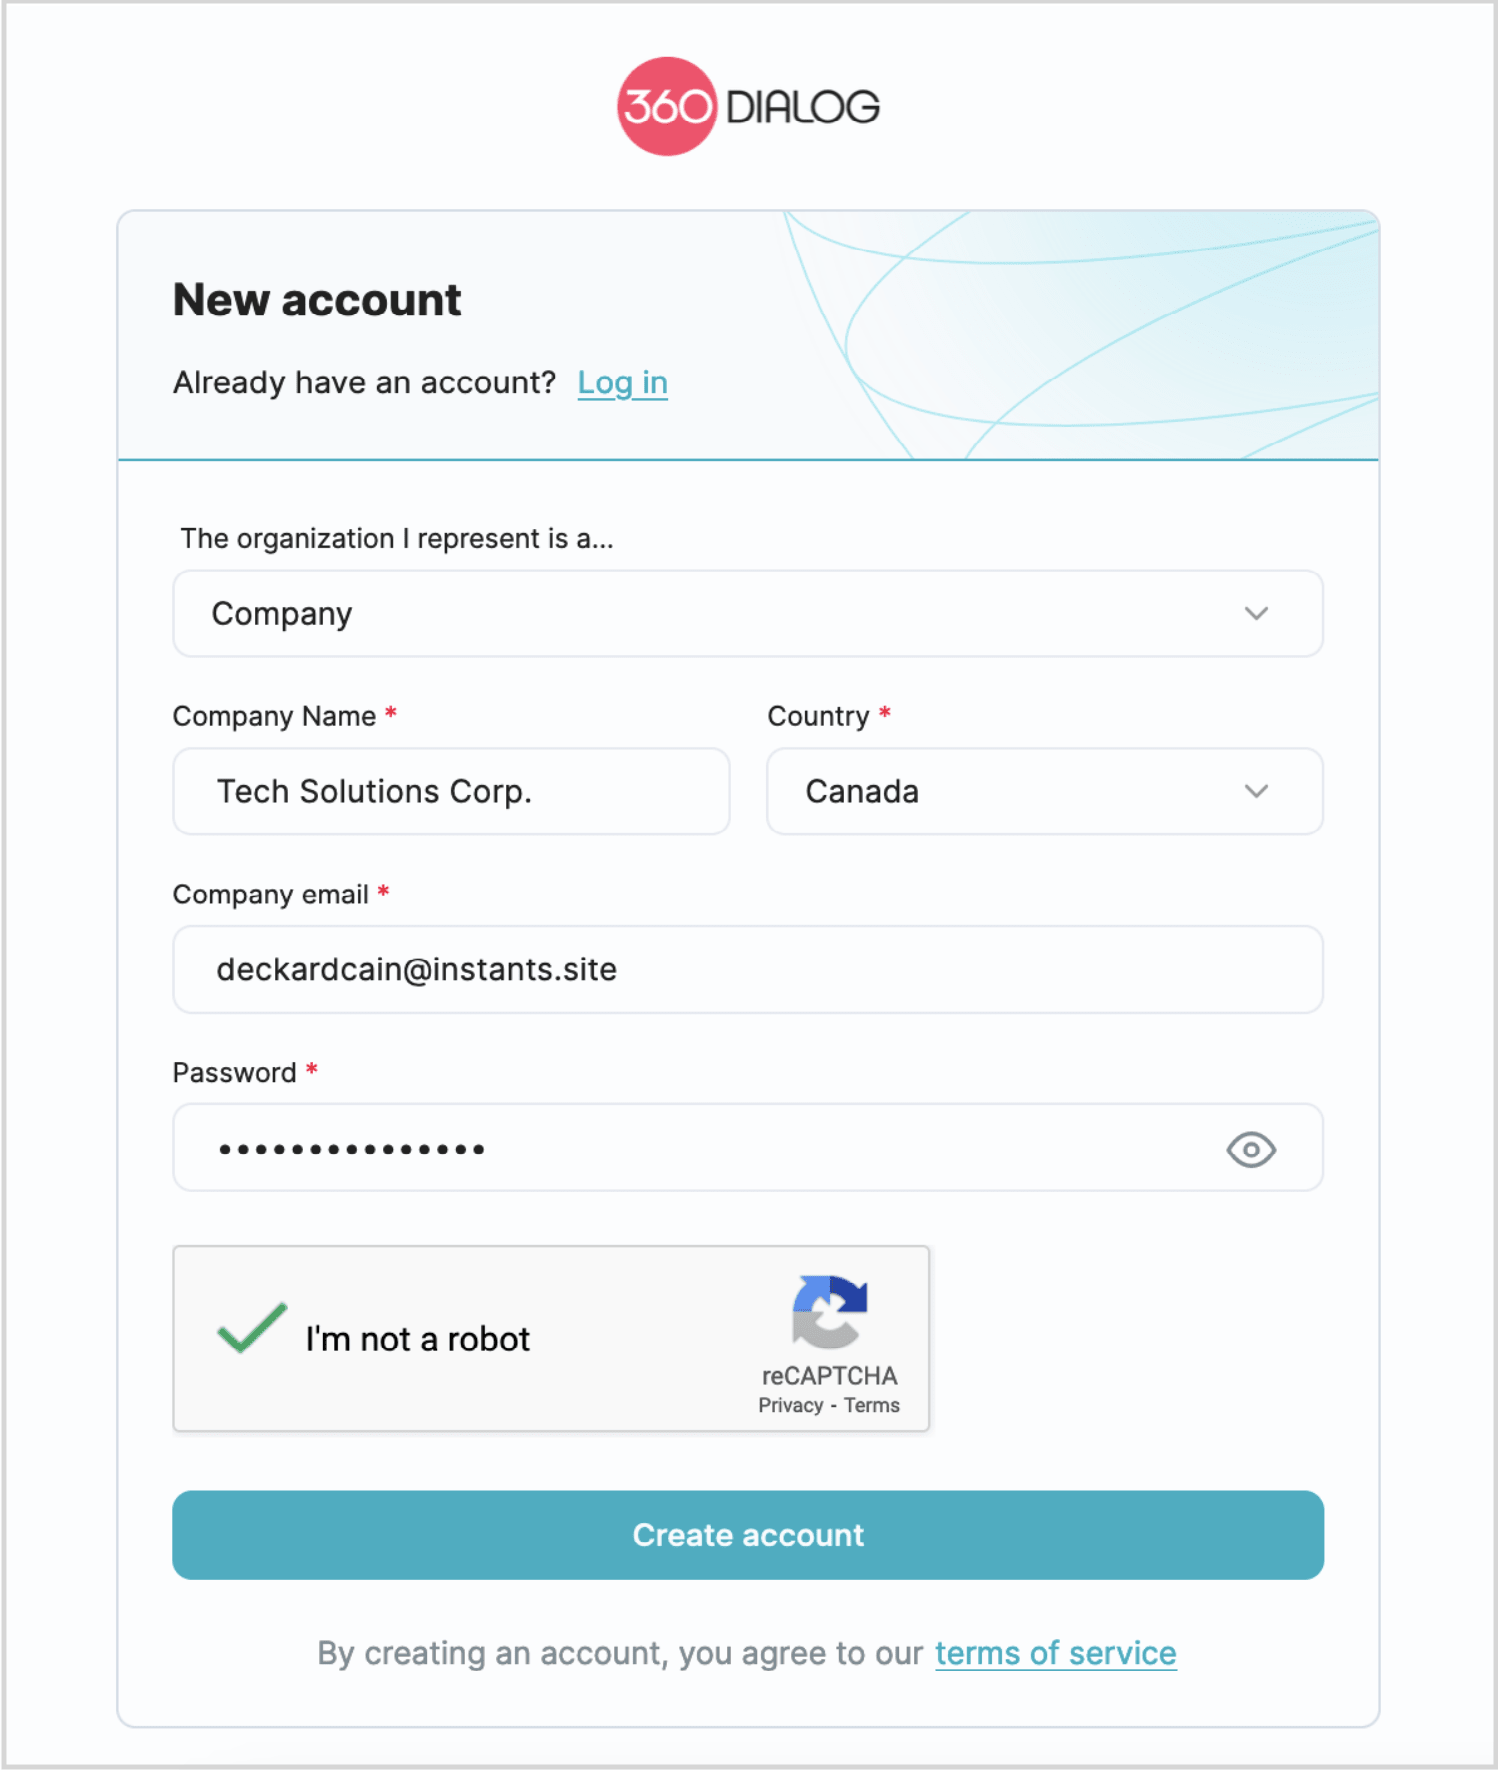
Before proceeding, take a moment to read the terms of use. It is essential to understand the terms and conditions governing the use of the 360 Dialog platform. After reviewing the terms of use, click the option to create your account.
Due to Meta's policies regarding the creation of government agency accounts, we will not cover this use case since government agency companies must obtain approval before creating WhatsApp Business accounts.
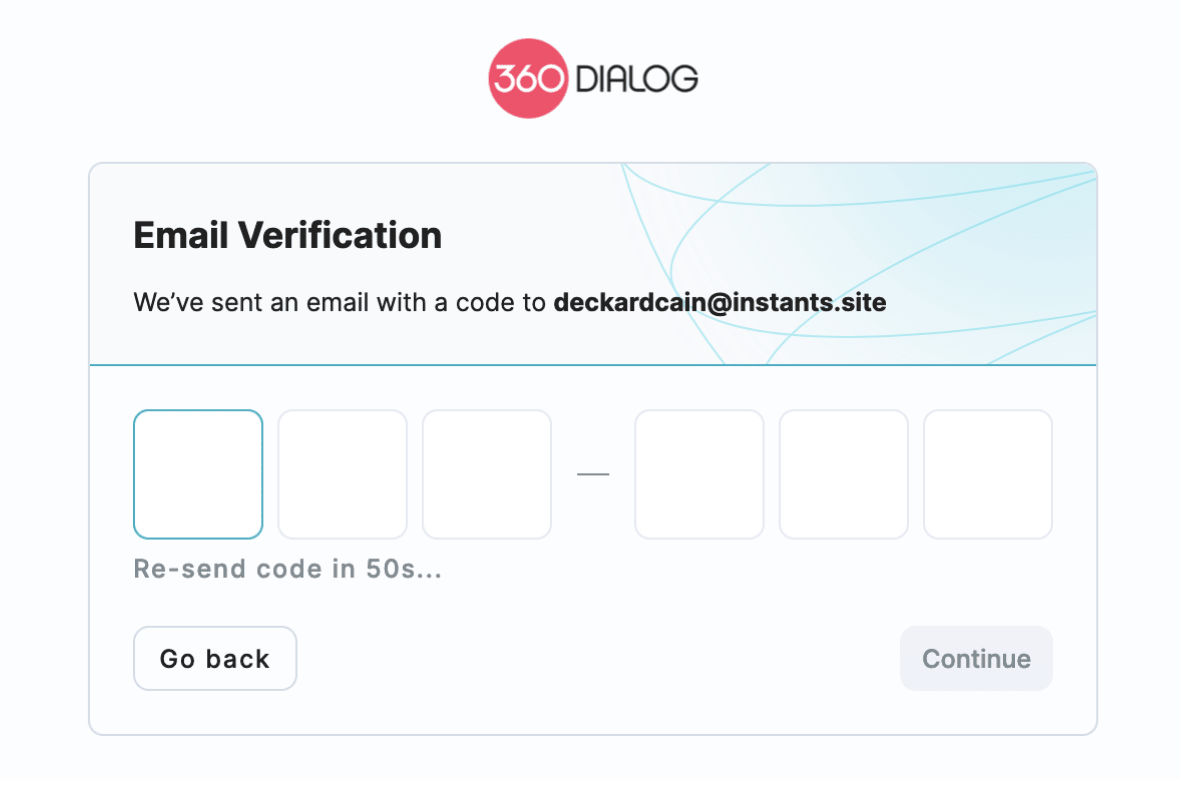
In the next window, you will be asked to verify your email via a one-time password.
Completing the account creation process will send a verification code to your email address. Check your email for the code, enter it in the field provided and, when you are ready, click the "Continue" button.
Once you have successfully submitted your code and your email address is verified, you can start the WhatsApp registration process in the following window. 
On the window shown, you will need to confirm the status of your phone number.
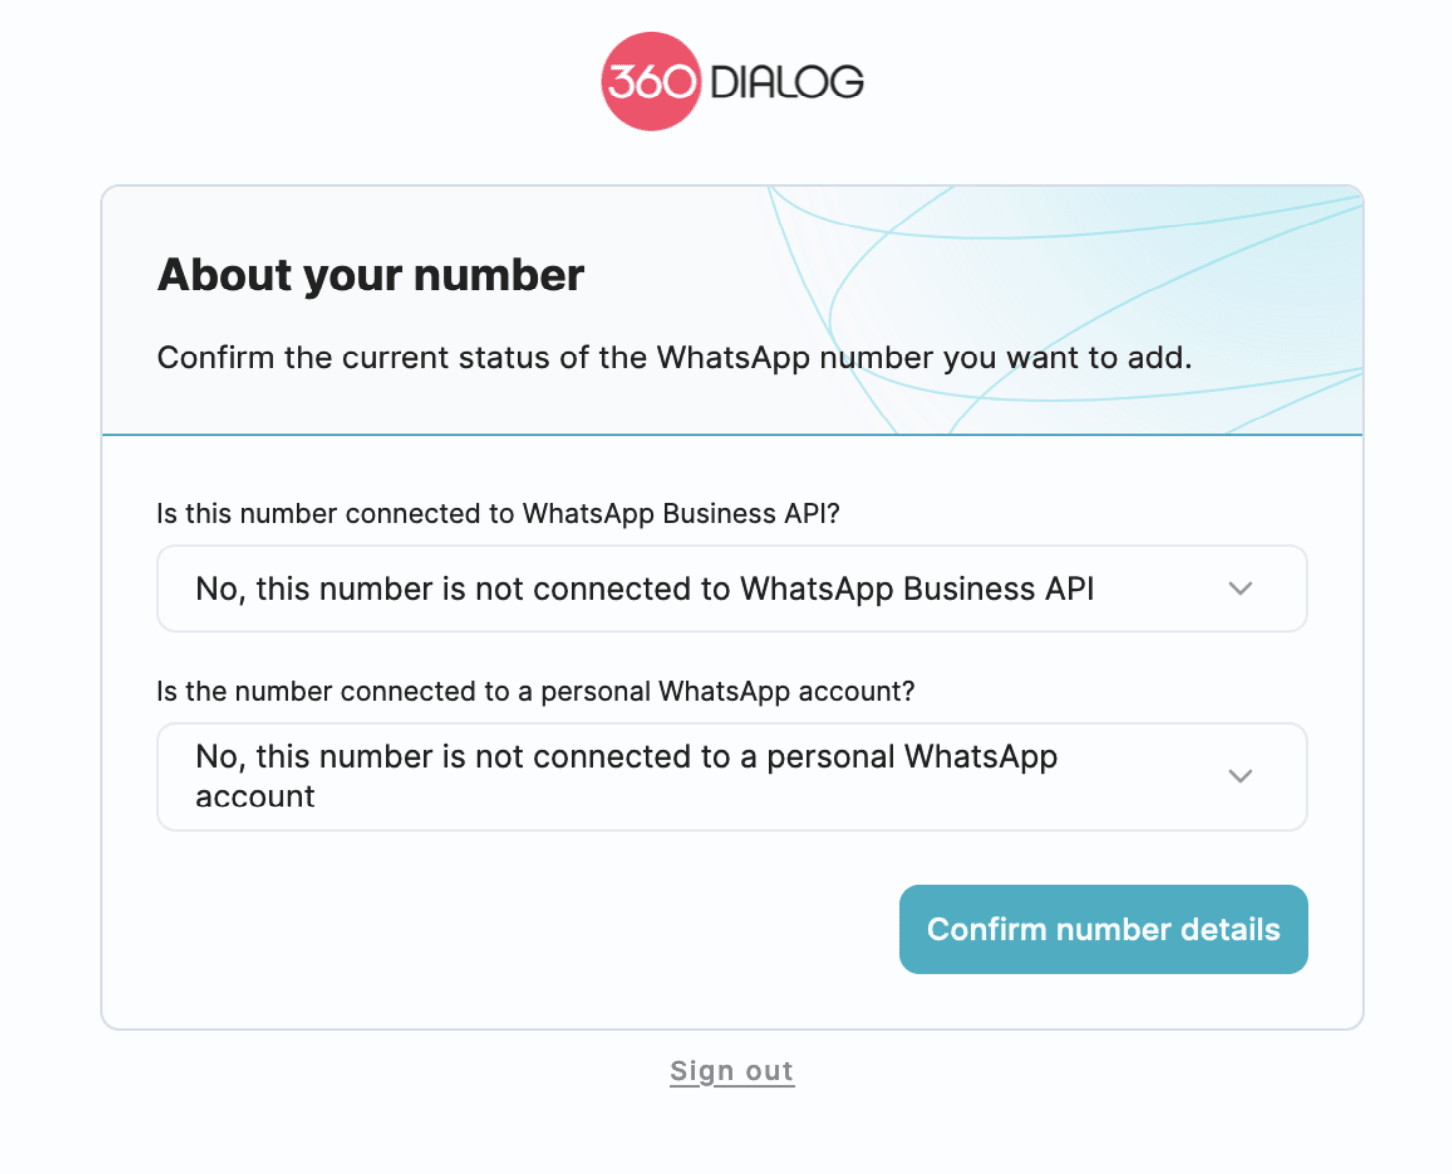
Indicate whether your number is connected to the WhatsApp Business API or whether it is associated with a personal WhatsApp account.
Click the Confirm number details button to continue the onboarding process. This action will confirm the status of your phone number and allow you to continue the configuration.
As we go, we will now launch the built-in sign-up process. This involves accessing your Meta account, selecting or creating a new WhatsApp Business account and assigning a phone number to your account.
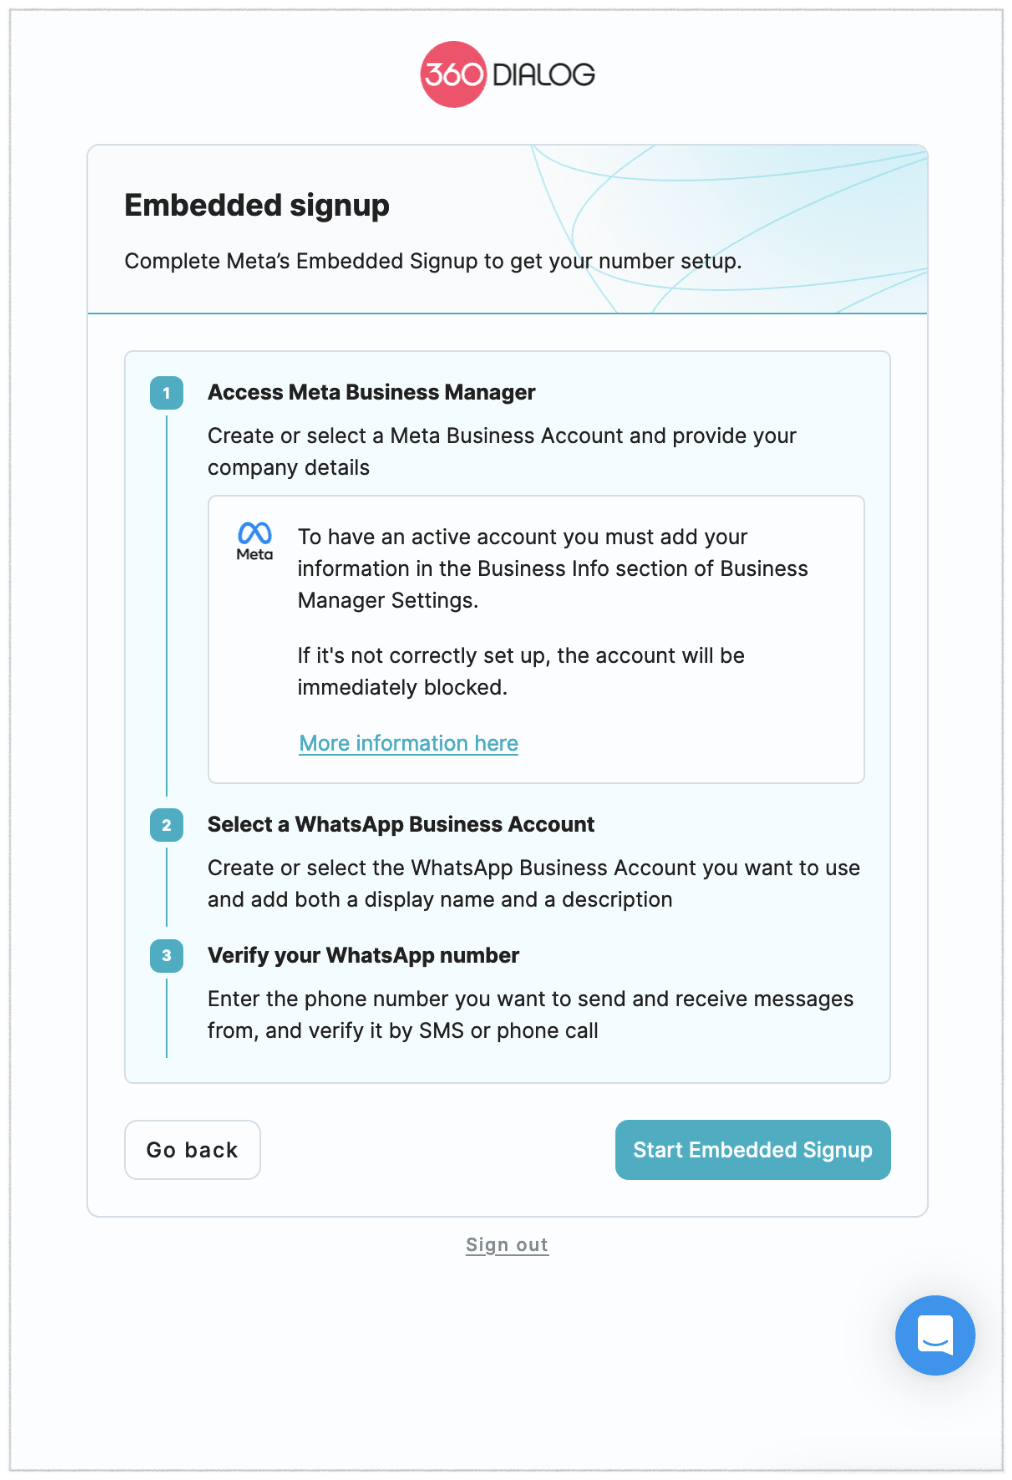
Continue by clicking the Start embedded signup button. You will then be asked to log in with Facebook, or if you are already logged in, simply continue as the Facebook user.
Now, you must connect your account to 360Dialog, where you will provide your company information to configure your WhatsApp business profile.
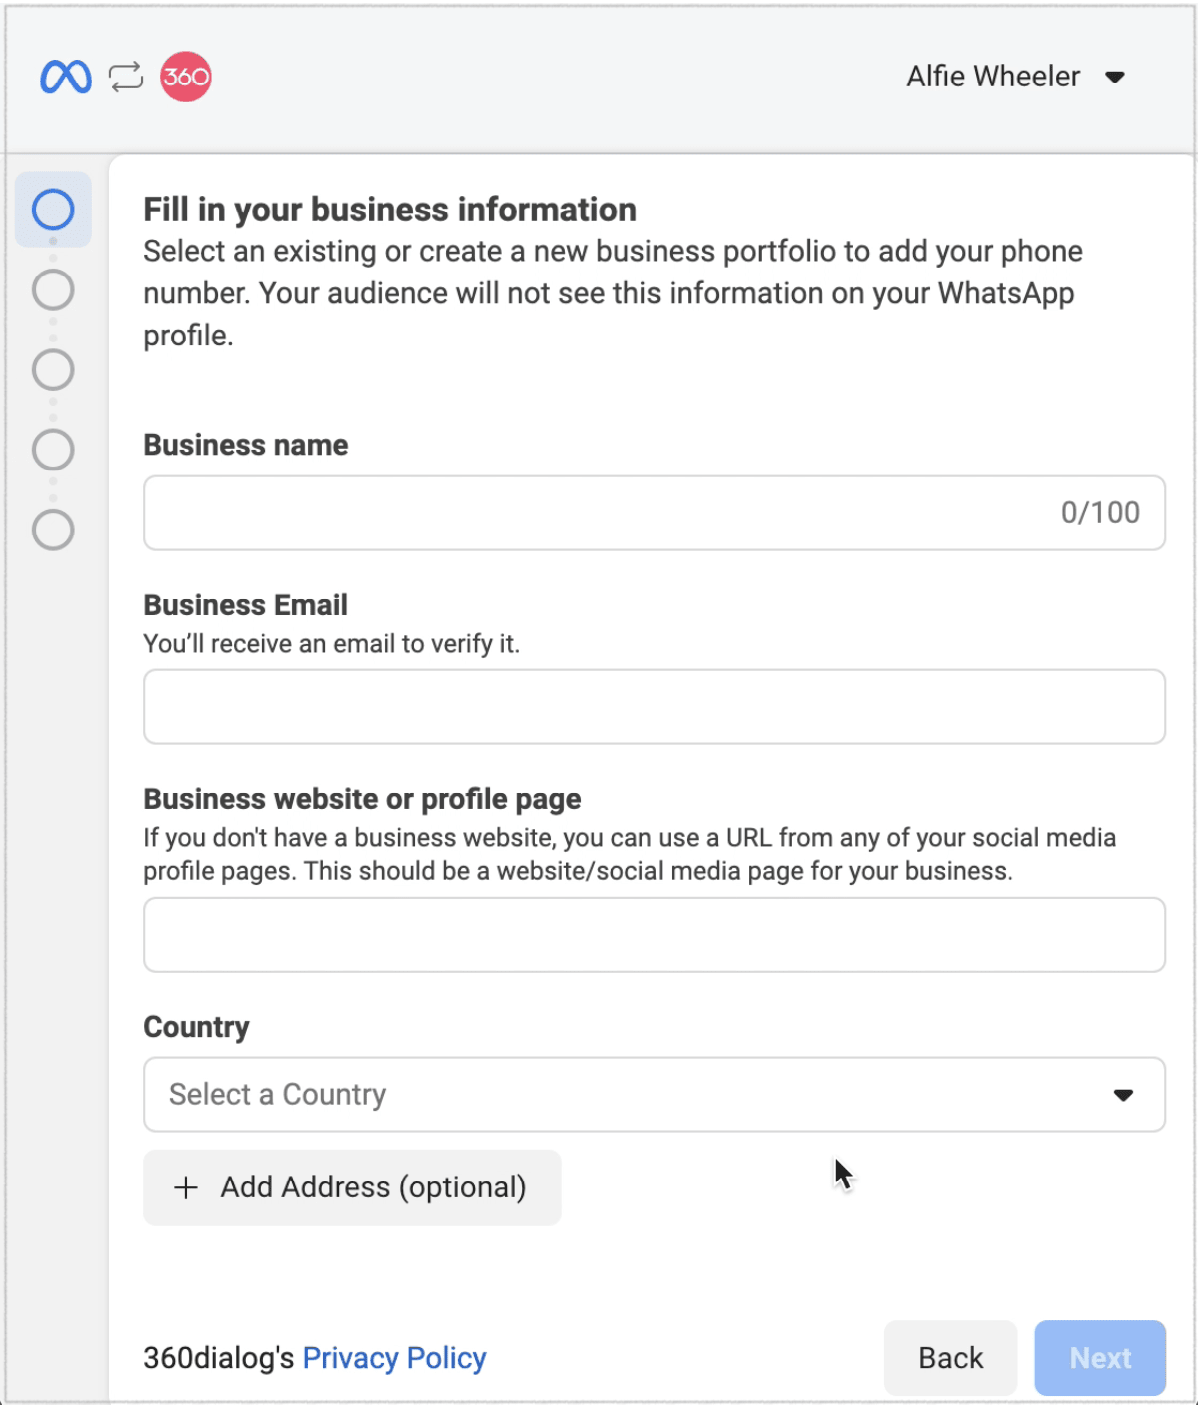
You can add here your company name, your business email address and your company’s public website. Please make sure the website is publicly accessible.
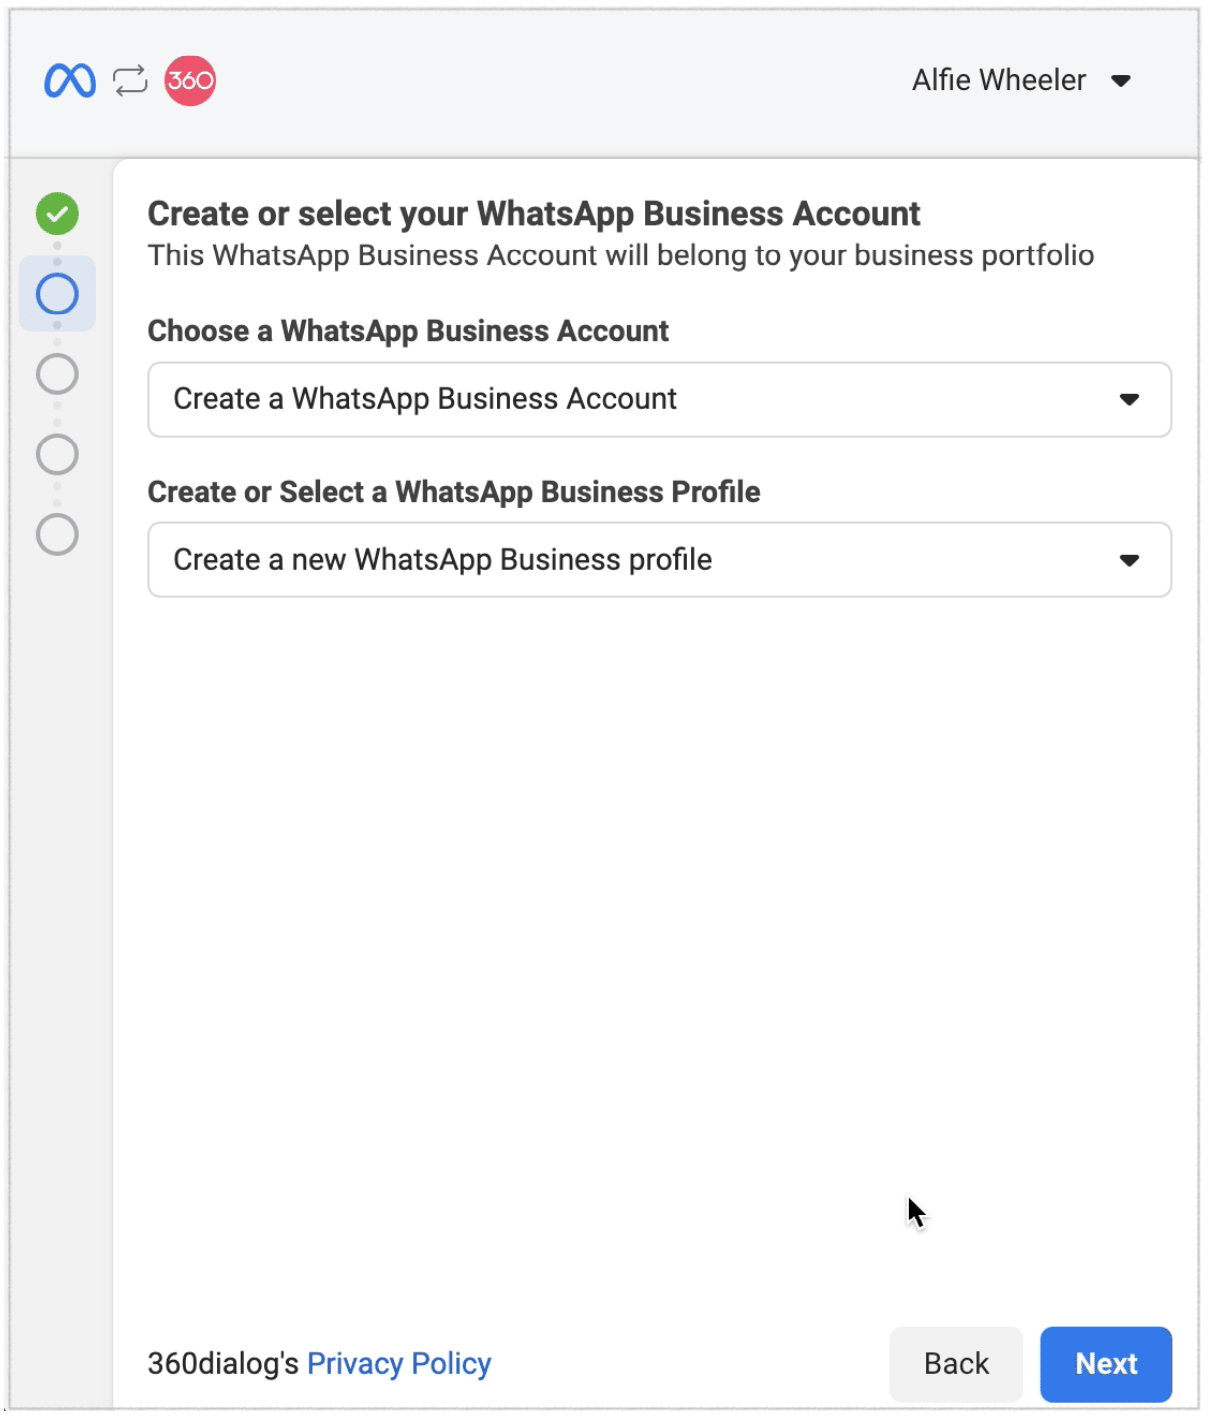
In the next window, you will be prompted to create a new business account or select an existing one. To continue the setup, click the Next button.
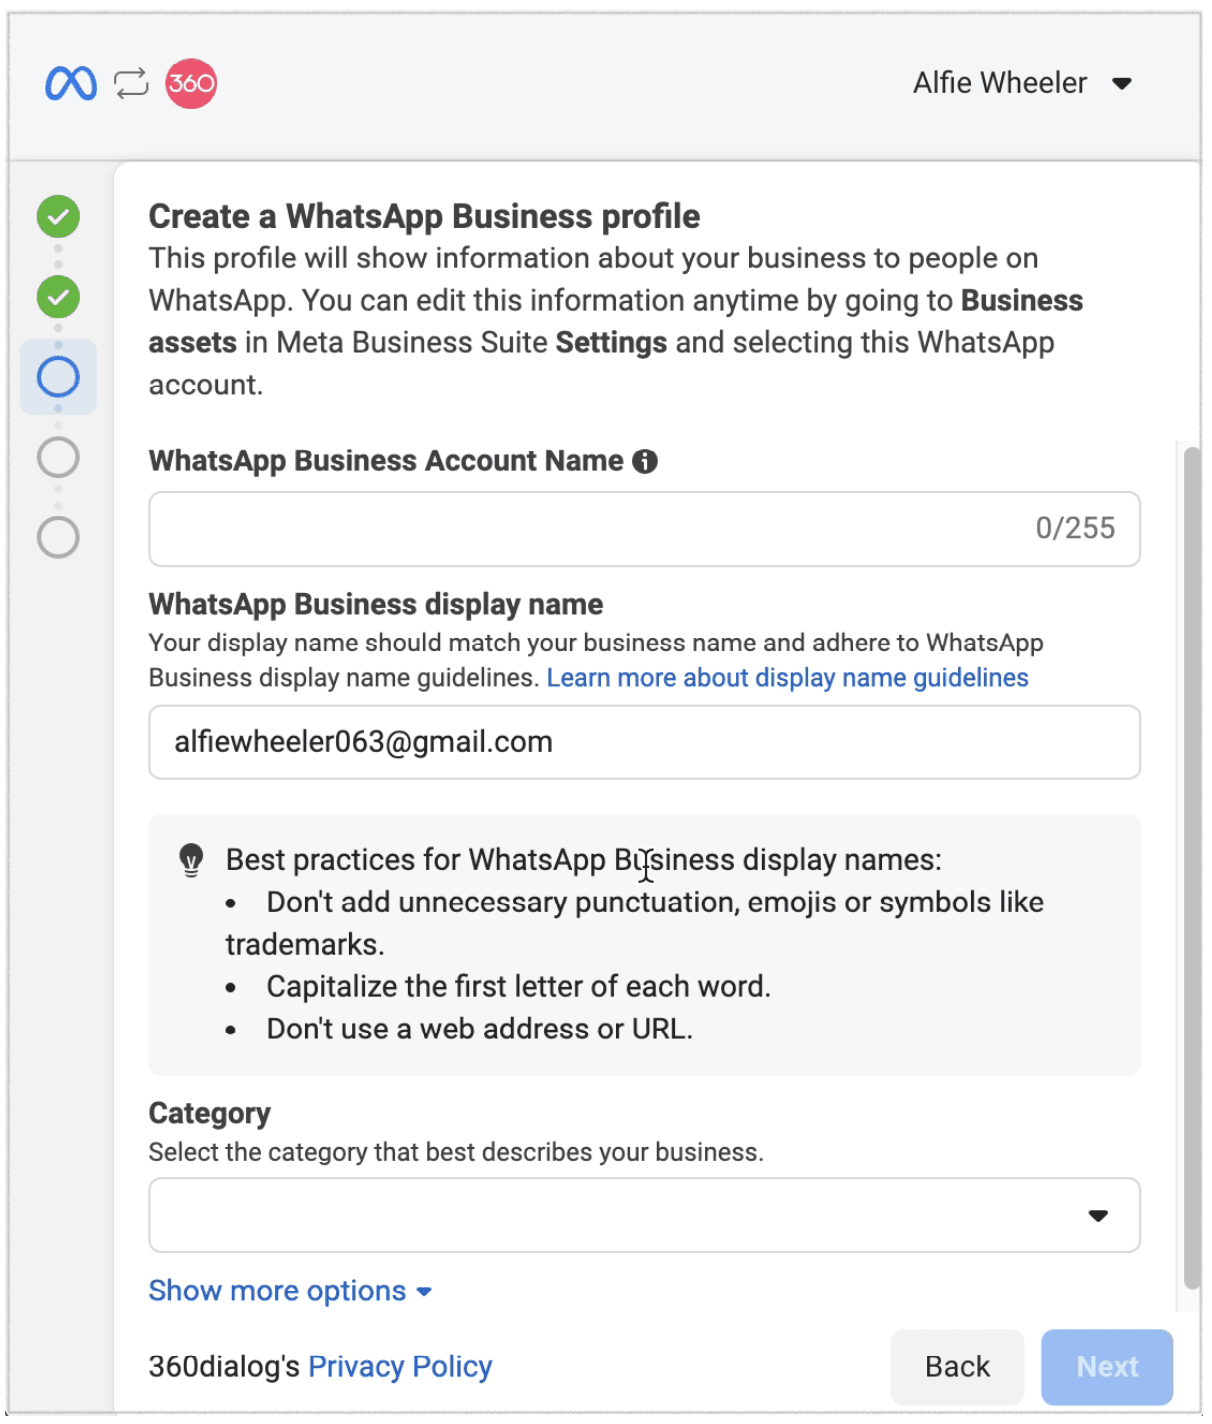
Then, you will create your WhatsApp Business profile, which will display information about your company to people on WhatsApp. Add a business account name and a WhatsApp Business display name, then select the category that best describes your business.
In the next window, you will need to add a phone number. Please make sure that the number you provide is unique, meaning that it has never been used on WhatsApp. You can choose how to verify your number (by SMS or phone call) and click the next button.
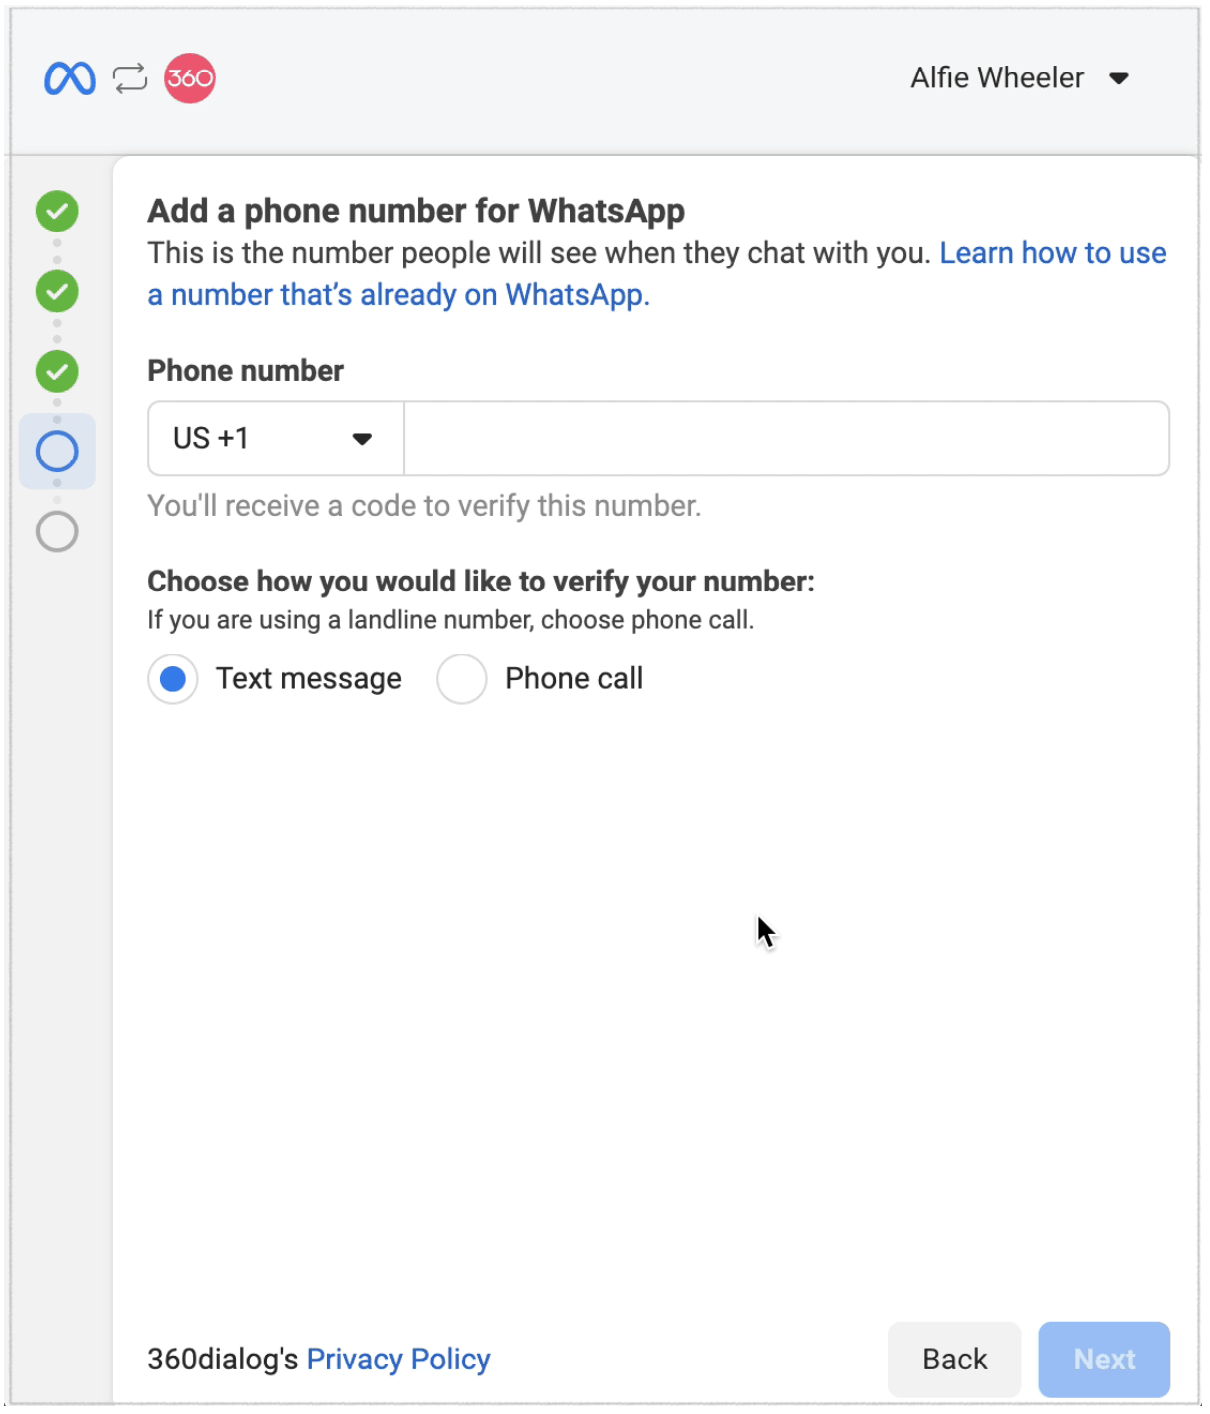
If your number is already connected to your WhatsApp account and you want to register this same number on your WhatsApp Business account, please follow the instructions explained on this link.
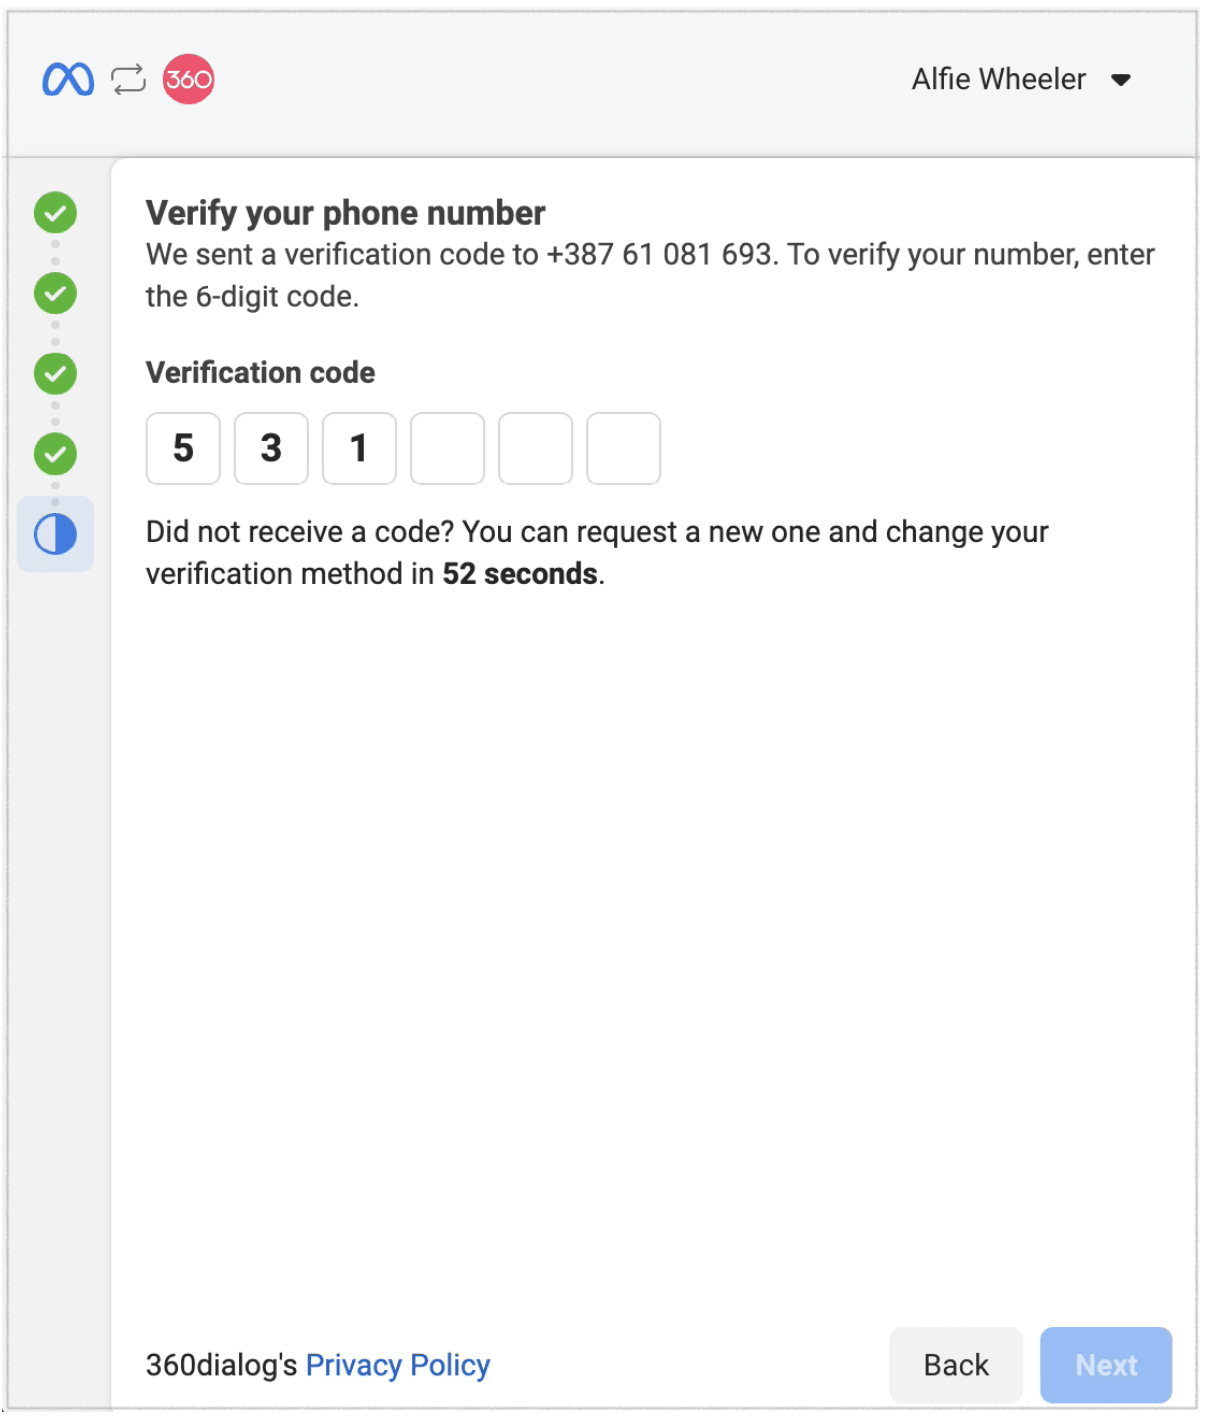
When you choose the verification method, you will receive a code that must be entered to continue the process.
Remember that you have 60 seconds to enter the code, otherwise you will have to repeat the process.
After confirming the completion of the process, you will need to wait a while as everything is set up. If there are too many requests at that moment, you will receive a notification.
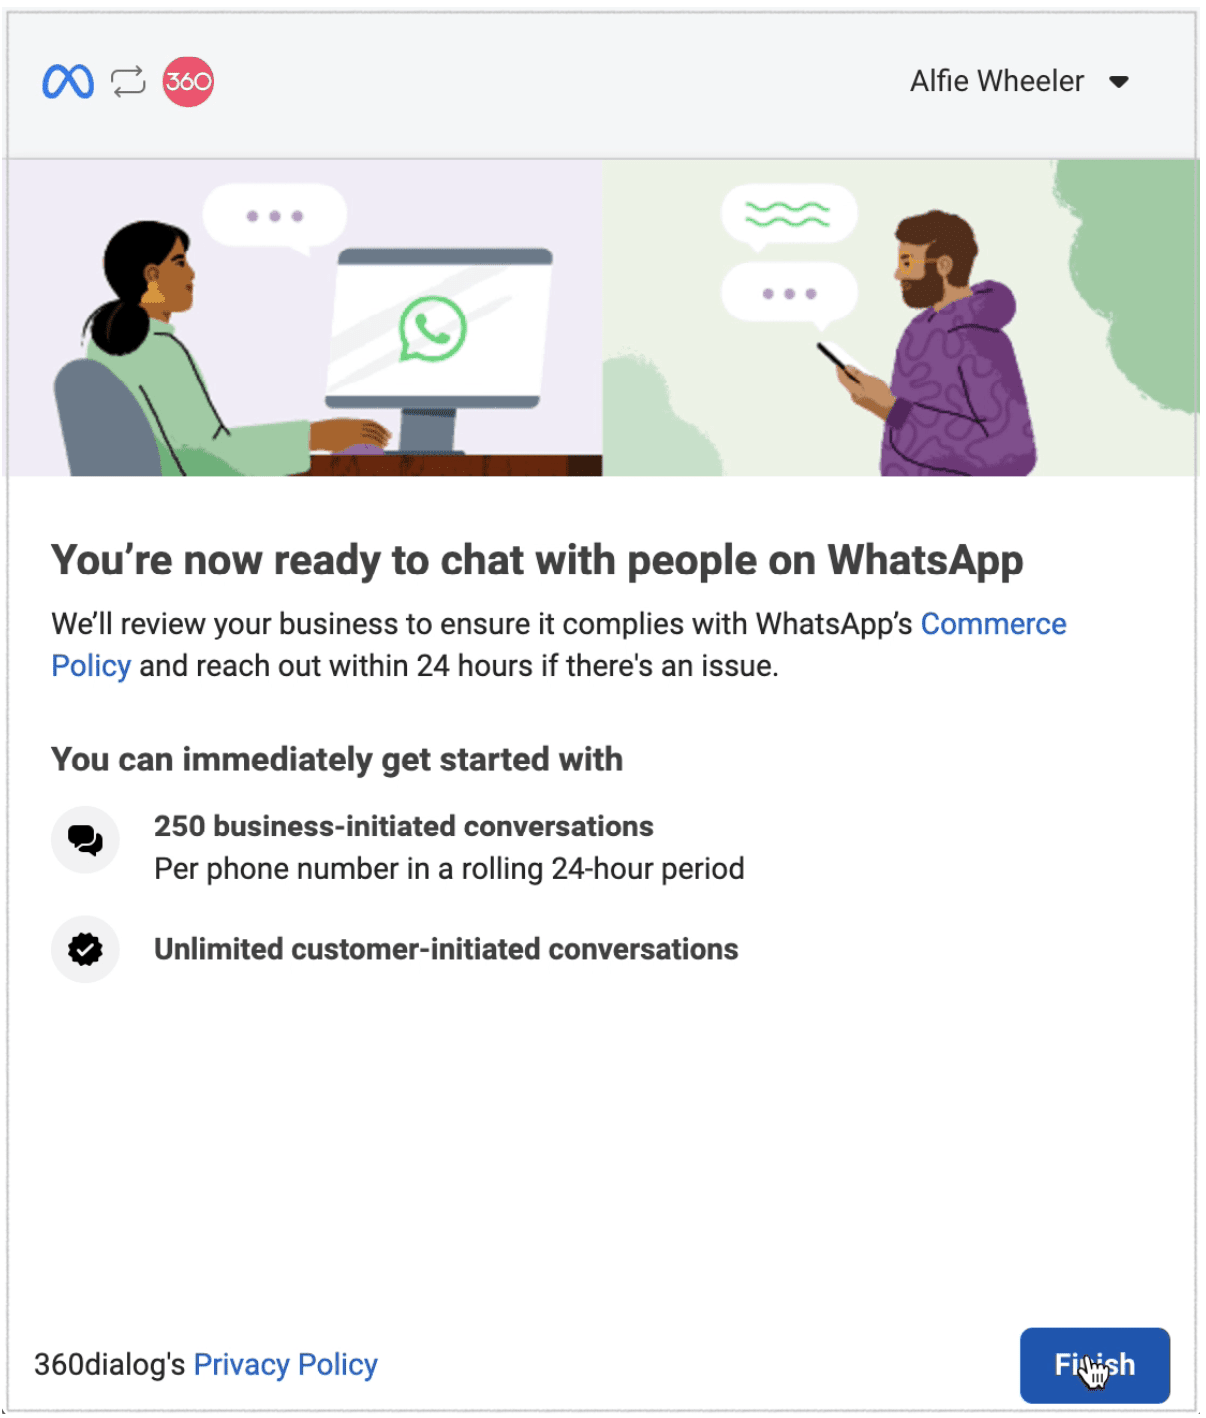
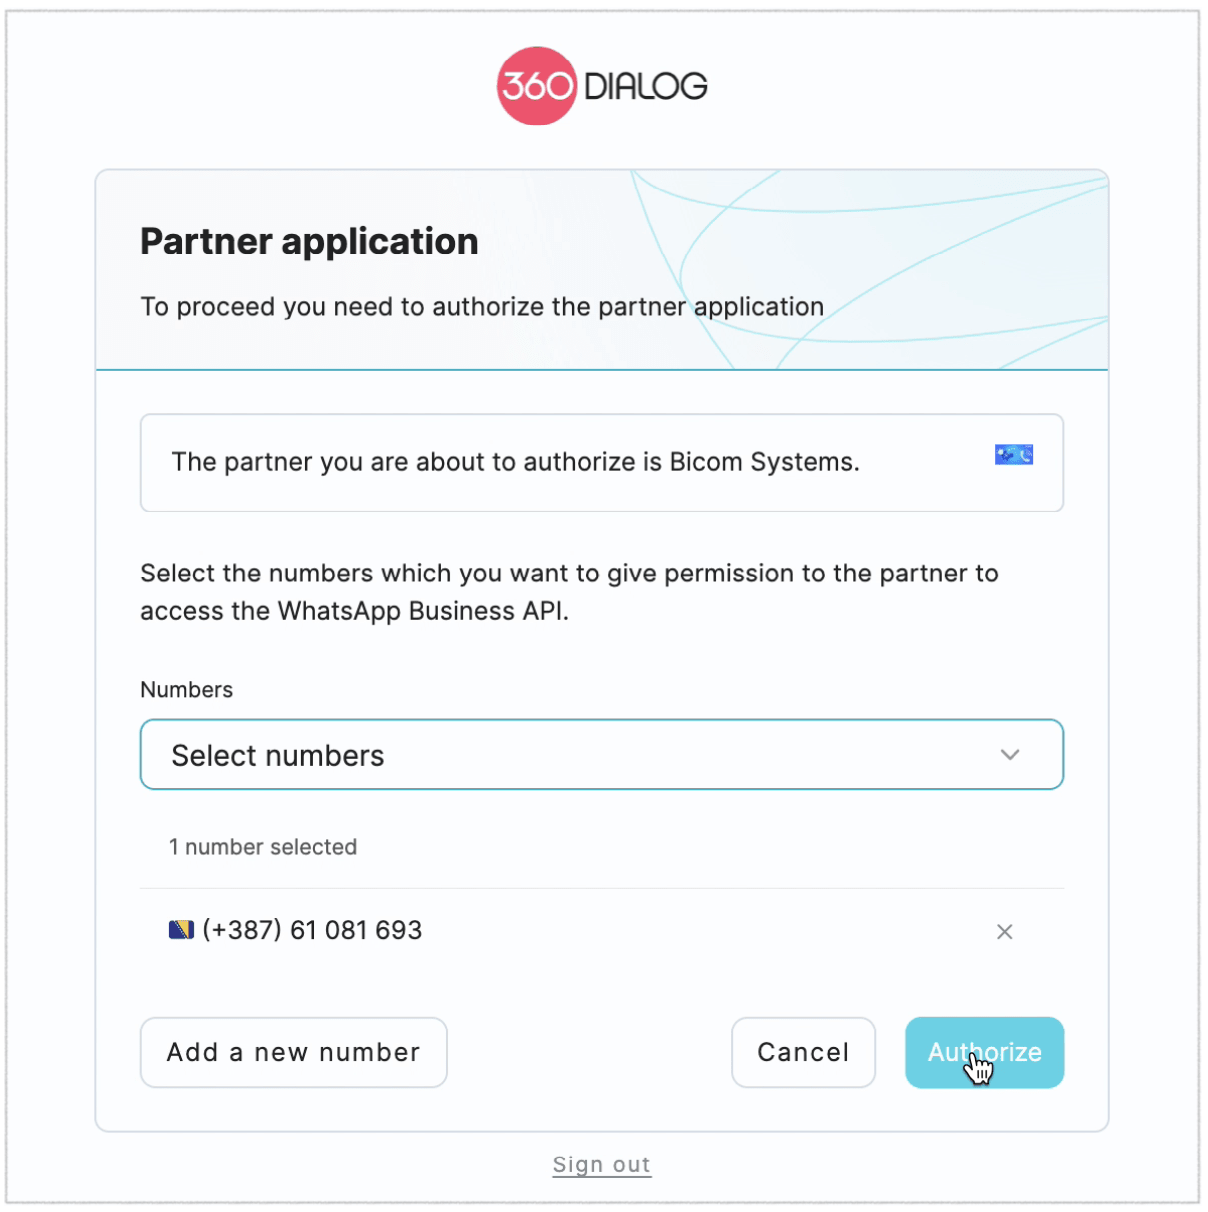
Once the configuration is complete, you will need to select the numbers to which you will grant the partner permission to access the WhatsApp Business API. When you select one or more desired numbers, click the Authorize button. Then, you will be automatically redirected to the CMP window.
Once you have successfully logged in via your WhatsApp account, the fields in the new window will be automatically filled in. At the end of the installation, the CMP window should look like the following image:
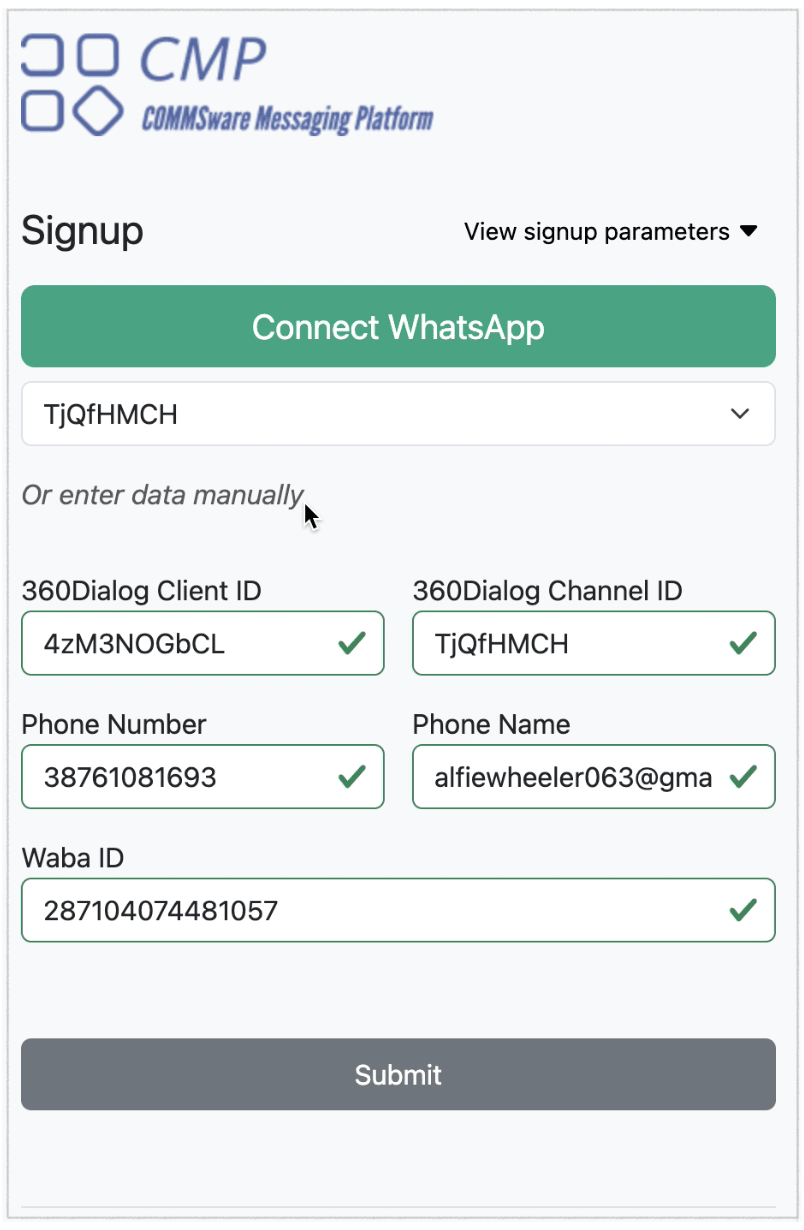
After clicking the «Submit» button, you will be redirected to the PBX GUI. From there, you will need to select the destination queue for the WhatsApp channel.
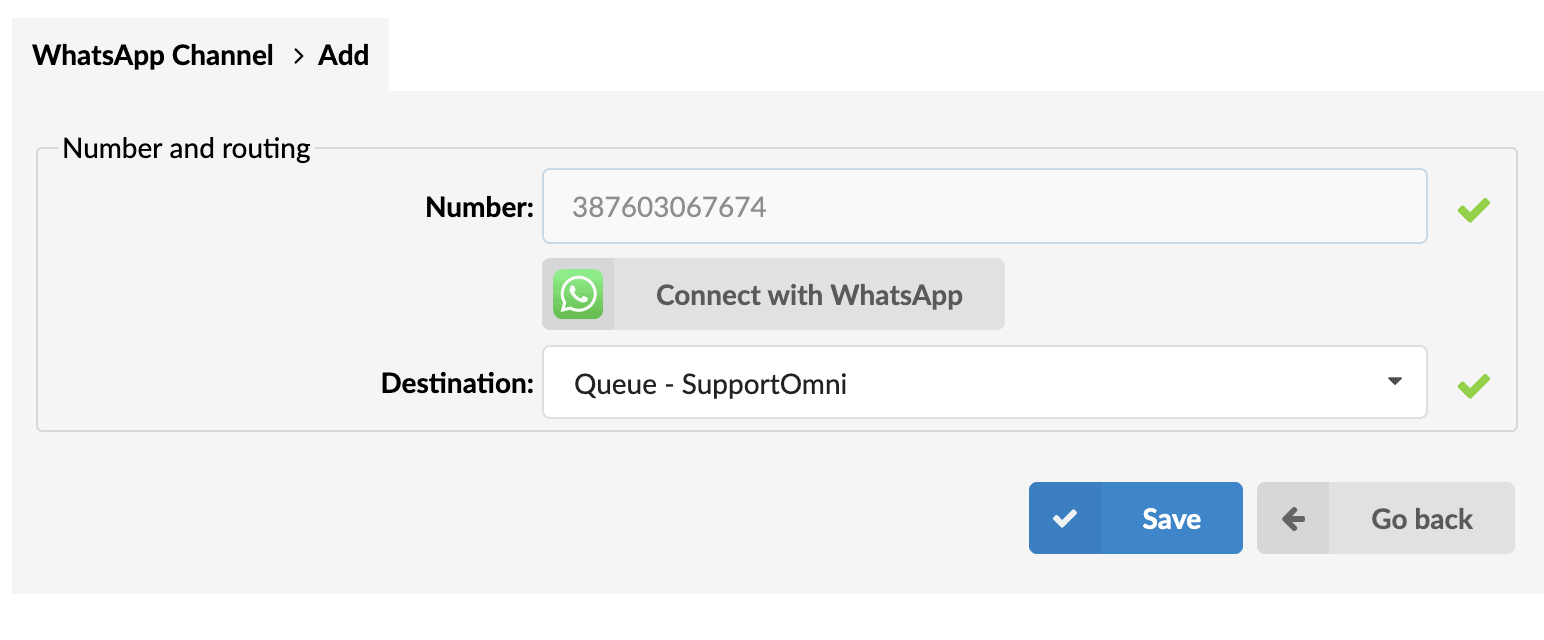
Once you have selected the destination queue, click the Save button to save the configuration. This will finalize the setup and ensure that incoming messages from the WhatsApp channel are routed to the designated queue in PBXware.
When a user chooses to delete their WhatsApp number from PBXware, the following confirmation message will be displayed:“Are you sure you want to delete the number: +1-786-232-XXXX? In the case of deleting the number, your number will move to a pending deletion status that will last until the end of the current month. Please be aware that during this period, you will be able to send or receive messages and reactivate your number, but you will not be able to create a new WhatsApp channel with this number. In order to reactivate your number, please contact us. your Dialog360 partner hub administrator.”
Why is this message displayed?
This message is provided to ensure that users are fully informed of the specific consequences of removing a WhatsApp number from PBXware. It highlights the temporary status change, the operational capabilities during the pending removal period and the steps required for reactivation, thus avoiding any confusion and helping users to make an informed decision.

