



Agents
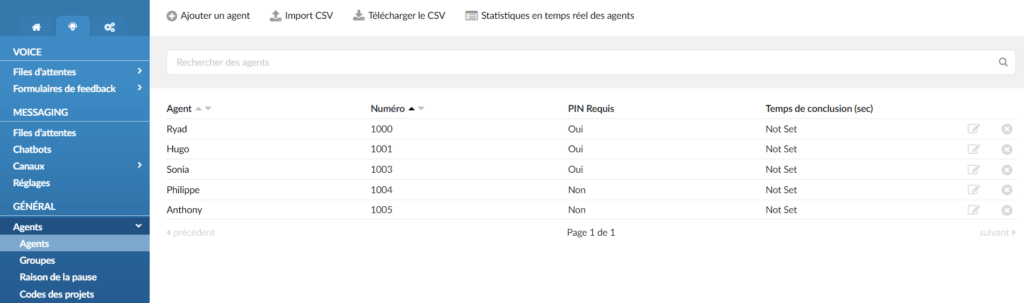
To simplify the process of adding multiple agents at once, you can use the ‘CSV Import’ option. This allows you to upload a CSV file containing agent information in bulk.
The following points must be taken into account when creating a CSV file:
- CSV header: Name
When importing a CSV, it is crucial to include the 'Name' header in the CSV file. This header is a required field and must be correctly spelled and filled in with the relevant information.
Omitting or incorrectly filling in the 'Name' header can cause the import process to fail.
- CSV header: Number
a) To ensure a successful upload and correct integration of the data into the system, make sure to include the ‘Number’ header in the CSV file and fill it in correctly. This header is of paramount importance because it serves as a crucial identifier for the agents.
b) When assigning an agent number, it is important to follow a specific format. The agent number must consist of four digits. Any deviation from this format may lead to unexpected behavior or errors when uploading the CSV file.
Fill in the CSV file
To import data using a CSV file, make sure the file is properly formatted. The table below provides an overview of the required headers and their corresponding information:

Once uploaded successfully, the following message will appear: “One record imported. No records skipped.”
If users find themselves in situations where they must skip data entry for certain headers in the CSV file, it is important to indicate this by adding double quotes (“) in the corresponding cells. Please refer to the example where a user only provided data for the headers ‘Name’, ‘Number’, ‘Last Name’, ‘AllowDirectPausedEntry’, and ‘PauseTime’:

If a header has no data to enter, it must still be represented by empty quotes ("").
If users do not enter double quotes for the entries they want to skip, the following message will appear: “0 records imported. One record skipped.” meaning that the upload was not successful. Please refer to the screenshot.
- CSV file download
To download a CSV file, simply click the designated button. This button is generally identifiable by an icon or a label indicating its purpose. By clicking it, the CSV file will be downloaded to your device.
Please refer to the example of a downloaded CSV file:

Real-time agent statistics
The real-time agent statistics provide a comprehensive overview of an agent's activity and performance during their time on the system. These statistics include all types of calls made by the agent, such as incoming, outgoing and direct calls (both incoming and outgoing).
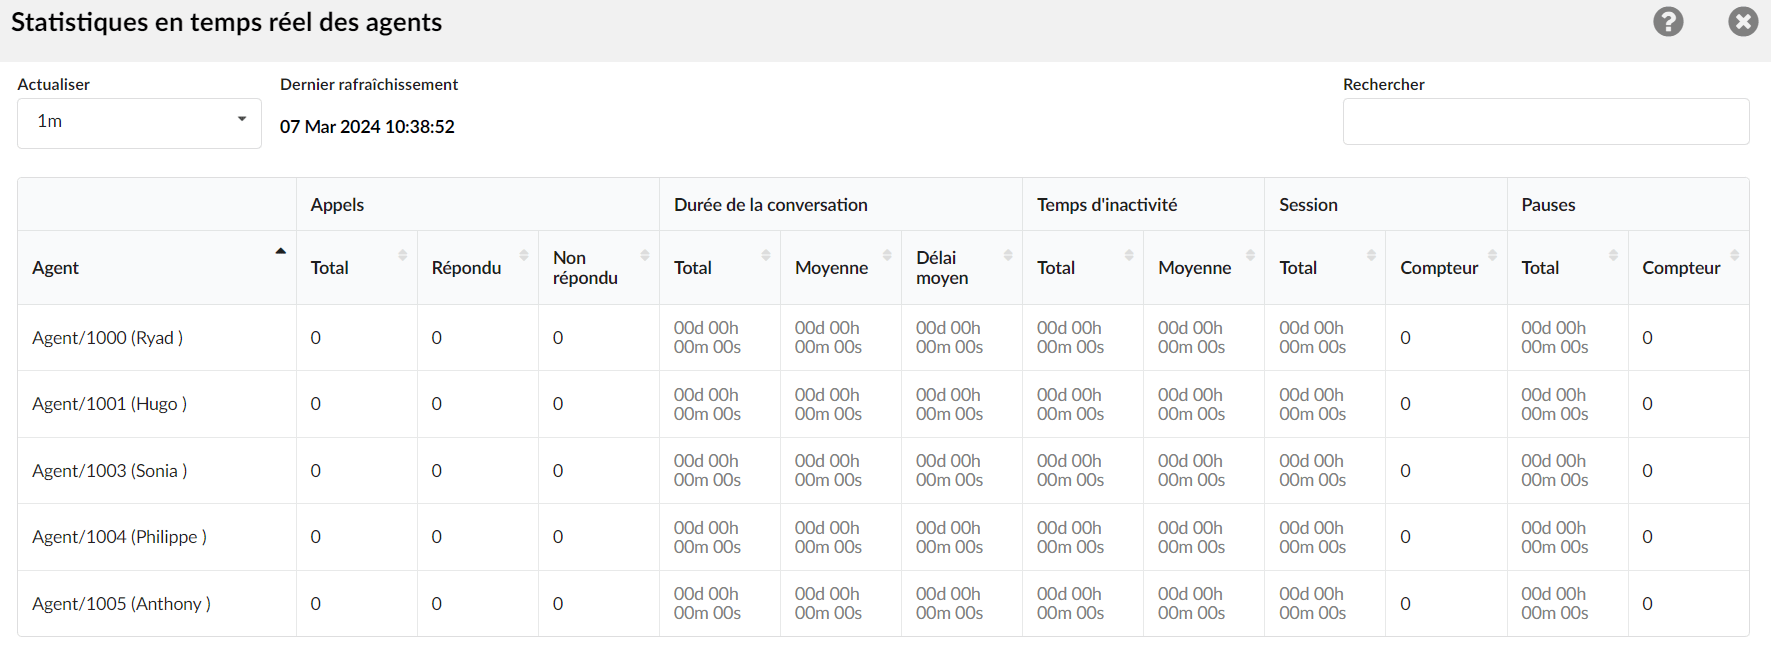
The agent statistics page offers key metrics that provide an overview of agent performance. These metrics include total talk time, idle time, login sessions, and total pause time. Total talk time represents the cumulative duration of the agent's conversations, while idle time shows periods of inactivity. Login sessions track the agent's system logins, and total pause time records the duration of pauses taken by the agent. These metrics help monitor agent availability and performance.
To access real-time agent statistics, you can use either the Communicator supervisor application or PBXware.
Add/edit an agent
In this section, users have the ability to add a new agent or modify the settings of an existing agent.
To add a new agent, click the “Add an agent” button and follow the proposed steps to provide the necessary details such as the agent's name, number, and other relevant information.
For existing agents, administrators can modify their settings by selecting the corresponding agent from the list. This opens an interface where administrators can modify various agent-related settings, such as their name, number, PIN, and other configurable options.
Agent
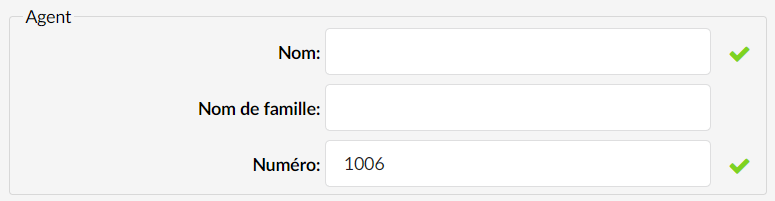
- Name
Enter the agent's first name.
- Last name
Enter the agent's last name or name.
- Number
Enter the unique identification number assigned to the agent in the system.
Connection options
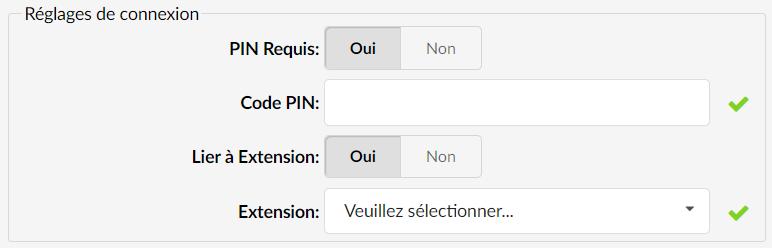
In this section, users can configure the settings for agent login sessions and extension binding.
- PIN required
This parameter can be toggled between “Yes” and “No” to determine whether agents must enter a PIN during the login process.
If set to “Yes”, agents will be prompted to enter their PIN when logging in.
If set to “No”, agents will not be required to enter a PIN during the login session.
PIN
Enter the agent's PIN in this field. The agent PIN is a personal identification number provided by the agent for authentication during the login process.
- Link to the extension
Use the drop-down menu to select whether the system should bind this agent to the specified extension.
When set to ‘Yes’, the system will only allow logins for this agent from the extension entered in the ‘Extension’ field.
When set to ‘No’, the agent can log in from any extension.
Note: Enabling extension binding provides an extra layer of security and restricts agent connections to a specific extension.
- Extension
Enter the extension from which the system will only allow logins for this agent. This means the agent will only be able to log in and access system features from the specified extension.
For example, if you set the extension to ‘100’, the system will restrict logins for this agent to extension ‘100’. This provides an additional level of security and ensures that the agent can only access the system from the designated extension.
- Login via access codes
The agent can log in to a system by dialing the access code *203 on one of the system's extensions. By default, the system will ask for the agent number, the agent PIN, and the number where the agent is currently located. This number can be a local extension or another remote destination.
The agent must log out with '*203' to stop receiving calls.
Direct
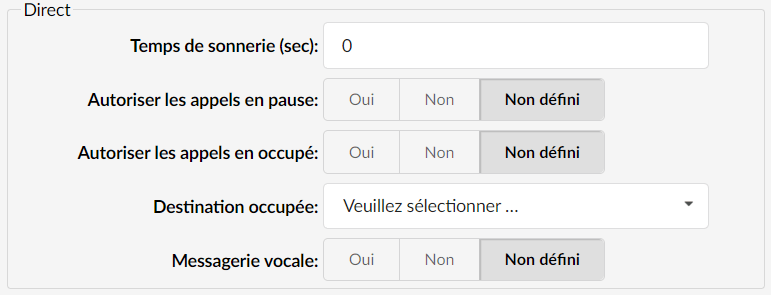
This section allows users to configure the settings related to 'Direct In' calls. 'Direct In' calls refer to incoming calls that are routed directly to a specific agent without going through a queue.
The 'Not set' option has been added to the agent settings. By default, this option is automatically set by the system, which means that all the configurations specified in the general settings will be applied to the agent. However, if changes are made to the agent settings, these changes will override the general settings configurations.
- Ring time (sec)
This option allows users to set the ring time for 'Direct In' calls.
(For example, this option is set to 32 seconds. When a direct call is received, the agent will ring for 32 seconds.)
- Allow calls when paused
When this option is set to “Yes”, users should be able to call an agent in a “Pause” state.
- Allow calls when busy
When this option is set to “Yes”, users should be able to call an agent who is already on a call/busy.
- Busy destination
The Direct In busy destination allows users to redirect a call to another destination if the agent is busy.
- Voicemail
This option will dial the destination's voicemail.
Settings

- Wrap-up time (sec)
Indicates the time designated for agents to complete post-interaction tasks, such as taking notes, updating records or preparing for the next interaction.
Capacity
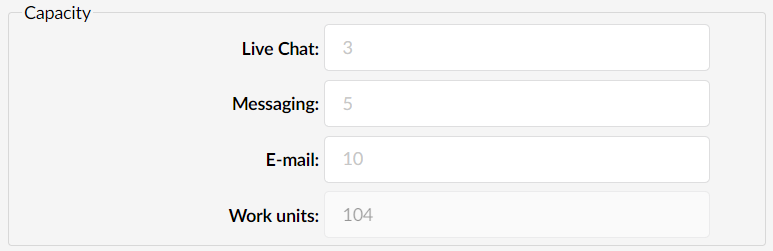
- Live chat
The default limit of 3 simultaneous live chat sessions for each agent is based on a reasonable estimate of what an agent can handle effectively. However, this number is adjustable to meet the specific needs of individual agents.
- Messaging
The default setting allows an agent to handle up to 5 simultaneous messaging sessions. This number is set based on a reasonable estimated workload for messaging, but can be adjusted to meet the agent’s specific needs.
By default, each agent can handle up to 10 simultaneous email sessions. This is based on a reasonable estimate of what an agent can efficiently handle with email and can be customized for each agent's specific situation.
- Work units
To calculate an agent's total work units, the individual capacities for live chat, messaging, and email are multiplied by their respective weightings, configured in the section MESSAGING > Settings, specifically in the work units area. These products are then added together to determine the total work units.
For example, if an agent has a capacity set to 3 live chats, 5 messages, and 10 emails, and the work unit settings are set to 4 for live chat, 2 for messaging, and 1 for email:
Live chat: (3 times 4 = 12)
Messaging: (5 times 2 = 10)
Email: (10 times 1 = 10)
By adding them together, (12 + 10 + 10 = 32), you will see that the total work units for this agent will be displayed as 32.
Pause reasons
When an agent needs to temporarily stop receiving calls without logging out, they have the option to pause. By pausing, the agent becomes temporarily unavailable to receive calls until they decide to resume.
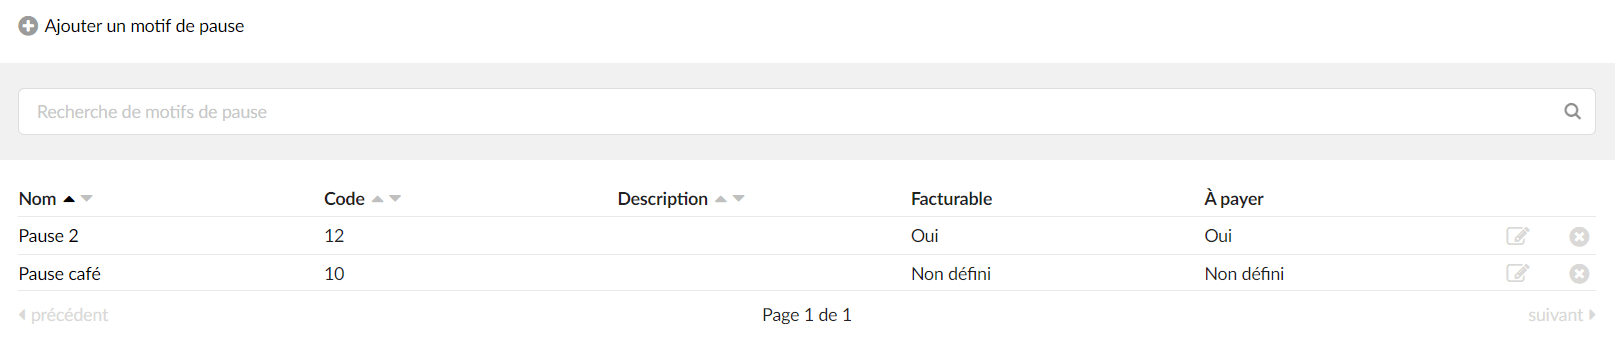
Pausing allows agents to take short breaks, attend to other tasks, or temporarily step away from their workstations while remaining logged in to the system. During the pause, calls will be routed to other available agents or handled according to the configured call handling rules.
Add/Edit a pause reason
The Add/Edit Pause section allows administrators to manage and customize the agent's pause settings.
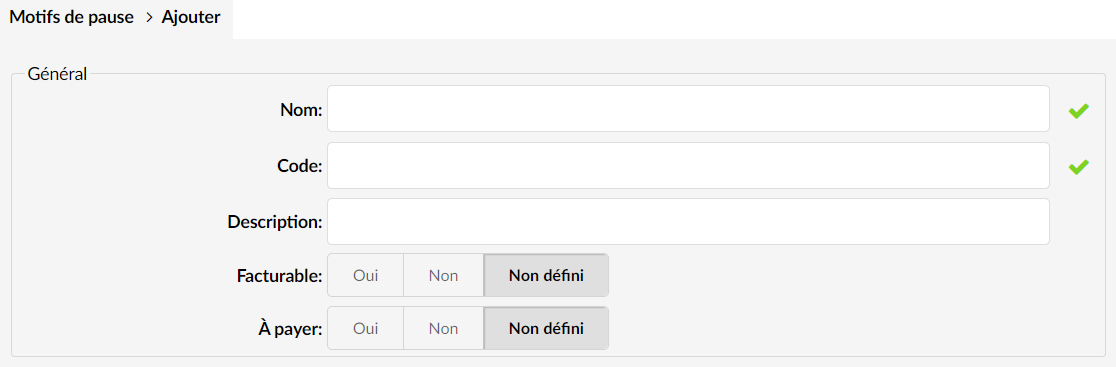
- Name:
Define a name for a pause reason.
- Code:
Enter a short code for a pause reason.
- Description:
Provide a brief description of a pause reason.
- Billable:
Define whether a pause will be billed to an agent.
- To pay:
Define whether a break is paid for an agent.
- Edit a pause reason:
Click this button to edit the configuration of a pause reason.
- Delete a pause reason:
Click this button to delete a specific pause reason from the system.

Settings
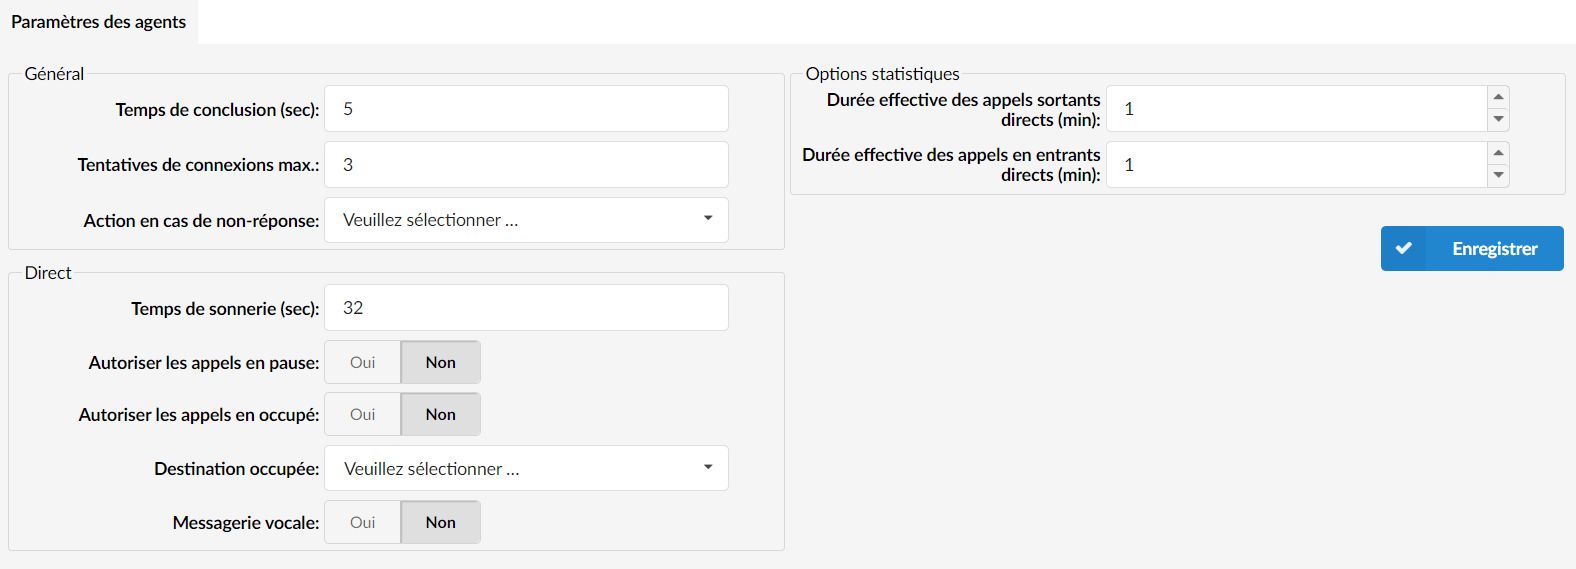
Agent settings
The “Agent Settings” section is part of the contact center system configuration and allows users to define certain basic parameters that affect how agents interact with the system and the system's behavior. Some of the parameters that can be configured include:
General
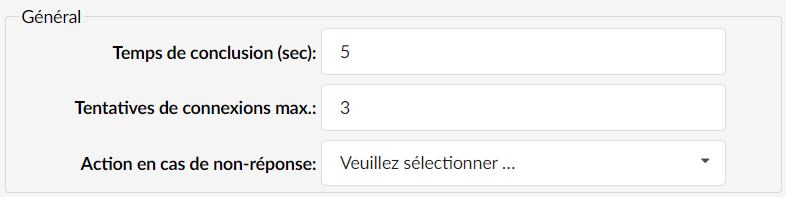
- Wrap-up time (sec)
Wrap-up time is the period after the end of a call during which the agent can perform post-call tasks such as taking notes or carrying out call-related activities.
(For example, agent Smith ends a queued call. A pause in seconds (wrap-up time) is imposed so that the agent can prepare for a new call.)
- Max. connection attempts
Users can specify the maximum number of login attempts allowed for agents. If an agent exceeds the specified number of login attempts without successful authentication, a notification will be triggered to indicate the login failure.
- Action on no answer
The "Auto pause" and "Auto logout" actions are automatic system responses when an agent does not answer an incoming call within a specified time. These actions are designed to manage agent availability and ensure efficient call handling within the contact center.
If the “Auto Pause” action is enabled, the system will automatically pause the agent after a predetermined period of time when they do not answer a call.
Alternatively, if the “Automatic logout” action is enabled, the system will automatically log the agent out of the system after a specified period of time when they do not answer a call.
Direct
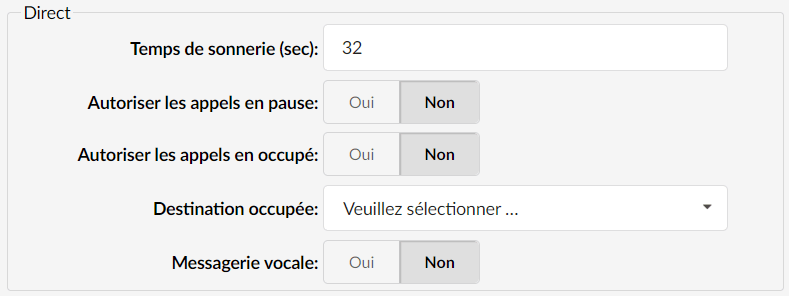
The Direct In configuration allows users to define specific parameters related to calls directly intended for a particular agent.
With this option, the user will be able to configure separate ring durations for the agent’s “Direct In” calls, and can also set the final destination once the ring duration is reached. In addition, the user can select the destination to which the caller will be routed if the agent is on pause/away.
- Ring duration (sec)
This option allows users to set the duration for which a direct call will ring on an agent's extension before being redirected or handled by the system.
- Allow calls when paused
By setting the “Call agents in paused state” option to “Yes”, users have the ability to call agents regardless of their pause state.
- Allow calls when busy
When the « Allow calls when busy » option is set to « Yes », it allows users to call agents who are already on an active call or in a busy state.
- Busy destination
This option allows users to redirect an incoming call to another destination if the called agent is already busy with another call.
- Voicemail
This option will dial the destination's voicemail.
Statistics options

- Effective duration of direct calls (min)
Define a call duration in minutes which can be reported as an effective outgoing call.
