



Dialer
Campaigns

Monitor campaign lists
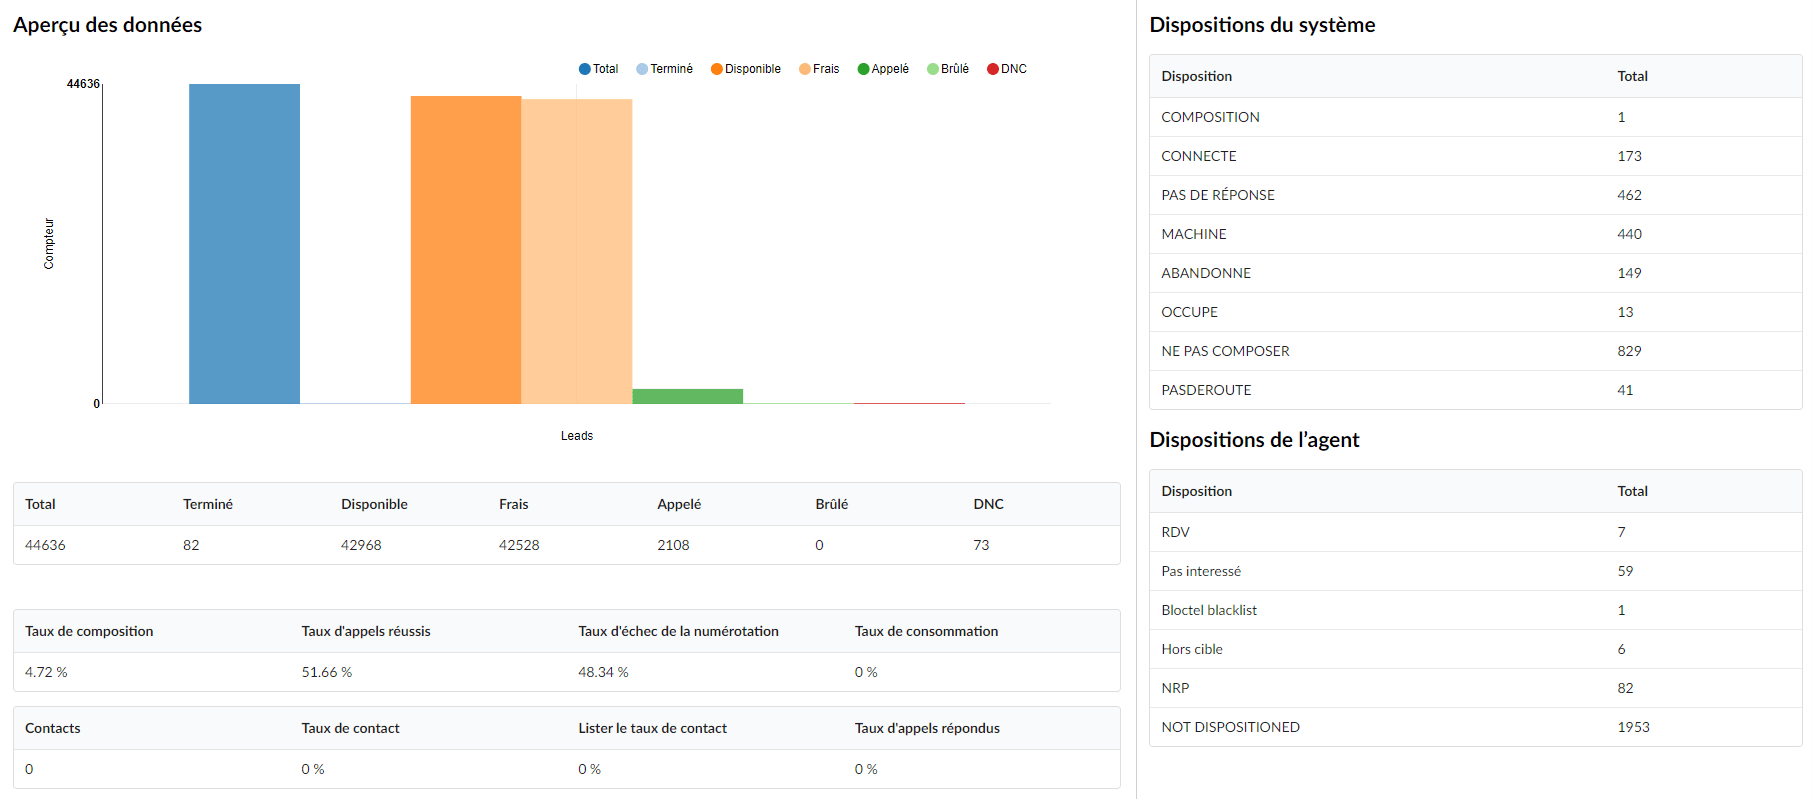
This page gives you an overview of the data concerning the current campaign. The page is refreshed every 5 minutes by default.
Monitor campaign lists
- Total
Displays the total numbers in the CSV files.
NOTE : this applies to all enabled CSVs.
- Completed
Displays the number of calls selected with the « Completed » disposition. - Available
Displays the number of records still available for the dialer to dial. - Charges
Displays the number of records that have never been dialed. - Called
Displays the number of records dialed by the dialer. - Burnt
Displays the number of members that were called with a maximum number of attempts.
NOTE : Please note that burned numbers will no longer be called back by the dialer.
- DNC
Displays the total number of numbers added as DNC numbers.
NOTE : DNC stands for “Do Not Call”.
- Contact
Displays the number of answered calls with a disposition where CONTACT = “Yes”.
- Contact rate
Displays the percentage of CONTACTS = yes divided by the number of dialed records.
- List the contact rate (total)
Displays the percentage of CONTACTS = yes divided by the total number of records.
- Response rate
Displays the percentage of answered calls (answered/dialed calls).
- System dispositions
The “System Dispositions” section displays the overview of the statistics of leads marked in different system dispositions.
- Agent dispositions
The “Agent Dispositions” section displays an overview of the statistics of leads marked in different agent decisions.
Monitor a campaign
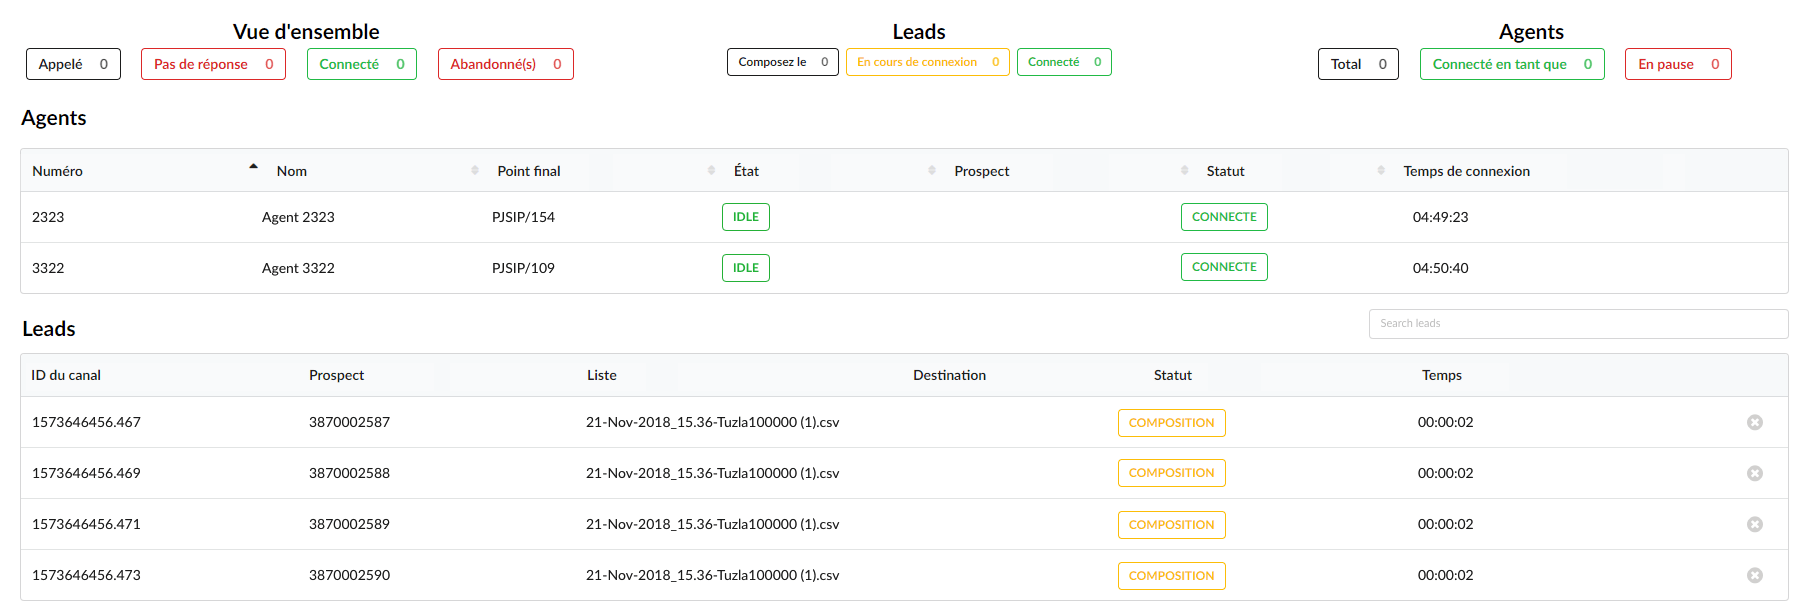
This page provides real-time campaign monitoring.
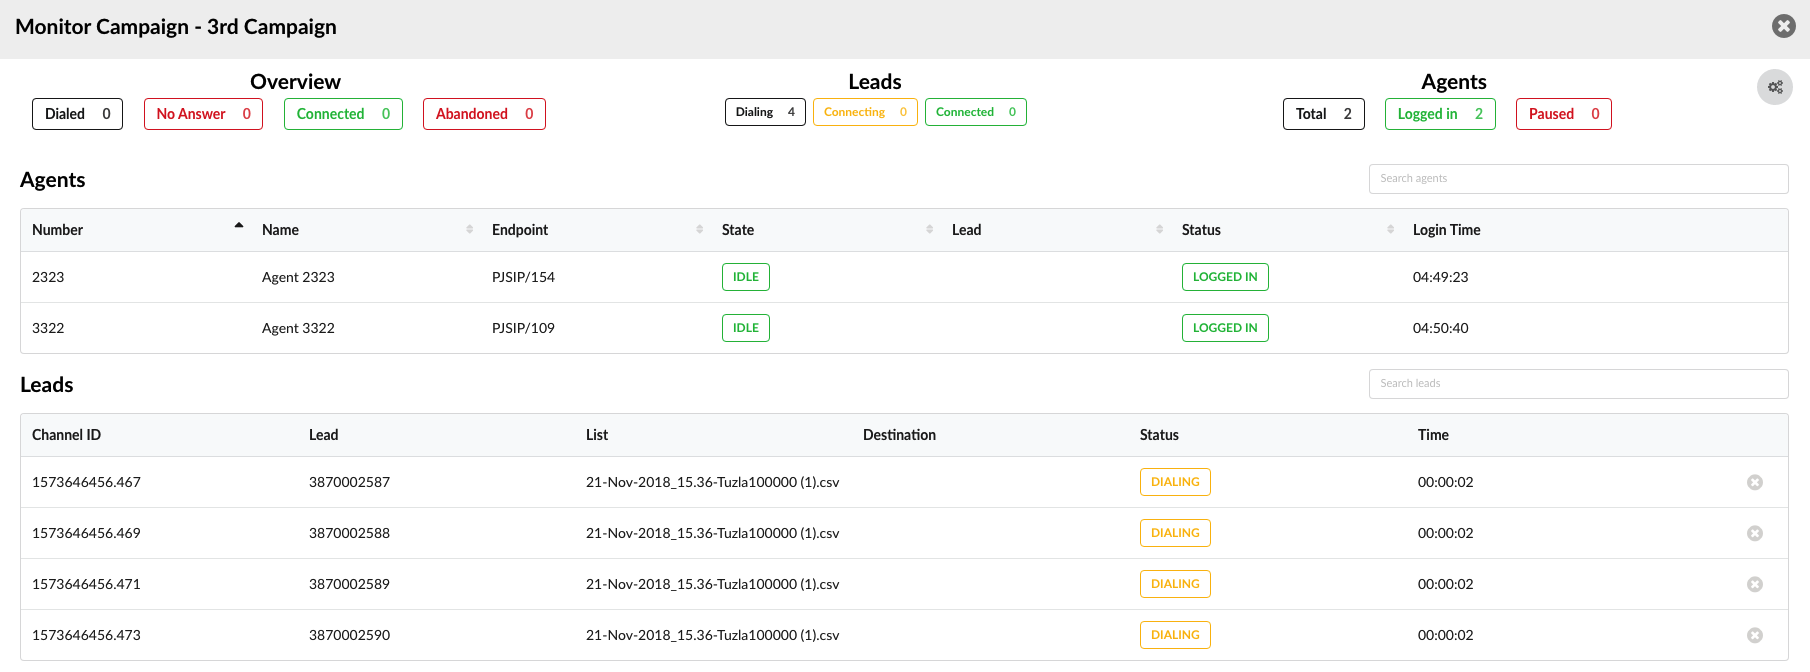
Monitor the campaign
- Overview
Statistical data for the current day. Users can see how many leads are dialed, connected, abandoned or unanswered.
NOTE: This data is refreshed every 10 seconds by default.
- Leads
Real-time data on active leads. Users can see how many leads are currently in dialing, connecting or connected state. The table provides detailed information about each active lead.
- Agents
Real-time data on active agents. Users can see how many agents are currently logged in or on pause. The table provides detailed information about each active agent.
Multiple monitoring

After selecting the “Monitor campaigns” option, users will be directed to another page offering exhaustive details obtained while monitoring campaigns. This page gives them the ability to access information related to all the campaigns present in the system. The data overview simplifies the monitoring process and offers a deeper insight into the status of calls, agents and contacts linked to the different campaigns.
- Calls
The Calls section displays all the details concerning the call procedure.
- Dialing
This represents the number of calls currently being dialed. If the ringing succeeds and a call is in progress, it will immediately be moved to the "Connected" line.
- Connecting
The number of connected calls.
- Connected
The number of successfully connected calls.
- Agents
The Agents section refers to the status of the agents and how many of them are logged in to the system or currently on pause.
- Connected
Number of agents connected to the system.
- Paused
Number of agents on pause.
- Idle
Number of agents with the status “Inactive”. These agents are not performing any action at the moment but are not paused.
- Busy
The number of busy agents who are currently on a call.
- Contacts
The Contacts section consists of the following two columns.
- Total
The number of contacts reached.
- Rate
Refers to the percentage of workload completed in the respective campaigns, to allow users to compare the workload of campaigns on the system.
Stop campaigns
Click the button Campaign stop to stop all campaigns.

Add a campaign
After pressing the «Add campaign» button, you will be prompted to access the page where you can edit the campaign.
General
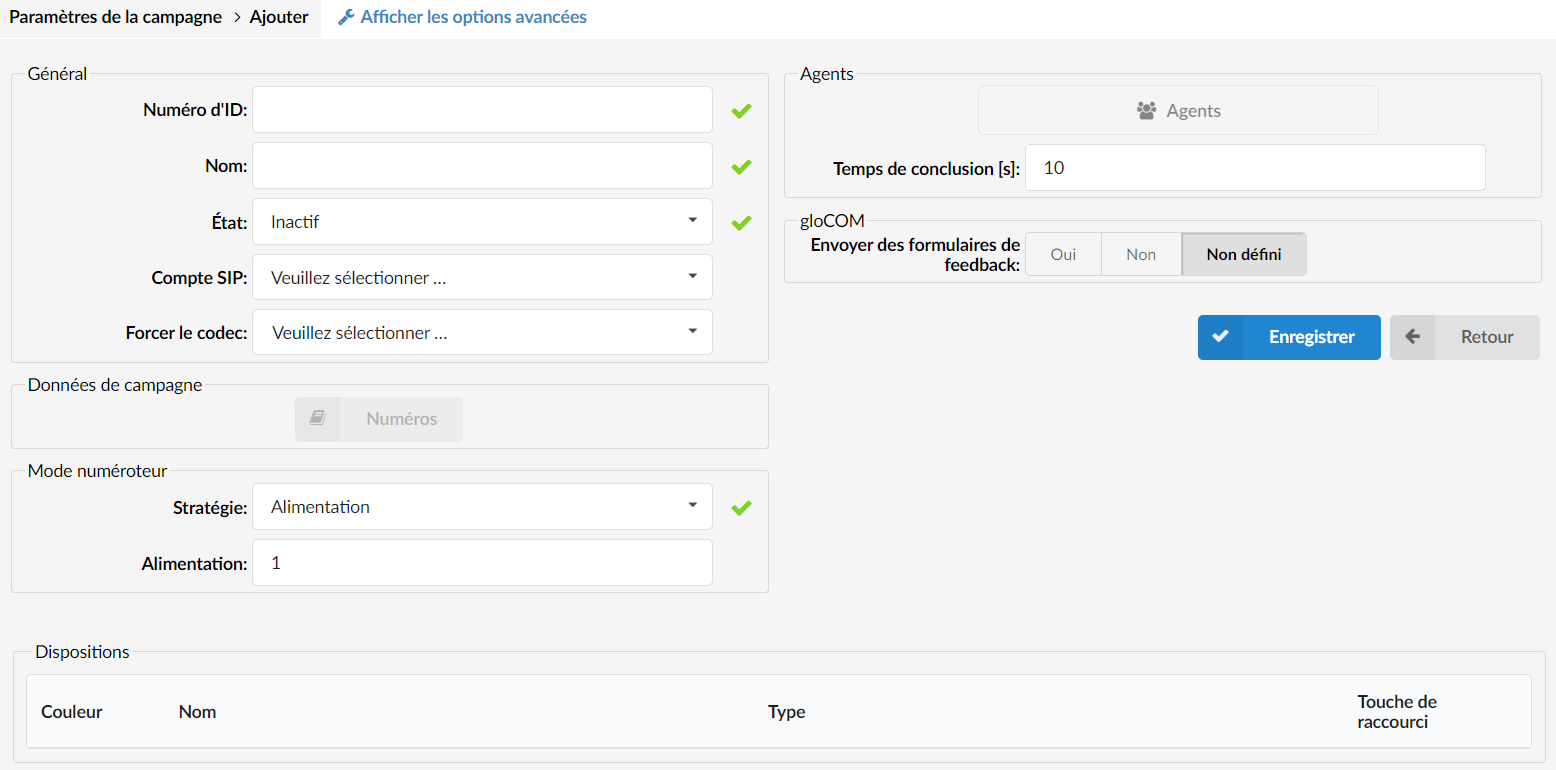
- Identification number
This field represents the campaign ID in numeric form.
- Name
Campaign name. The name should describe the campaign in a few words.
- Status
By clicking on the drop-down menu, users are prompted to modify the campaign status.
(For example, changing “Status” from Active to Inactive will stop or start the campaign.)
- SIP account
A campaign can be forced to use a single Trunk. If nothing is specified, it will use the other available Trunks.
(For example, click the drop-down list to choose the trunk to force on this campaign.)
- Force the codec
A specific codec can be chosen to be forced on the Campaign.
(For example, choose a codec to force on the campaign from the drop-down menu.)
- Recording
This option is used to record calls. It is only used with strategies that use agents as destinations.
Campaign data

- Numbers
Numbers to be dialed as part of this campaign.
(Click the « Numbers » button and you will be prompted to access another page where a CSV file can be downloaded.)
Numbers
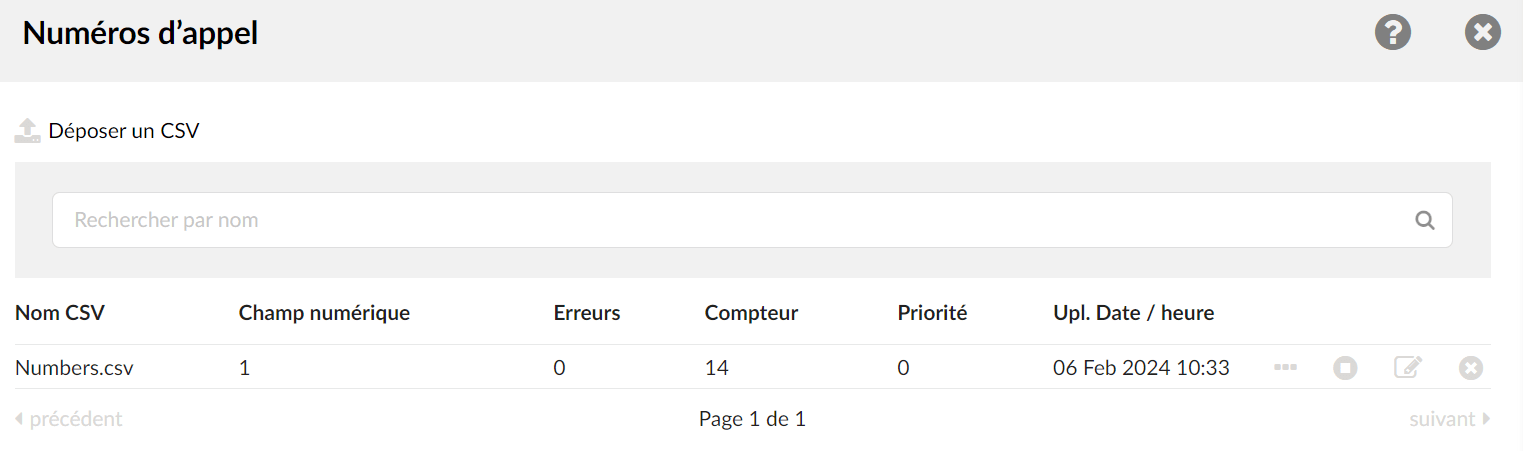
The page Numbersallows users to control and edit the Numbers list.
- CSV download
Upload the CSV list. Once imported, users will be prompted to access a different window and prompted to enter the column index for the number and/or to enter the column index for the name. This last field is optional.
TIP: A simple CSV file is downloaded, containing two lines. The first line represents the CSV headers and the second displays information about the numbers. For more details, please refer to the example below. Information about the column used for the numbers must be specified in the system and the index starts at 1. Additionally, the "Name" column can be used, so it will be displayed to agents during a call.
Example:
Number, First Name, Last Name, Address, Age
100, John, Doe, Somewhere Some Street, 22
- CSV Name
Name of the uploaded CSV file. Once clicked, it opens the “Edit CSV” page.
- Edit the CSV
Once users upload their CSV files, they can click on the preferred file and be taken to another page, “Edit CSV”. From there, they can select “Priority” and a “Feedback Form”, or further edit the “CSV Data” section.
- Priority
Setting a higher priority for the CSV file will result in a campaign using that specific CSV file over the others.
- Feedback form
Select the feedback form sent to agents when leads are dialed in this list.
The “CSV Data” section allows you to make additional changes to the file.
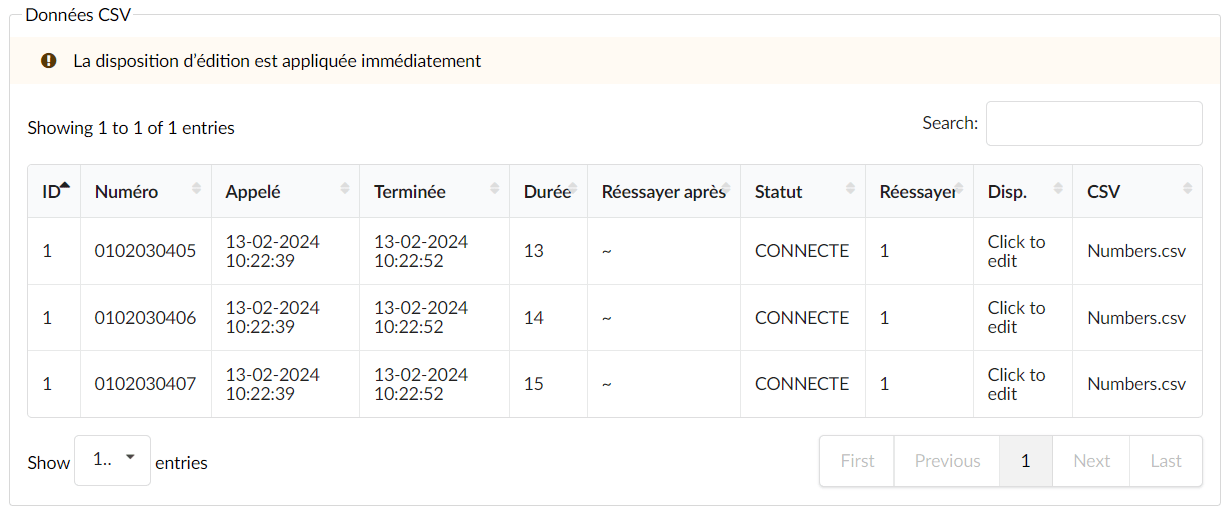
The fields are presented below:
ID – sets the internal ID in a database.
Number – represents the number of a lead when dialing.
Composed – refers to a timestamp when a lead was dialed.
Completed : refers to the timestamp of the end of a call to a lead.
Duration – displays the duration of a call.
Retry after indicates that the next dialing must take place after the selected time.
Status : displays the last status of the lead. The statuses are as follows:
- DIALING
- TRUNK
- CONNECTED
- NO ANSWER
- MACHINE – Answering machine detected
- ABANDONED
- BUSY
- NO_DIAL
- NO_ROUTE
Retries – displays the number of attempts.
Layout – represents the disposition set for this call. From there, it can be changed to a different disposition.
- Numeric field
The number of the specified field entered during the CSV upload.
- Errors
The number of errors displayed.
- Accounts
The number of records in the CSV file.
- Priority
If many CSV files are uploaded, set the priority of each one.
- Upl. Date and time
Displays the exact date and time of the CSV file download.
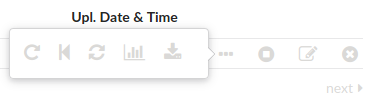
If users hover their mouse over three dots in the menu, the following items will appear:
- Reset
Reset all numbers in the list.
- Reset no answer only
Reset all no-answer numbers in the list.
- Reset by layout
Reset all numbers in the list with a specified disposition.
- Show CSV statistics
Show data statistics for the current list.
- CSV download
Download the current CSV file.
CSV will have fields such as "number", "name", "city", "details", "dialed_number", "disposition", "ivrdtmf" representative (voicemail). Apart from these fields, all data submitted by the feedback form must be present if the script is configured.
The other buttons represent the following:
- Enable
Each list must be enabled to be able to be used by a campaign.
NOTE: Uploading multiple lists for a single campaign is not a good practice. Instead, try to split the lists across multiple campaigns.
- Power strategy
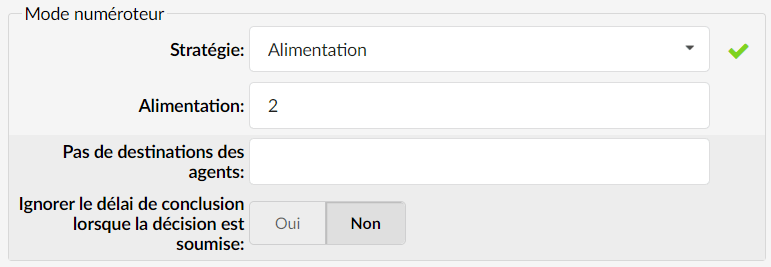
The power supply represents the number of leads to dial for each agent.
When using the Power strategy, the campaign dials leads based on the idle agents multiplied by the power number.
This works as follows:
1. The campaign retrieves leads based on their power.
2. The campaign dials "Leads" for each agent power x.
3. The Agents are placed in the pool.
4. First, the Lead that answers will be connected to one of the agents, and the others will be removed.
- Preview strategy

This strategy allows an agent to preview certain details about the leads before deciding to dial them. An agent can retrieve the next lead in the campaign lists, and once they choose to make a call, they must press the Dial button. After pressing this key, Dialer will attempt to connect the agent to the lead.
For this strategy to be applied, the client Communicatoris required.
- Progressive strategy

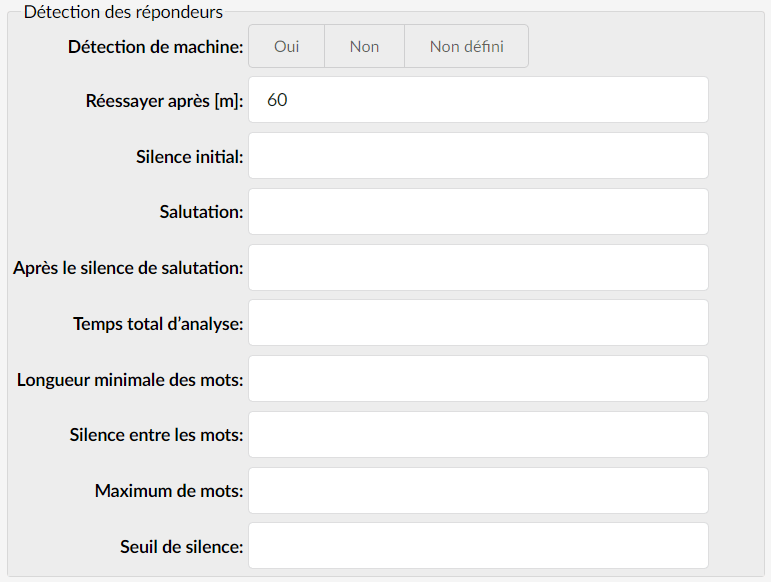
This strategy works in the same way as the Preview strategy, the only difference being that the Agent has a certain amount of time during which they must dial. If the agent does not dial within the desired time, the system will automatically dial the number.
Preview delay
Indicates how long it will take the system before automatically dialing the agent's main number.
- Voicemail strategy
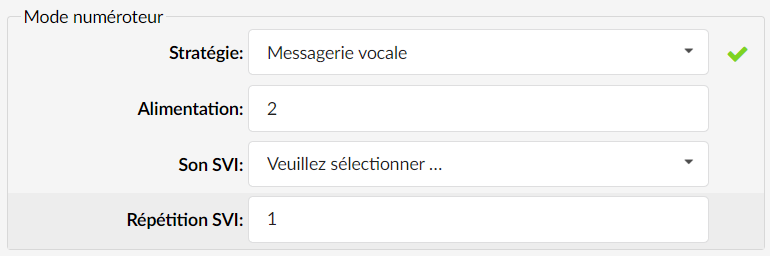
This strategy automatically broadcasts the message to the leads. In addition, it records the DTMF pressed during the message.
Power
Represents the number of leads to dial for each agent
IVR sound
Sound file selection. Files must be prefixed with dialer-vm-ivr
IVR repetition
Represents the number of times the sound is repeated
NOTE: The sounds must have the prefix dialer-vm-ivr in their name so that the system can recognize the sound file.



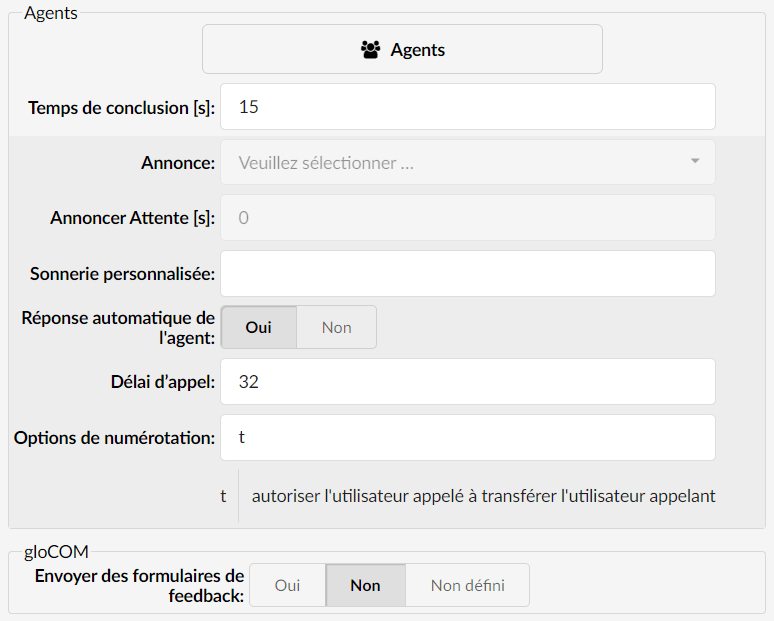
Agents

- Agents
By pressing the “Agent list” button, a pop-up window will open.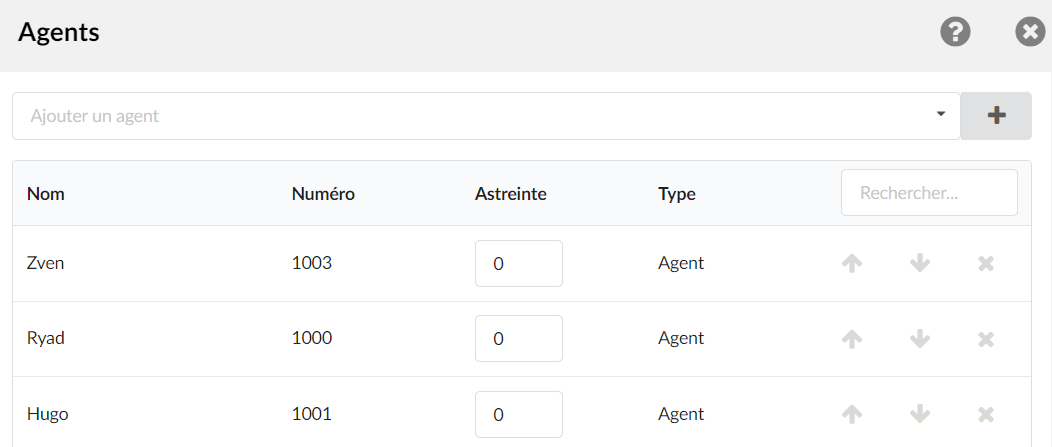
- Select the agents
Drop-down list in which you can select one or more agents/agent groups/extensions to add to the queue list.
Press the ” + ” button to add the selected agents/agent groups/extensions to the queue list.
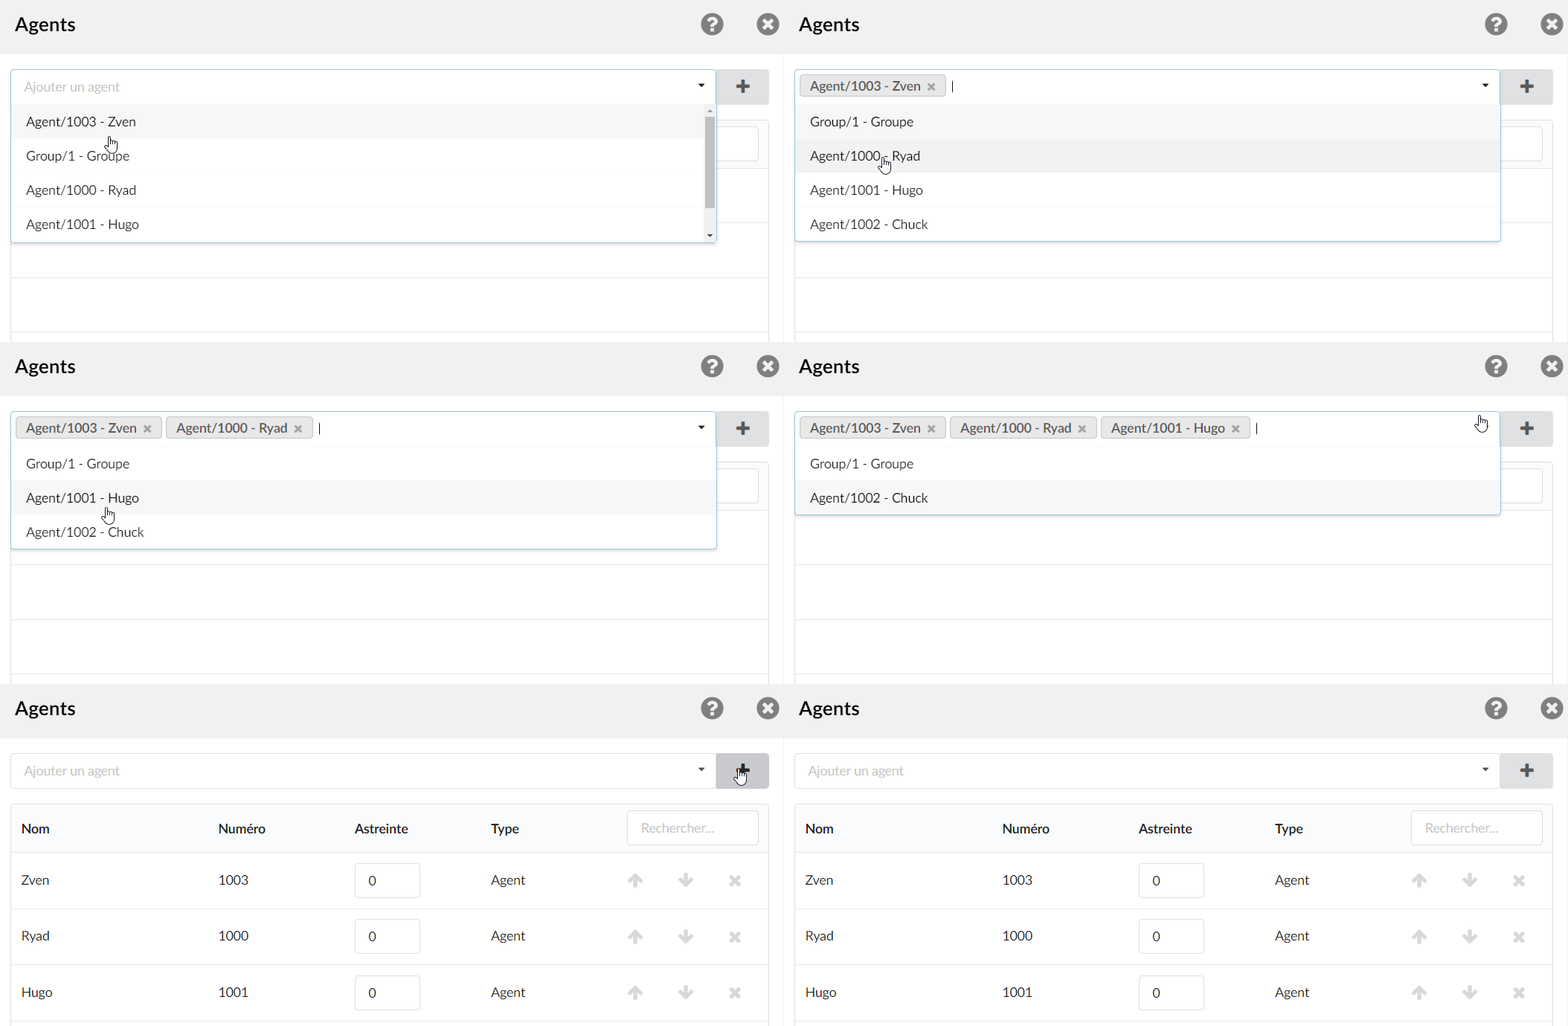
There is a table that displays the queue agents with the following details:
- Name
Agent name
- Number
Agent number on the system
- On-call duty
This value can be set per agent, so that the system can decide which priority to use when sending calls to agents.
(For example, set values between 0 and 10, where 0 is the highest priority and 10 the lowest. If the strategy is set to “ringall”, then only the available agents with the lowest priorities will ring. ).
- Type
Queue member type.
- Search
Ring group queue agents.
- Up arrow
Move the queue agent one place up in the queue list.
- Down arrow
Move the queue agent one place down in the queue list.
- Remove the agent
Remove the agent from the queue.
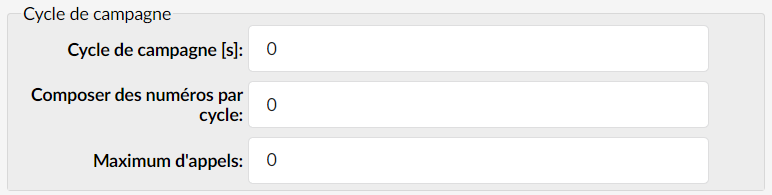
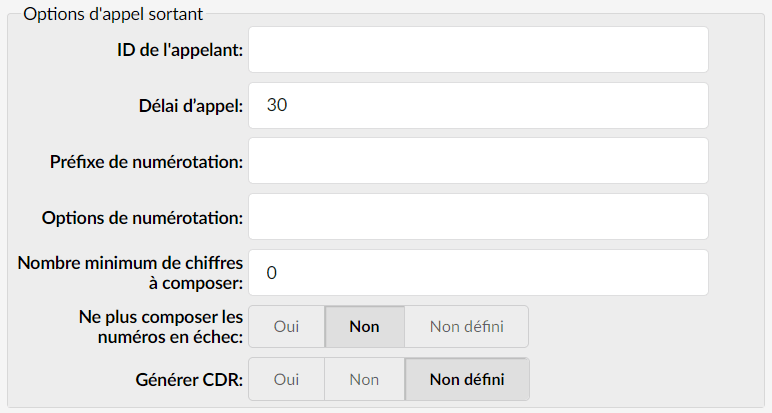
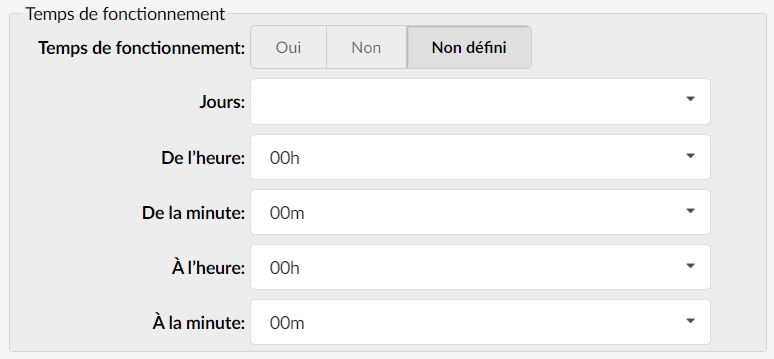


DNC numbers
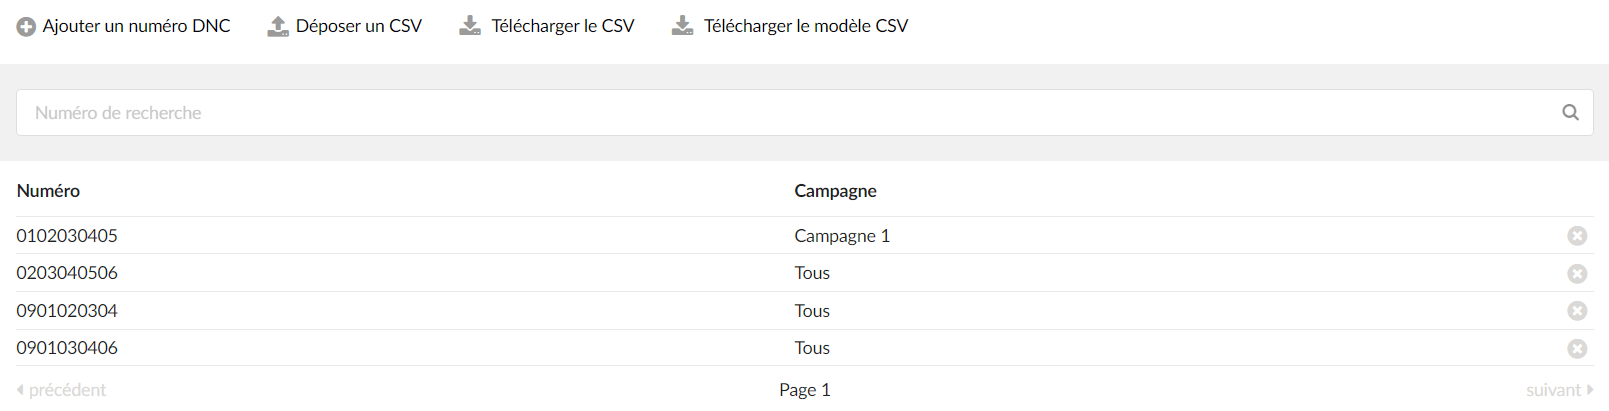
DNC (Do Not Call) numbers contain a list of numbers that agents should not dial. Users can upload the list via CSV. These numbers can be removed from the list or added manually. Any DNC number marked by an agent via the disposition will be visible here.
- Add a DNC number
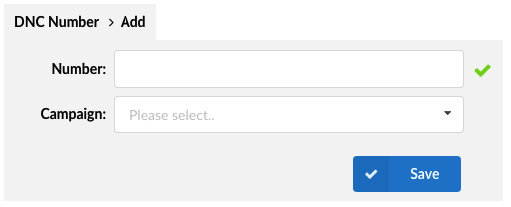
Add DNC numbers
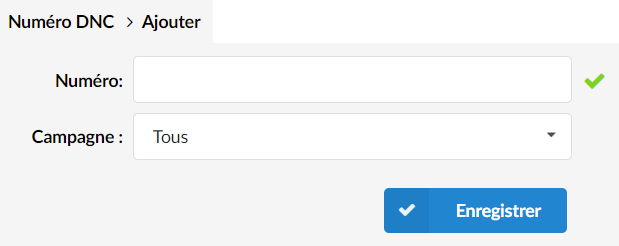
By clicking on the “Add a DNC number” button, users will be prompted to access a different window in which they can modify their DNC numbers.
(For example, click the button to add DNC numbers.)
- Number
Number to add.
- Campaign
A drop-down menu displaying the list of campaigns on the system. After selecting one, the DNC number will be applied to that specific campaign.
- Import the CSV
Import a list of DNC numbers via a CSV file.
- Download the CSV
The CSV download button is used to download the existing list as a CSV file.
- Download the CSV template
Download the CSV template.
