



FR EN

Queues

Estimated reading: 12 minutes

The feature Omnichannel integrates messaging queues to systematically classify and route incoming customer interactions. These queues correspond to specific topics or departments, allowing precise guidance of customer messages. Each queue adopts a message distribution strategy, whether manual or automatic assignment for quick responses. The system assigns a defined number of agents to each queue. By setting operating hours, queues can be adjusted to align with activity fluctuations or peak periods. The flexibility of agent management allows supervisors to allocate resources efficiently. The distinction between manual and automatic assignment provides control over message distribution, the latter even including a returning customer recognition feature.

Using messaging queues offers several advantages for businesses:

1. Improved customer experience : streamlined message management results in faster and more accurate responses.
2. Efficient resource allocation : assign agents based on their expertise or availability.
3. Flexibility : tailor queue settings to meet various customer needs and operational requirements.

Thus, implementing email queues contributes to an organized, responsive and efficient functioning of customer service.

Queues

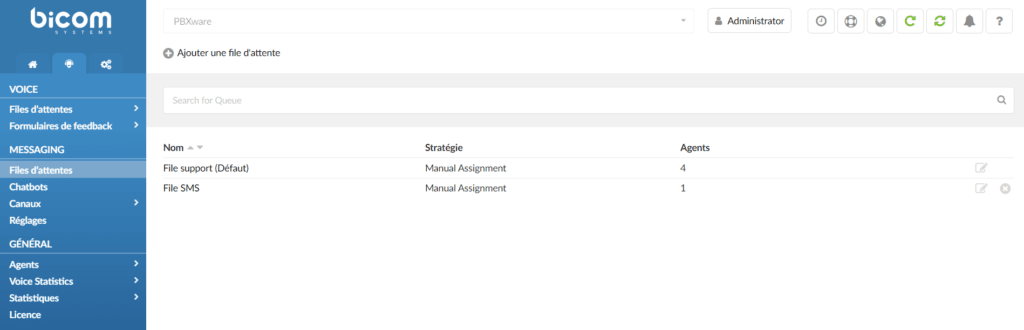
The landing page provides the following information:
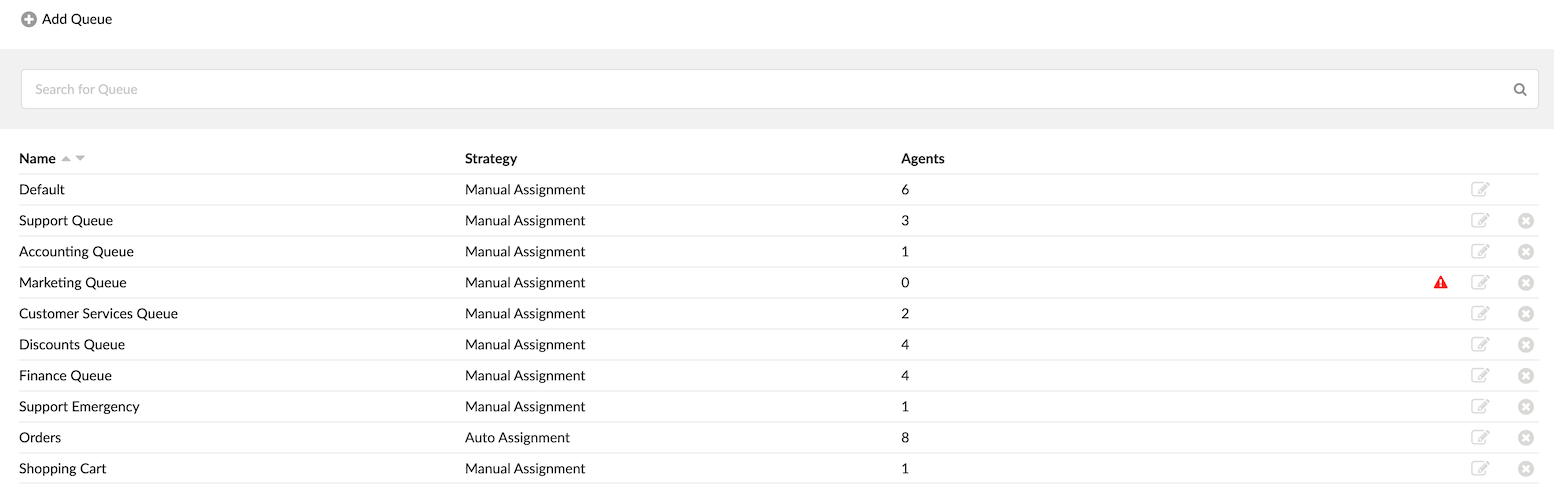
files-7.x-files-quelist-omni.png

  • Name

This field displays the name of the queue, such as “Support”, representing the objective or service associated with the queue.

  • Strategy

This field specifies the queue strategy, dictating how incoming tickets are allocated to agents. For example, in a “Manual assignment” strategy, agents assign tickets to themselves manually.

  • Agents

This field displays the number of agents currently assigned to the queue. For example, there may be “5” agents who are members of the queue.

  • Warning panel

A warning icon appears if no agent is present in the selected queue. Hovering over this icon will display a warning message.

Add/Edit a queue
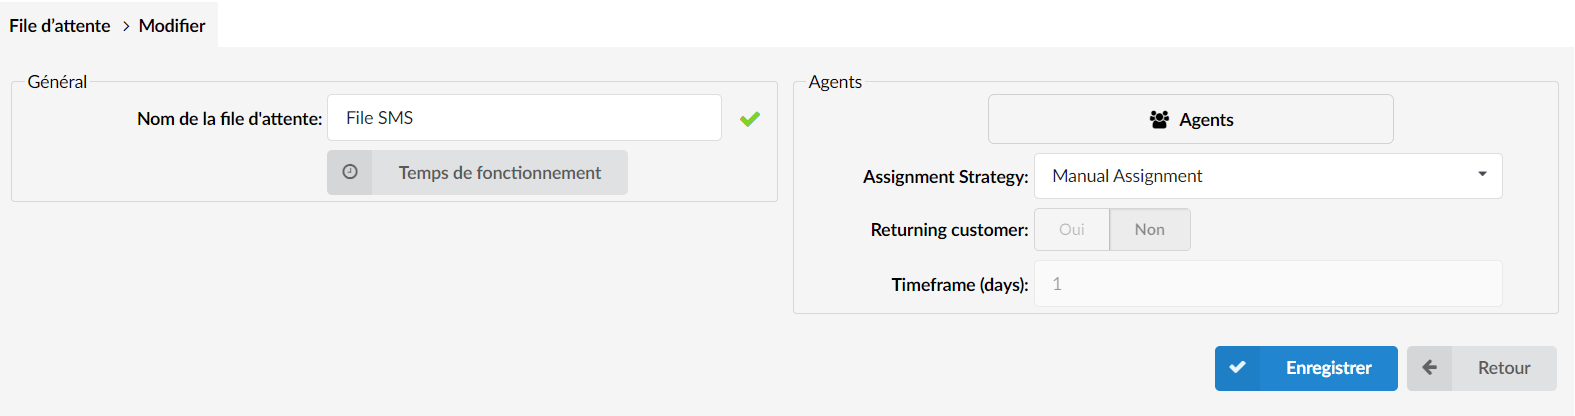
In the Queues section, you can add a new queue by clicking the "Add queue" button. Once you have created a queue, you can add specific agents to this queue by choosing from the list of available agents, just like in the voice queues. You can also give a name to your queue so that it is easily recognizable.

Add/Edit a queue

  • Queue name:

Unique name/identifier of the queue network.

  • Agents

By pressing the “Agent list” button, a pop-up window will open.
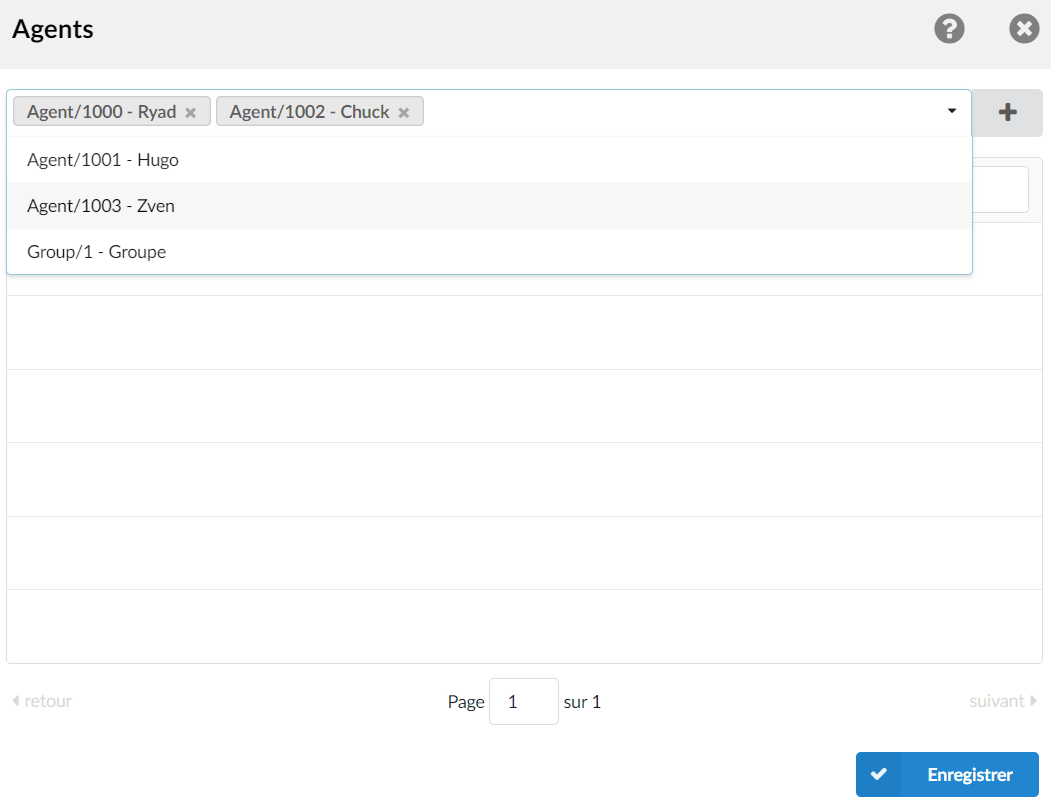
  • Select the agents

Drop-down list in which you can select one or more agents/agent groups/extensions to add to the queue list.

Press the “+” button to add the selected agents/agent groups/extensions to the queue list.
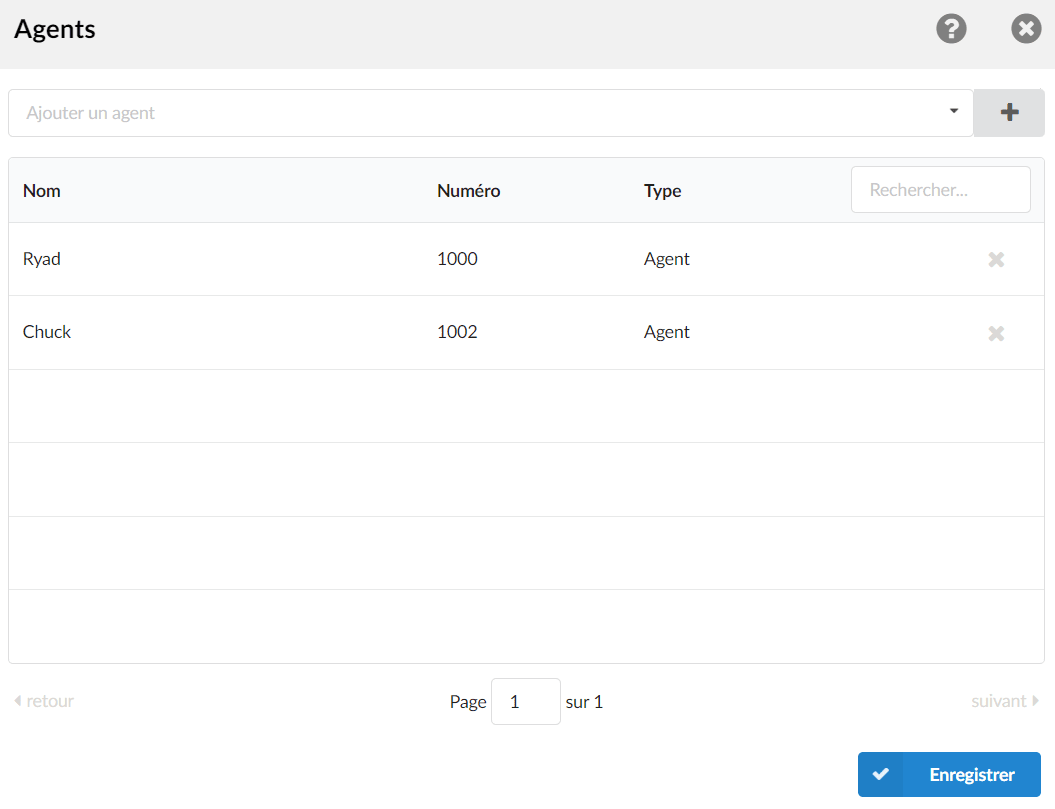

There is a table that displays the queue agents with the following details:

  • Name

Agent name

  • Number

Agent number on the system

Schedules

By setting the operating hours, queues can be adapted to align with business changes or peak periods. 
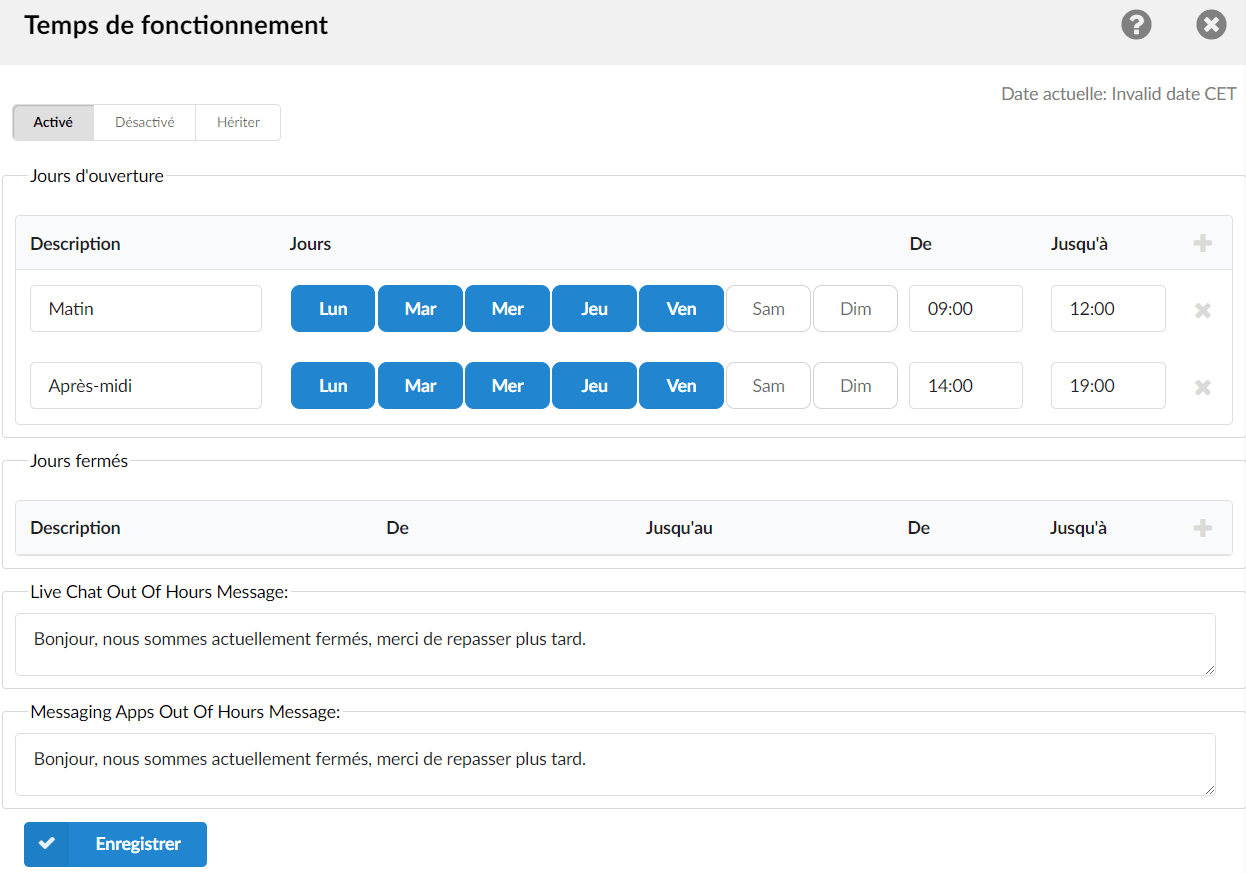
The “Operation Times” section now has two additional segments: “Live Chat Message Outside Business Hours” and “Messaging Apps Message Outside Business Hours”. The first allows businesses to define a specific message for visitors who access Live Chat or SMS outside of business hours.

  • Operating hours:

Enable operating hours.

The description of the destinations follows in this order of priority:

  • Opening days: The “Open Days” section allows you to define the days of the week and the time ranges during which your services are available. The section lists all days from Monday to Sunday, as well as the “Time from” and “Time until” fields for each day.
    By defining these ranges, you establish the time window during which users can send messages, emails, or participate in live chats with your service. For example, if you set “Time from” to 9:00 AM and “Time until” to 5:00 PM from Monday to Friday, users will be able to communicate with you during these specific weekday hours.
    This configuration helps manage customer expectations and also ensures that your team has adequate staffing during the periods when interaction is possible.

  • Closed days : “Closing Dates” is a section in the “Operating Hours” settings that allows you to specify particular dates and times when your service will be unavailable. This section includes fields for “Description”, “Start Date”, “End Date”, “Start Time”, and “End Time”.
    Description: This field lets you provide a brief explanation or reason for the closure, such as “Public holiday” or “Scheduled maintenance”.
    Start date and End date: these fields allow you to define a date range during which your service will be closed. This can be a single day or several days.
    Start Time and End Time: these fields allow you to further refine the specific hours of unavailability within the chosen date range.
    By configuring the “Closing dates” section, you ensure that users are aware that they will not be able to send messages, emails, or participate in live chats during the specified hours. This helps manage customer expectations and allows you to plan your staffing needs accordingly.

  • The chat message outside business hours allows you to define an automated response to customer requests that arrive outside of operating hours. This message informs customers when they can expect a reply, thereby improving their experience and managing their expectations.

  • The out-of-business-hours application Message parameter allows you to configure an automated response to customer requests received via messaging apps when you are out of service. This automatic response helps manage customer expectations regarding when they will receive a reply from you.

Assignment strategies

omni-queues-assignments-strategy.png
An important aspect of the Queues section is the assignment strategy. You can choose between two options: manual assignment and automatic assignment.

Manual assignment

With manual assignment, agents have the ability to choose the messages they will take and respond to. This allows for a more personalized approach, where agents can select the messages that best match their skills and expertise.

Automatic assignment

The automatic assignment strategy ensures a fair distribution of work by assigning customer requests to agents based on a sophisticated understanding of each agent's capacity and the valuation of the work unit. Below is the detailed explanation of how this system works.

Workload calculation

Agent capacities and work units are crucial indicators:

  • Capabilities : these are defined in the agent edit settings and determine the maximum number of interactions an agent is allowed per communication channel.
  • Work units : defined under Settings , they provide a weighted value to each interaction, reflecting the effort or attention required.

For example, if the work unit values are as follows:

  • Live chat : 4 units
  • Messaging : 2 units
  • Email : 1 unit

These values suggest that a live chat is equivalent in terms of effort to four emails or two messages. With that in mind:

  • Live chats : An agent with a capacity of 3 can handle up to:
    3 (capacité) x 4 (unité de travail) = 12 unités

  • Messages : If they can handle 5 messages, each worth 2 units:
    5 (capacité) x 2 (unité de travail) = 10 unités

  • Emails : If they are able to process 10 emails, each worth 1 unit:
    10 (capacité) x 1 (unité de travail) = 10 unités

This results in an agent's total capacity in work units being 32 units , which corresponds to its “My workload” when fully utilized.

Assignment logic

In order to never exceed an agent's workload capacity, the auto-assignment algorithm takes into account:

Creating tickets

When a ticket is created during operating hours for a particular queue, it triggers the algorithm to automatically assign the ticket.

Ticket transfer

If a ticket is transferred outside operating hours for a queue, the algorithm automatically assigns the ticket.

Operation start times

At the start of a queue's operating hours, the algorithm automatically assigns the tickets.

Adding new agents

When new agents are added to a queue from the PBXware GUI, the algorithm automatically assigns the tickets.

Other auto-assignment activities


Agent login

When an agent logs in to the system, the algorithm automatically assigns tickets based on the current parameters.

Resume an agent's pause

When an agent is not paused, the algorithm automatically assigns tickets taking into account the agent's current capacity and workload.

Ticket closing

When an agent closes a ticket, the algorithm assigns a new ticket based on the current workload and capacity.

  • Agent status change

If an agent changes from the "active" state to the "inactive" state, the algorithm reassigns tickets to maintain optimal load balancing.

To summarize what we said earlier, automatic assignment depends on the following cases:

  • Capacity balancing:

Distributes tickets so that the total active work does not exceed the agent's workload threshold, as defined by their capacity and the weighted work units.

  • Relative strength of work units:

Understands that some channels require more effort, adjusting the number of assignments accordingly (for example, a live chat may be equivalent to handling two messages or four emails).

Agent status: takes into account whether agents are logged out, on pause or not part of a queue, in which case no new ticket will be assigned to them.

  • Return to the queue:

When agents log in, resume from pause, or are added to a queue, tickets are assigned to them based on their remaining workload capacity.
Operating hours consideration: ensures that tickets are assigned only during working hours, with queued tickets waiting to be assigned at the start of the next working period.

This approach ensures that agents work with optimal efficiency without being overloaded, maintaining a balanced distribution of tasks aligned with their specified capacities.

Recurring customers and delay

  • Recurring customer : enabled with the automatic assignment strategy, this feature decides on the assignment of messages from loyal customers.

Configurability

  • Yes : when selected, the system prioritizes routing messages from returning customers to the same agent they previously interacted with, ensuring consistency and an improved user experience.
  • No : if this option is selected, messages from loyal customers are treated as new interactions and can be assigned to any available agent.
  • Delay definition: Delay (days): this input field allows administrators to set a particular delay in days. This may relate to how long a loyal customer is recognized or to other relevant queue metrics.

Identify recurring customers

  • Agent allocation: if a loyal customer is identified within the specified time frame, they will be directed to the same agent they previously interacted with, unless that agent is paused or logged out.
  • Fallback solution : If the original agent is not available, the system will direct the returning customer to the best agent available at that time.
  • Consistency : By directing loyal customers to the same agent, the system ensures continuity and a more personalized experience.
    Efficiency: the Delay setting allows precise control over agent scheduling and allocation, thereby optimizing resource utilization.
  • Flexibility : the ability to enable or disable the Loyal Customer option per queue, along with the configurable delay, provides a versatile tool for managing different types of customer interactions.
Share

Queues

Or copy the link below

CONTENT